 Program development > C# > WinForms > Content
C# Winforms panel border, with color, style, thickness and dotted line(ControlPaint.DrawBorder)
Div elements are generally used for layouts in web development. Panel controls are just like div elements for layout interfaces in Winforms. The default borders of controls in Winforms are not very beautiful. If you want to design a beautiful interface, you can redraw the borders of the controls. Generally, we redraw the Panel's borders. So the article will take the method of redrawing the border of Panel as an example to illustrate the method of redrawing the border of the Winforms control.
You can redraw the Winforms Panel border, you can either cover the original border or keep and draw another border to form a bump effect in C#. The class and method used for redrawing is ControlPaint.DrawBorder. There are two methods for redrawing, which are described below.
I, Draw Winforms panel border in C#: Set different colors, widths and styles on each side
1. Drag a Panel control to the main form, keeping the default name panel1, and select Fixed3D for BorderStyle.
2. Double-click Panel1 to open the code file. Add the following code to the panel1_Paint(object sender, PaintEventArgs e) method:
private void panel1_Paint(object sender, PaintEventArgs e)
{
ControlPaint.DrawBorder(e.Graphics, panel1.ClientRectangle,
Color.White, 1, ButtonBorderStyle.Solid, // left
Color.White, 1, ButtonBorderStyle.Solid, // top
Color.DimGray, 1, ButtonBorderStyle.Solid, // right
Color.DimGray, 1, ButtonBorderStyle.Solid);// bottom
}
There are three arguments on each side: border's color, width(thickness), and style; if you change 1 to 0, the original border is covered; otherwise, if properly matched colors, you will get the bump effect of border. The example operation effect is shown in Figure 1:
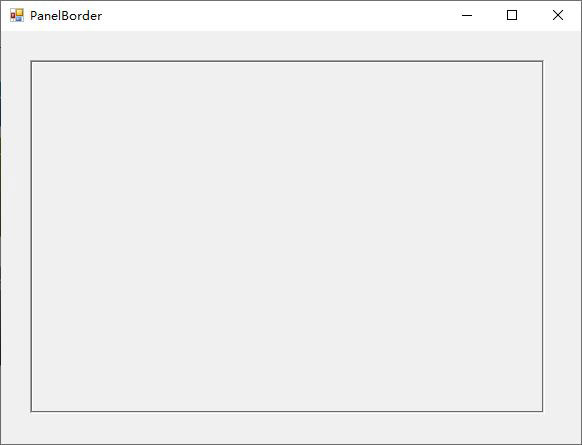
Figure 1
If you select "None" for "BorderStyle", it is another effect(protrusion inside the border).
II, Draw Winforms panel border in C#: Same style on each side
The steps are the same as the method one, just add the following code to the panel1_Paint(object sender, PaintEventArgs e) method:
private void panel1_Paint(object sender, PaintEventArgs e)
{
ControlPaint.DrawBorder(e.Graphics, ClientRectangle, Color.Ivory, ButtonBorderStyle.Solid);
}
Each side is set to the same style, that is, the same color, width, and style.
III, Draw a dotted border and set the border's color and width(thickness) for Winforms Panel
Before drawing the dashed border of the Panel, you need to set its BorderStyle to "None".
1. Method one
private void Panel1_Paint(object sender, PaintEventArgs e)
{
ControlPaint.DrawBorder(e.Graphics, panel1.ClientRectangle,
Color.Black, 1, ButtonBorderStyle.Dotted, // left
Color.Black, 1, ButtonBorderStyle.Dotted, // top
Color.Black, 1, ButtonBorderStyle.Dotted, // right
Color.Black, 1, ButtonBorderStyle.Dotted);// bottom
}
In the code, 1 indicates the width of the dotted line, which can also be set to 2, 3, ...; Color.Black indicates that the dotted line is set to black; "Dotted" indicates the style of the dotted line, which can also be set to "Dashed". The effect is shown in Figure 2:
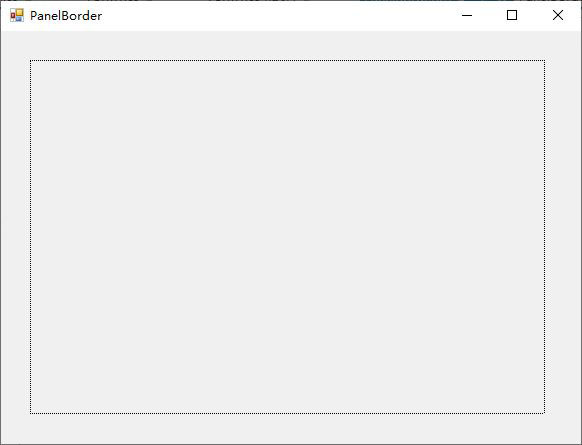
Figure 2
2. Method two
private void Panel1_Paint(object sender, PaintEventArgs e)
{
Panel panel = (Panel)sender;
float width = (float)4.0;
Pen pen = new Pen(SystemColors.ControlDark, width);
pen.DashStyle = DashStyle.Dot;
e.Graphics.DrawLine(pen, 0, 0, 0, panel.Height - 0);
e.Graphics.DrawLine(pen, 0, 0, panel.Width - 0, 0);
e.Graphics.DrawLine(pen, panel.Width - 1, panel.Height - 1, 0, panel.Height - 1);
e.Graphics.DrawLine(pen, panel.Width - 1, panel.Height - 1, panel.Width - 1, 0);
}
The variable width is the width of the dotted line to be drawn in the code, and its value is 4; SystemColors.ControlDark represents the shadow color of the three-dimensional element; "Dot" represents the dashed line style. The effect is shown in Figure 3:
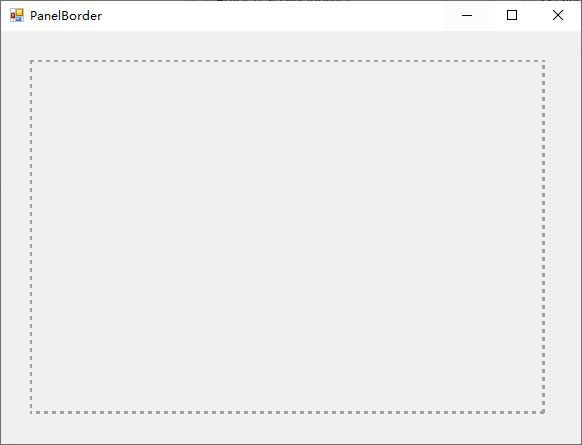
Figure 3
There are six types of DashStyle:
Solid: Specifies a solid line.
Dash: Specifies a line consisting of dashes.
DashDot: Specifies a line consisting of a repeating pattern of dash-dot.
DashDotDot: Specifies a line consisting of a repeating pattern of dash-dot-dot.
Dot: Specifies a line consisting of dots.
Custom: Specifies a user-defined custom dash style.
Set the border color:
float width = (float)4.0;
Color color = Color.Green;
Pen pen = new Pen(color, width);
IV, Set style for Winforms Panel
There are three kinds of Panel border styles in Winform, they are "None, FixedSingle, and Fixed3D". "None" means no border, "FixedSingle" means a single-line border, and "Fixed3D" means a three-dimensional border. There are two ways to set them, one is to set it in the properties dialog box, and the other is to set it by code, as follows:
1. Method one. Right-click on the Panel and select "Properties" to open the "Properties" dialog box. Find "BorderStyle" and select a style for it.
2. Method two. Double-click the Panel and copy the following code:
this.panel1.BorderStyle = System.Windows.Forms.BorderStyle.Fixed3D;
to
private void Panel1_Paint(object sender, PaintEventArgs e)
{
}