How to make a table of contents in word and change, delete or update after adding new content
In Word, if the content that is required to be arranged is automatically generated a table of contents, the chapters need to be set to different heading styles according to the level, the chapters should be set as Title, and the sections should be set to the heading 1, heading 2, and heading 3; In addition, the table of contents and content should be paged independently, that is, their page numbers must start from 1, so subsections are also needed.
After the table of contents is automatically generated, if new contents are added, you need to add the chapters of the added content to the table of contents, just update the table of contents or change the automatic table to another automatic table style. If you want to cancel the table of contents, you can delete them. The following are the specific steps of how to make a table of contents in word. It is divided into five steps, and the version used for the operation is Word 2016.
I, How to make a table of contents in word Step 1: Set the chapter style
1. Select the first level title "Chapter 1 Basic Operation of Word", the current tab is "Home", click the "Heading 1" above the "Style" in the upper right corner of the window, and set the selected text to the "Heading 1" style; click "Center" icon to center the first level title; and click "Font Size" dropdownlist, select 24 in the pop-up options to increase the font size; and click "Bold(B)" icon to bold; and click "Font Color" dropdownlist, select "Black" to change blue to black.
2. Select the secondary title "1.1 Basic Settings", click "More(ie, a horizontal + small inverted triangle icon)", select "Heading 2" in the expanded style, and set the style of the selected text to "Heading 2"; the same method sets the font to 20.
3. Select the three-level title "1.1.1 Timed Save Settings", hold down Alt, select "1.1.2 Display Settings", select "Heading 3", set the selected texts to the style, the same method sets the font to 16. Operation process steps, as shown in Figure 1:

Figure 1
Hint: Only some of the titles are set above. The remaining titles also need to be set to "Heading 1" according to "Chapter", "Heading 2" for the first level "section", and "Heading 3" for the second level "section". If there are third-level "section", you can set them to "Heading 4", and so on.
4. Description: The chapter style is set to classify the title of the book in order to automatically generate the table of contents. When word generates Automatic table of contents, it is generated from the highest to the lowest in the title level.
II, How to make a table of contents in word Step 2: Set the section break
1. Click on the front of "Chapter 1" to position the cursor there, select the "Layout" tab, click "Breaks", and select "Next Page" under "Section Breaks" in the pop-up menu. Insert a section break on the next page (ie insert a section break between the table of contents and the content to achieve separate page number setting for the table of contents and content);
2. Drag the scroll bar on the right to move to the previous page, select the "Home" tab, and click the "Show/Hide" icon to display "section break (next page)", indicating a section break successful was inserted. Click the "Show/Hide" icon again to hide the section break, as shown in Figure 2:
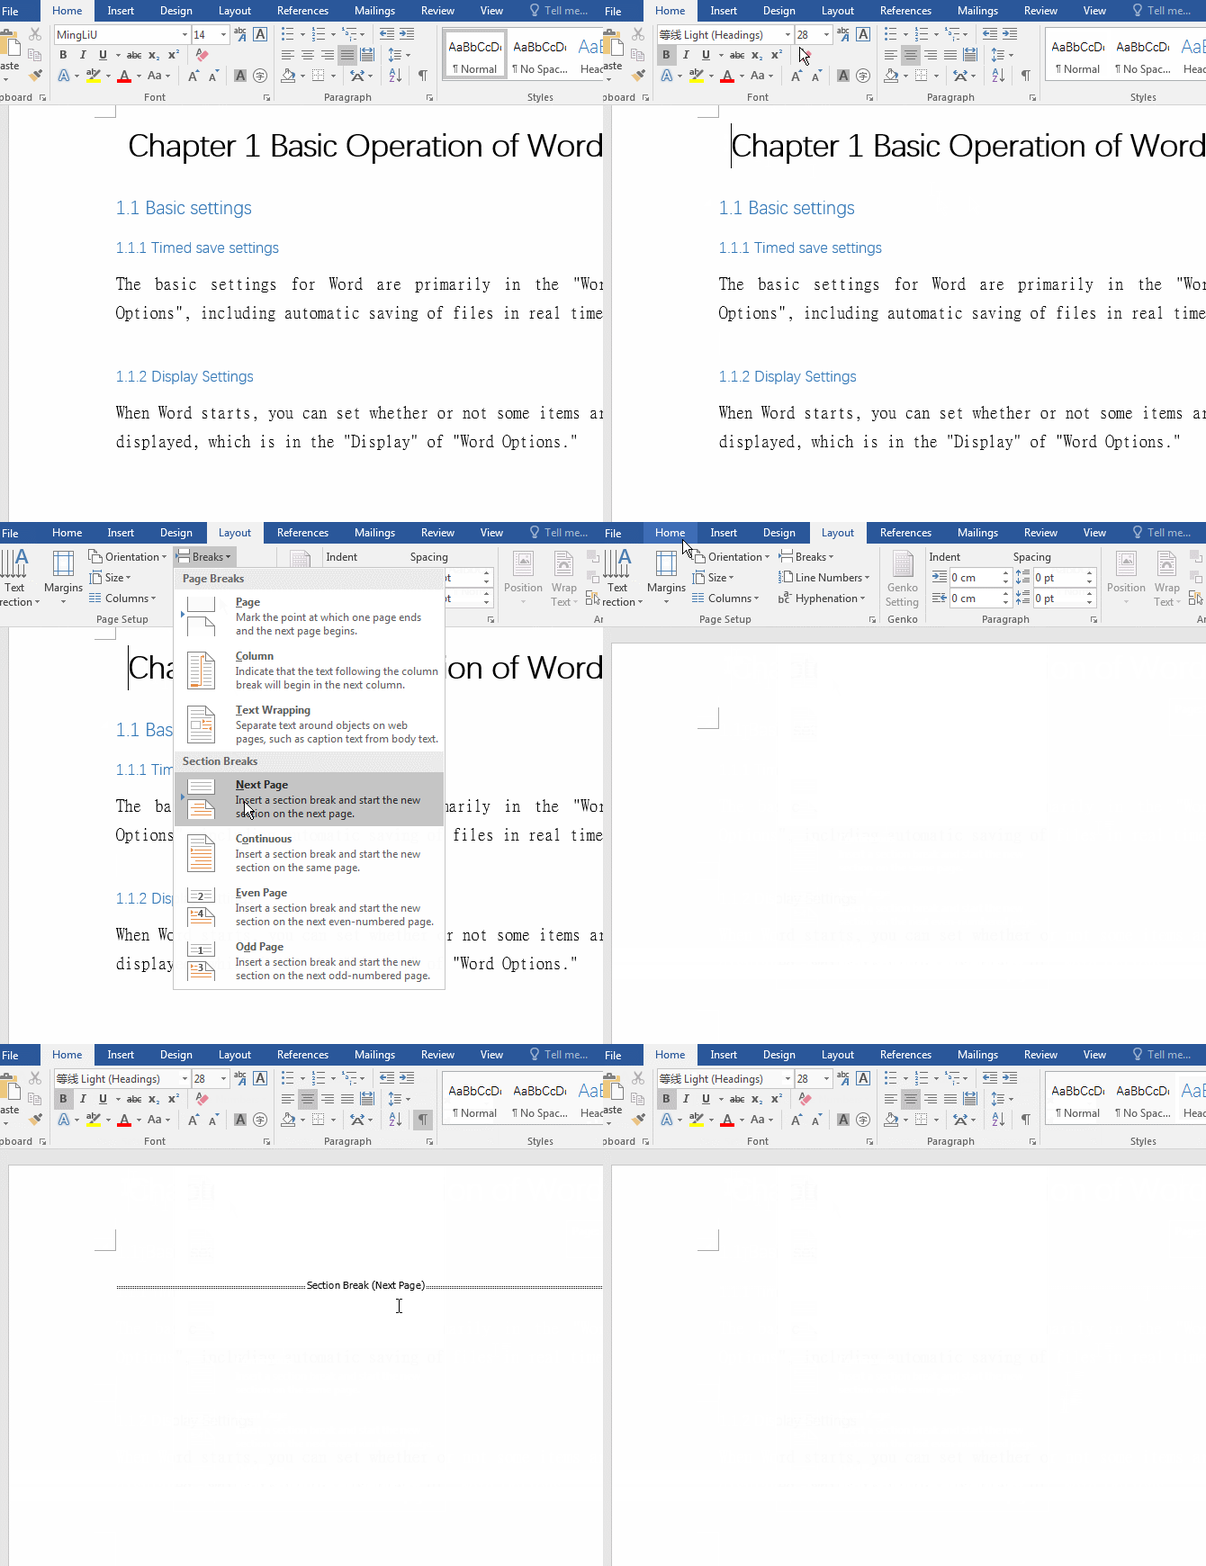
Figure 2
3. Description: The purpose of setting the section break is to make it easy to set the page number that are table of contents page and the content page start with 1, otherwise their page numbers will be connected, that is, the page number of the content will be connected to the page number that is the table of contents.
III, How to make a table of contents in word Step 3: Set the page number
1. Select the "Insert" tab, click "Page Number", select "Bottom of page" in the pop-up menu, select "Plain Number 2" in the expanded page number style, then insert the page number for all pages; the page number of each section It is connected in order, the first section is the first page, press "PadeDown" two times, move to the second section, select page number 2, click the "Page Number" in the upper left corner of the window, and select "Format Page Numbers" in the pop-up menu.
2. Open the "Page Number Format" window, select "Start at" for "Page Numbering", keep 1 in the input box, click "OK", then the second section starts from the first page, and drags the right scroll bar. , move to the next page, the second page of the second section has become 2; the operation steps, as shown in Figure 3:
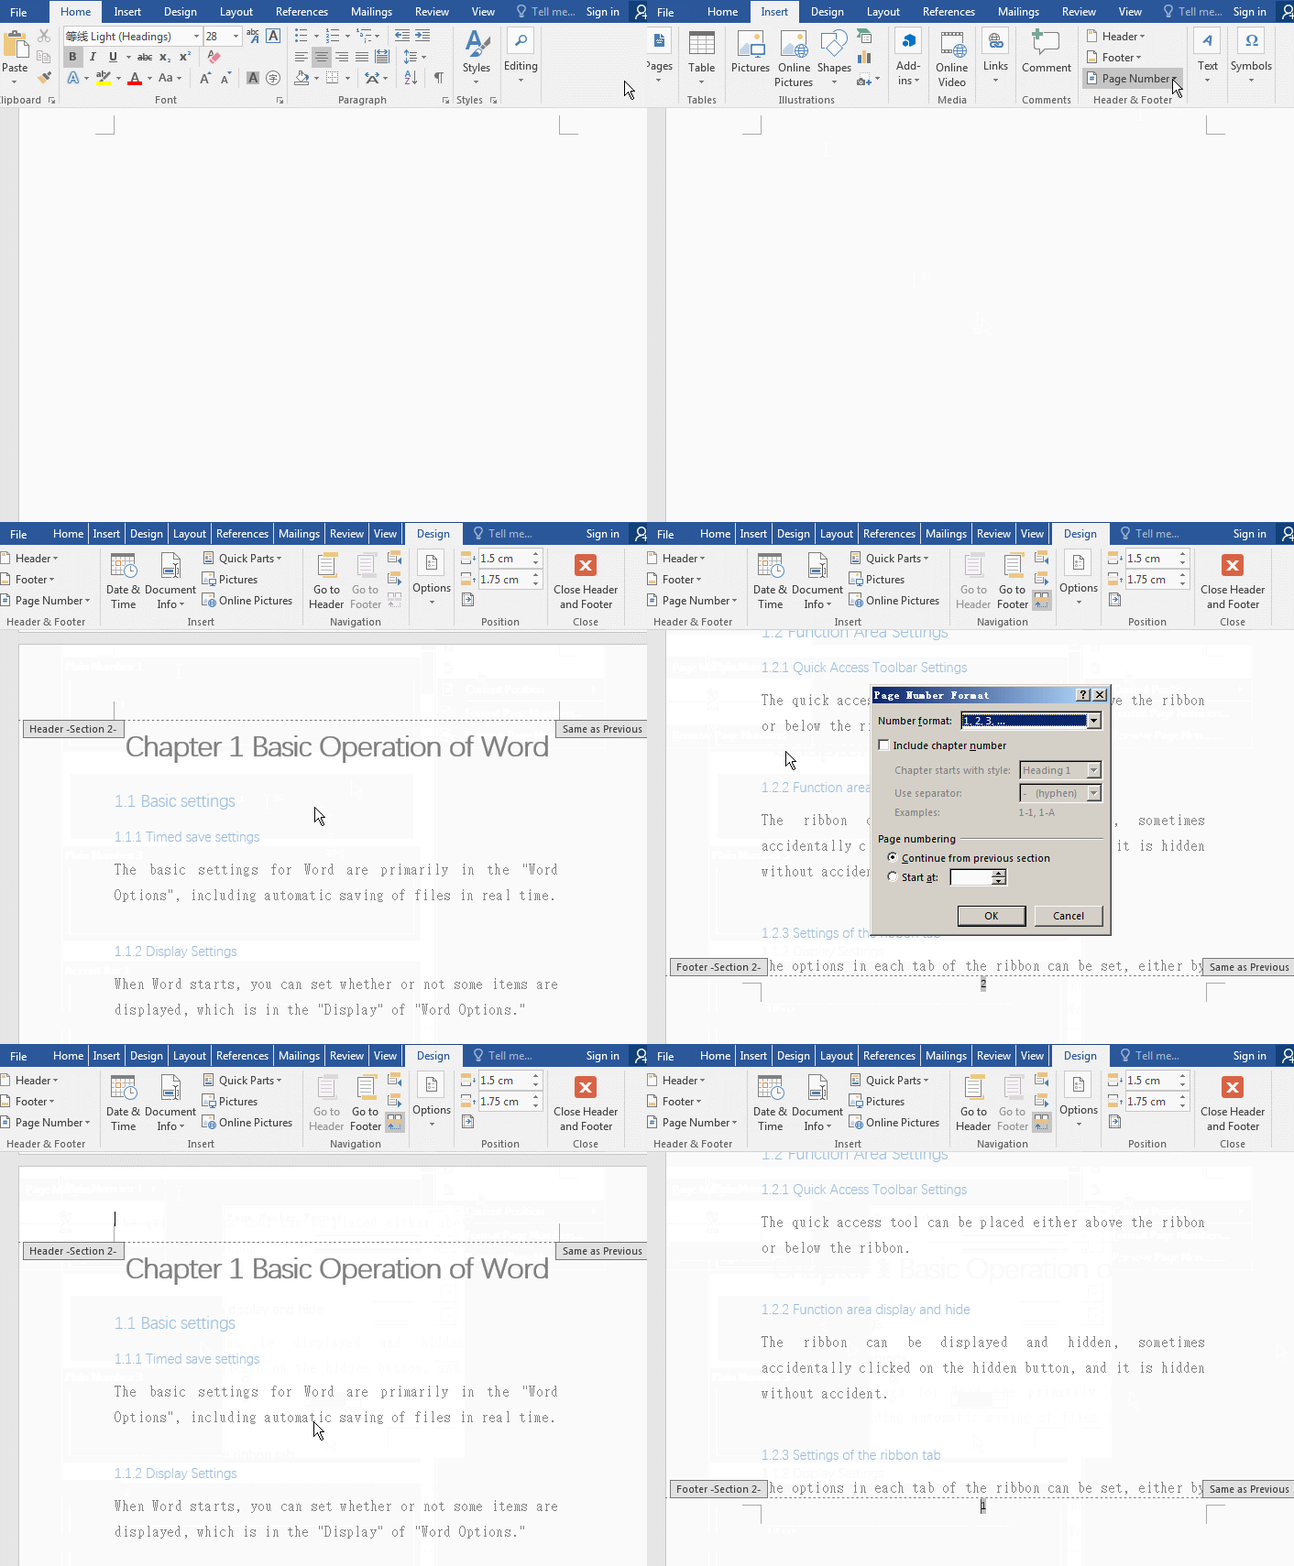
Figure 3
3. If you think the page font is too small, select the "Start" tab, click the "Font Size" drop-down list box, and select a suitable font size; if you want to change the font, click the "Font" drop-down list box and select one. Kind of fonts.
IV, How to make a table of contents in word Step 4: Generate a table of contents
1. Click "Close Header and Footer" to exit the editing state of the header and footer. Drag the scroll bar on the right to move to the first page, Click the first page, select the "References" tab, and click "Table of Contents" on the top left corner of the window, select "Automatic Table 1" in the pop-up style, the book automatically generates a table of Contents according to the selected style; the operation process steps, as shown in Figure 4:
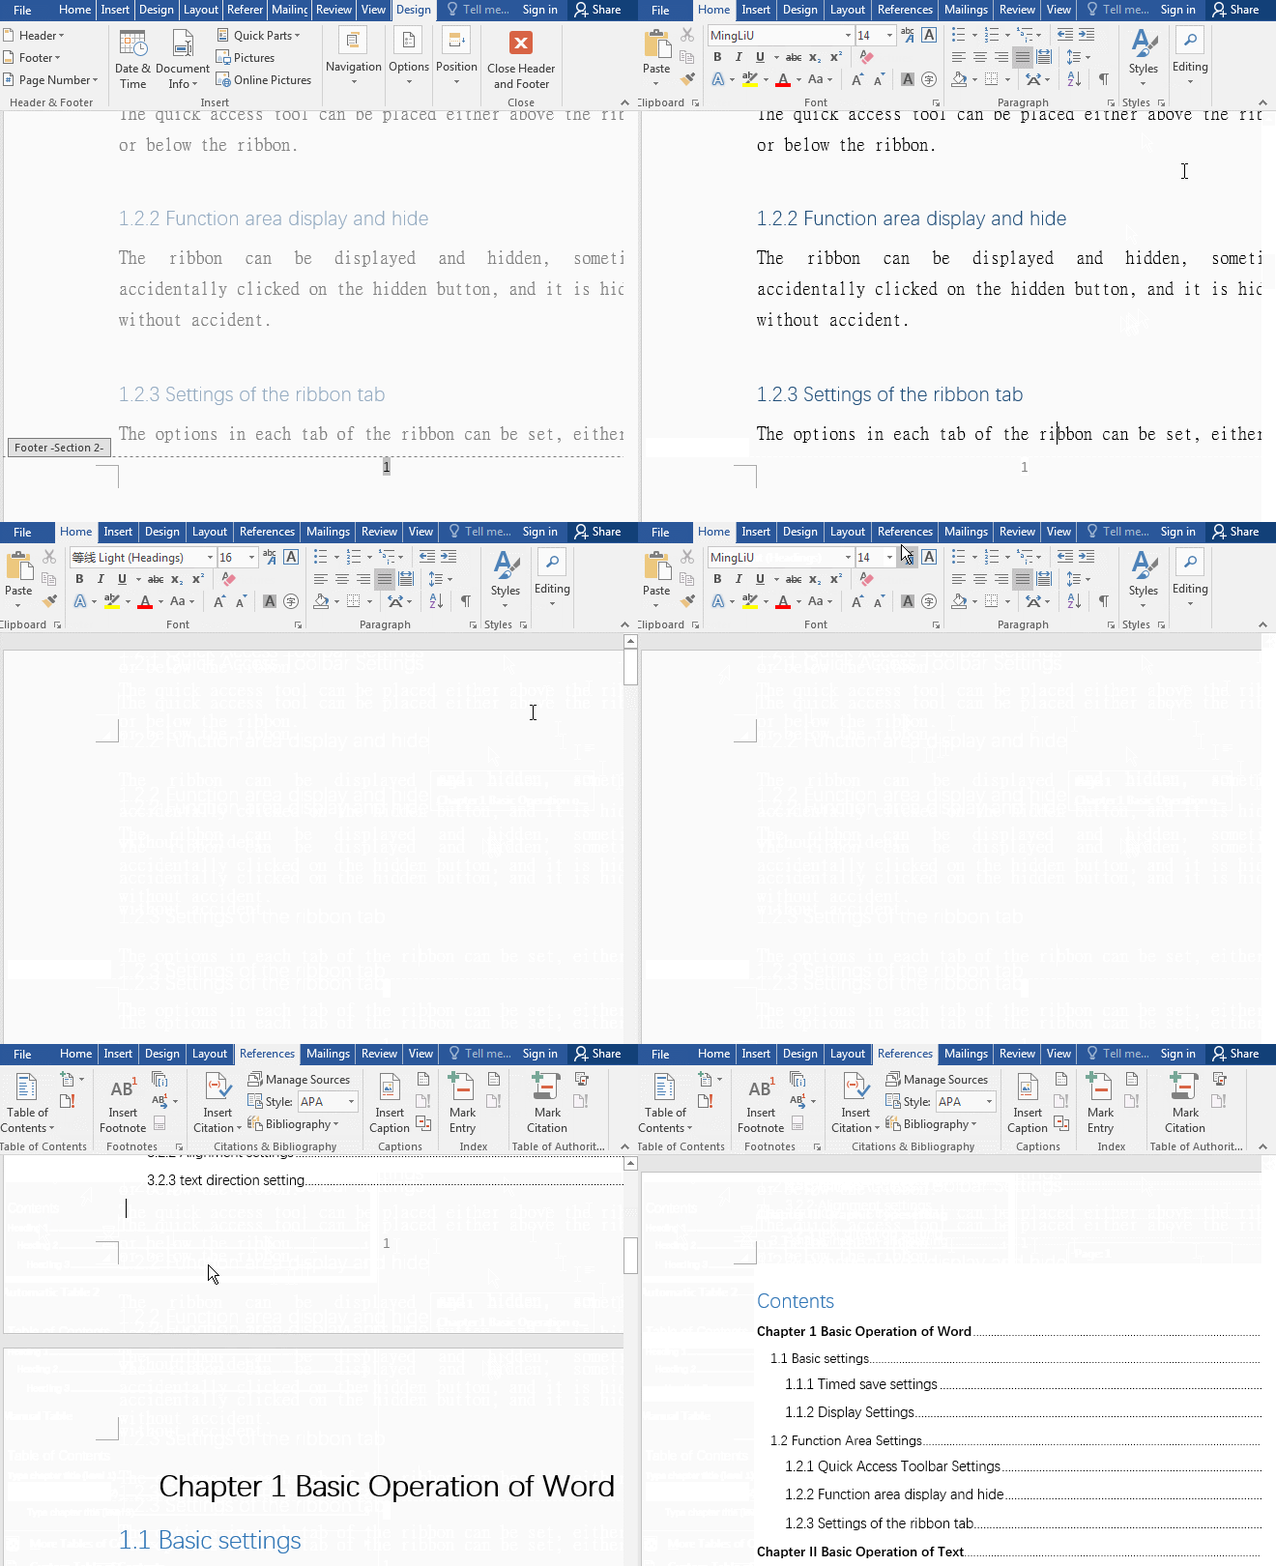
Figure 4
2. Tip: Be sure to close the header and footer before generating the contents. Otherwise, multiple duplicate contents will be generated. Since generating contents will take up a lot of computer resources, generating multiple contents at one time will make the computer unresponsive.
V, How to make a table of contents in word Step 5: Set the contents style
Center the word "Contents". On the "Home" tab, select the "Contents", click the "Horizontal Center" icon, then the "Contents" is centered; the operation steps, as shown in Figure 5:
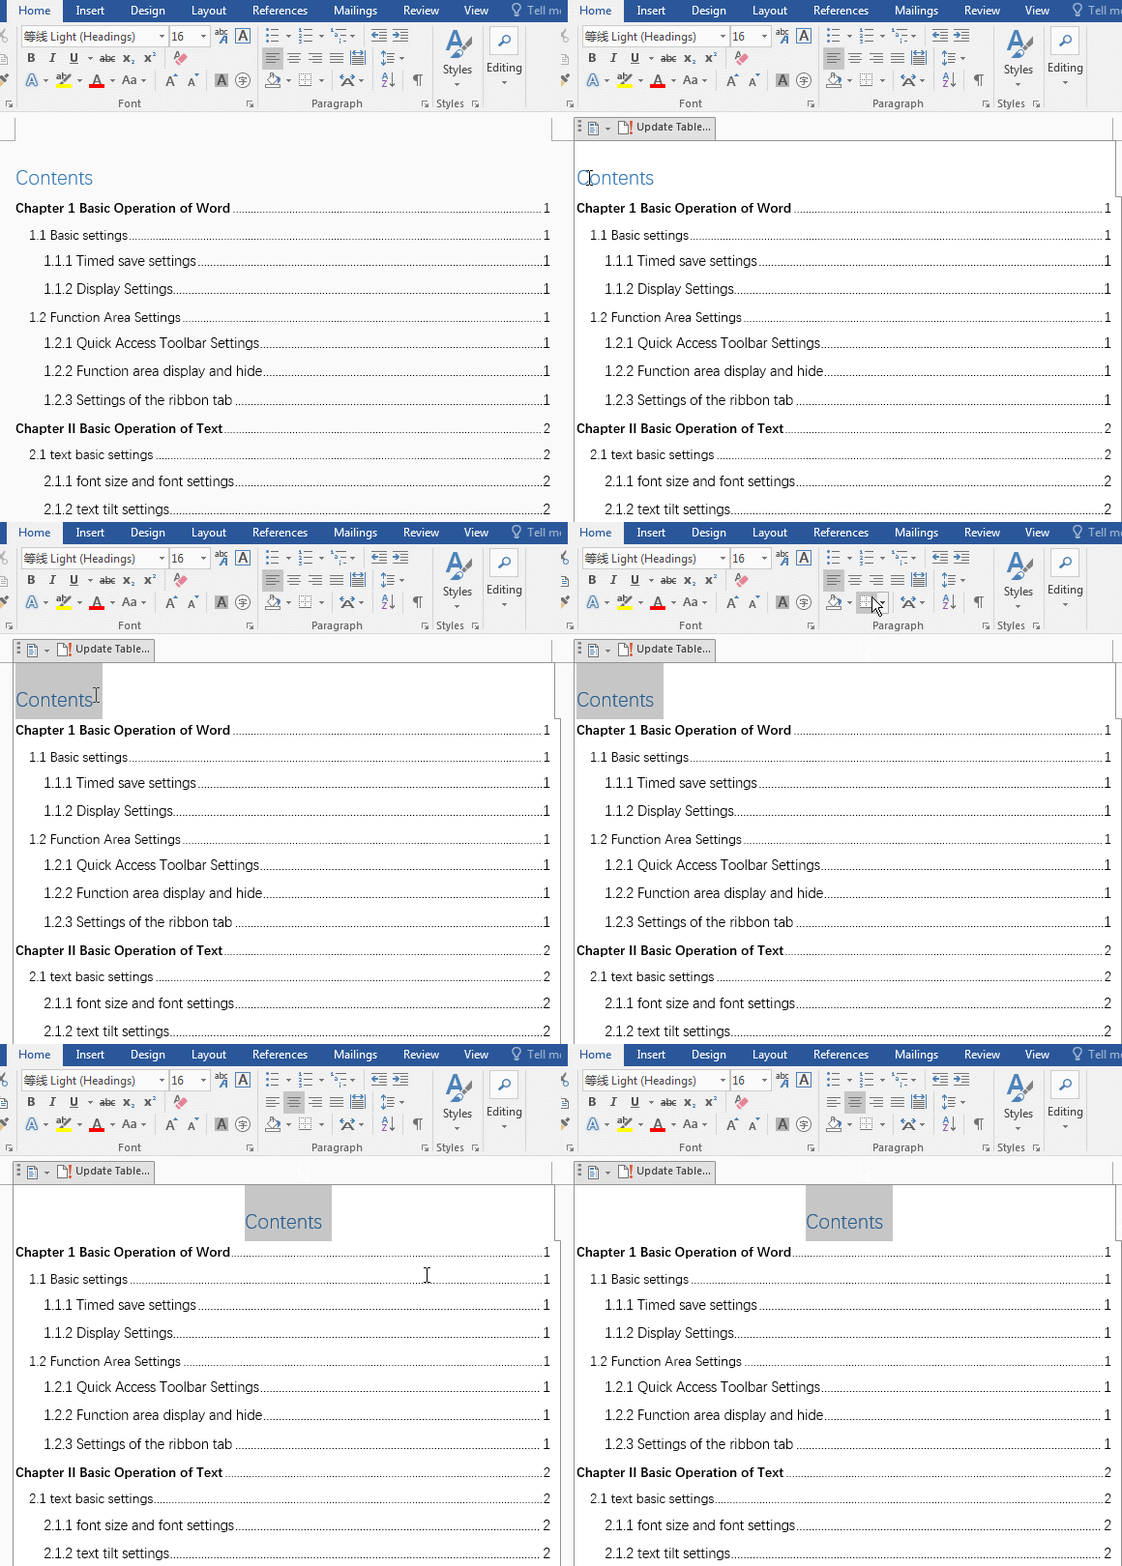
Figure 5
VI, How to make a table of contents in word updates, changes and deletes
1. Update the table of contents. If you add new chapters, you need to add them to contents, just update the contents by clicking "Update Table". Method: click Contents anywhere, select them, click "Update Table" in the upper left corner of the Contents, in the open window, select "Update entire directory", click "OK", the newly added chapter is also updated to the directory; the operation process steps, as shown in Figure 6:
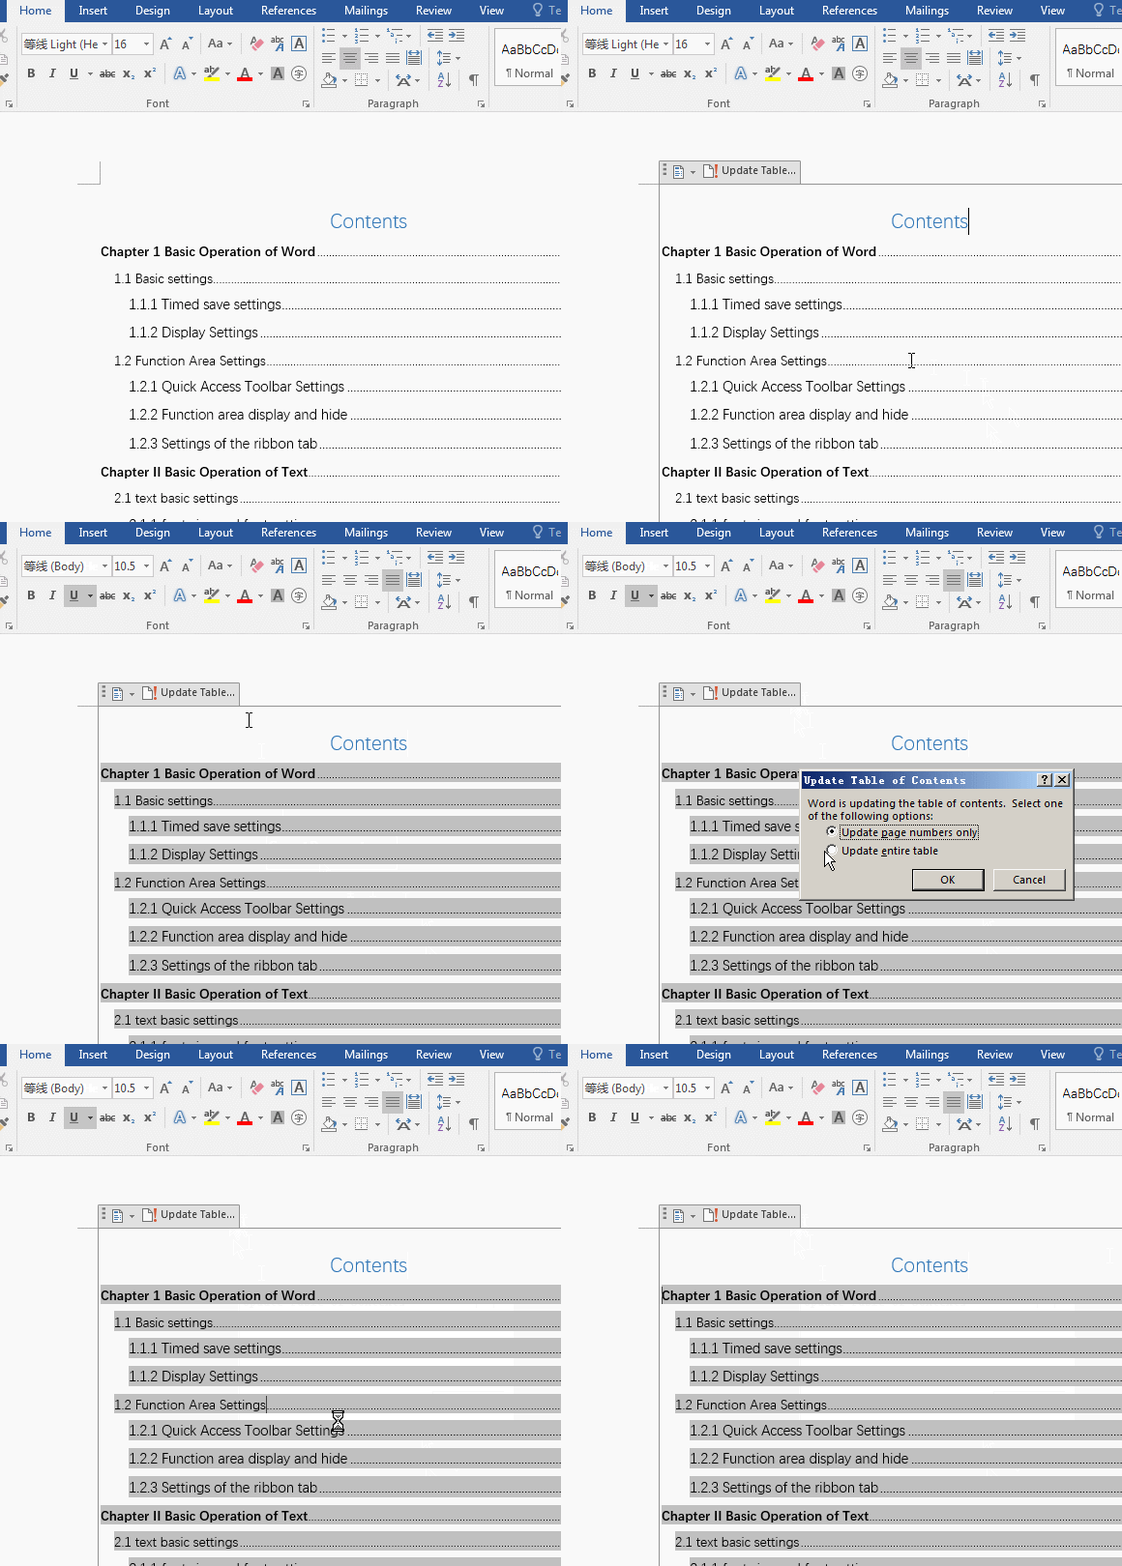
Figure 6
Hint: After updating the contents, all the previously set styles are gone and need to be reset.
2. Change and delete the table of contents. Click anywhere in the contents to select them, click the icon in the upper left corner of the "Contents", select "Automatic Table 2" in the pop-up contents style, and the Contents will be changed to the selected style, the original style is also gone. Click the icon and select "Remove Table of Contents" at the bottom of the pop-up menu, the table of contents will be deleted; the operation steps are as shown in Figure 7:
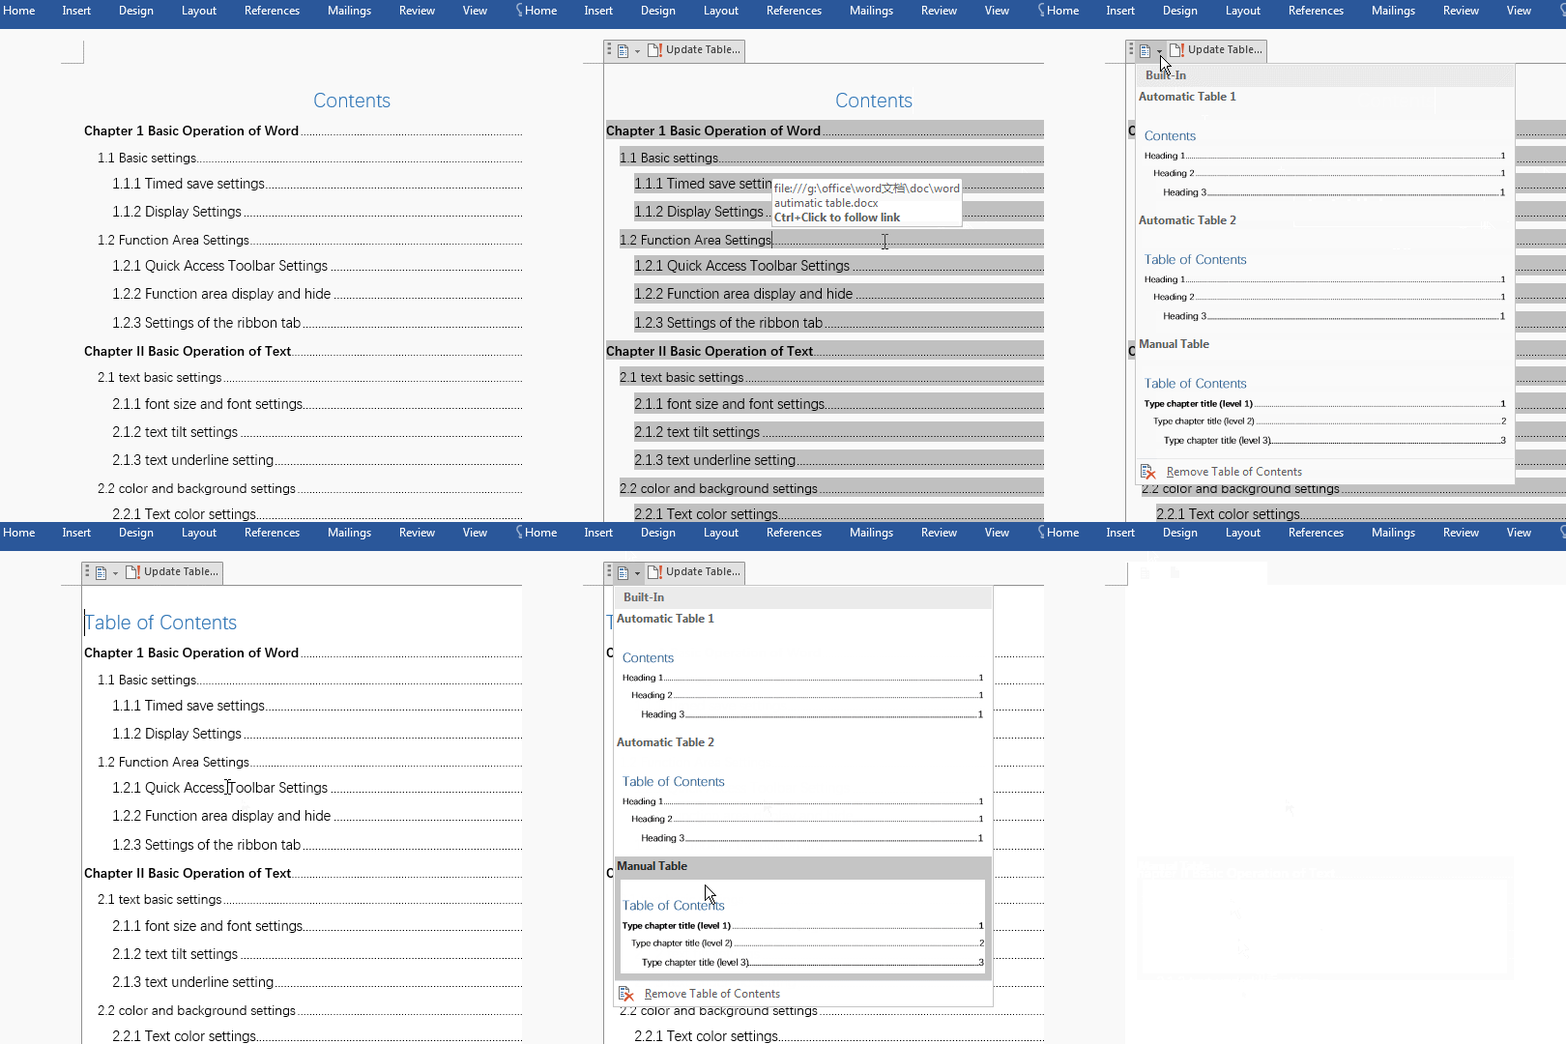
Figure 7
Tip: You must select "Automatic Table" when changing the automatically generated table of contents (that is, you cannot select "Manual Table"), otherwise the table of contents will not be automatically generated by chapter.
