 Program development > C# > WinForms > Content
C# Winforms listview show table(adaptive column width), add checkboxes,select items and change color
The DataGridView control is very powerful, and it is convenient to display the table, but the performance is not so high; the ListView control is not so powerful, and it requires more code to display the table, but the performance is relatively high. During the development process, you can choose according to your needs; it is not difficult to use the ListView control for displaying table. The following are two specific examples.
I, C# Winform ListView generates table
1. Pull a ListView control into the Form1 window and double-click the Form1 to open the codebehind file.
2. Show table code(fixed column width):
using System;
using System.Collections.Generic;
using System.ComponentModel;
using System.Data;
using System.Drawing;
using System.Text;
using System.Windows.Forms;
namespace DisplayTable
{
public partial class Form1 : Form
{
public Form1()
{
InitializeComponent();
}
private void Form1_Load(object sender, EventArgs e)
{
DisplayTableWithListview();
}
private void DisplayTableWithListview()
{
listView1.GridLines = true;// Whether the grid lines are displayed
listView1.FullRowSelect = true;// Whether to select the entire line
listView1.View = View.Details;// Set display mode
listView1.Scrollable = true;// Whether to show the scroll bar automatically
listView1.MultiSelect = false;// Is it possible to select multiple lines
// Add header(column)
listView1.Columns.Add("Product name", 160, HorizontalAlignment.Center);
listView1.Columns.Add("Product number", 100, HorizontalAlignment.Center);
listView1.Columns.Add("Price", 100, HorizontalAlignment.Center);
listView1.Columns.Add("Number", 100, HorizontalAlignment.Center);
// Add items into table
for (int i = 0; i < 6; i++)
{
ListViewItem item = new ListViewItem();
item.SubItems.Clear();
item.SubItems[0].Text = "Product" + i.ToString();
item.SubItems.Add(i.ToString());
item.SubItems.Add((i + 7).ToString());
item.SubItems.Add((i * i).ToString());
listView1.Items.Add(item);
}
}
}
}
The effect of table is shown in Figure 1:
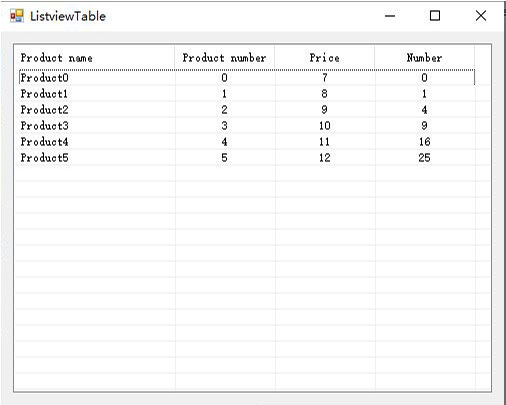
Figure 1
3. The adaptive column width code is as follows:
using System;
using System.Collections.Generic;
using System.ComponentModel;
using System.Data;
using System.Drawing;
using System.Text;
using System.Windows.Forms;
namespace DisplayTable
{
public partial class Form1 : Form
{
public Form1()
{
InitializeComponent();
}
private void Form1_Load(object sender, EventArgs e)
{
DisplayTableAdaptiveWidthColumn();
}
private void DisplayTableAdaptiveWidthColumn()
{
listView1.GridLines = true;// Whether the grid lines are displayed
listView1.FullRowSelect = true;// Whether to select the entire line
listView1.View = View.Details;//Set display mode
listView1.Scrollable = true;// Whether to show the scroll bar automatically
listView1.MultiSelect = false;//Is it possible to select multiple lines
// Add header(column)
listView1.Columns.Add("ProductName", "Product name");
listView1.Columns.Add("SN", "Product numbe");
listView1.Columns.Add("Price", "Price");
listView1.Columns.Add("Number", "Number");
// Add items into table
for (int i = 0; i < 3; i++)
{
ListViewItem item = new ListViewItem();
item.SubItems.Clear();
item.SubItems[0].Text = "Product" + i.ToString();
item.SubItems.Add(i.ToString());
item.SubItems.Add((i + 7).ToString());
item.SubItems.Add((i * i).ToString());
listView1.Items.Add(item);
}
listView1.Columns["ProductName"].Width = -1;// Set width based on items
listView1.Columns["SN"].Width = -2;// Set width based on title
listView1.Columns["Price"].Width = -2;
listView1.Columns["Number"].Width = -2;
}
}
}
The effect of table is shown in Figure 2:

Figure 2
II, C# Winform ListView function extension in table
1. How to add checkbox in listview in C# winforms
You must set the ListView's CheckBoxes and MultiSelect properties to True. Drag another CheckBox control below ListView, open the Properties dialog box(right-click the CheckBox, and select Properties), and change its "Text" property to "Select All"; select the "Events" tab, and add "CbAll_CheckedChanged" to the right of "CheckedChanged". Press "Enter" to add the selection change event.
Method 1:
private void SelectAllCheckBoxes(ListView lv, bool currVal)
{
for (int i = 0; i < lv.Items.Count; i++)
lv.Items[i].Checked = currVal;
}
Method 2:
private void SelectAllCheckBoxes(ListView lv, bool currVal)
{
foreach (ListViewItem item in lv.Items)
item.Checked = currVal;
}
Call:
private void CbAll_CheckedChanged(object sender, EventArgs e)
{
SelectAllCheckBoxes(listView1, cbAll.Checked);
}
The effect diagram is shown in Figure 3:
Figure 3
2. Winforms listview delete selected items
Drag a Label control to the right of "Select All" under ListView; open the "Properties" dialog box(Right-click listView1, select "Properties"), select the "Events" tab, add the lblDel_MouseClick event to the right of MouseClick, and add the following code:
private void lblDel_MouseClick(object sender, MouseEventArgs e)
{
foreach (ListViewItem item in listView1.Items)
{
if (item.Checked)
item.Remove();
}
}
3. Winforms listview change color and font for selected items to highlight
Open the Properties dialog box(Right-click listView1, select Properties), select the "Events" tab, add the listView1_ItemSelectionChanged event to the right of CheckedChanged, and add the following code:
private void listView1_ItemSelectionChanged(object sender, ListViewItemSelectionChangedEventArgs e)
{
listView1.FullRowSelect = true;
if (this.listView1.SelectedItems.Count > 0)
{
// Clear the original foreground color
foreach (ListViewItem item in listView1.Items)
item.ForeColor = Color.Black;
// Clear original background color and font
foreach (ListViewItem item in listView1.Items)
{
item.BackColor = Color.White;
Font f = new Font(Control.DefaultFont, FontStyle.Regular);
item.Font = f;
}
listView1.SelectedItems[0].SubItems[0].ForeColor = Color.OrangeRed;
Font newFont = new Font(Control.DefaultFont, FontStyle.Bold); // Bold selected line f
listView1.SelectedItems[0].SubItems[0].Font = newFont;
listView1.SelectedItems[0].BackColor = Color.FromArgb(5, 206, 249, 221);// Set background color of selected row
listView1.SelectedItems[0].Selected = false;
}
}
The effect diagram is shown in Figure 4:
Figure 4
4. Winforms ListView mouse over the item, its background changes color
(1) Quick response method
Open the "Properties" dialog box(Right-click listView1, select "Properties"), select the "Events" tab, add the listView1_MouseMove event to the right of MouseMove, and add the following code:
private void listView1_MouseMove(object sender, MouseEventArgs e)
{
ListView lv = (ListView)sender;
ListViewItem oldItem = null;
if (lv.Tag != null)
oldItem = (ListViewItem)lv.Tag;
ListViewItem curItem = lv.GetItemAt(e.X, e.Y);// Get the item under the mouse
if (curItem != null)
{
// Restore the background color of the last item which the mouse was over
if (oldItem != null && oldItem != curItem)
oldItem.BackColor = lv.BackColor;
curItem.BackColor = Color.LightGreen;// Set the background color of the current item
lv.Tag = curItem;
}
else
{
if (oldItem != null && oldItem.BackColor != lv.BackColor)
oldItem.BackColor = lv.BackColor;
}
}
The effect diagram is shown in Figure 5:
Figure 5
(2) Slow response method
Add the listView1_ItemMouseHover event to the right of ItemMouseHover, and add the following code:
ListViewItem lastSelectedItem = null;
private void listView1_ItemMouseHover(object sender, ListViewItemMouseHoverEventArgs e)
{
if (lastSelectedItem != null)
lastSelectedItem.BackColor = Color.White;
e.Item.BackColor = Color.LightGreen;
lastSelectedItem = e.Item;
}
5. C# Winforms ListView line height
Code:
private void SetLineHeight()
{
ImageList imgList = new ImageList();
imgList.ImageSize = new Size(1, 24);// Set the width and height of ImageList
listView1.SmallImageList = imgList;
}
Call:
private void Form1_Load (object sender, EventArgs e)
{
DisplayTableWithListview();
SetLineHeight();
}
The effect diagram is shown in Figure 6:
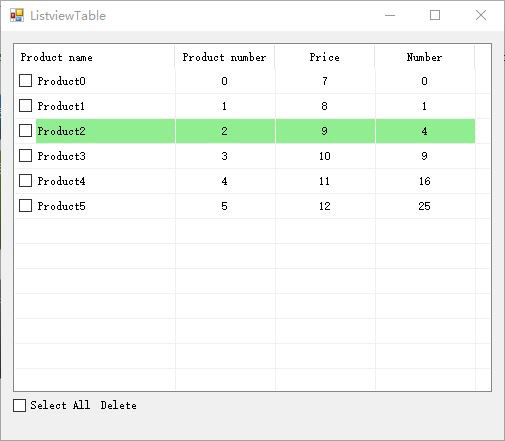
Figure 6
The above code is tested by Visual Studio 2019 and can be directly copied to the file to see the effect.
-
Related Reading
- C# Read and write to text file Newline, with one lin
- C# label control, with winforms label transparent ba
- C# Richtextbox change font color, add and foreach li
- C# sort files or folders by name, date and creation
- C# Windows Forms foreach controls, with Textbox and
- C# sorted dictionary by value, key or length of the
- C# Winforms panel border, with color, style, thickne
- C# random number generator in range, with double,str