
Word table properties explain in detail with alt text greyed out
There are Size, Alignment and Text Wrapping for the Table Properties in Ms Word. The Rows and Columns, Size of Cells and Alignments have been introduced in the previous chapters. These properties of the table are similar to them, and the way they are set is not much different. Text Wrapping is only available in tables, not in Rows, Columns, and Cells; The so-called Text Wrapping is a situation where the table is surrounded by text, which may only be adjacent to text on one side, or adjacent to text on both sides or three sides, or surrounded by text on all four sides.
The Text Wrapping of the table is mainly realized by Positioning, including the Horizontal position, the Vertical position, the Distance from surrounding text, Move with text, and Allow overlap.
I. Word table properties settings (How to find table properties in Word?)
1. Right-click the table, select Table Properties in the pop-up menu, open the Table Properties window, and select the Table tab. As shown in Figure 1:
Figure 1
2. Preferred width is the same as described above. Look at the Alignment, there are three alignment methods of Left, Center and Right, Left refers to the alignment of the table to the left, if the width of the table is equal to or greater than the width of the page, it cann't be seen, only the width of the table is less than the width of the page can be seen, the smaller the width of the table, the more obvious; The same goes for Center and Right, and in general, the choice of alignment is often combined with table size and text wrapping; For example, if the width of the table is less than the width of the page, The Center is usually selected.
Why is the Indent from left to the right of Alignment gray? This is because the Text Wrapping of the table does not select None, and immediately becomes optional when None is selected, as shown in Figure 2:
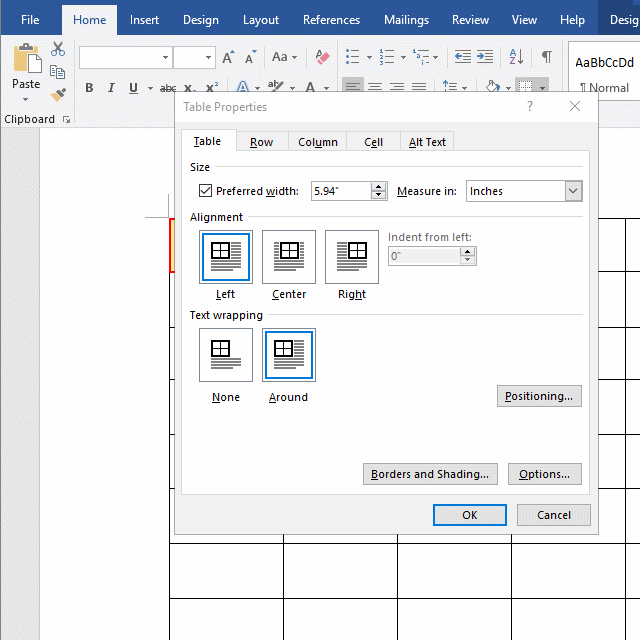
Figure 2
II. Word table properties Around Positioning
1. Right-click the table, select Table Properties, open the Table Properties window, click Around, the Positioning button will immediately become selectable, and the Alignment will also change, click Positioning to open the Table Positioning window, as shown in Figure 3:

Figure 3
2. There are four items that can be set, namely: Horizontal, Vertical, Distance from surrounding text and Options, there are five options: Left, Right, Center, Inside and Outside for the Horizontal, the first three will not be said, and the last two will be introduced. Inside refers to the edge of the range where text can be entered on the page, that is, the position of the two right-angled at the top of the page; Outside refers to the outer edge of the page. There are three options for Relative to, namely: Margin, Page and Column, where Mrgin is the distance between the outer edge of the page and the edge of the text input range, and Column will be described in a later chapter. Select Outside for Horizontal, select Margin for Relative to, and the steps and effect as shown in Figure 4:
Figure 4
Select Outside for Horizontal, select Page for Relative to, the steps and effect as shown in Figure 5:
Figure 5
Through the above comparison, you can deepen your understanding of the horizontal position of the table.
3. The Vertical is similar to the Horizontal and you can choose different items to preview the effect. Select Paragraph for the Relative to, It will automatically enter 0 for Position.
4. There are four options for the Distance from surrounding text: Top, Bottom, Left, Right,, and the steps and effects are shown in Figure 6:
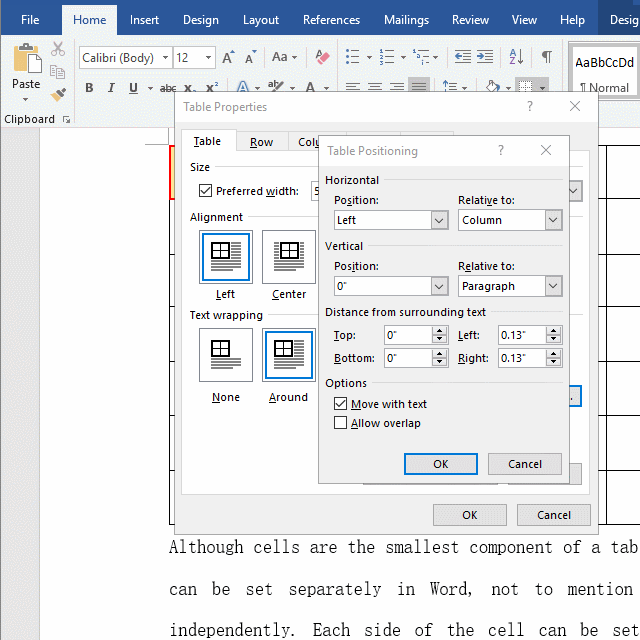
Figure 6
Since the Horizontal is set to Left, the table cann't be completely surrounded by text, only the bottom edge is adjacent to the text, although all four sides are set to 1", but only the bottom is 1" away from the text.
5. Move with text under Options is mainly for Vertical Position, which can be checked or unchecked, and it can be kept as default; Allow overlap refers to whether to allow overlap with other content in the document, which can be checked as needed.
Tip: If Allow overlap is checked, but Move with text is not checked, the two tables may overlap together. When Move with text is checked, it will no longer overlap.
6. Take another example of aligning the table in the center and wrapping the text. After clicking OK, the effect is as shown in Figure 7:
Figure 7
III,. Word table properties can't be changed (Word table properties alt text greyed out)
It may be caused by the Word template being corrupted, delete it and create a new one. For details, see "How to turn off Microsoft Word compatibility mode that appears when opening or creating a new document". If it still doesn't work, you can try installing a newer version of Ms Word, such as Ms Word 2019, as the new version solves a lot of problems.
IV. Word table properties Positioning is gray
When The Text Wrapping of the table is set to None, the Positioning is grayed out, and it can be selected by changing it to Around. The way is as follows: right-click the table, select Table Properties in the pop-up menu, open the Table Properties window, and select Around under Text Wrapping, the Positioning is no longer gray, and the steps are shown in Figure 8:

Figure 8