 Office > Excel > Excel 2019 > Content
How to make diagonal header in Word table, with drawing single/double lines and change color, weight
There are two ways to draw a slash in table in Word, one is to draw it by drawing a table, and the other is to draw it by drawing a straight line. The slash that is drawn with former is with the table as a whole, but in higher versions of Word(such as Word 216), only one diagonal line can be drawn; the diagonal line that is drawn with latter is a independent line, but two or more can be drawn. You can use this method when making double slashes and above.
There are three ways to add text to the slashes. One is to enter the text directly, then wrap it, and then press the space key to move them to the appropriate position; the second is to use the superscript and subscript to arrange the text to the appropriate position; the third is to arrange text in a text box. The first two methods are applicable to single slash headers, and the latter method is applicable to double slash headers.
I, How to make diagonal header in Word table
(I) How to make a single diagonal header with Word table split cell diagonally
1. How to draw a diagonal line in word
Click the table once to display the "Layout" tab for editing the table, select the tab, click "Draw Table", the mouse changes to a pencil shape, and move it to the vertex in the upper left corner of the first cell of the table, hold down the left button and drag it to the lower right corner until it reaches the vertex in the lower right corner of the cell, release the left button, and draw a slash; the operation steps, as shown in Figure 1:
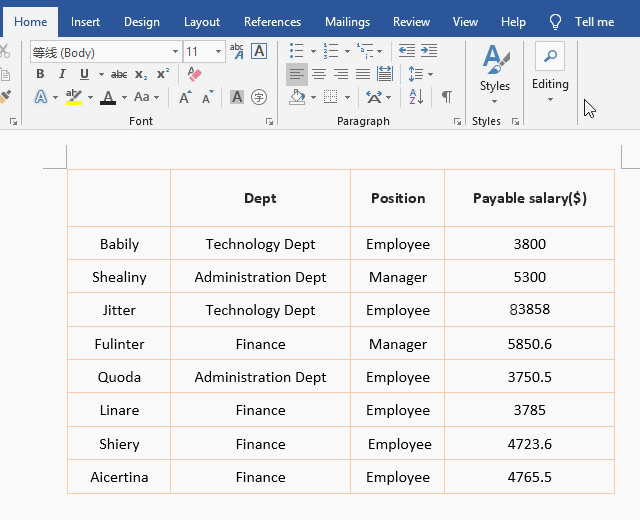
Figure 1
2. Word diagonal text(How to type up and down form diagona)
A. Method 1: Enter text and wrap. Click the first cell of the table, position the cursor inside, enter "ItemFirst Name", move the cursor before "First", press Enter, then "First" jumps to the second line; then position the cursor in front of "Item", continue to press the "Space" key until the position of the word "Item" is appropriate; click the diagonal arrow to the right of "Paragraph" to open the "Paragraph" dialog box, and select "Indents and Spacing" tab, change the "Before" to "6 pt" under "Spacing" in the middle of the dialog box, click "OK"; position the cursor before "Item", press the "Backspace" key once to move it to left; move the mouse to right line of first column, it changes to "double arrows + double vertical lines" icon, press left button, drag to right until the diagonal does not touch the "Name"; the operating process steps, see screenshot in Figure 2:
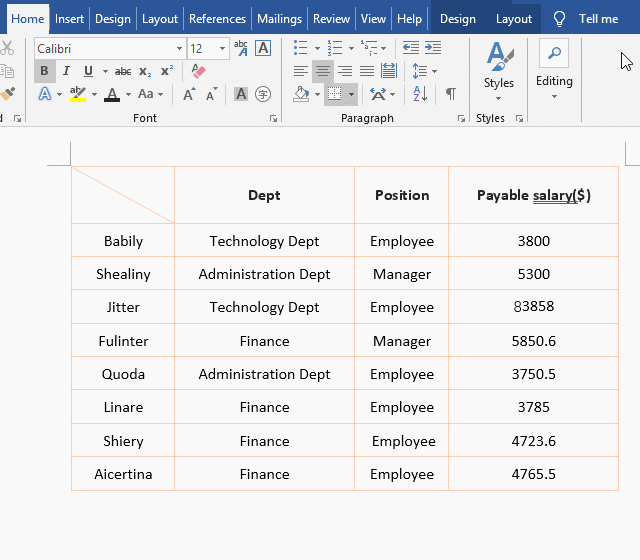
Figure 2
B. Method 2: Use superscript and subscript. Position the cursor in the first cell of the table, enter "Item", press Enter, continue to enter "First Name", select "Item", press the shortcut keys Ctrl + D (or click the diagonal arrow to the right of "Font") to open the "Font" dialog box, click "Superscript" to check it, click "OK", then "Item" will be used as the "Superscript"; select "First Name", press Ctrl + D, check "Subscript" in the dialog box that has been opened, click "OK", then the phrase "First Name" is used as the superscript; select all the text, click the "size" drop-down list box, and select 16; click the diagonal arrow to the right of "Paragraph" to open the "Paragraph" dialog box, and select "Indents and Spacing" tab, click "Line Spacing" drop-down list box, select "Exactly" in the pop-up menu, change "12 pt" to "16 pt" under "At:", click "OK", the space between "Item" and "First Name"is appropriate; position the cursor before "Item", press "Space" key until the position of "Item" is appropriate; position the cursor before "First Name", press "Backspace" once, "First Name" align left; the single slash header will be completed; the process steps, As shown in Figure 3:
Figure 3
(II) How to draw a double diagonal lines header in Word
1. How to draw double diagonal line in word
Select the "Insert" tab, click "Shape" in the "Illustrations group, and select the line under "Lines" in the pop-up menu. The mouse becomes a black bold plus sign, move it to the vertex in the upper left corner of the table, hold down the left button and drag to the lower right corner until you reach the right of the first cell in the table, then draw a slash and automatically switch to the "Format" tab, click "line" in the upper left corner of the window, draw another diagonal line in the same way; the operation steps are shown in Figure 4:
Figure 4
2. Add text to double diagonal line
A. Draw a text box and enter text. Hold Alt and press N, X, D and H once(or select the "Insert" tab, click "Text Box", and select "Draw Horizontal Text Box" from the pop-up menu), and the mouse becomes a black bold plus sign, and move it to near the upper edge of the first cell, hold down the left button and drag to the lower right corner, then draw a text box and automatically switch to the "Format" tab, enter "Item"; click "Shape Fill", Select "No Fill" in the pop-up options to remove the background color of the text box; click "Shape Outline" and then select "No Outline" to remove the border of the text box; select the word "Item" and select the "Home" tab, Click bold "B", make the text bold; click "Center" icon, make it center; move the mouse to the small circle on the bottom line of the text box, when it becomes a cross with four arrows, hold down the left button, drag down until the bottom margin is suitable; the operation steps are shown in Figure 5:
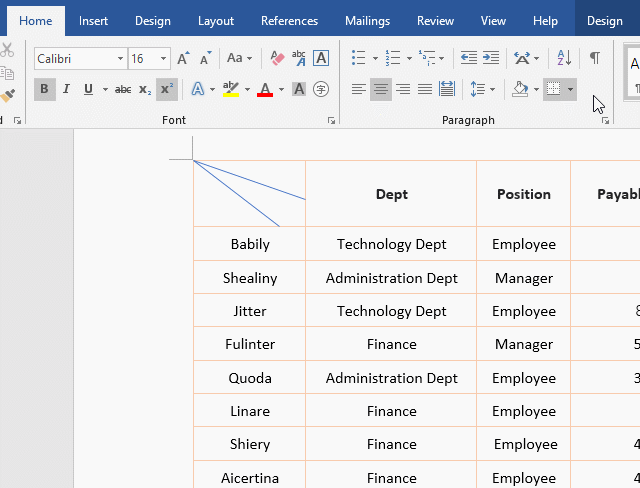
Figure 5
B. Continue adding text. Move the mouse to the side of the text box. After the mouse changes to a cross with four arrows, click to select the text box, press Ctrl + C to copy, and then press Ctrl + V to paste a copy of the text box. Move the pasted text box to between the two diagonal lines, select "Item" in the text box, enter "Salary"; move the text box to the appropriate position between the two diagonal lines; move the mouse to "Semicircle with arrow" at the top of the text box, after the mouse becomes a black semicircle with arrow, hold down the left button and rotate to the right to make the text box parallel to the diagonal line. Click anywhere in the table, press Ctrl + V to paste another text box, move the text box to the lower left corner of the second diagonal line, select the word "Item", enter "First Name", make the text box longer, select "First Name", click "Font Size" drop-down list box, select 10 from the pop-up menu(You can make "First Name" parallel to the diagonal line). So that the double diagonal lines header is made; the operation process steps are shown in Figure 6:

Figure 6
II, How to set the style of table diagonal line in Word
(I) How to set the style of single diagonal line
1. How to change table line color in word? Click the table once, select the "Design" tab on the right, click the "Pen Color" drop-down list box, select a color(such as "Orange, Accent 2") in the pop-up color panel, and the mouse changes to the shape of the knife, move it to the diagonal line and click once, the diagonal line will change to the selected color.
2. How to change table line weight and style. Click the "Line Weight" drop-down list box, select "1 pt" in the pop-up line options, and the weight of the diagonal line becomes 1 pt. Click the "Line Style" drop-down list box, then select the second dotted line, and then click the diagonal line again, it will become the selected dotted line. The operation steps are shown in Figure 7:
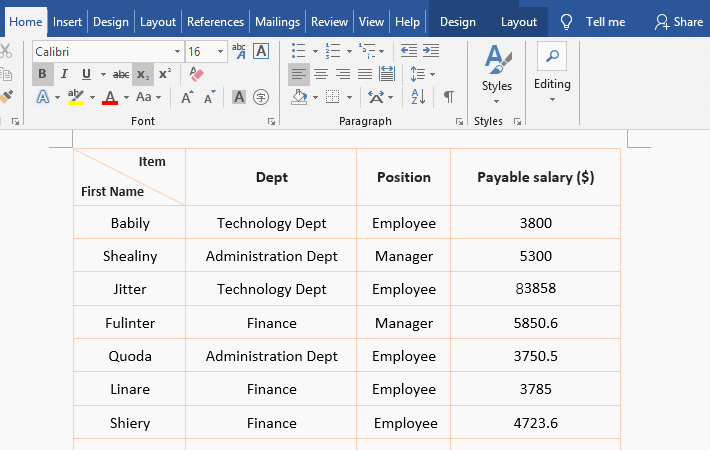
Figure 7
(II) How to set the style of double diagonal lines
1. Click the diagonal line above to select it, hold down Shift, click another diagonal line, select both diagonal lines, select the "Format" tab, click "Shape Outline", and select a color(Such as "Orange, Accent 2, lighter 40%"), then the double diagonal lines become the selected color;
2. Click "Shape Outline" again, and select "Weight → 1 pt" in turn, then the Weight of the double diagonal lines become 1 pt. Select a dashed line in the same way, the double diagonal lines become a dashed line again. The operation steps are shown in the Figure 8:
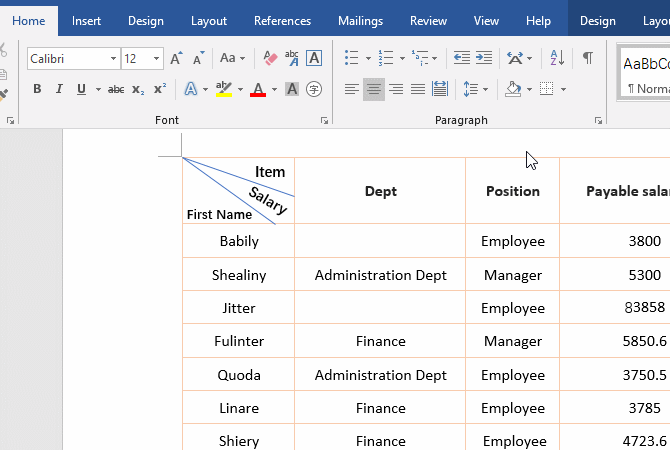
Figure 8
III, How to delete the diagonal line in the table in Word
1. Delete the single diagonal line
Click table once, select the "Layout" tab, click "Eraser", the mouse changes to the shape of the eraser, move it on the diagonal line, click the left button once, the diagonal line will be erased; the operation process steps are shown in Figure 9:

Figure 9
2. Delete the double diagonal lines
Click the first diagonal line to select it, press Delete, it is deleted; then select another diagonal line, and then press Delete again, it is also deleted; the operation steps are shown in Figure 10:
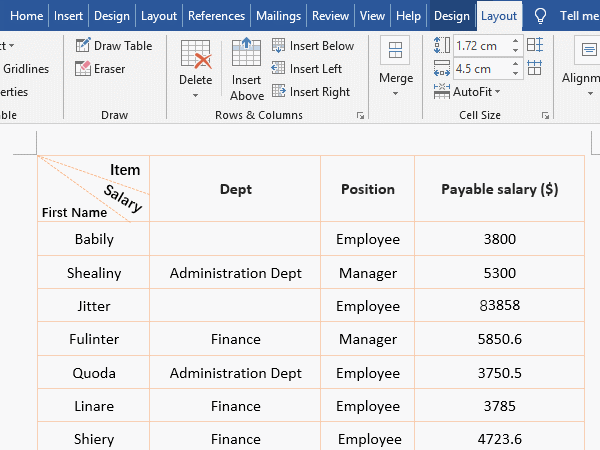
Figure 10
-
Related Reading
- How to set Header and footer in word(13 examples), i
- How to make a table of contents in word and change,
- How to underline in word, with double, wave,long und
- How to delete a blank page in word(7 examples), incl
- How to start page numbers on page 3 and each section
- How to convert word to excel(3 ways, with keeping co
- How to change line spacing in word, with 1.5, single
- How to encrypt excel file and protect sheet, workboo