How to repeat header row in word table and make across part retract to previous page
If the table has more than one page in Word, it will be automatically paginated. To make it easier to read, the header rows are usually repeated on each page. In general, you only need to set a repeated header rows for the table. It will be displayed on each page of the table. Sometimes no matter how you set the repeating header rows, the across part will never repeat.
There are usually several situations after the table is across. The first is: the table is only spread by one line or blank, which is very inconvenient to print. At this time, it is often necessary to retract the part of spread to the previous page. The second is: one line Spreading causes the entire table to jump to the next page. In this case, setting to allow the table to be spread across pages cannot be resolved. The third type is: the frame is not displayed in the spreading part of table. In this case, setting allows the table to break across pages.
I. How to repeat header row in word table
Click the header row of table. On the one hand, position the cursor on the header row to indicate operations on the header rows, and on the other hand to display the "Layout" tab, select the displayed "Layout"(on the right) tab, and click the "Repeat Header Rows" on the upper right corner of window, the header rows will be displayed on each page of table, and the operation process steps are shown in Figure 1:
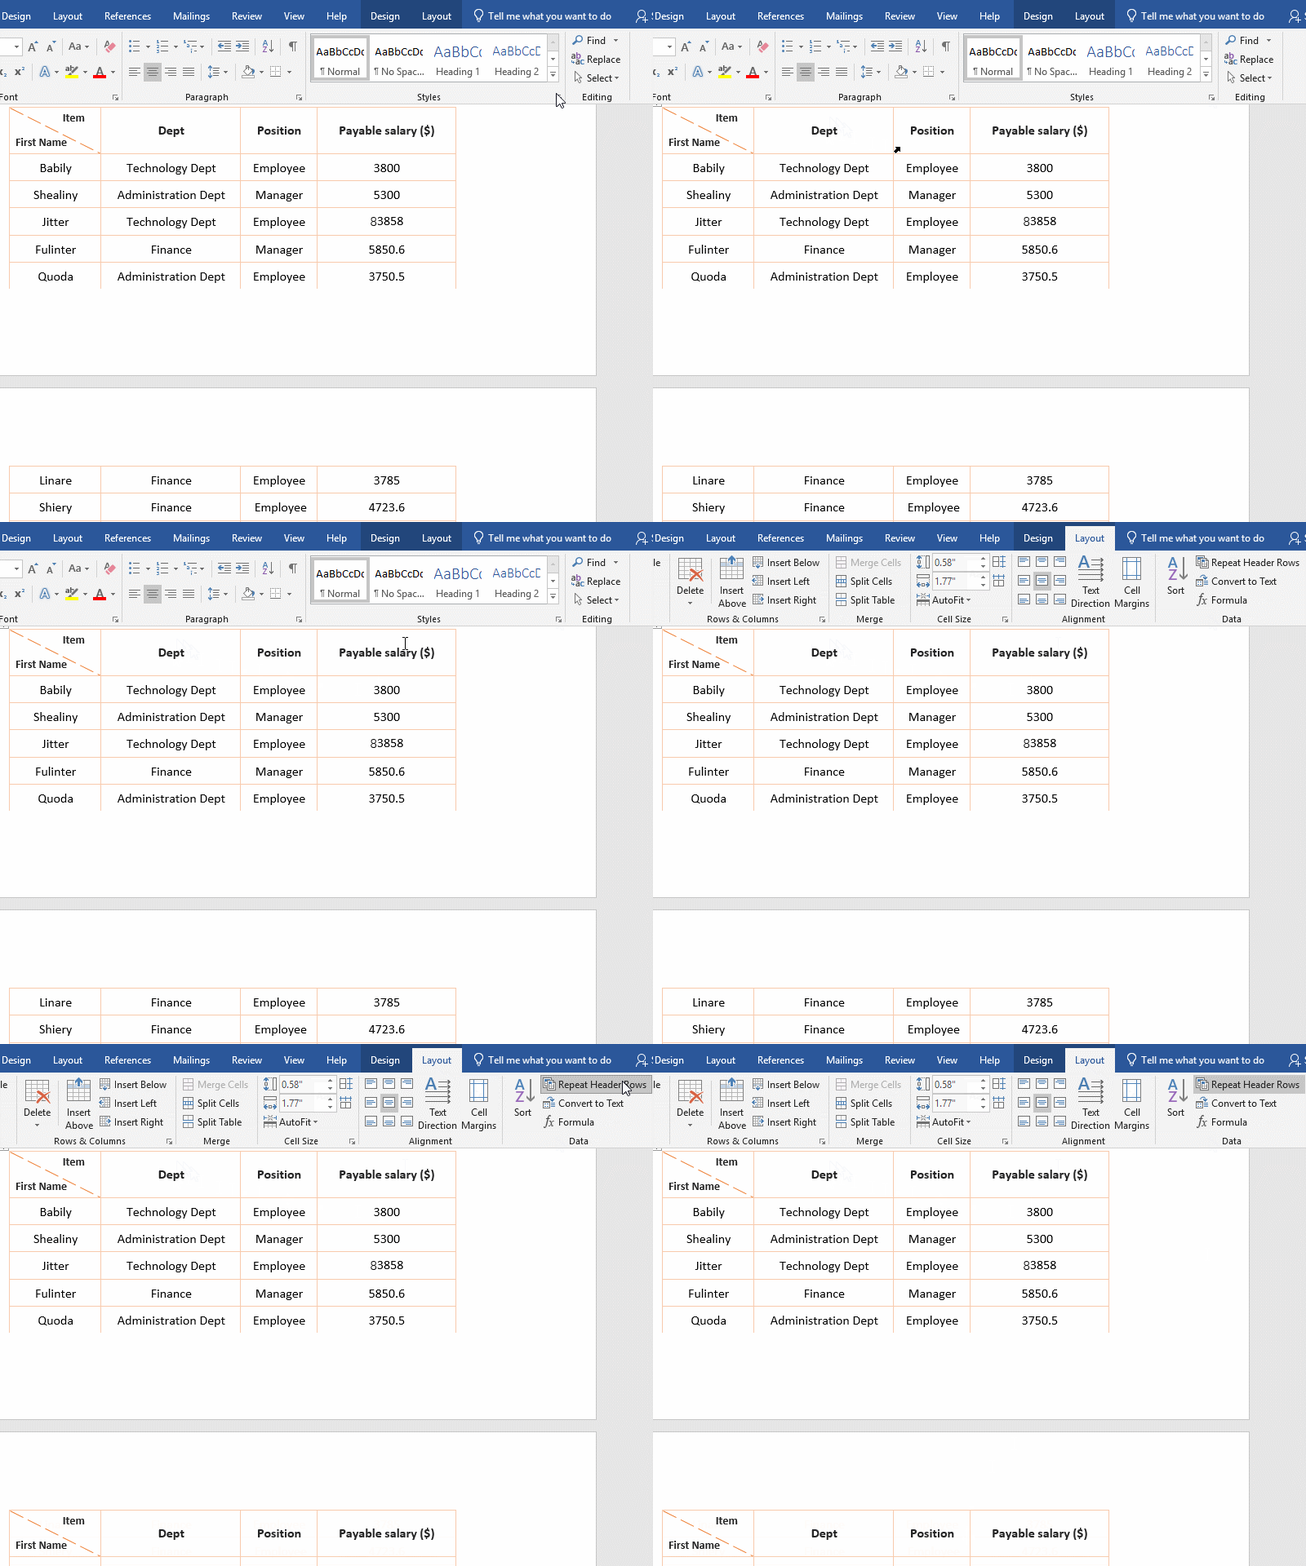
Figure 1
II. Header row won't repeat in word table
(1) The reason why the header row won't repeat
1. Check "Repeat as header row at the top of each page".
Click the header row of table, and then click "Repeat Header Rows". Header row in the spread part of table won't repeat. Right-click the header row of table, select "Table Properties" in the pop-up menu, open the "Table Properties" dialog box, select "Row "Tab, check whether "Repeat as header row at the top of each page" is checked. It has been checked, indicating that this is not the reason. Click "OK" to close the window; the steps of operation process are shown in Figure 2:
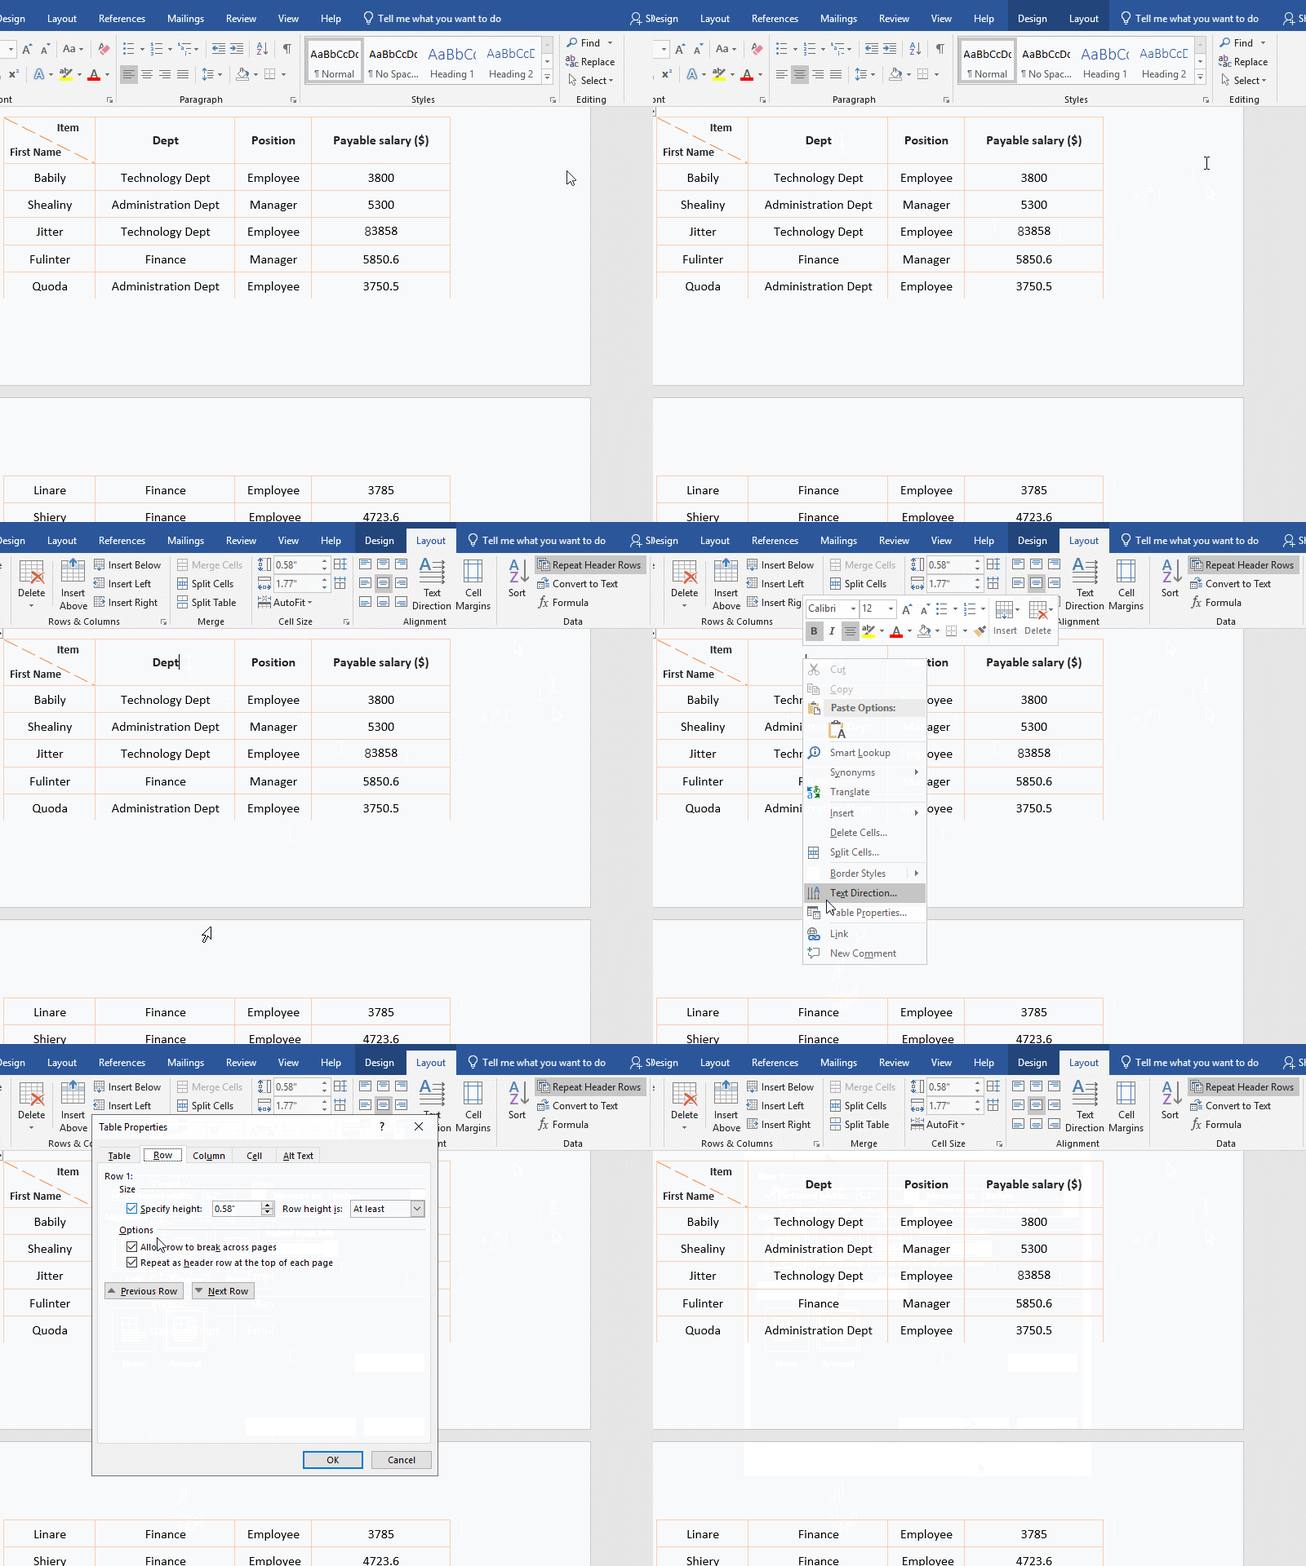
Figure 2
2. Check the text wrapping method of table.
A. Position the cursor on the header row, select the displayed "Layout"(on the right) tab, click "Properties" in the upper left corner of window, open the "Table Properties" dialog box, select the "Table" tab, select "Around" for "Text Wrapping" by default, select "None", and click "OK", the header rows appears in the spread part of table, indicating that when the text wrapping mode of table is set to "Around", the header row will not be repeated in the spread part of table; the operation process steps are shown in Figure 3:
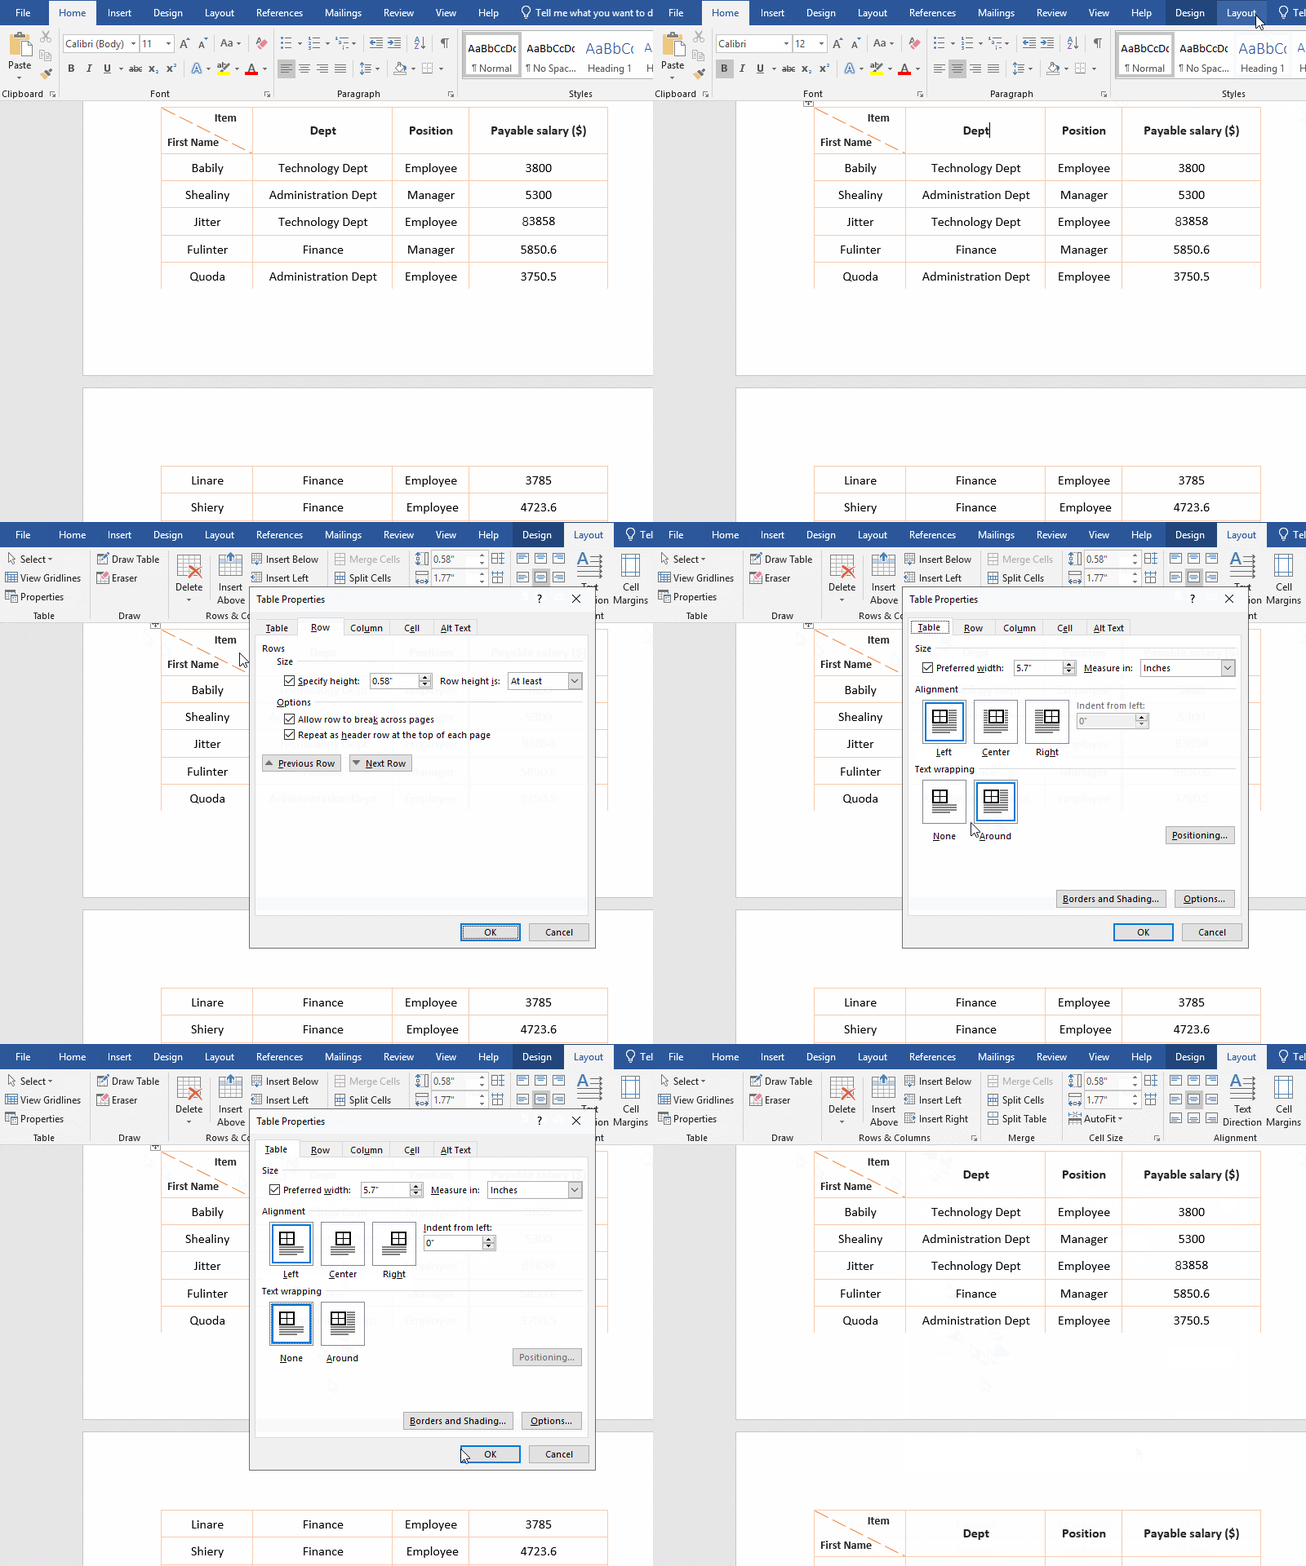
Figure 3
B. Why doesn't the header row repeat after the table is set to "Text Wrapping"? Table "Text Wrapping" means that the four sides of the are surrounded by text. Since the four sides can wrap the text, it means that the table is only displayed on one page and will not spread across pages, so the header row will not be repeated.
(2) After repeating the header rows of a spread-page table, why did the repeated header rows disappear again?
It's the two reasons mentioned above. You may unintentionally uncheck "Repeat as header row at the top of each page" or set the table text wrapping method to "Wrap" in the process of editing the document. Check the steps above. Just set it.
III. Why does the rows or the entire table skip to the next page after the table is spread across pages in Word?
(1) Word row skips to next page
Position the cursor behind text one of the cells in the top row, press Enter twice, and the last row will jump to the next page; right-click the "icon with four arrows in the box" at the upper left corner of table(or select the entire table, and then right-click it), select "Table Properties" in the pop-up menu, open the "Table Properties" dialog box, select the "Row" tab, check "Allow row to break across pages", click "OK", the text in the last row of table will return Previous page; operation process steps, as shown in Figure 4:
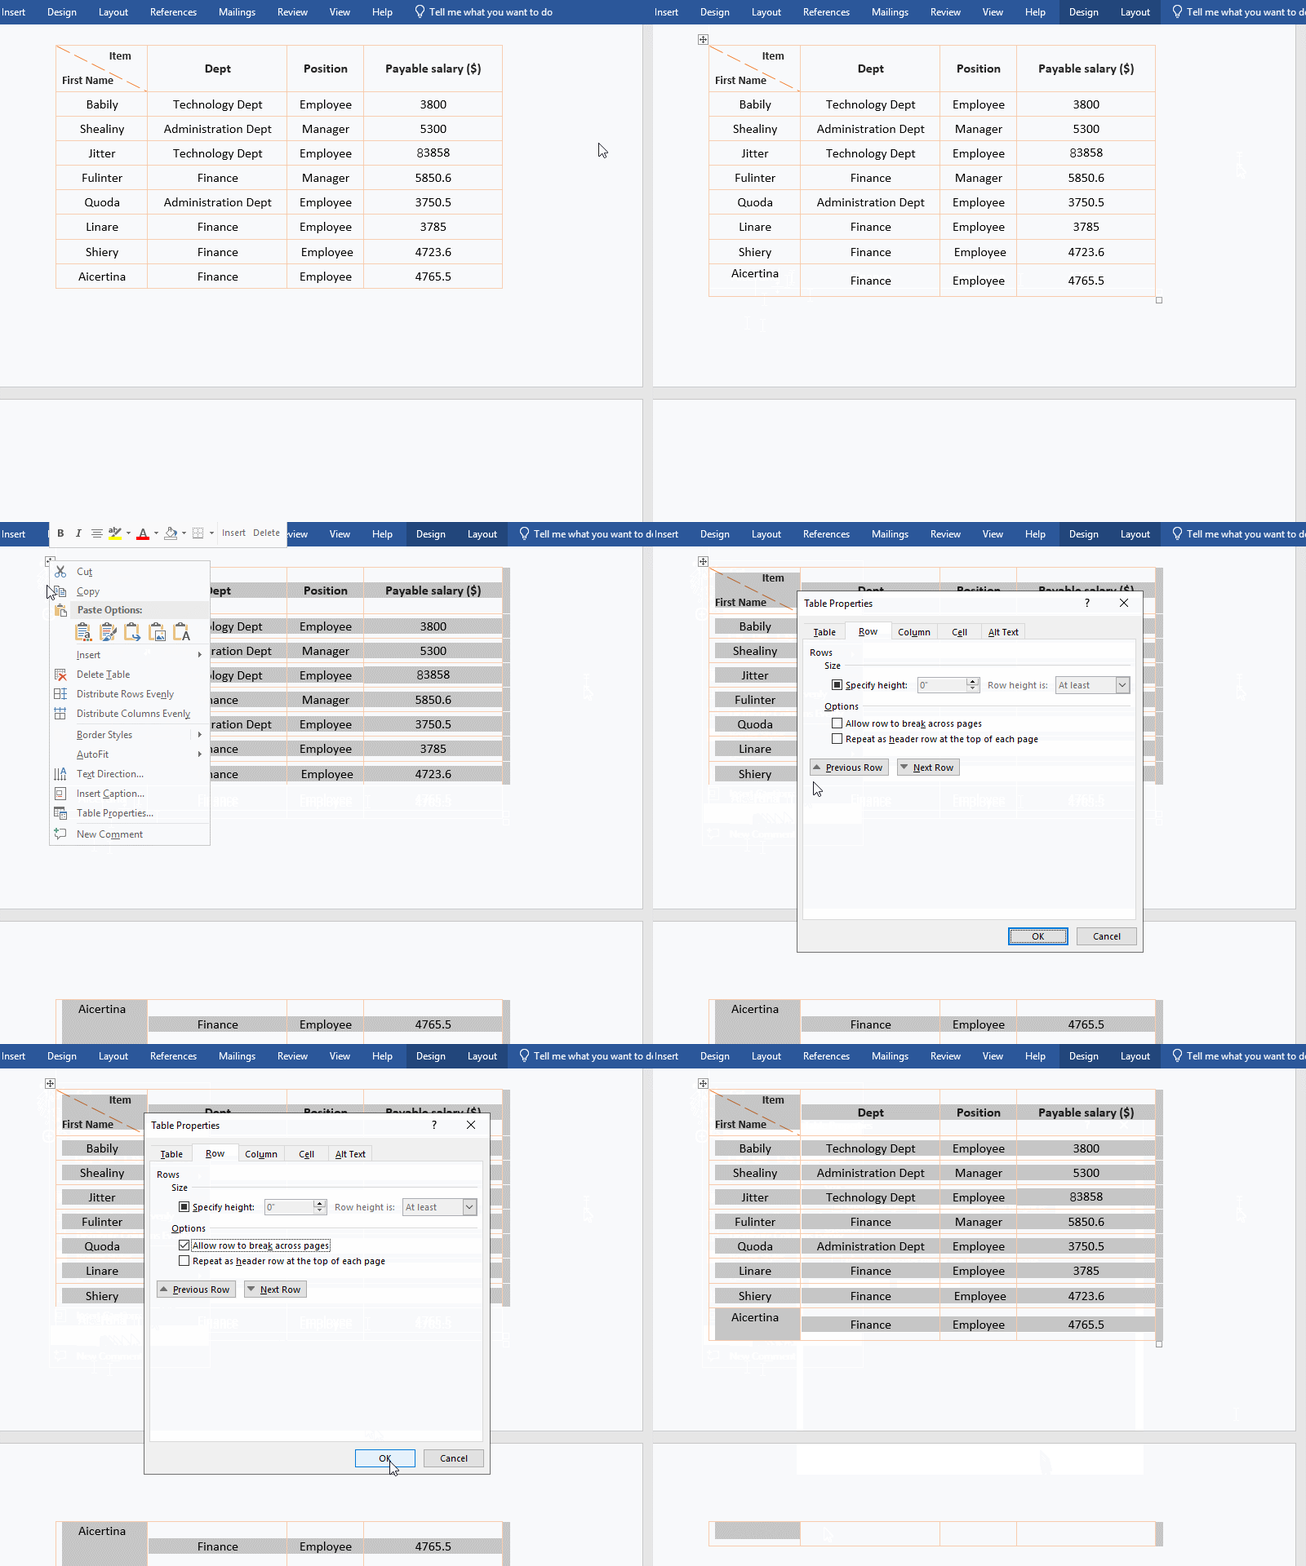
Figure 4
Tip: Word table breaks across pages, the part that skips to the next page is blank or no border(usually in the lower version of Word, such as Word 2003), you only need to check "Allow row to break across pages"; To retract the part that skips to the next page to the previous page, please see the method below.
(2) Word table skips to next page
Position the cursor behind the text in the first cell of last row, press Enter once, and the entire table will skip to the next page; click the "icon with four arrows in the box" at the upper left corner of table, select the entire table, and right-click it, select "Table Properties" in the pop-up menu, open the "Table Properties" dialog box, select the "Row" tab, uncheck "Repeat as header row at the top of each page", click "OK", the entire table skips back On the previous page, the operation process steps are shown in Figure 5:
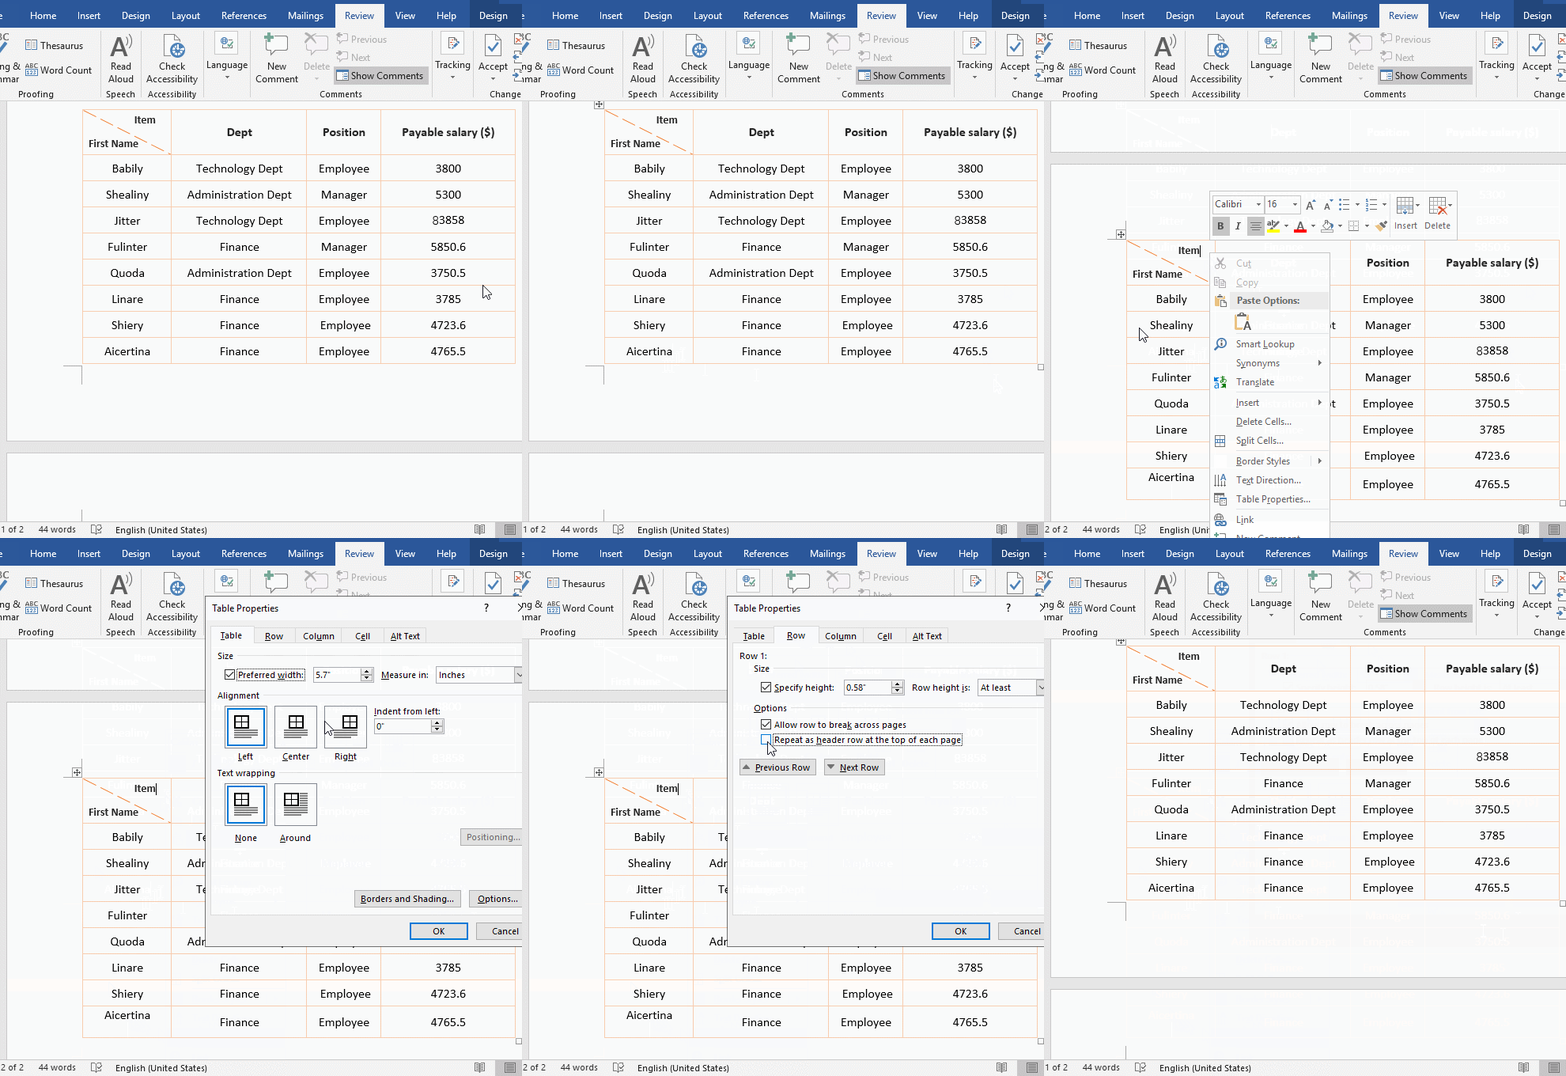
Figure 5
(3) Each row of table occupies one page
When unchecking the check box "Allow row to break across pages and Repeat as header row at the top of each page", and check "Page break before", the table will occupy one page per row. The solution is:
Press "PageDown" on the keyboard to turn down the page, each row of table occupies one page, then press "PageUp" on your keyboard to turn to the header row, right-click the "icon with four arrows in the box", select the entire table, and click "Paragraph Settings" icon, open the "Paragraph" dialog box, select "Line and Page Breaks" tab, Uncheck "Page break before", click "OK", all rows of table are merged into one page; the steps of the operation process are shown in Figure 6:
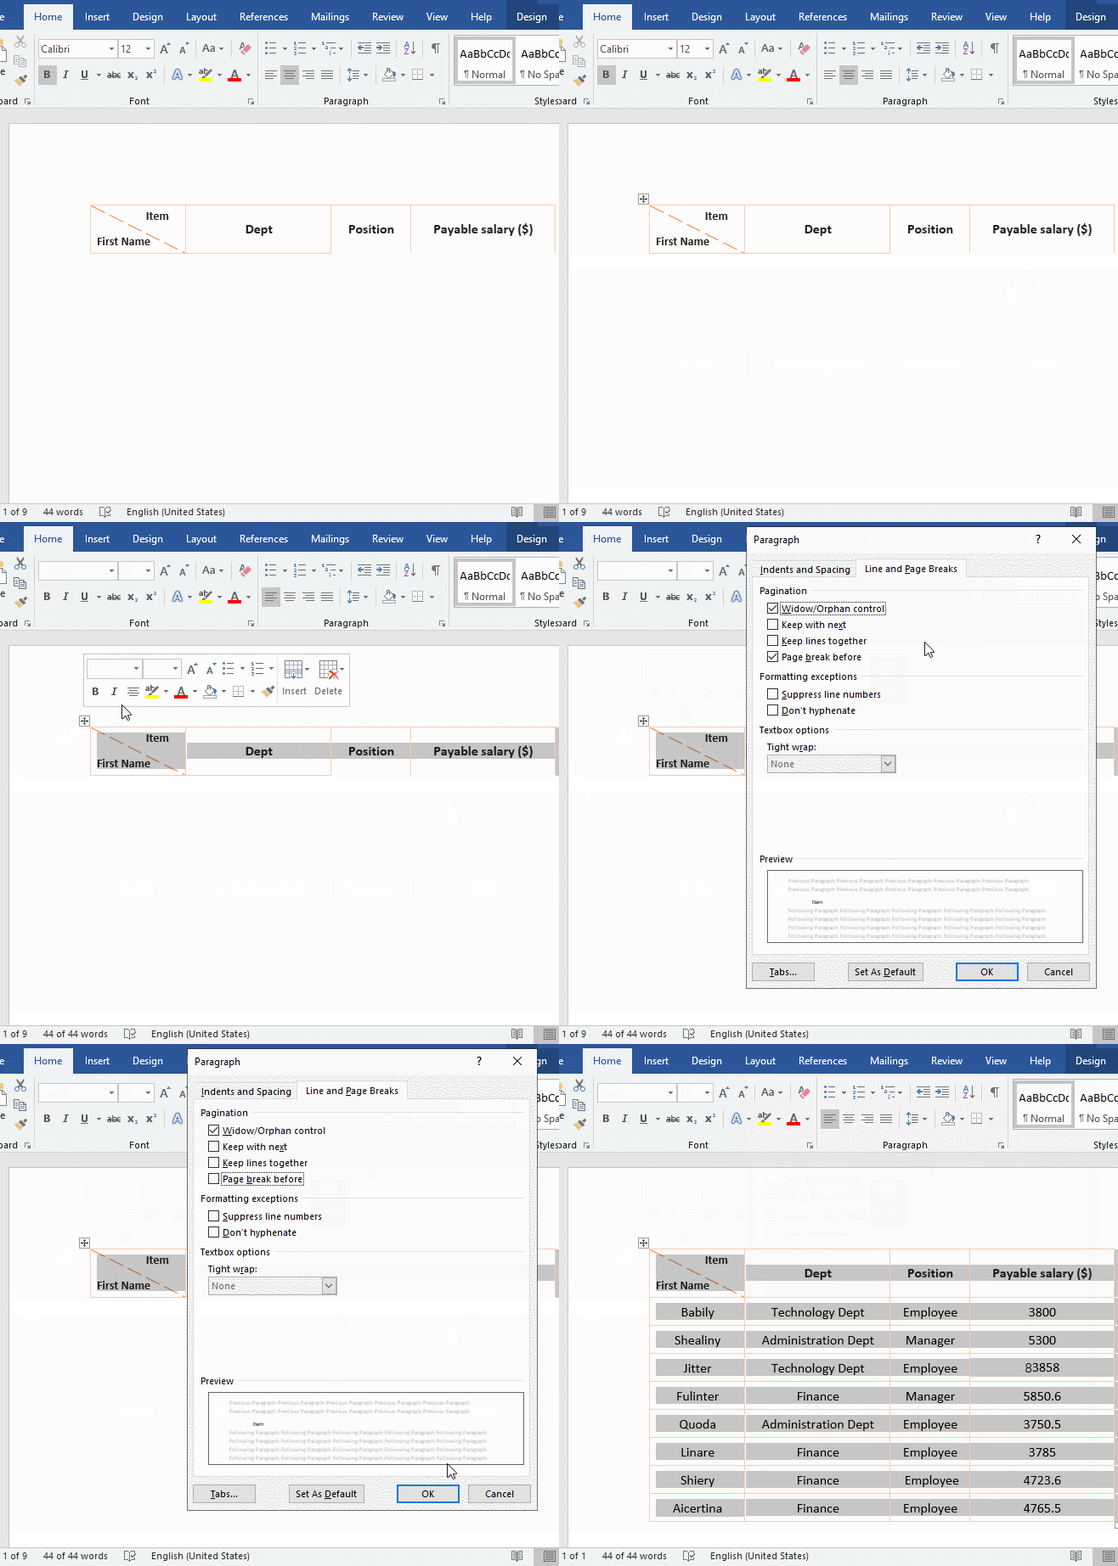
Figure 6
IV. How to shrink back to the previous page the part of table that does not have many spreads in Word
1. Across page caused by font size or line spacing.
A. Click once on the table, position the cursor in one of cells, press Shift + Alt + 5(on the numeric keyboard), select the entire table, click the "Line and Paragraph Spacing" icon, and select 1.0 from the pop-up options, the part of table spread has been retracted to the previous page;
B. The table is retracted to the previous page too much. If you want it to occupy exactly one page, you can increase the height of each row by a bit. The method is: move the mouse to the bottom line of table, after the mouse becomes "Double horizontal line + double arrow" icon, hold down the left button and drag down to the bottom of page, right-click the table, and select "Distribute Rows Evenly" in the pop-up menu, the table just occupies one page. The operation process steps are shown in Figure 7:
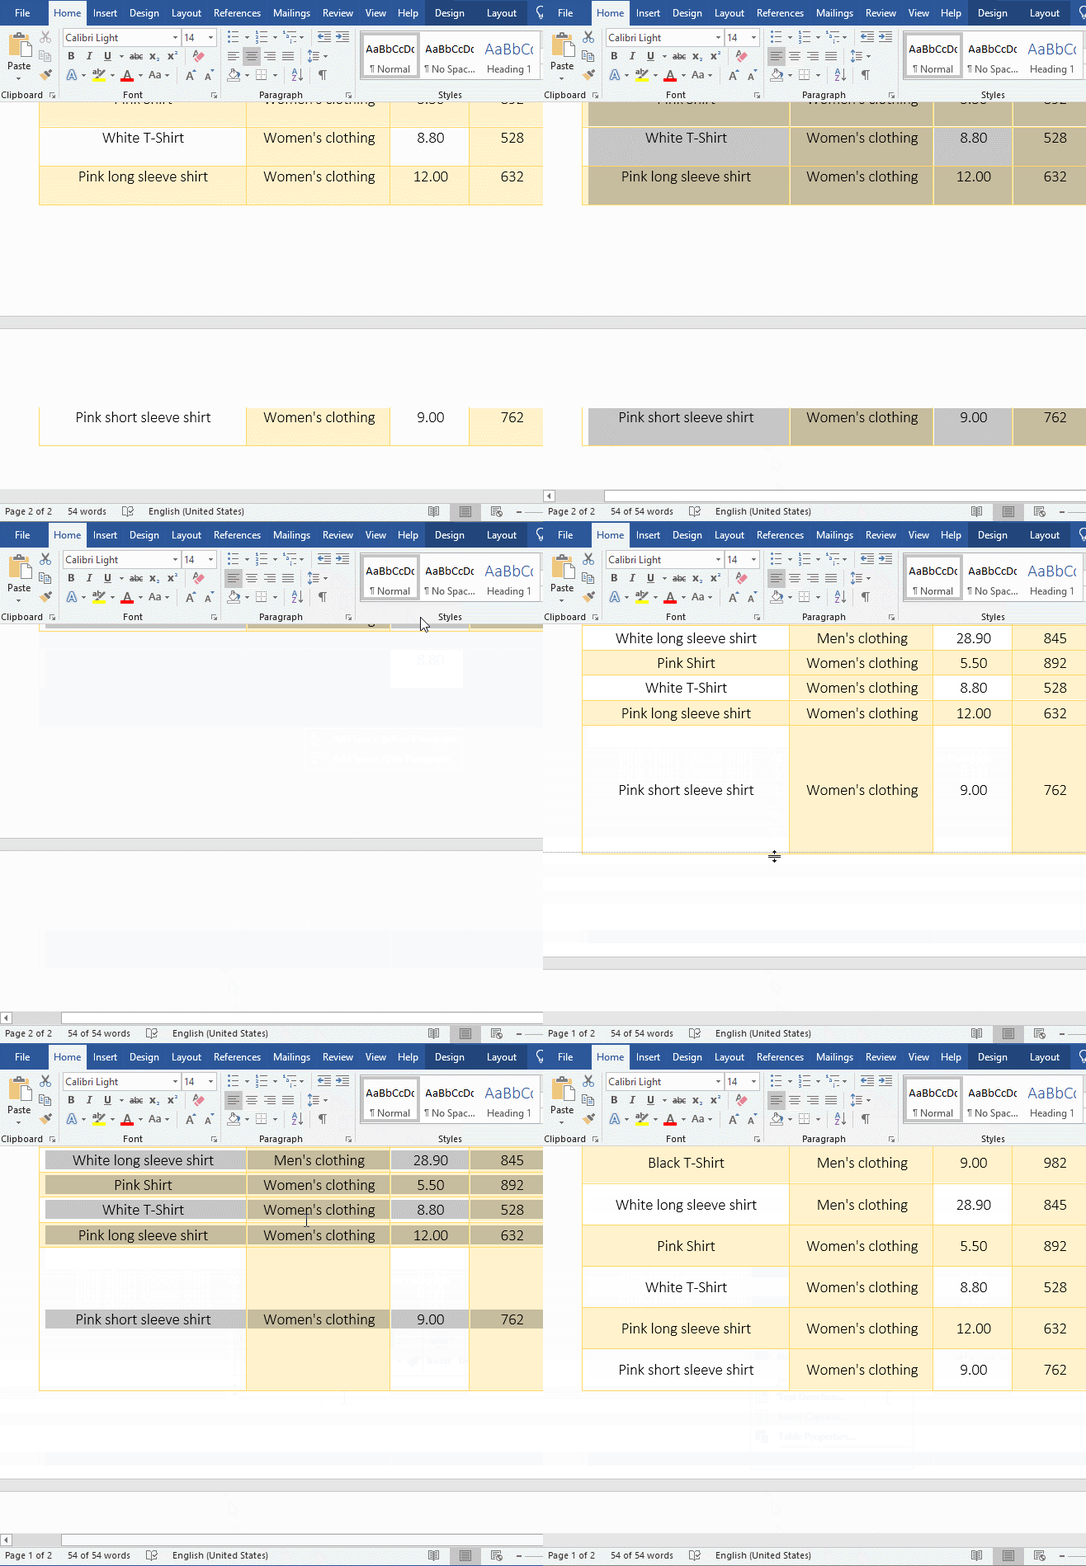
Figure 7
2. Across page caused by row height.
A. Click any cell of table to position the cursor inside, press Shift + Alt + 5(on your numeric keyboard), select the entire table, click the "Font Size" drop-down list box, and then select 9, the text in table becomes smaller, but the part of across page is not retracted to the previous page; click the "Line and Paragraph Spacing" icon, 1.0 has been selected.
B. Select the "Layout" tab, click the small down arrow to the right of "Row Height", set the row height to 0.3 inch, and the spread part of table will be retracted to the previous page. The operation process steps are shown in Figure 8:
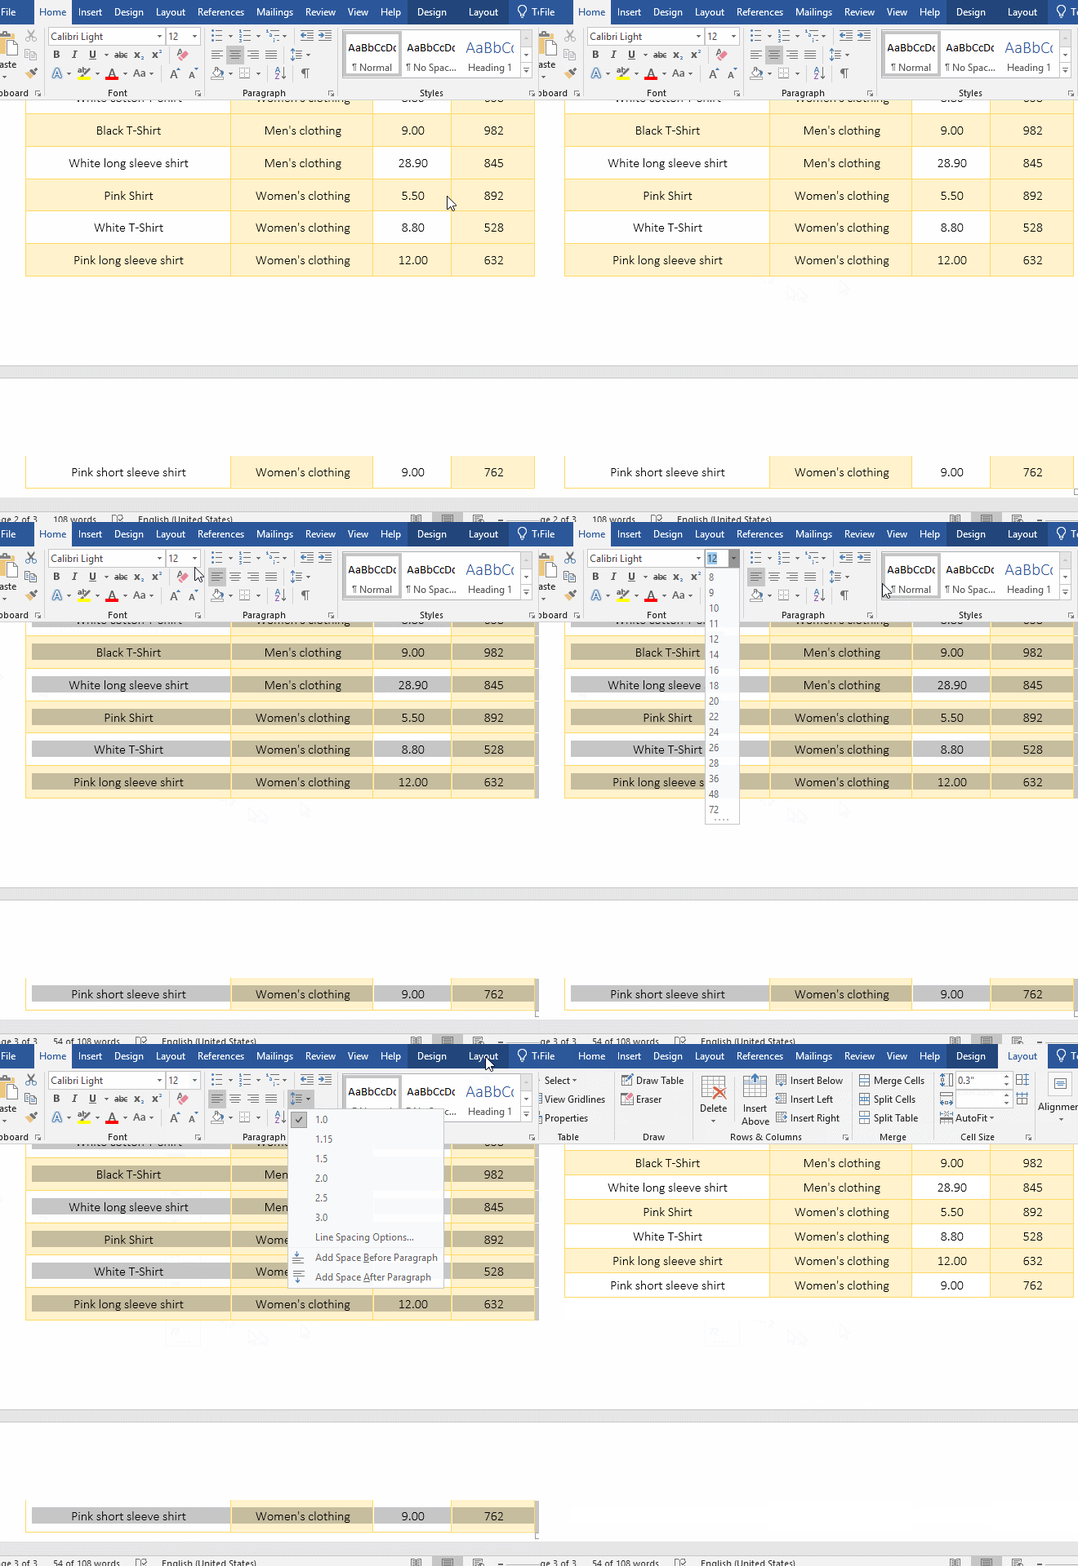
Figure 8
Tip: If the across page is caused by the font size being too large, the method of adjusting row height cannot make the spread part to be retracted to the previous page, and vice versa.
-
Related Reading
- How to add cross symbol and tick mark in Word, with
- Find ProPlusww.msi when opening Office(Word/Excel),
- How to set Header and footer in word(13 examples), i
- How to make a table of contents in word and change,
- How to underline in word, with double, wave,long und
- How to delete a blank page in word(7 examples), incl
- How to start page numbers on page 3 and each section
- How to convert word to excel(3 ways, with keeping co
- How to change line spacing in word, with 1.5, single
- How to solve right click menu in word/excel/powerpoi
- Javascript remove spaces (first and last, between wo
- How to make diagonal header in Word table, with draw
