 Office > Excel > Excel 2019 > Content
How to encrypt excel file and protect sheet, workbook and remove password and unprotect
There are two ways to encrypt excel file, one is to encrypt with the protect workbook, and the other is to use the general options to encrypt. The file can not be edited but can still be viewed after being encrypted with the former, that is, it can be opened in "read only" mode; the file can neither be viewed nor edited after being encrypted with the later, and the security level is relatively high.
In addition to encrypting files, you can encrypt a worksheet or workbook in Excel; in which a worksheet is encrypted, you can also see the encrypted content, but you can't modify it; after encrypting the workbook, you can hide one or more worksheets to be encrypted and only displays after you enter the correct password. In addition, you can modify or delete your password, whether it's a document or a worksheet or workbook.
I, How to encrypt excel file
(I) Encrypt the saved document(Encrypted with "Excel protect workbook")
1. Click the "File" tab, select "Info" on the left, click the "Protect Workbook" icon, select "Encrypt with Password" in the pop-up options, open the "Encrypted Document" dialog box, enter the password, press Enter Or click "OK", enter the same password again, press Enter, the encryption is successful, the prompt message under the "Protect Workbook" on the right side of the icon also changes to "A password required to open this workbook"; the operation steps, such as Figure 1 shows:
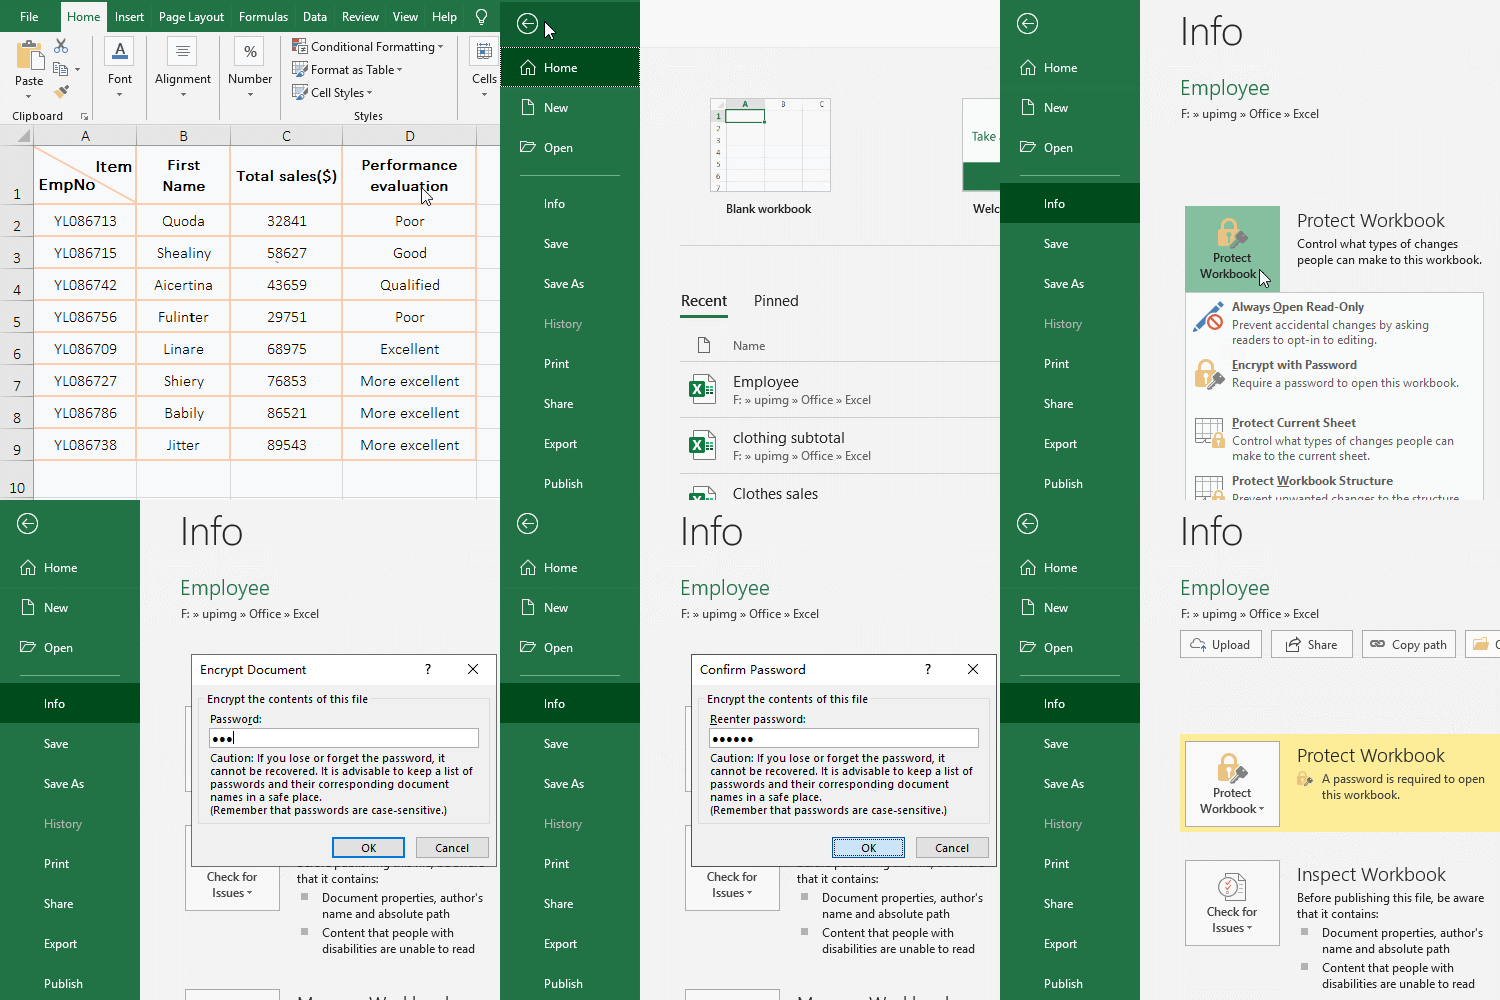
Figure 1
2. Use the shortcut keys Alt + F + I + P + E can also open the "Encrypted Document" dialog box. The key press method is: hold down Alt and press F, I, P and E one by one.
Tip: After the encryption is successful, save it(press Ctrl + S or click the save in the top left corner of the screen), otherwise the encryption will not be successful, and you will not need to enter the password for the next time you open it.
(II) The newly created document is encrypted when it is first saved, and can be set to open the password and change the password(encrypted by "General Options")
1. Press Ctrl + S to switch to the "Save As" page, select "Browse", open the "Save As" dialog box, click the "Disk(D)" on the left,double click the "Excel and doucument" folder respectively, put the "document" folder as the save folder; copy the "Saraly" to the input box to the right of "File name", click "Tools", select "General Options" in the pop-up options, open the "General Options" dialog box;
2. Enter the password to open the document on the right of "Password to open", then enter the password to modify the document on the right of "Password to modify", click "OK" or press "Enter" to open the "Confirm Password" dialog box, enter the password to open the document again, press Enter, then prompt to enter the password to modify document, enter the password again, press Enter", then click "Save", the passwords are set successfully; the operation process steps, see screenshot in Figure 2:
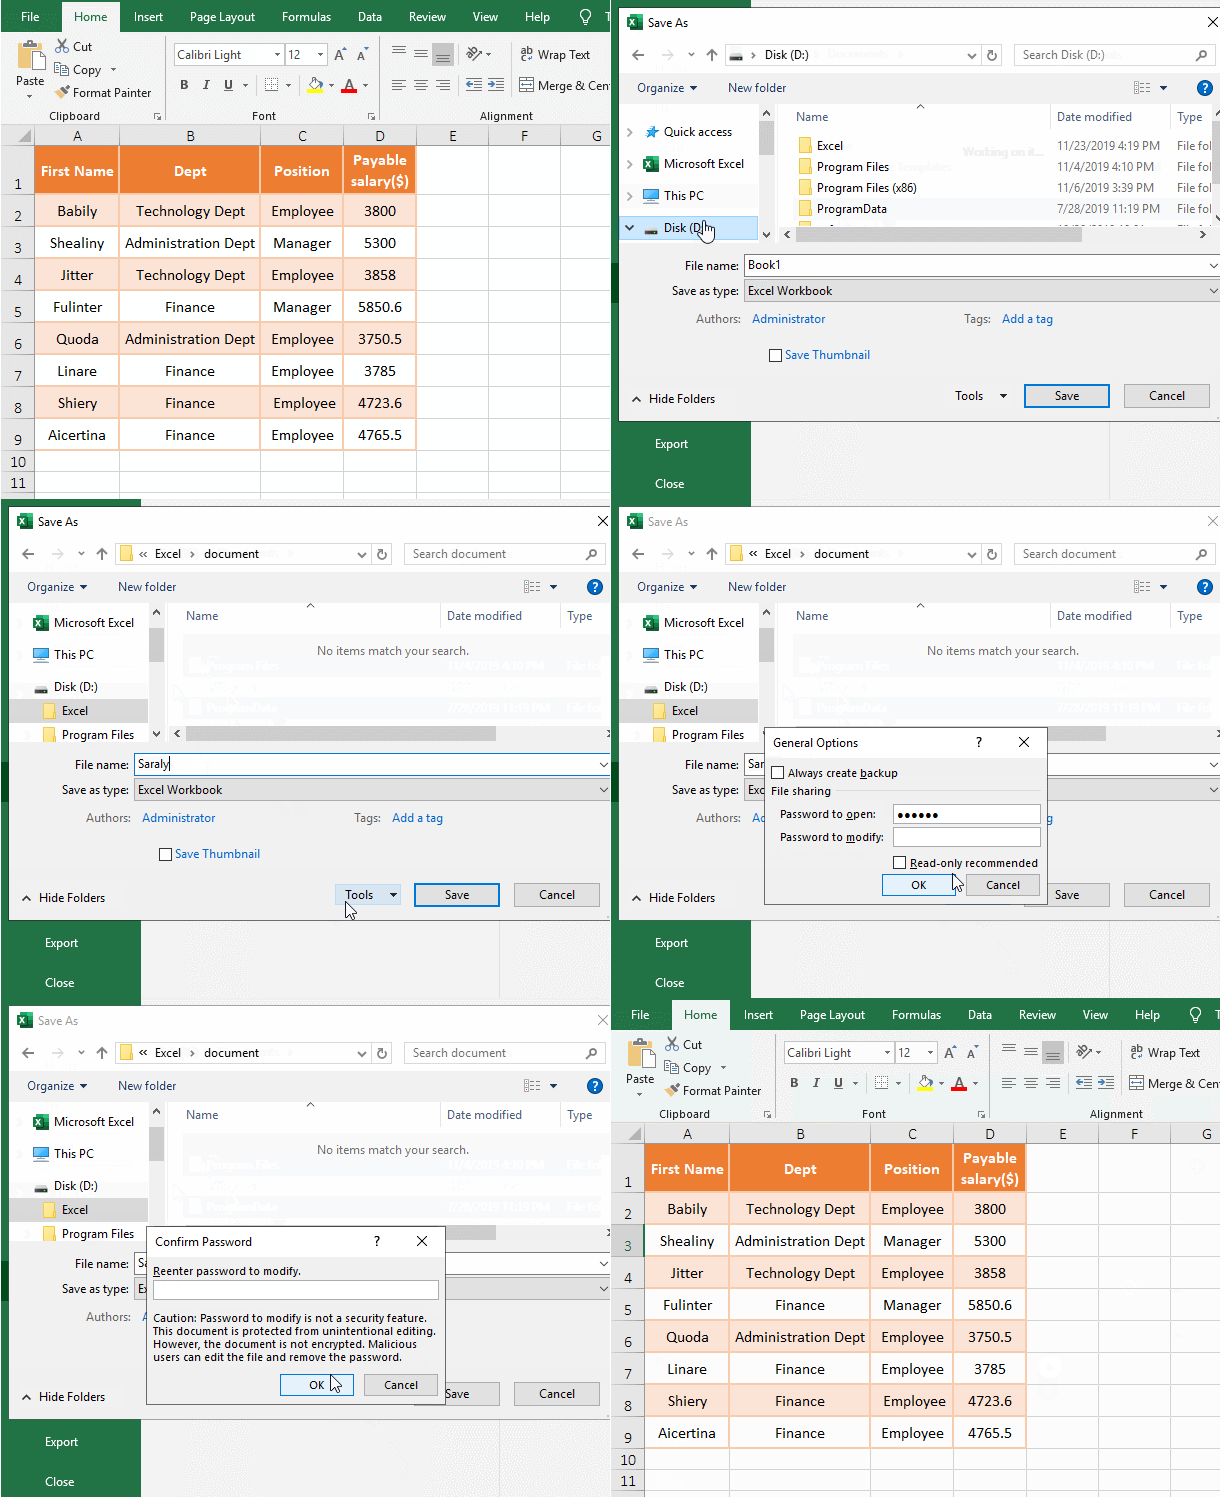
Figure 2
3. "Password to open" and "Password to modify" can be set to the same or different, preferably set to different. "Read-only recommended" means to set the document to "read-only", that is, you can only read and can not edit and modify it. If the document does not need to be modified, you can check it; if you want to modify it after setting it to "read-only", you can right-click the document in the folder where the document is saved, select "Properties" in the pop-up menu, remove the checkmark from "read-only", and click "OK".
4. How to open the document. When you open a document to be encrypted, first enter the "Password to open". If you do not modify it, click "Read Only"; if you want to modify it, enter "Password to modify" and click "OK"; if the document is set to "read only", then just enter "Password to open" can open it directly; To enter "Password to modify", you should cancel "read only".
Tip: You can also set only one password here. To set which password, enter it in the corresponding input box.
(III) Encrypt when save as
1. Hold down Alt, press F and A one time, switch to the "Save As" page, click "Browse", open the "Save As" dialog box, change the file name to "
saraly1", click "Tools", select "General Options" in the pop-up options, enter "Password to open", then enter "Password to modify", press Enter to confirm, enter "Password to open" again, press Enter, and enter "Password to modify" again, press Enter to confirm, then click "OK" to save, save as successful and set the password to open and modify; the operation process steps, as shown in Figure 3:
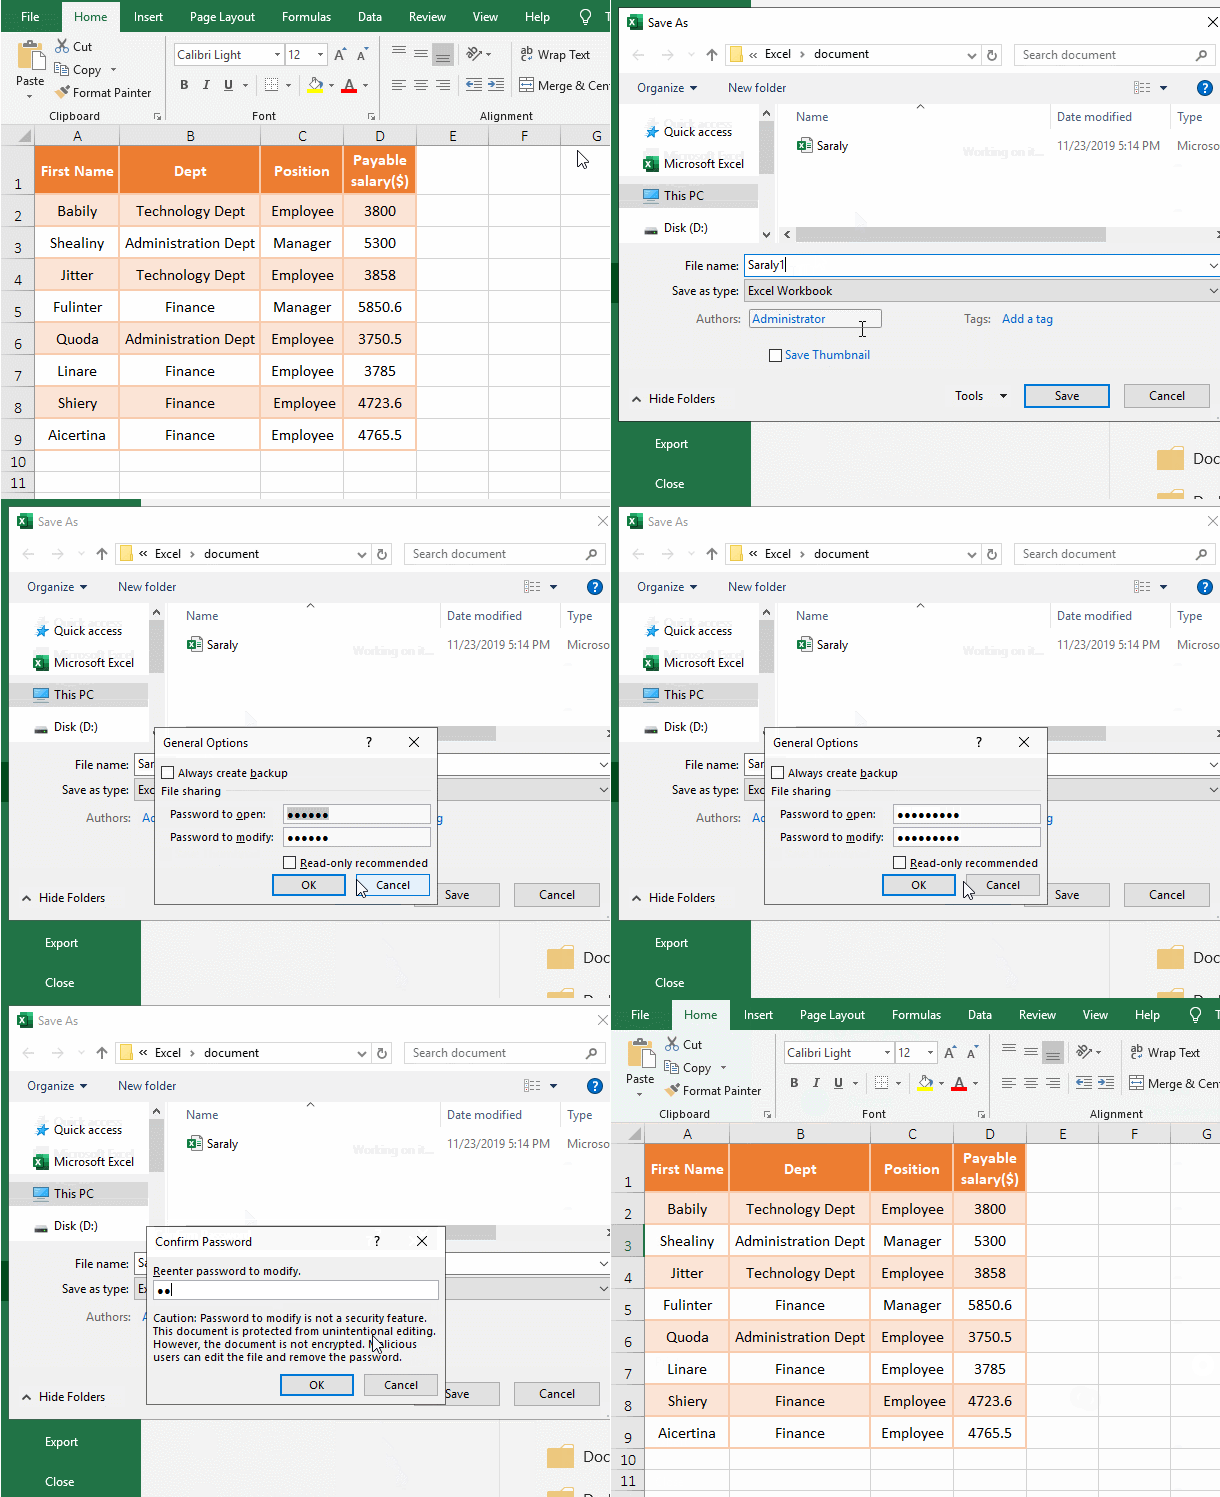
Figure 3
2. This operation only sets the password for the saved file, and the original file does not have a password.
(IV) The difference between the encryption with the "Protect Workbook" and "General Options"
The encryption for the document with the "Protect Workbook" only sets the password to modify, the document can also be opened in read-only mode, that is, the document can be viewed. The encryption for the document with the "General Options" has a higher security level. You need to enter the "Password to open" to open it. If you want to modify it, you also need to enter the "Password to modify". But no matter which encryption method, the security level is not particularly high, it is easy to crack, if it is a particularly important document, you need to use a more secure encryption method.
II, Excel password to modify and remove
(I) Modify and remove with "Protect Workbook"
1. Excel password to modify. Click "File" tab, select "Info" on the left, then click "Protect Workbook" icon, select "Encrypt with Password", open the "Encrypt Document" dialog box, select the original password, enter the new password, click "OK" to confirm, enter again the new password, click "OK" to confirm again, the password is changed successfully; the process steps are as shown in Figure 4:
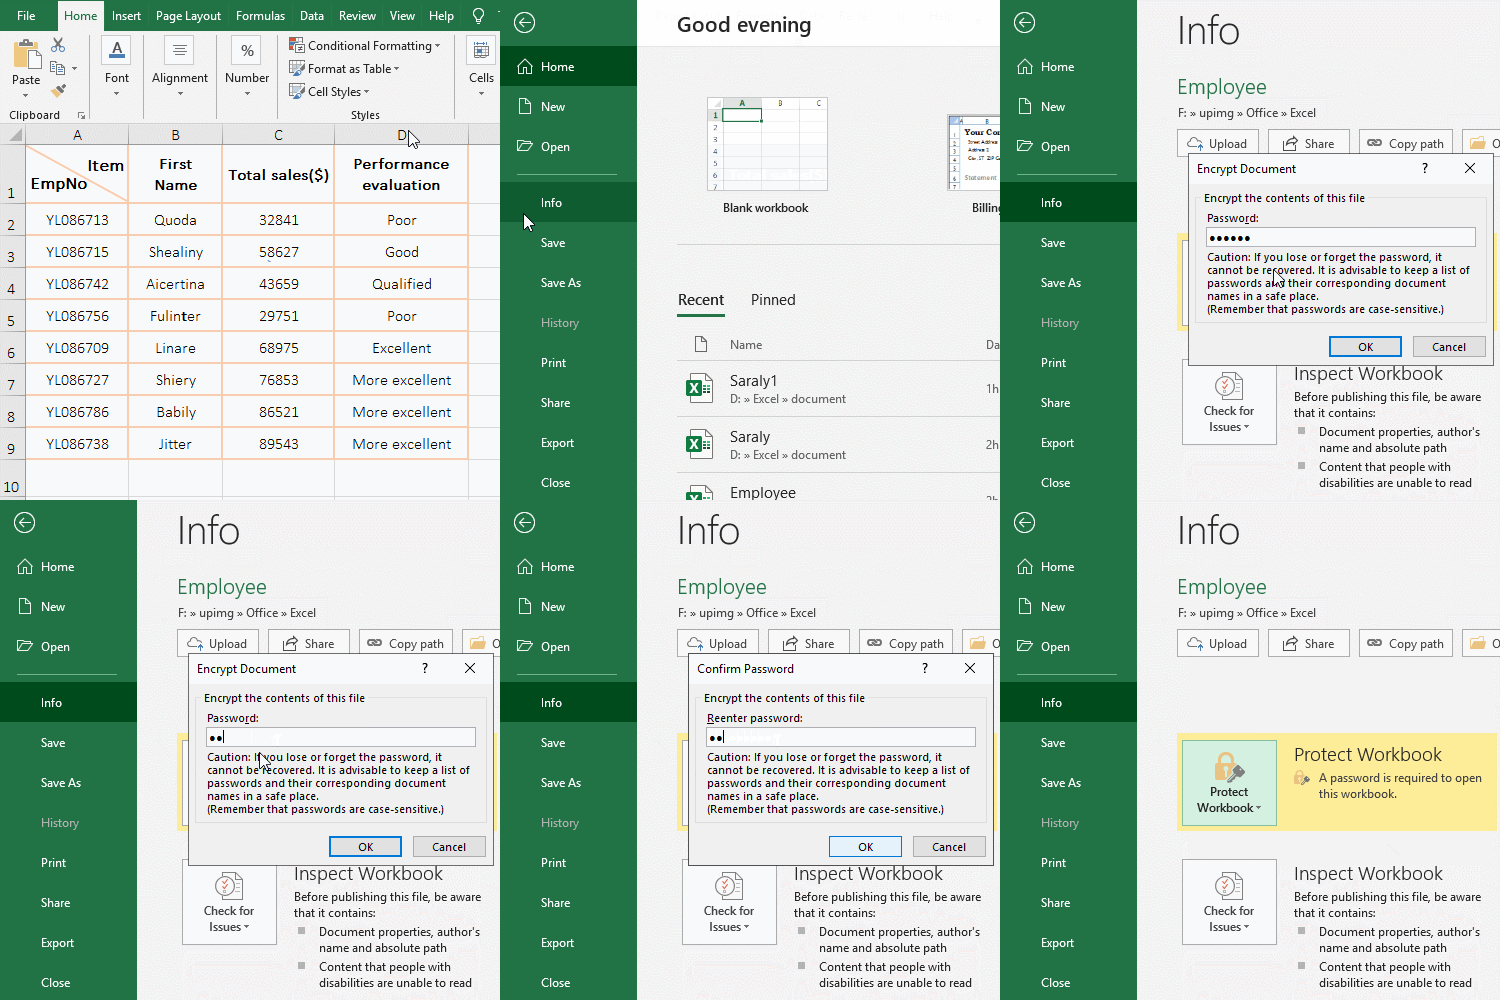
Figure 4
2. Excel password remove. Select "File" tab → Info → Protect Workbook, opens the "Encrypted Document" dialog box, delete the original password, press Enter to confirm, the password is deleted, the prompt under "Protect Workbook" is changed from "A password required to open this workbook" to "Control what types of changes people can make to this workbook", indicating that the password was successfully deleted; the last step is to save; the process steps are as shown in Figure 5:
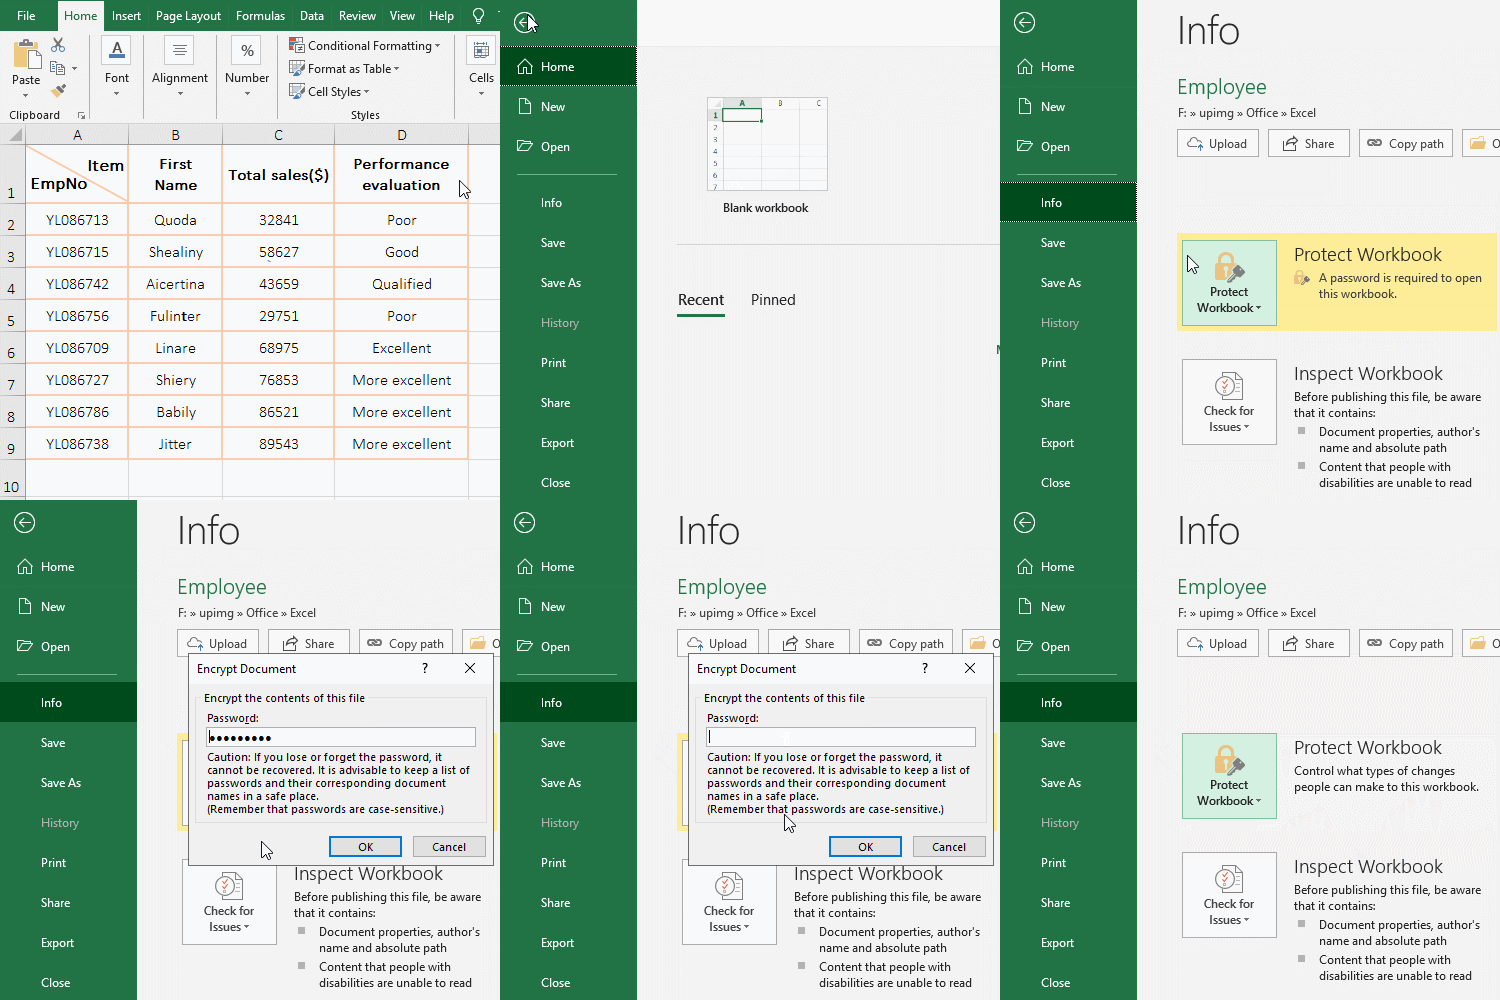
Figure 5
3. Tip: You can only modify or delete the "Password to open" with "Encrypt with password" under "Protect Workbook". You cannot modify or delete "Password to Modify".
(II) Modify and delete with "General Options"
1. Excel password to modify. Hold down Alt, press F and A respectively, go to the "Save As" page, select "Browse", open the "Save As" dialog box; click "Tools", select "General Options" in the pop-up options, open the "General Options" dialog box; all the characters in the input box on the right are selected, enter the new password for "Password to open", press the Tab key, enter the new password for "Password to modify", press Enter to confirm, enter "Password to open" again, press Enter to donfirm, enter "Password to modify" again, press Enter to confirm, click "OK" to save, pop up "whether to replace the original file" dialog box, click "Yes", the password is changed successfully; the operation process steps, see screenshot in Figure 6:
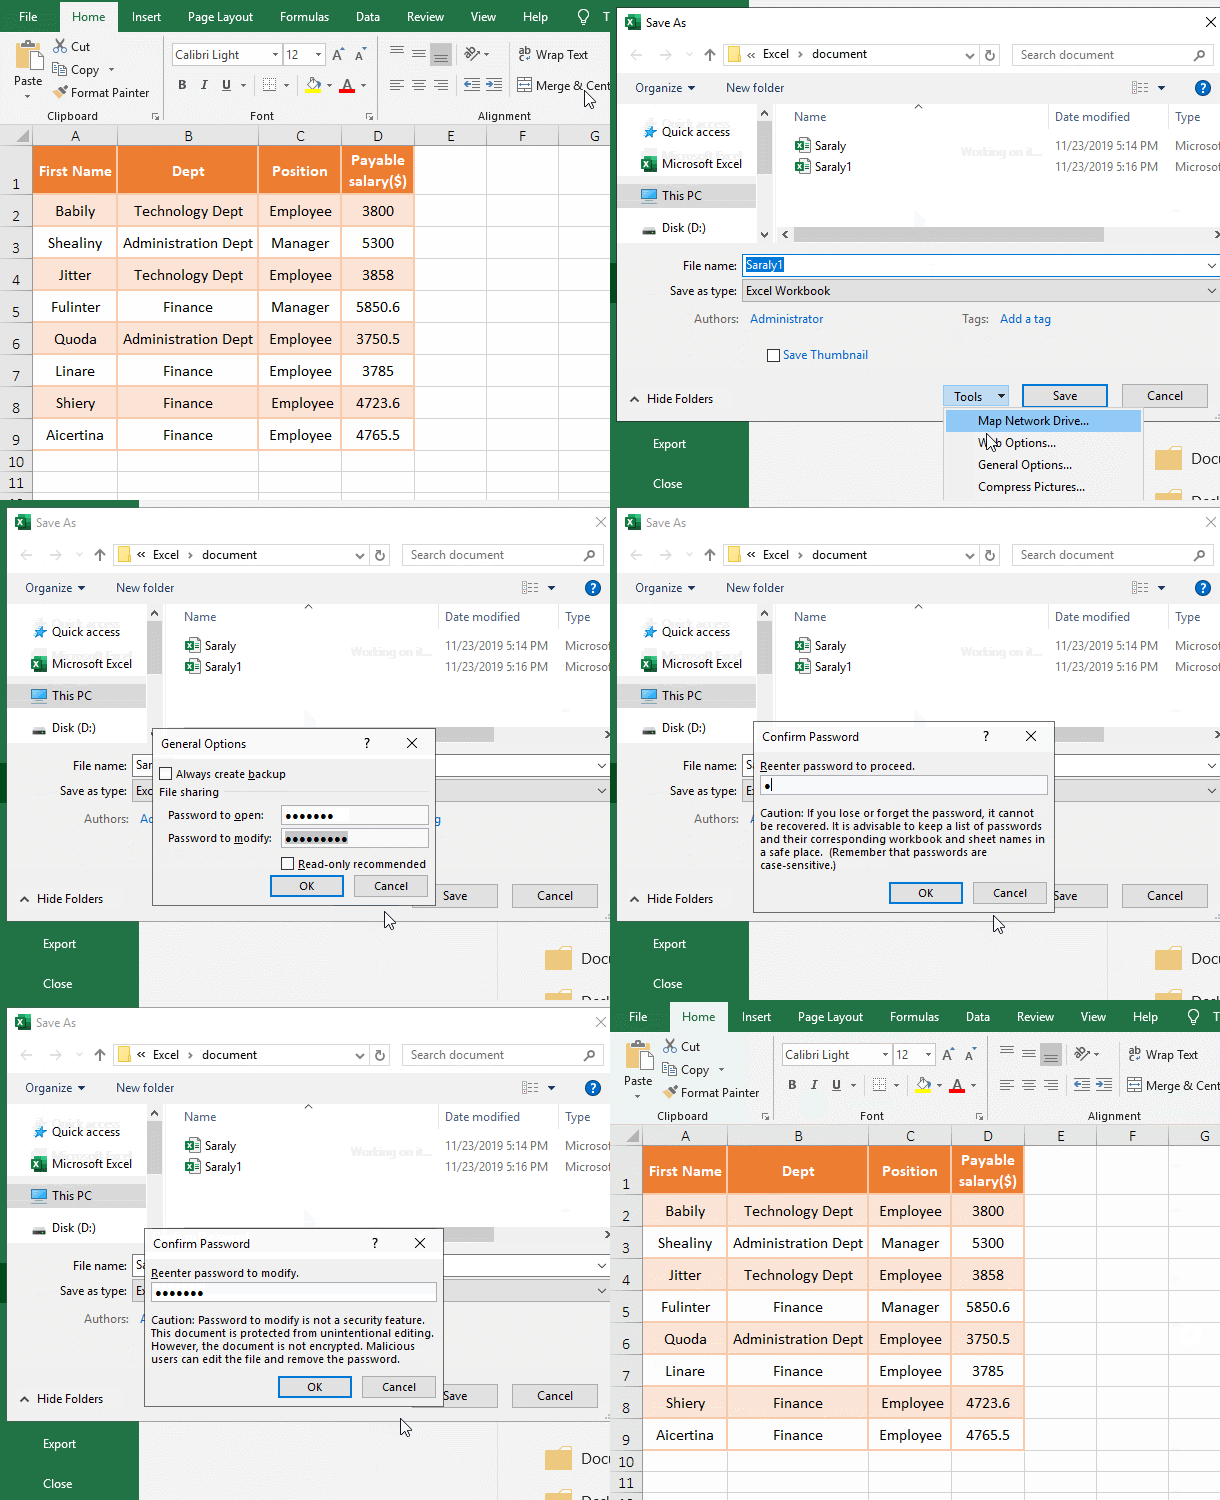
Figure 6
2. Excel file password remover. Hold down Alt, press F, A and O respectively, open the "Save As" dialog box; click "Tools", select "General Options" in the pop-up menu, open the "General Options" dialog box; press Delete on the keyboard, press Tab key, press Delete again, press Enter twice, pop up "Saraly1.xlsx already exists. Do you want replace it?" dialog box, click "Yes", the passwords are removed. See screenshot in Figure 7:
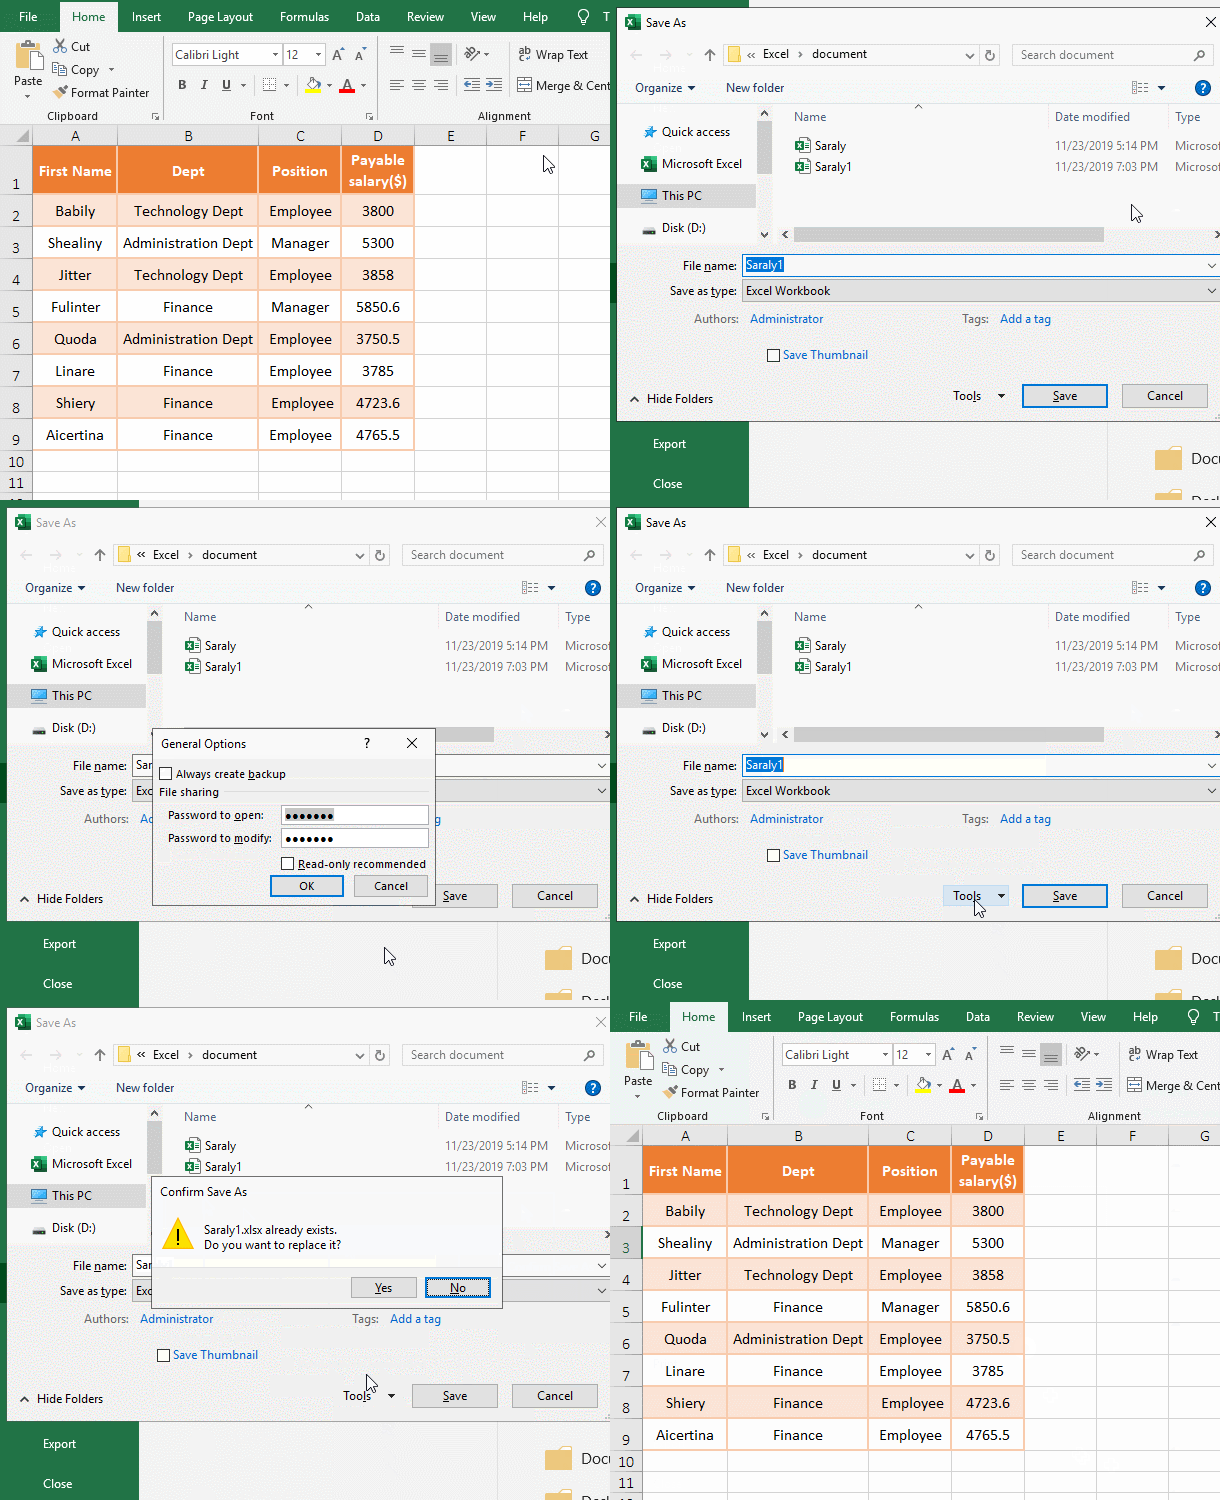
Figure 7
III, Excel Protect Sheet and Workbook
(I) Excel Protect Sheet(You can read after protection, but can not modify)
1. If you want to Protect the worksheet "employee". Select the "Review" tab, click "Protect Sheet", open the "Protect Sheet" dialog box, do not check any options, do not allow others to make any changes, enter the password, press Enter to confirm, enter the password again, and then press Enter to confirm again, the protection worksheet is successful, and the "Protect Sheet" also becomes "Unprotect Sheet". Double-click any cell to pop up a small dialog box prompting "The cell or chart you're trying to change is on a protected sheet. To make a change, unprotect the sheet. You might be requested to enter a password." Click "OK" to close it; the process steps are as shown in Figure 8:
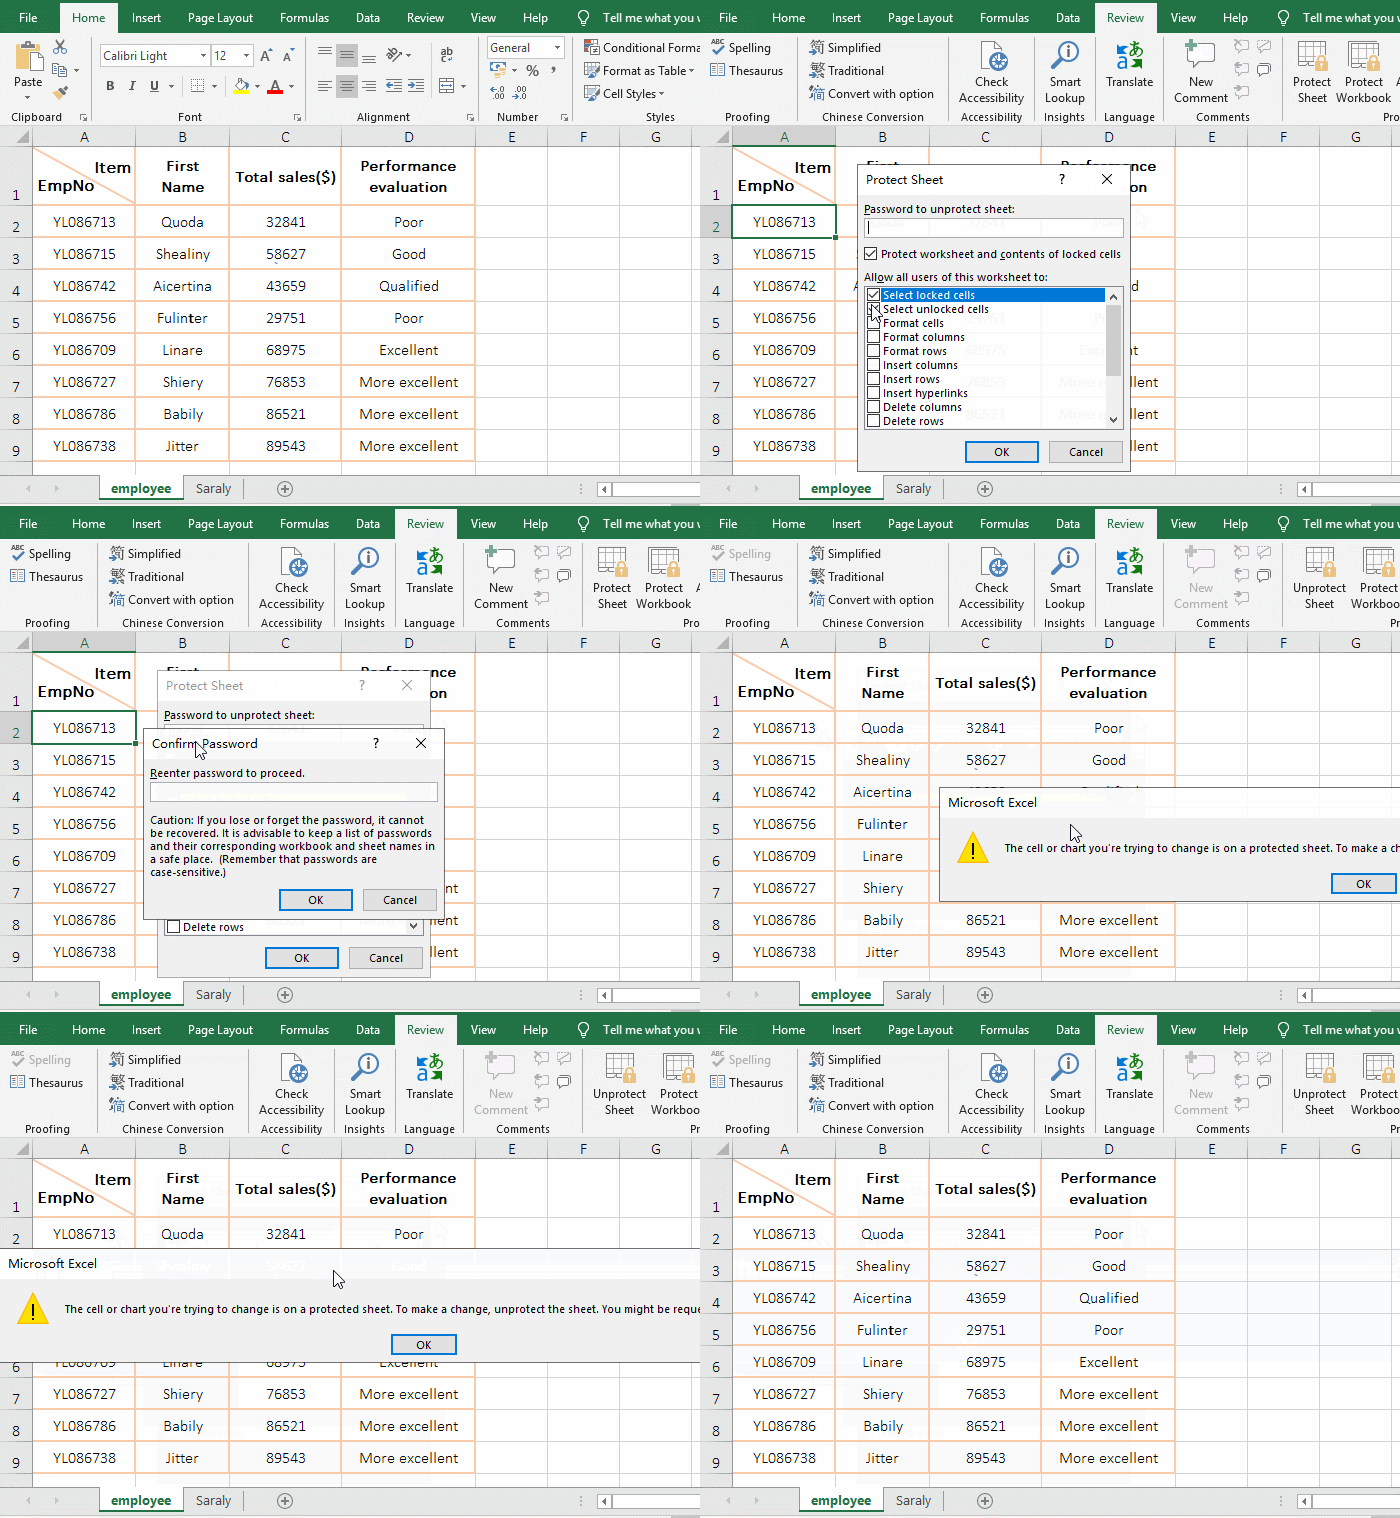
Figure 8
2. So the protect sheet can not be edited, but you can also see the contents, if you are not allowed to see the content, but also hide the worksheet, specifically look at the following protect workbook.
(II) Excel Protect Workbook(Cannot be seen or modified after protection)
1. If you want to protect two worksheets in the Workbook at a time(you can also protect one worksheet at a time). The current sheet is "Salary", hold down Shift, click "Protect" to select two sheets, right click them, select "Hide" in the pop-up menu, hide the two selected sheets, click "Protect Workbook", open the "Protect Structure and Windows" dialog box, check "Structure", enter the password, press Enter to confirm, enter the same password again, press Enter to confirm again, right click on the worksheet "employee", "Unhide" is grayed out and is not optional, indicating that the protection is set successfully; the operation process steps are as shown in Figure 9:
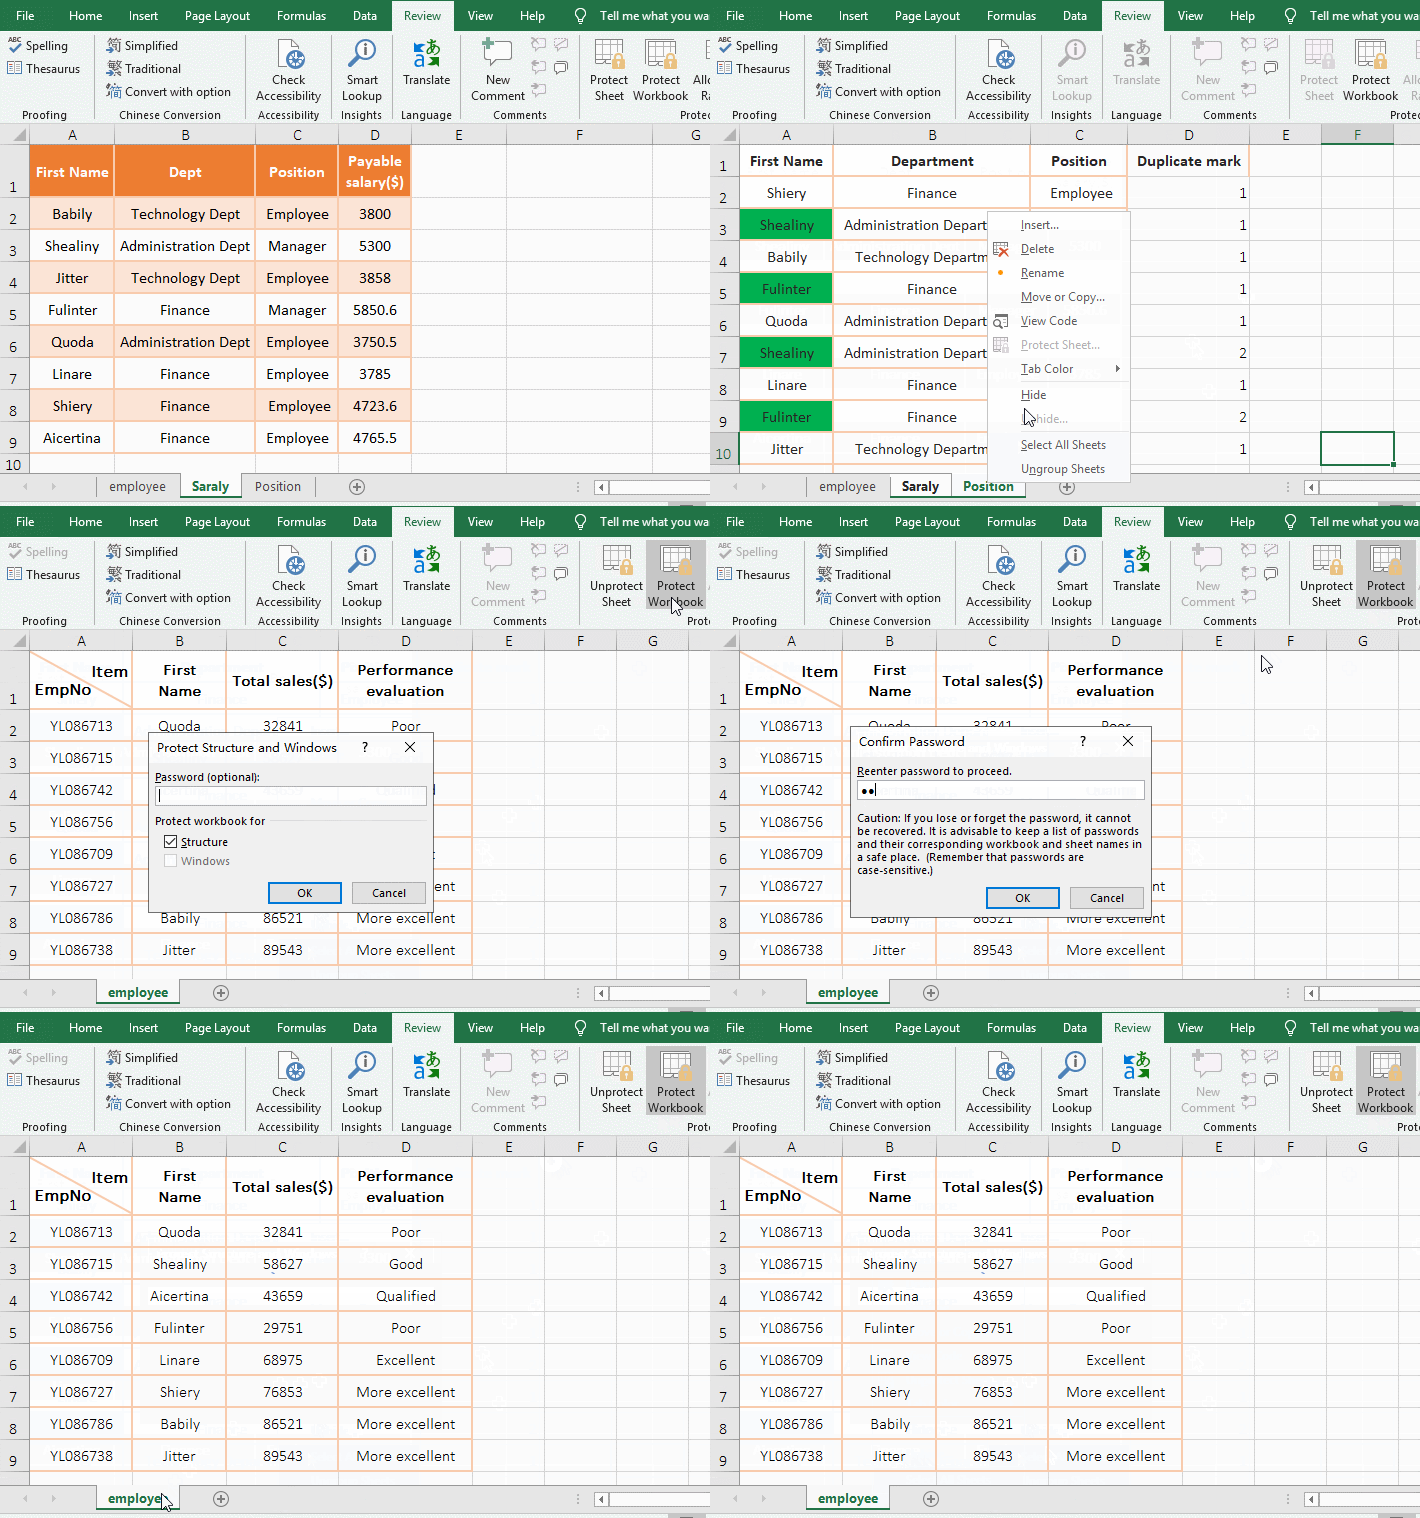
Figure 9
Tip: The two protected methods above can only be used in Excel2007 or above. Excel2003 does not have these two functions. If you protect Excel2003 worksheet or workbook, you can use VBAProject project properties, see below.
IV, How to unprotect excel sheet and workbook
(I) How to unprotect excel sheet
Select the "Review" tab, click "Unprotect Sheet", open the"Unprotect Sheet" dialog box, enter the password, press Enter, the sheet to be protected is revoked, the operation process steps, see screenshot in Figure 10:
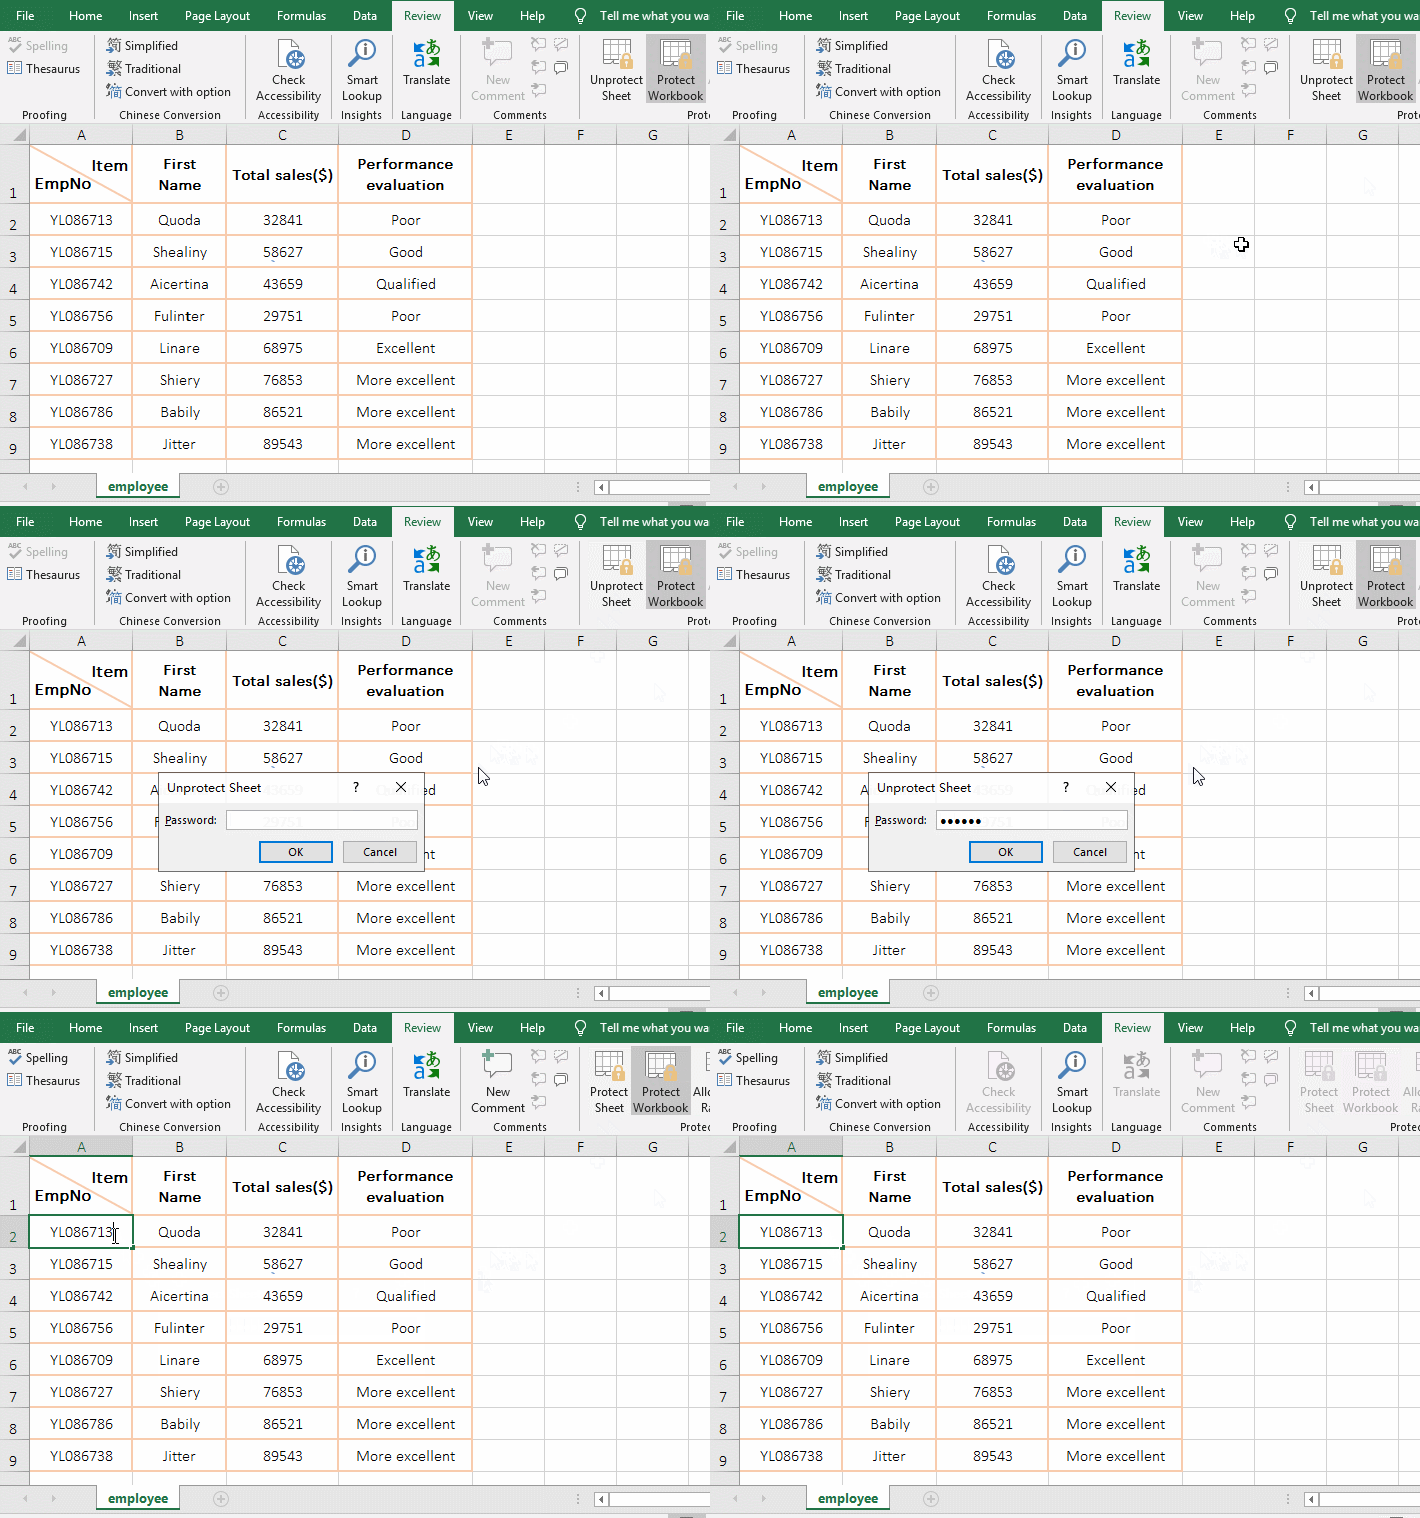
Figure 10
(II) How to unprotect excel workbook
Click "Protect Workbook", open the "Unprotect Workbook" dialog box, enter the password, press Enter, right click on the sheet "employee", select "Unhide", open the "Unhide" dialog box, there are "Saraly and Position" two sheets, but only one can be selected at a time, select "Saraly", click "OK", the sheet "Saraly" is shown, the same method shows the sheet "Position"; the operation process steps are as shown in Figure 11:
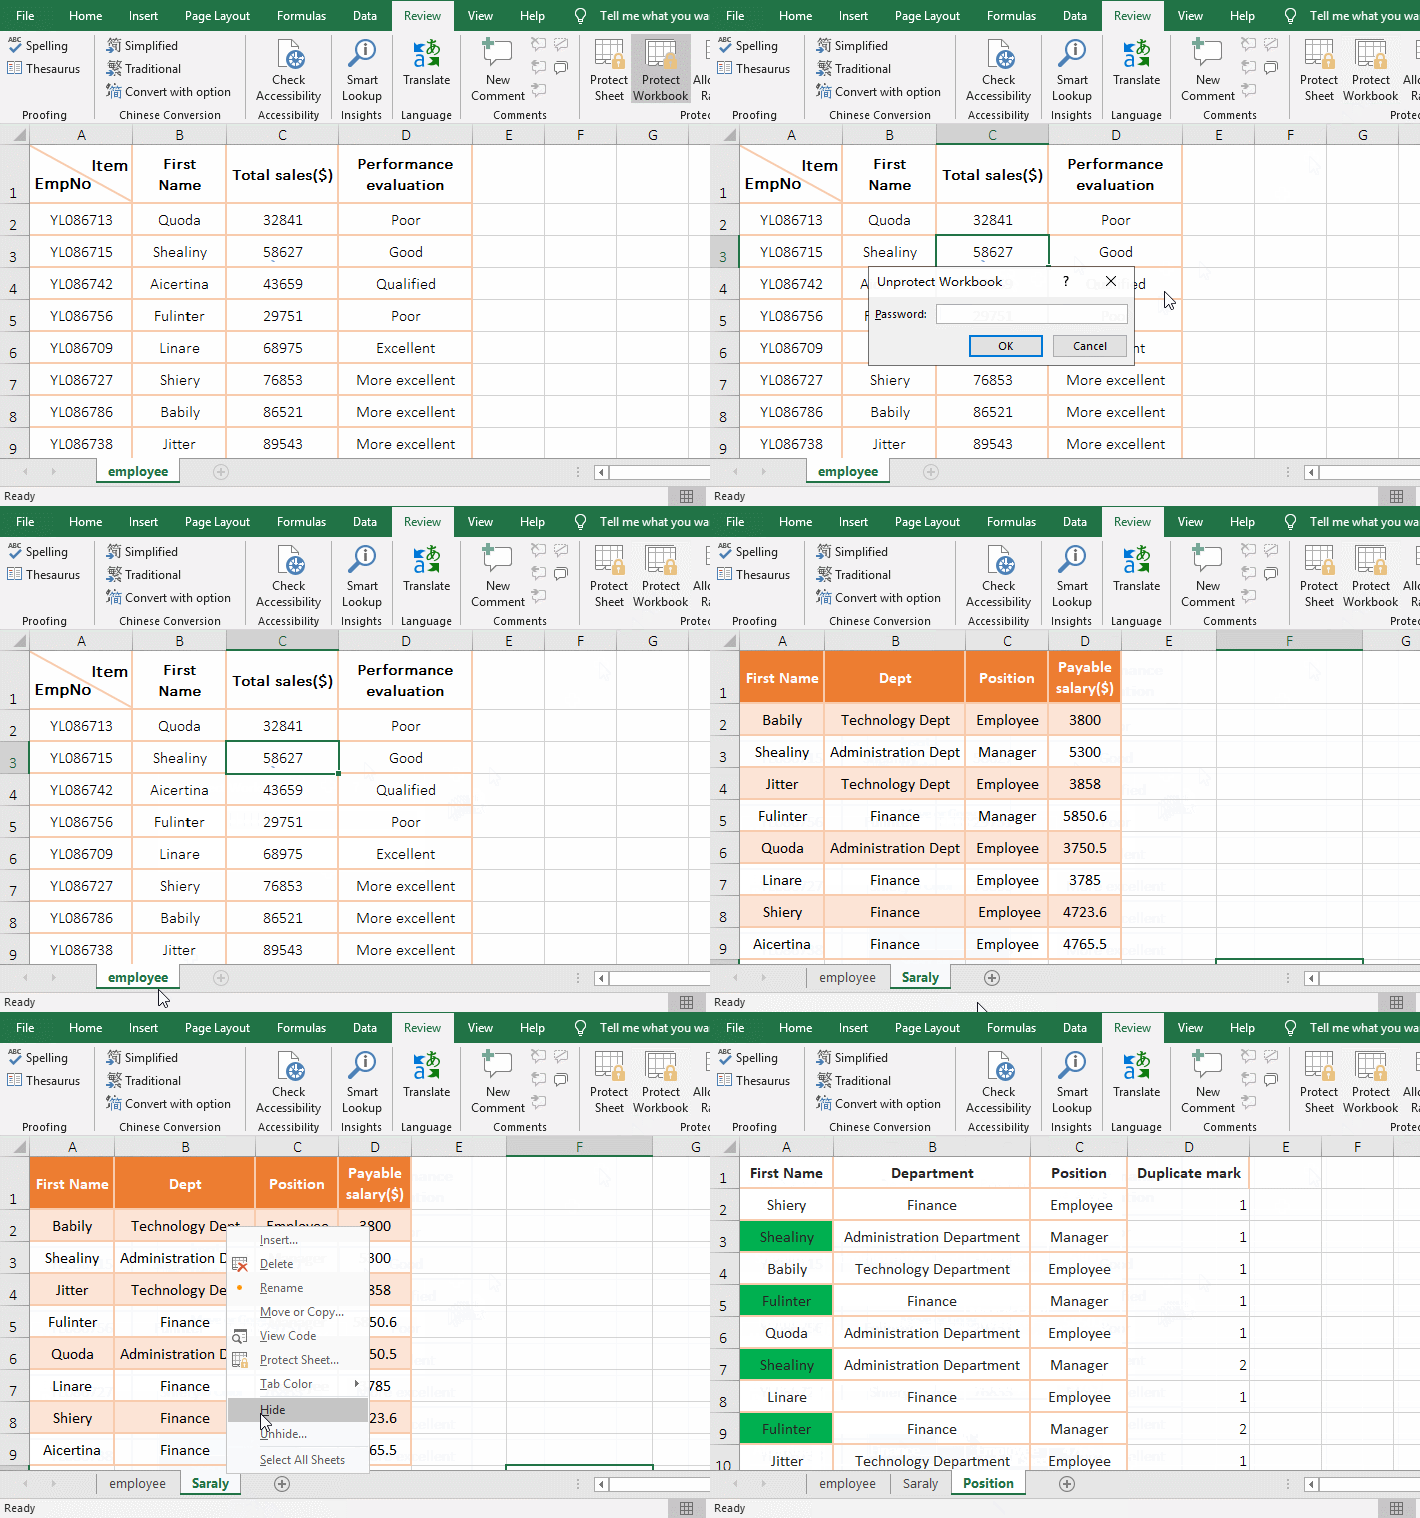
Figure 11
V, Excel vba protect sheet with VBAProject Properties and VBA code
(I) Excel vba password protect sheet
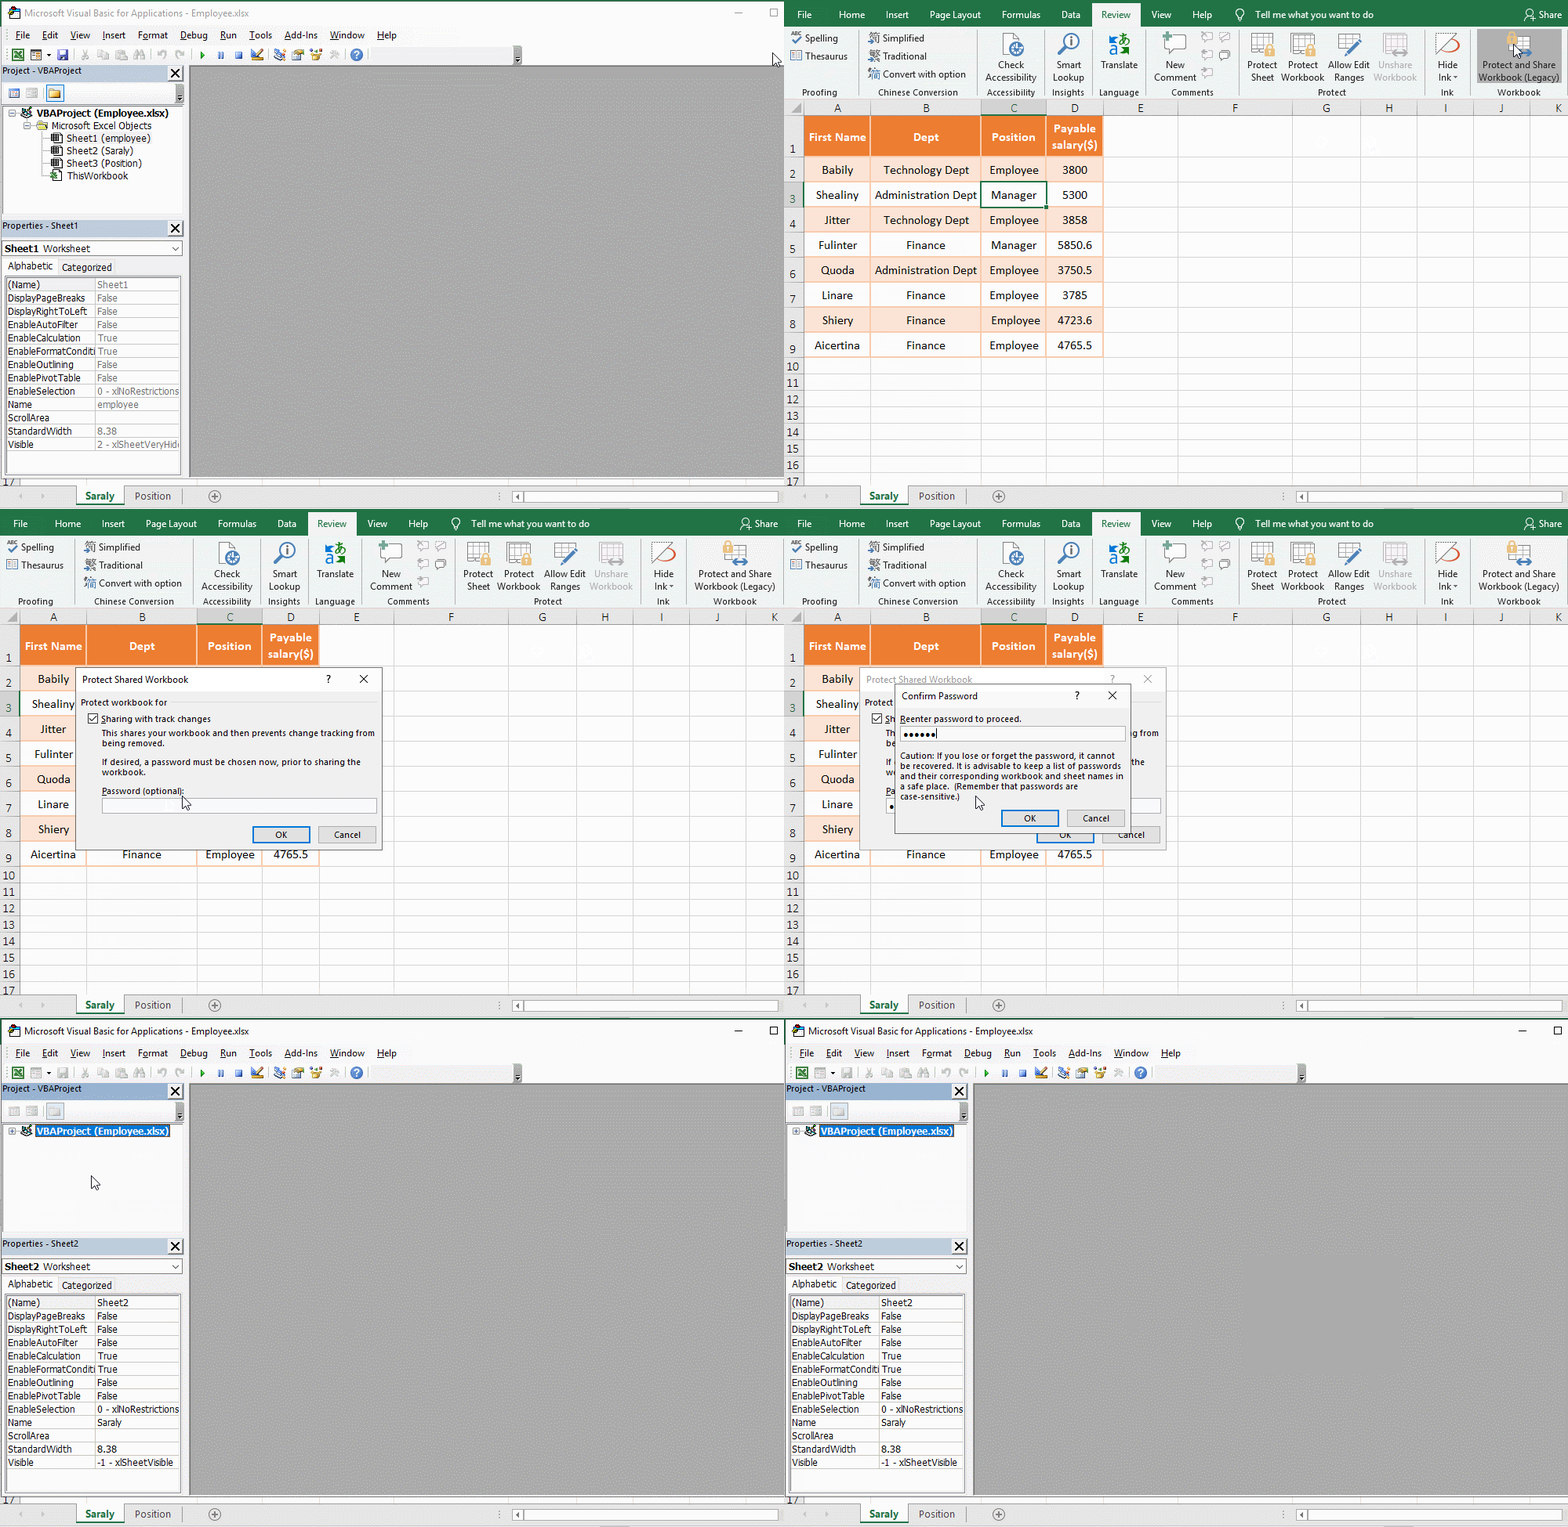
1. In the Excel window, press the shortcut keys Alt + F11 to open the VBA window. Select "Sheet1" by default on the left side, click the input box to the right of the property "Visible", select "2 - xlsheetveryhidden" in the pop-up options, and the "Sheet1" is hidden; right click "Sheet1", select "VBAProject Properties" in the pop-up menu, open the "VBAProject - Project Properties" dialog box, select the "Protection" tab, check "Lock project for viewing", enter the same password twice, press Enter to confirm "; the operation process steps are as shown in Figure 12:
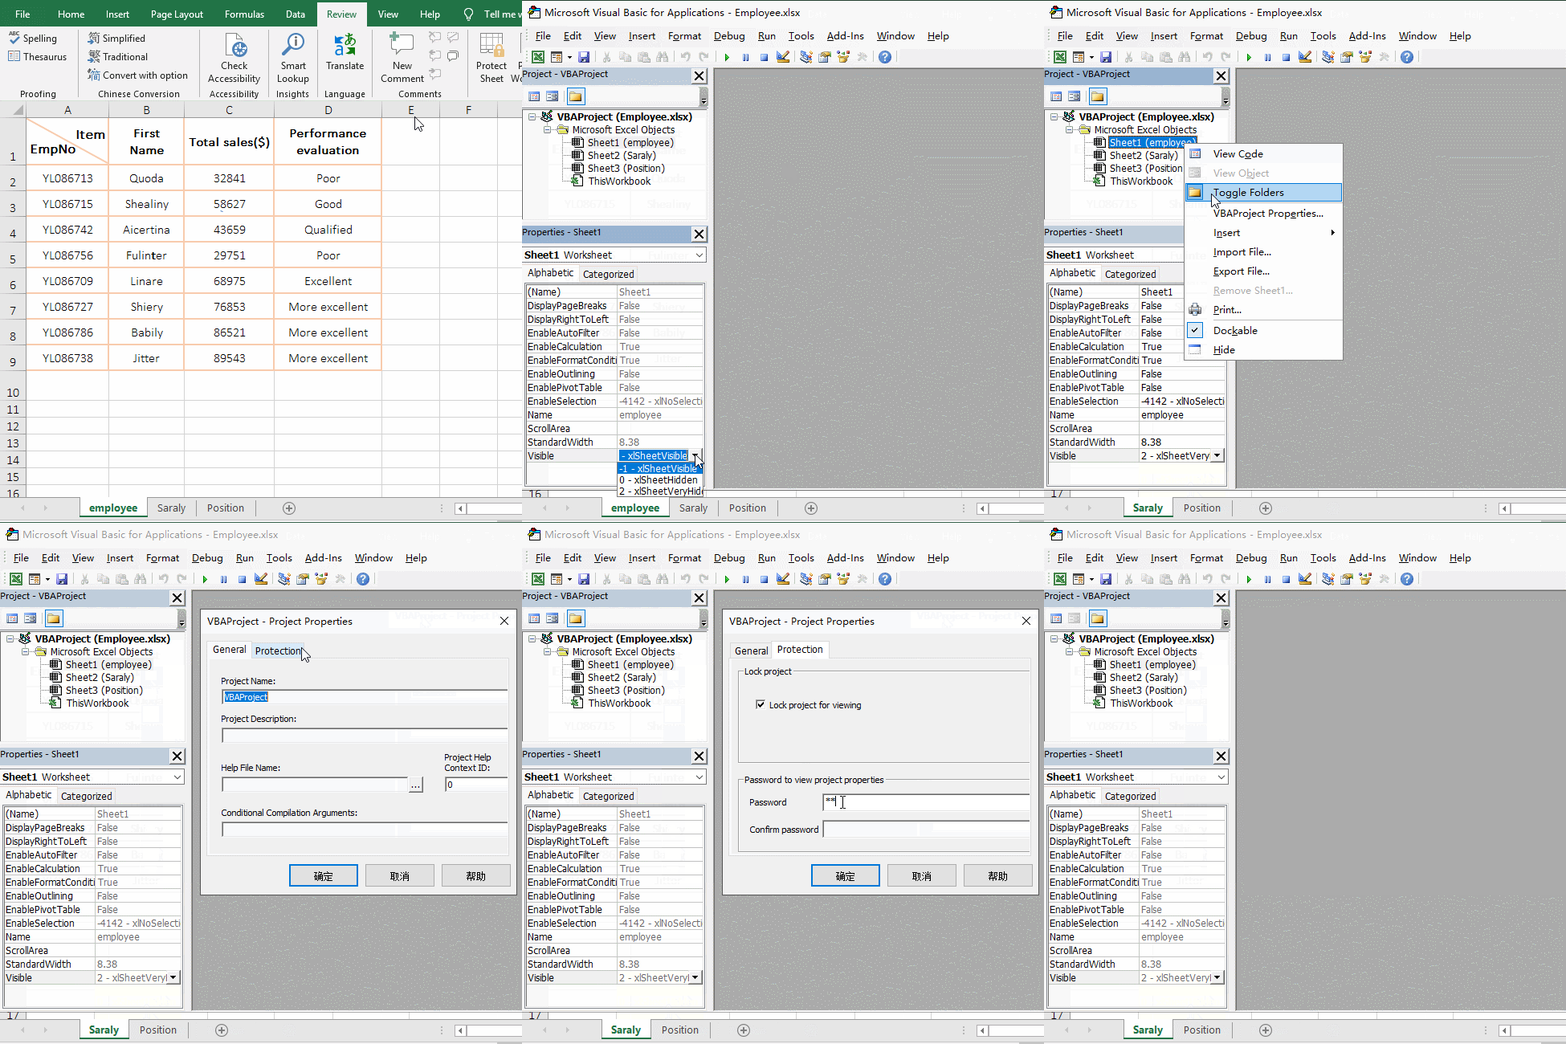
Figure 12
2. Press Alt + F11 again to switch to the Excel window, select the "Review" tab, click "Protect and Share Workbook", open the "Protect Shared Workbook" dialog box, check "Sharing with track changes", enter the same password as before(or enter a different password), press Enter, enter the password you just entered, press Enter again, press Enter to select "OK" in the pop-up inquiry dialog box; press Alt + F11 again to switch to the VAB window, Click the plus sign(+) to the left of VBAProject, prompting "Project is unviewable", indicating that the setting is successful, and finally saving the document; the operation process steps are as shown in Figure 13:
Figure 13
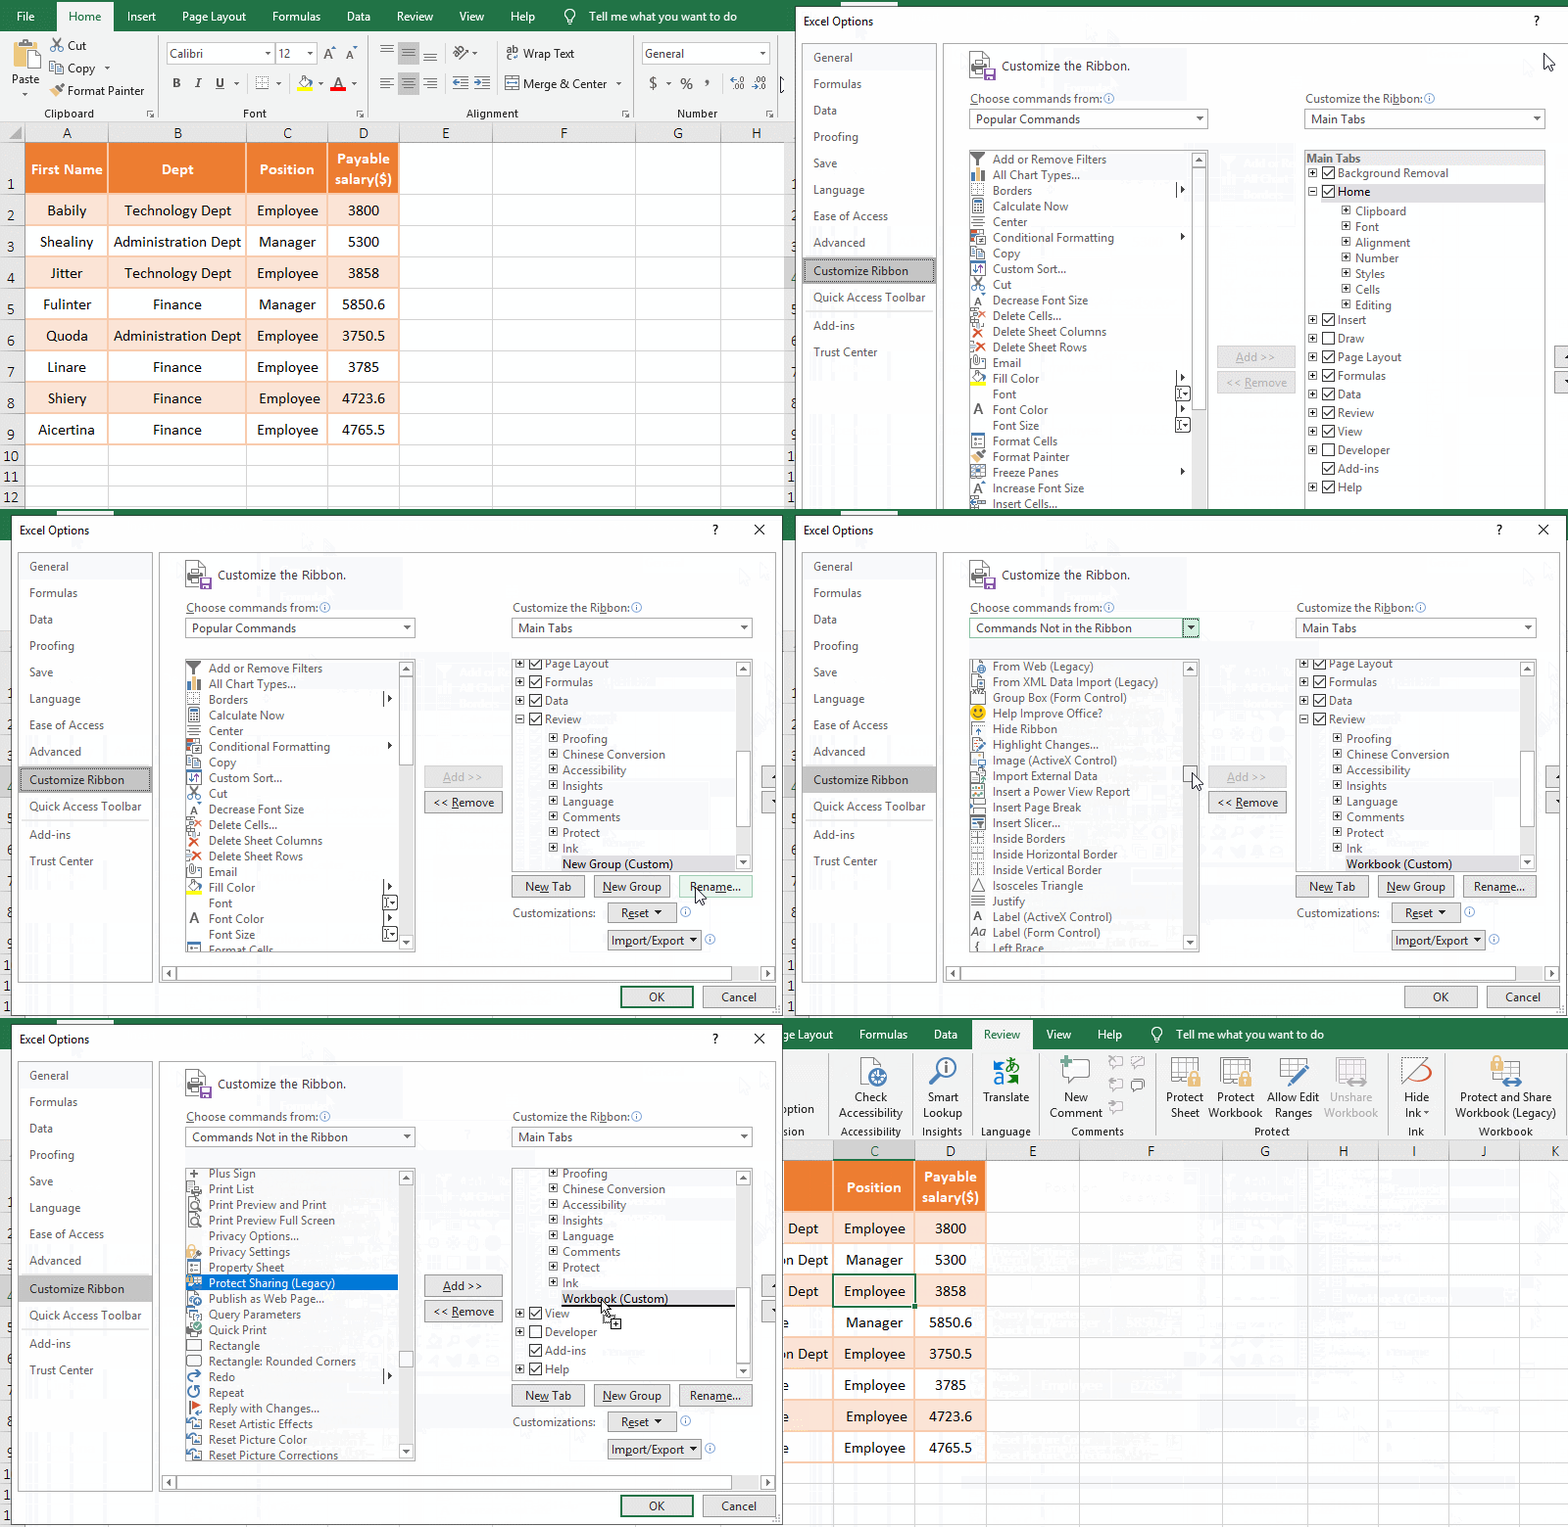
Tip: If it is Excel 2019, there is no "Protect and Share Workbook" in the "Protect" group of the "Review" tab, you need to add it, the method: Right any blank space in the ribbon, select "Customize the Ribbon" to open the "Excel Options" dialog box and automacically select "Customize Ribbon"; right click the "Review" on the right side of the dialog box, select "Add New Group" in the pop-up menu, create a new group; right click the "New Group", select "Rename" in the pop-up menu, open the "Rename" dialog box, enter "Workbook", click "OK"; click the drop-down list box below "Choose commands from", select "Commands Not in the Ribbon", find "Protect Share(Legacy)" in the list box, drag it to the new group "Workbook", click "OK", then "Protect Share" is added to "Review" and is placed to the right of the ribbon. See screenshot in Figure 14:
Figure 14
(II) Modify and cancel protect(How to unshare excel workbook)
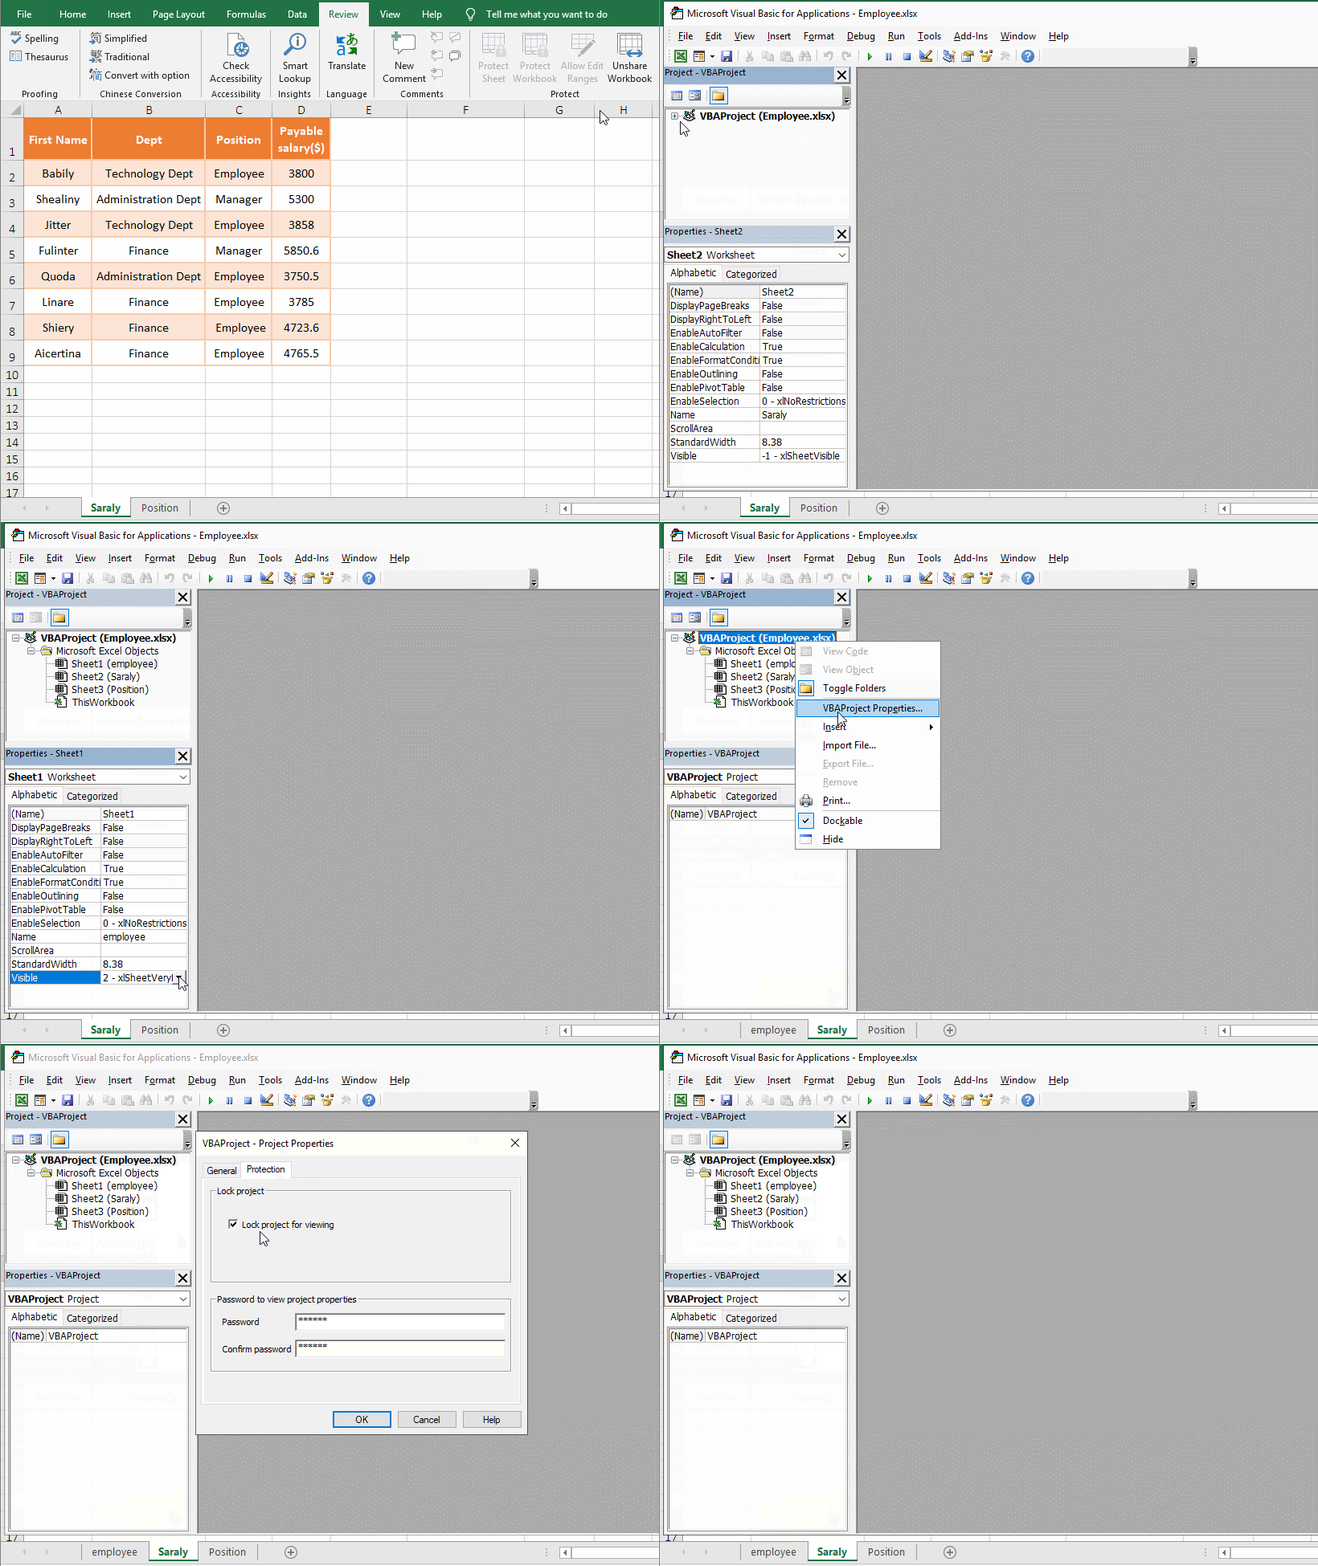
1. In the Excel window, select the "Review" tab, click "Unshare Workbook", press Alt + F11 to switch to the VBA window, click the plus sign(+) to the left of the "VBAProject" to expand, select "Sheet1", then click the drop-down list icon in the input box to the right of the "Visible", select "-1 - xlSheetVisible";
2. Right-click "Sheet1", select "VBAProject Properties" in the pop-up options, open the "VBAProject - Project Properties" dialog box, select the "Protect" tab, uncheck "Lock project for viewing", delete the password, press Enter to select "OK", the protection is canceled, switch to the Excel window, and Sheet1 has been displayed; the operation steps are as shown in Figure 15:
Figure 15
Tip: If you want to change the password, select the old password and enter the new password, just like when protecting.
-
Related Reading
- How to move rows,columns,cells,table in excel(there
- How to use Excel rank function(11 examples, with Ran
- Combine multiple excel sheets into one pivot table w
- How to create a pivot table in excel(15 examples, wi
- Excel pivot table percentage of grand total(parent r
- How to make a table of contents in word and change,
- How to convert excel to pdf(6 examples, with selecti
- How to calculate average in excel, with quickly find
- How to make an excel spreadsheet, with the top 10 kn
- How to generate multiple reports from one pivot tabl
- How to merge cells in excel(three ways to combine, w
- How to split cells in excel, with unmerge cells and
