 Office > Excel > Excel 2019 > Content
How to convert excel to pdf(6 examples, with selections in multiple worksheets,table and blank page)
How to change excel to pdf? You can convert a worksheet to a Pdf and convert all the worksheets in a workbook to Pdf in excel. If there are multiple pages in the worksheet, you can convert all the pages or only convert some pages into Pdf. If you only need to convert some parts of the worksheet to Pdf, just select the content to be converted, and select "Selection" under "Publish what" in the "Option" dialog, it is also possible to convert all the selected items in multiple worksheets to Pdf at one time.
The "table" is grayed out in the convert excel to pdf option by default, because the content to be converted is not a table, because Excel defaults to the range, only the range is converted to a table or create a table, "table" is optional. To convert a range to a table, simply apply the style of table. In addition, if a blank page appears after the Pdf is converted, the print range needs to be ignored. The following is 6 examples which how to change excel to pdf.
I, How to convert excel to Pdf: only one worksheet
(I) Convert all pages to Pdf
1. If there is a excel spreadsheet in which there are 3 pages to be converted to Pdf. Click the "File" tab, select "Export" on the left, switch to the "Export" dialog box, select "Create PDF/XPS Document" → Create PDF/XPS, open the "Publish as PDF or XPS" dialog, click the "Office" in the path, then double-click the folder "pdf", save the published file to this folder, the other keep the default settings, click "Publish", then start publishing, the length of time depends on the size of the excel document, due to the currently published document has only 3 pages, so it will be released and automatically opened with the software of Pdf reader(such as google chrome); the process steps are as shown in Figure 1:
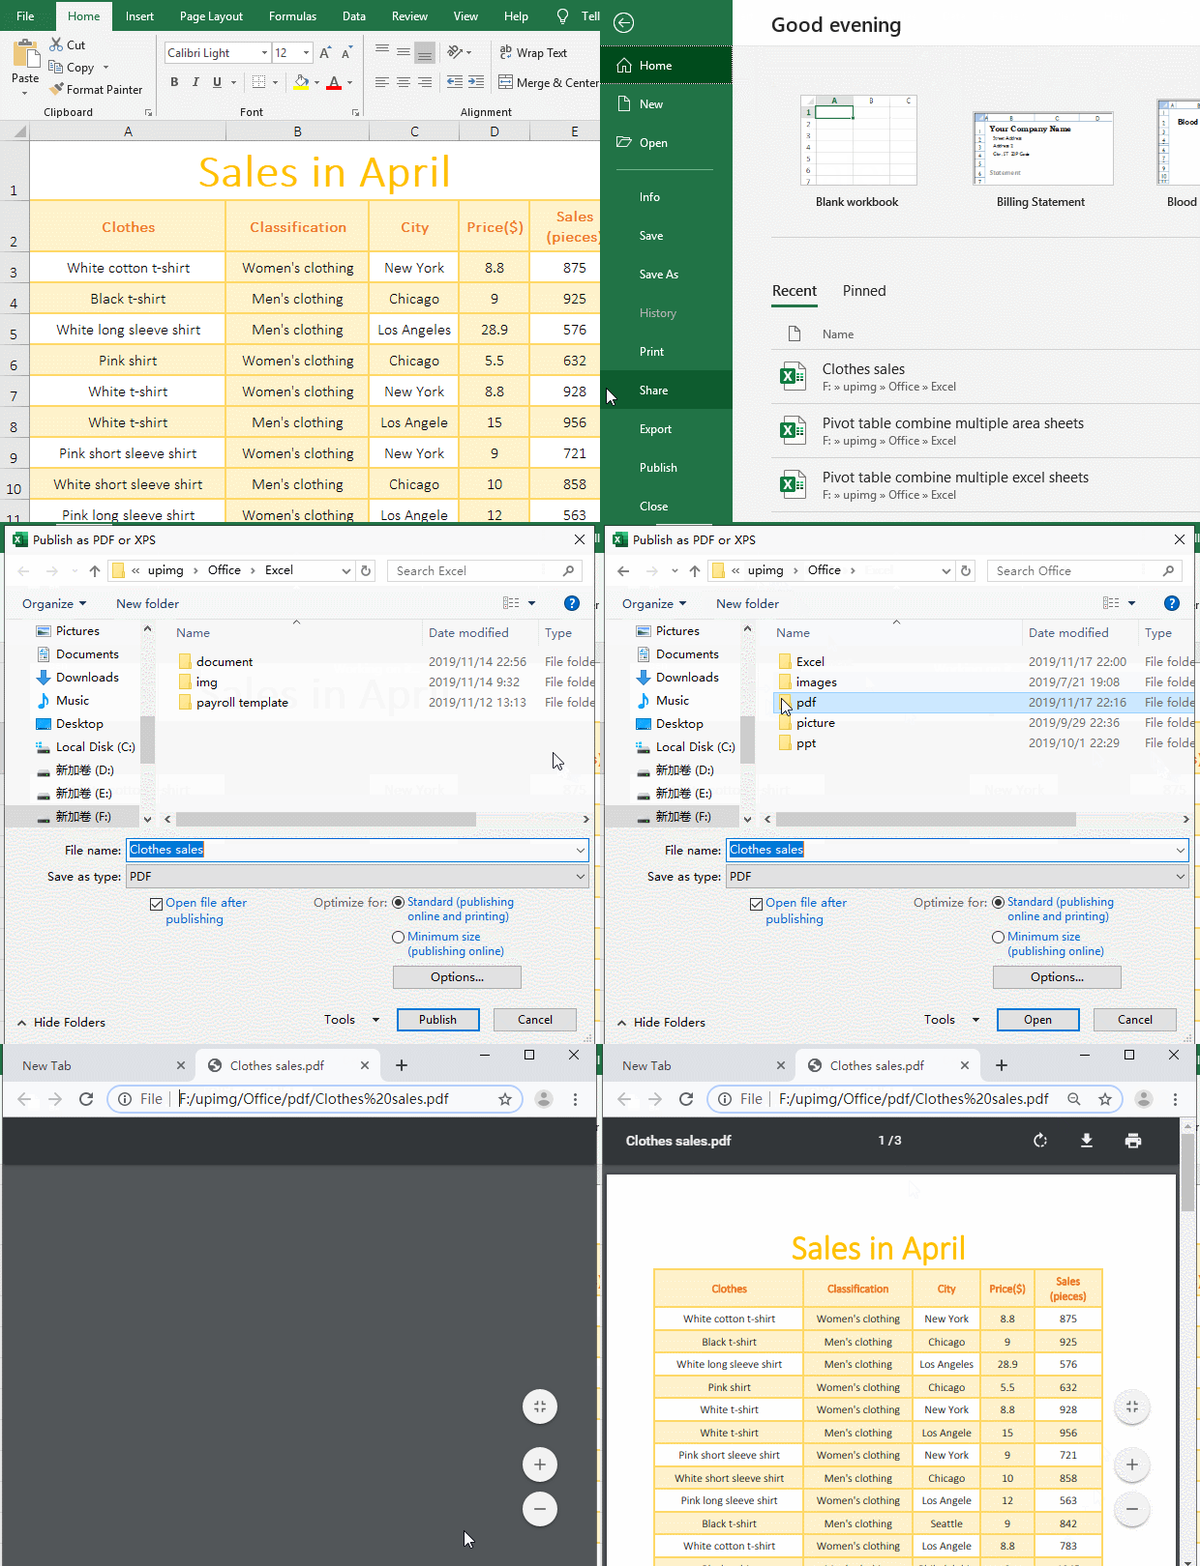
Figure 1
2. If "Open file after publishing" is checked when publishing, and it does not open automatically after publishing, it is because the computer does not have a software of Pdf file reader installed. In addition, all the pages in a worksheet are published because the "All" is selected for the "Page Range" by default.
Tip: If prompted when publishing: No printers are installed. To install a printer click the File tab, and then click Print. Click No Printers Installed, and then click Add Printer. Follow the instructions in the Add Printer dialog box.
Because the print service "Print Spooler" does not start, just launch the service by pressing the Windows logo key + R (the Windows logo key is on the right of the left Ctrl, which consists of four small squares) to open the "Run" dialog box. Copy the command services.msc to the input box, press Enter, open the "Services" dialog box, find the "Print Spooler", right click on it, and select "Start" in the pop-up menu. Then close Excel and restart.
(II) Convert only the specified pages to Pdf with shortcut key Alt + F + E + A
1. If only the 2, 3 pages of the spreadsheet in the above example are converted. Hold down Alt, press F, E, and A one time, open the "Publish as PDF or XPS" dialog box; select the "pdf" as the save folder, change the "File name" from "clothing sales" to "clothing sales 1"; click "Options", select "Page" for "Page Range", enter 2 for "From", and enter 3 for "To", others keep the default settings, click "OK", click "publish", then start publishing, after the publish is completed, it will also be automatically opened with the software of Pdf reader, it can be seen that there are only two pages; the operation steps are as shown in Figure 2:
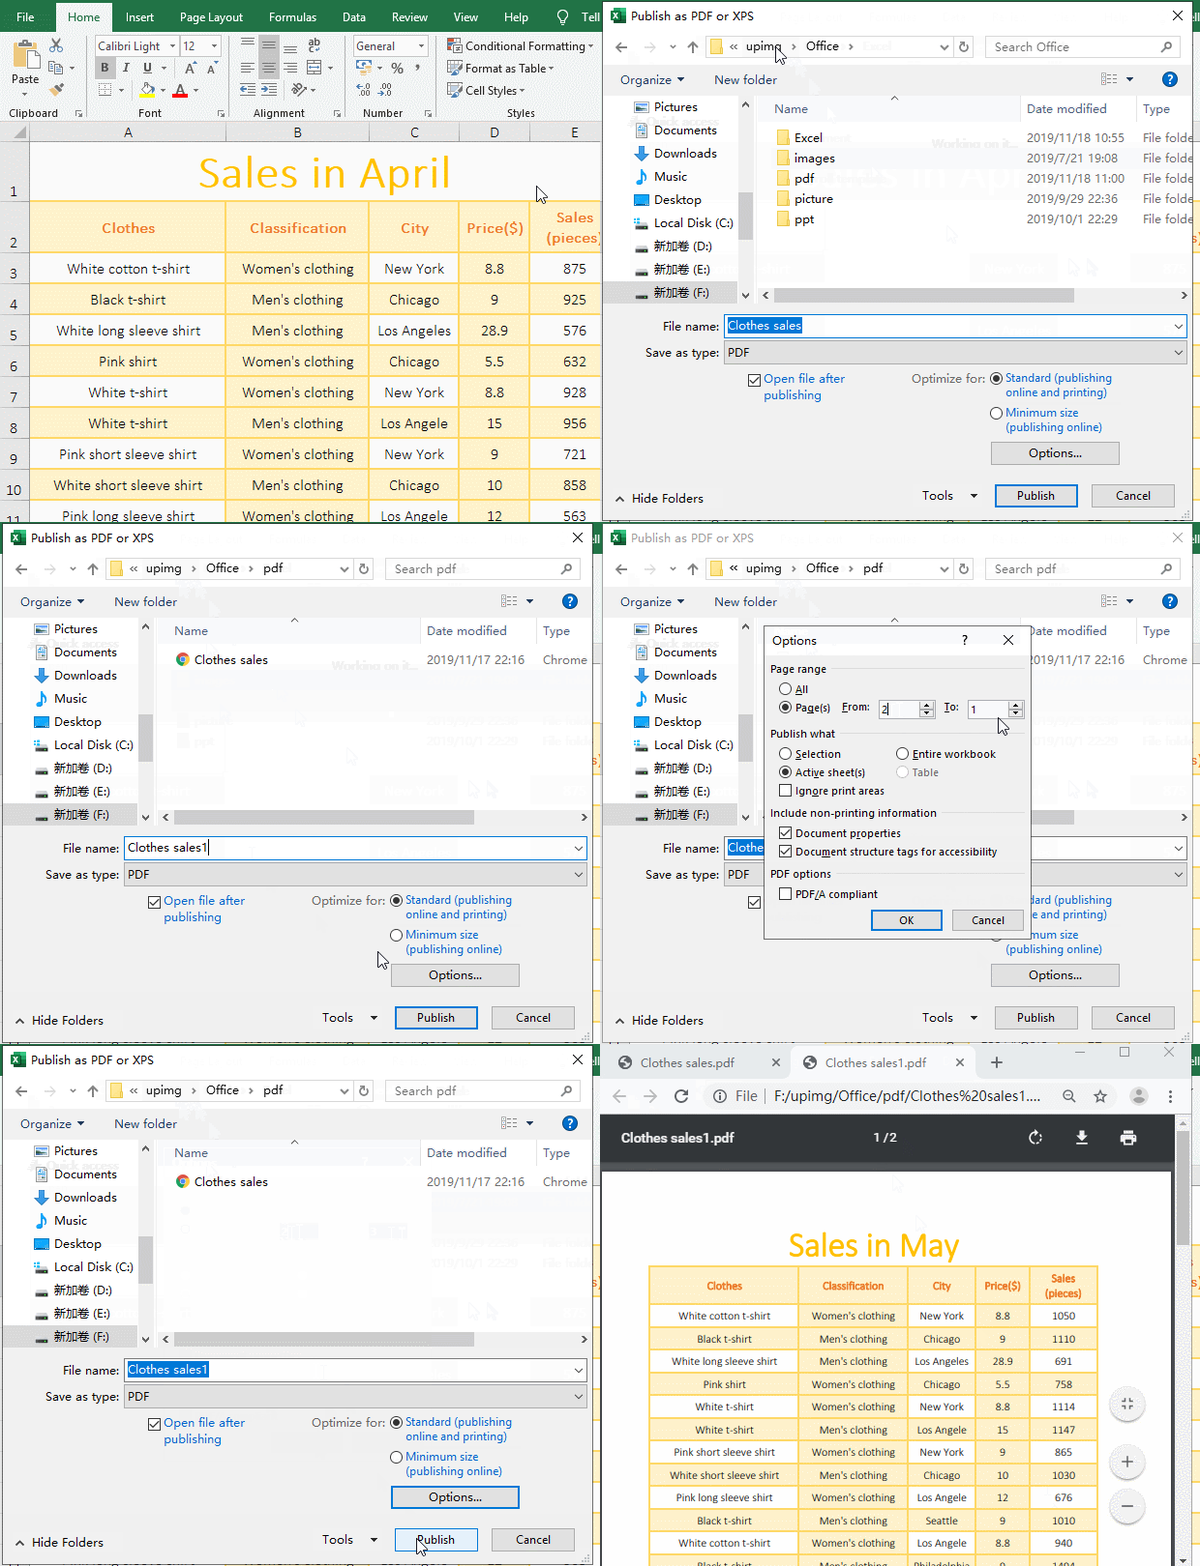
Figure 2
2. If the last page specified exceeds the actual number of pages in the document, excel will automatically publish to the last page of the document.
II, How to convert excel to Pdf: Convert all worksheets in the workbook
(I) Convert all content to Pdf
1. The workbook "Sales in the second quarter of clothing" has three worksheets, which are sales for April, May, and June, and now all of them are converted to Pdf. Hold down Alt, press F, E and A respectively to open the "Publish as PDF or XPS" dialog box, also select the folder pdf as the save folder; click "Options", select "Entire Workbook" for "Publish what", Others keep the default settings, click "OK", then click "Publish", then all three worksheets will be converted to Pdf, and automatically opened with the software of Pdf reader; the process steps, see screenshot in Figure 3:
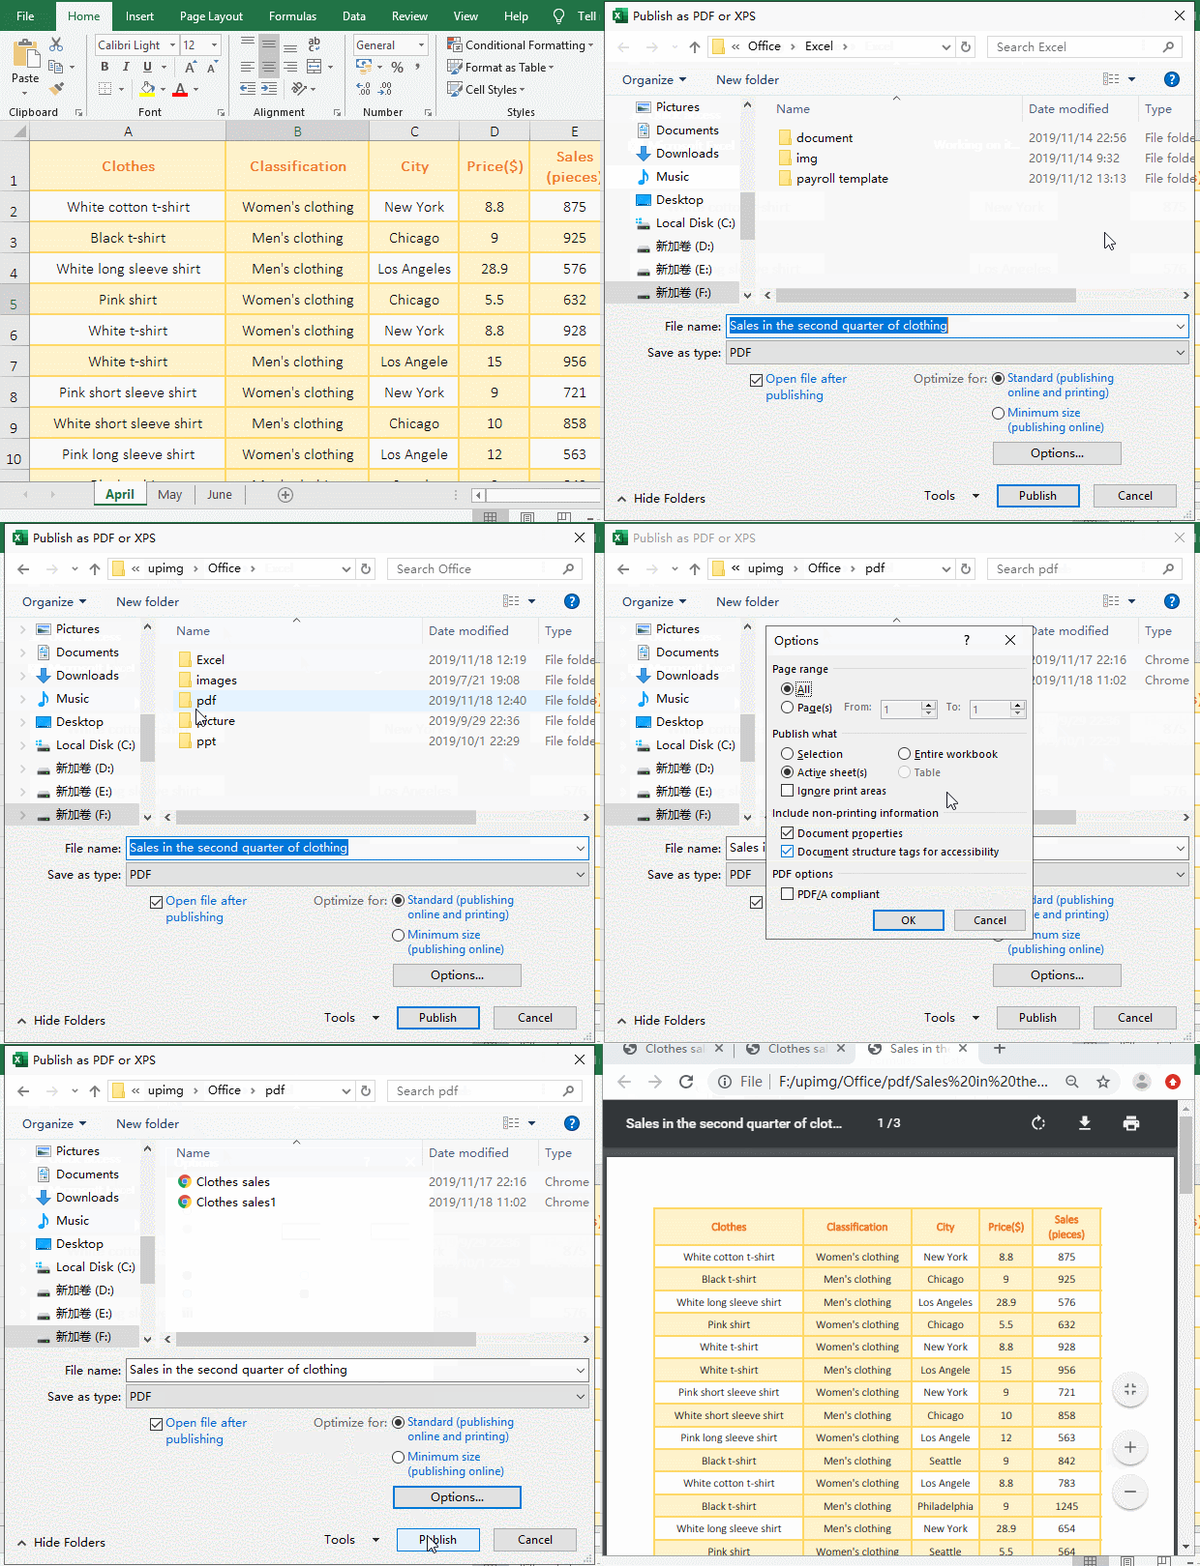
Figure 3
2. Tip: Convert Excel to Pdf, the border of the table will become a lot thicker. Therefore, if the border of table in excel is not a thin line, set it to a thin line first. The table that had been converted to Pdf in the demo has been set to a thin line, it still gets a lot thicker after the conversion.
(II) Convert only the selected content to Pdf
1. If only the first four rows of each worksheet are converted to Pdf. The current worksheet is "April", hold down Shift, click the worksheet tab "June", select all the worksheets, and select the first four rows of the table; press Alt, press F, E, and A one time, open "Publish as PDF or XPS" dialog box; click "Options" to open the "Options" dialog box, select "Selection" for "Publish what", others unchange, click "OK"; change "File name" to "Sales in the second quarter of clothing 1", then click "Publish", then start the conversion, after a while, it will be successful and automatically open with the software of Pdf reader, from which you can see that only the first four rows selected in the three worksheets are converted into Pdf; operation process steps, see screenshot in Figure 4:
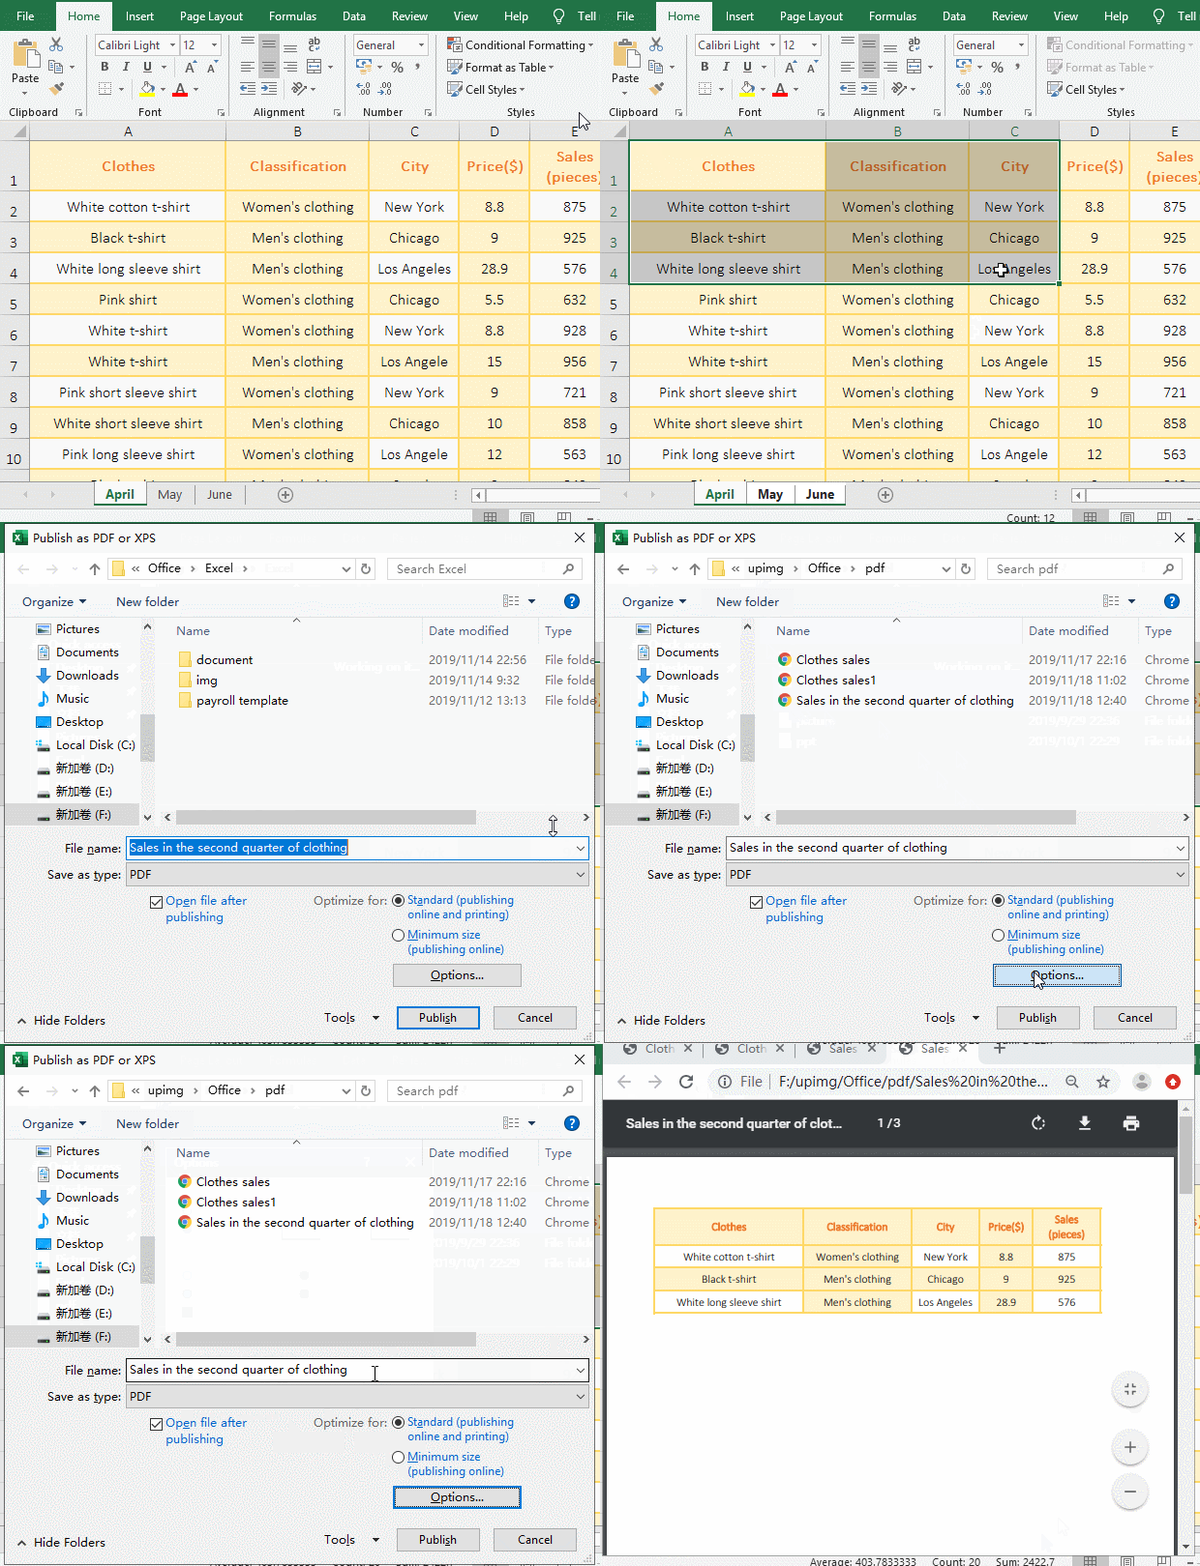
Figure 4
2. From the demo, if you only need to convert the specified content of all the worksheets in a workbook to Pdf, just combine the worksheets(the method is: select the worksheet, if you want to select all, like in the demo you can do this; if you only select the part, hold down Alt, then select one by one), and then select the content to be converted.
III, How to convert excel to Pdf: Options analysis
(I) "Optimize for"
"Optimize for" is divided into two options: "Standard" and "Minimum size". The "Publishing Online and Printing" in the brackets behind the "Standard" in the publish dialog box, meaning: it can be used for publishing online(ie it can be sent to the Internet) or for printing; the "Minimum size" is only the "publishing online", which is only suitable for sending to the Internet.
What do the comments "standard" and "Minimum size" in brackets mean? In fact, it tells us that the choice of "standard" to Pdf, the content that has been converted to Pdf is relatively clear, it can be used for printing, if the network speed, it can also be sent to the Internet, but the file is relatively large; select "Minimum size" to convert to Pdf, the content blur is better than selecting "standard", but the file is small and suitable for sending to the Internet for transmission.
(II) Page range
"All" refers to publishing all pages of a worksheet or all worksheets in a workbook. If only partial pages are converted to Pdf, select "Page" and then enter the start page and end page, all of which have been demonstrated.
(III) Publish what
"Publish what" has four options, "Selection" means to convert only the selected content into Pdf, "Entire workbook" means to convert all worksheets in a workbook to Pdf, "Active sheet" means to convert the current worksheet to Pdf, "Table" means to convert only the table to Pdf. The first three items have been demonstrated above, only the "Table" is demonstrated and explained here.
The method of Converting the "Table" to the Pdf as follows:
1. The "table" is grayed out by default, because the current conversion is not a table but a "range", this is the case in the above demo, because Excel defaults to range instead of tables, only create the table with the "table" in the "Insert" tab(or press Ctrl + T) or convert the "range" into a "table", the "Table"can be selected; the process steps, see screenshot in Figure 5:
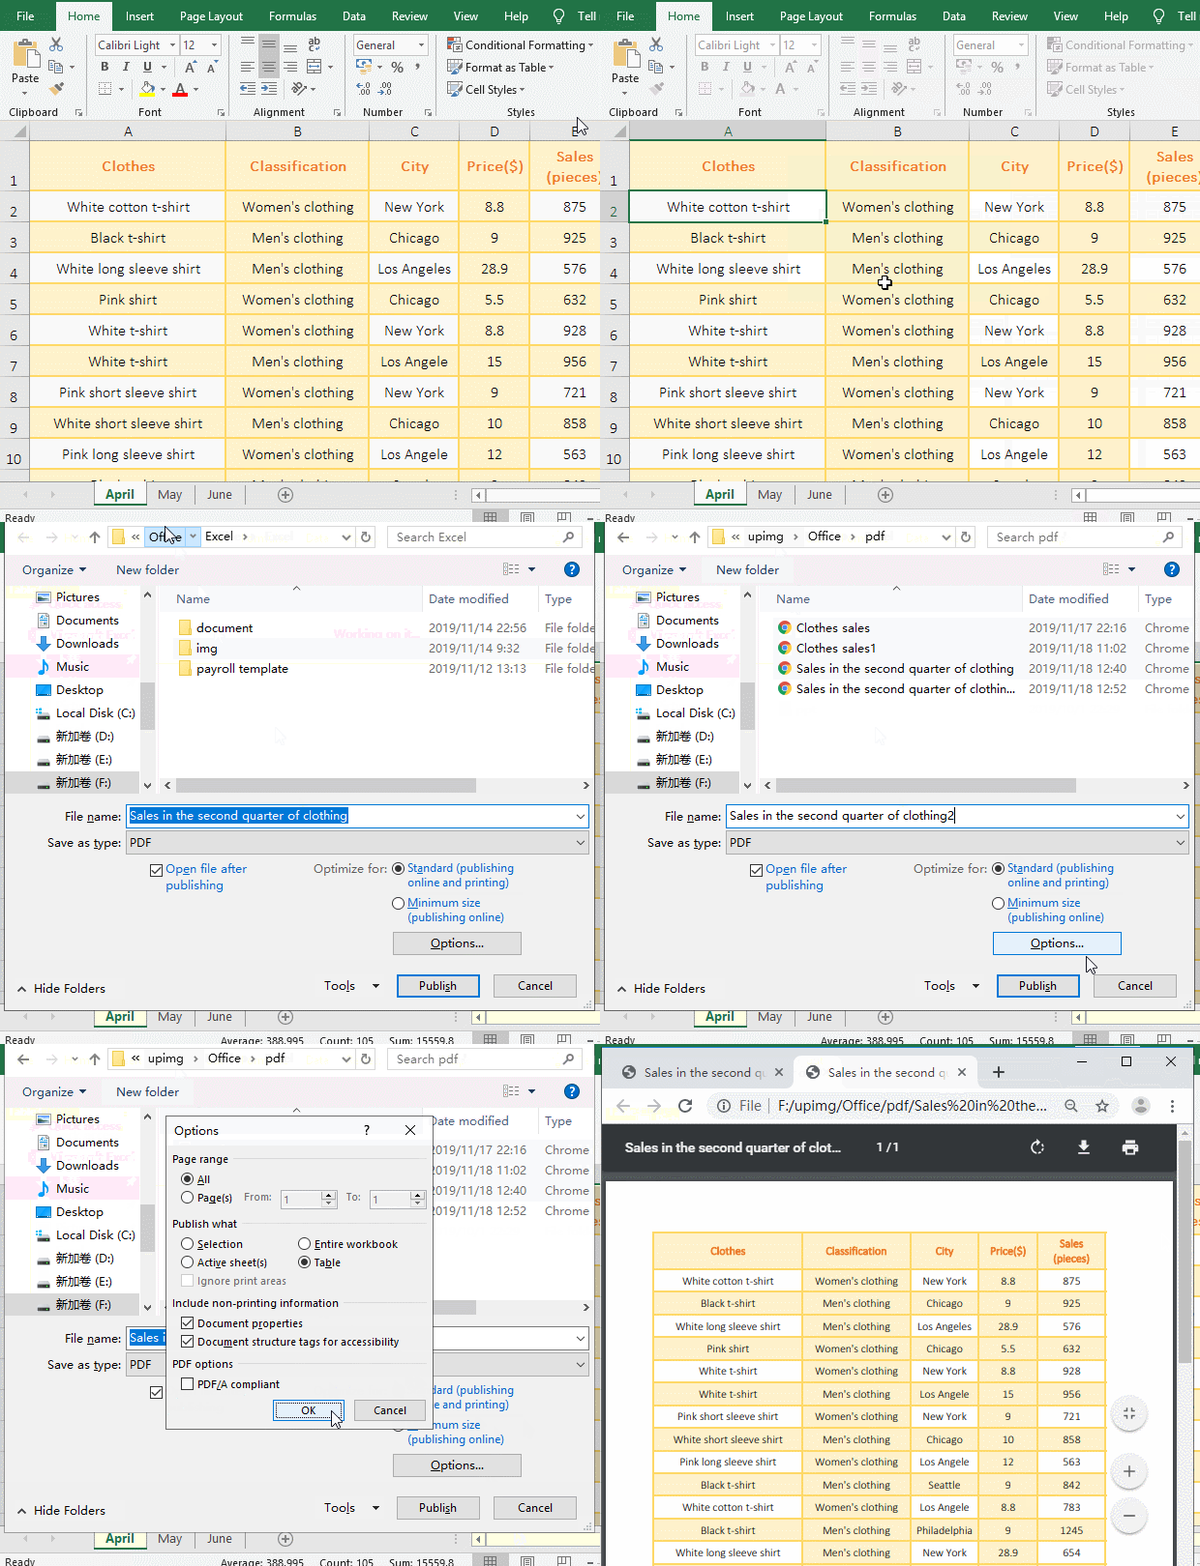
Figure 5
2. The operation process step description: select one of the cells with data(such as B2), the current tab is "Home", click "Format as Table", select a style in the pop-up table style, then "range"is changed to "table"; press and hold Alt, press F, E, and A, respectively, open the "Publish as PDF or XPS" dialog box; select the pdf as the save folder, change the "File name" to "Sales in the second quarter of clothing2"; click "Options", open the "Options" dialog box, the "Table" is changed from gray to optional; select "Table", click "OK", and then click "Publish" to start publishing, after a while, the publish is completed and automatically opened, the entire table was converted to Pdf.
(IV) Ignoreprint print area to avoid blank pages after conversion to Pdf
1. Set one row of data and several rows of blanks as the print area. Select A7:E11, select the "Page Layout" tab, click "Print Area", select "Set Print Area" in the pop-up options, only set the selected area as the print area; press and hold Alt, press once F, E, and A, open the "Publish as PDF or XPS" dialog box, click "Publish", the conversion will succeed, but only one row of data;
2. Press the shortcut key Alt + F + E + A again to open the "Publish as PDF or XPS" dialog box, click "Options", select "Ignore print area" in the dialog box that has been opened, click "OK", and then click "Publish"; after the publish, the content outside the print area is also published, indicating that "Ignore print area" is to convert the content that is not in the print area; the operation steps are as shown in Figure 6:
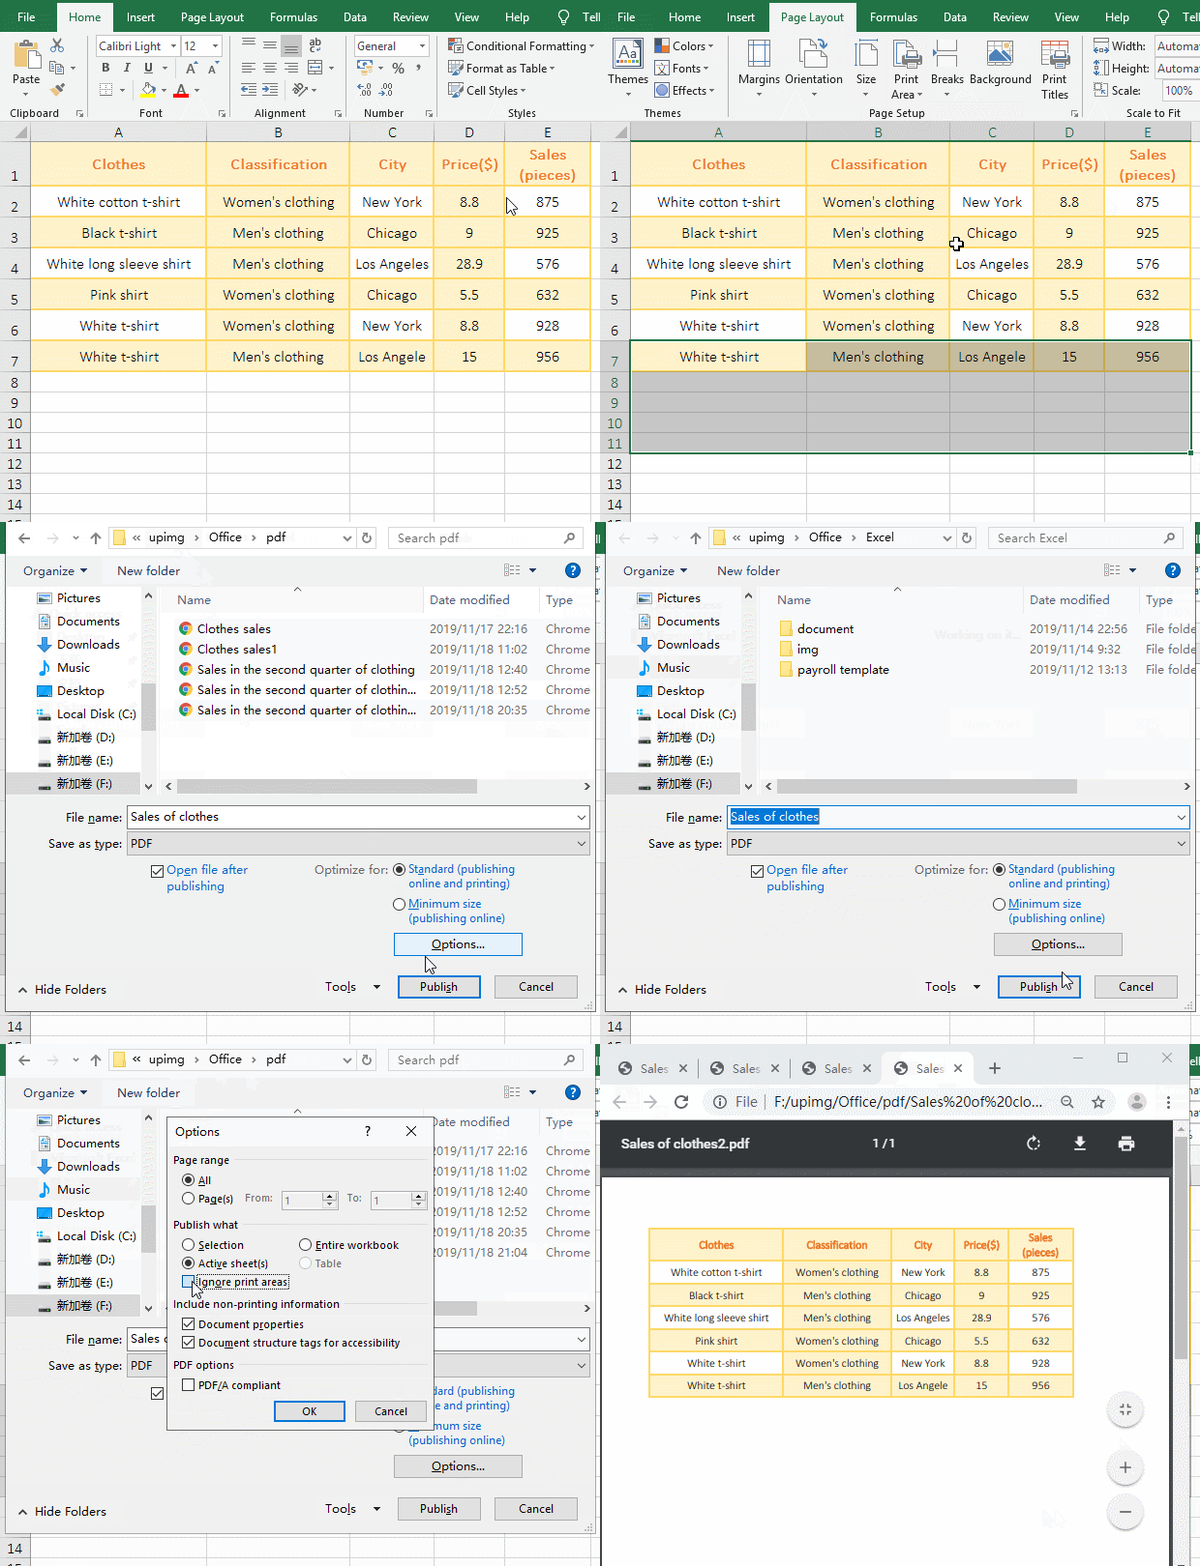
Figure 6
3. As you can see from the demo, if the worksheet to be converted has content that is not in the print area, you need to check "Ignore print area", otherwise the content that is not in the print area will be ignored; if all the content is not in the print area, and the "Ignore print area" is not checked, after converting to Pdf, they are all blank pages.
(V) PDF options
The ISO 19005-1 standard (PDF/A)(1) is promulgated by the International Organization for Standardization in October 2005, is called "Document Management for Electronic Document Formats for Long-Term Storage - Part I: Use of PDF 1.4 (PDF/A)(1)", this option keeps the default check.
-
Related Reading
- Combine multiple excel sheets into one pivot table w
- How to create a pivot table in excel(15 examples, wi
- Excel pivot table percentage of grand total(parent r
- How to adjust row height and change width of column
- How to generate multiple reports from one pivot tabl
- How to use advanced filter in excel(7 examples, mult
- How to filter in excel(16 examples, with number,text
- How to sort in excel(11 examples), include sort by c