 Office > Excel > Excel 2019 > Content
How to adjust row height and change width of column in excel, with convert their units to inches,cm
Set the row height and column width in Excel, you can set one row or one column at a time, or you can set multiple rows or columns at a time. There are two ways to set them, one is the drag adjustment method, and the other is the numerical method. In addition to setting the row height and column width, you can also fix the row height and column width(that is, lock the row height and column width), set them to be equal (that is, make the cells into a square), the former is implemented with the protect worksheet, the latter is achieved by unifying the row height and column width units.
The row height in Excel is in points in the Normal view, if you want to convert the unit to inches, centimeters(cm) or millimeters (mm), you need to turn Normal into Page Layout(you can also use macro VBA, but More troublesome). The row height and column width defaults to centimeters in the Page Layout, but the unit can be customized after the value, so it is easy to convert the unit to inches, pixel or millimeters (mm).
I, How to change row height and change width of column in excel
(I) How to change row height in excel
1. The drag adjustment method.
A. Adjust one row at a time. Increase the header row in the first row of the table; move the mouse to the bottom of the first row number 1, the mouse turns into a cross with arrow in the vertical direction, press and hold the left button and drag down to increase the row height. The process steps are shown in Figure 1:
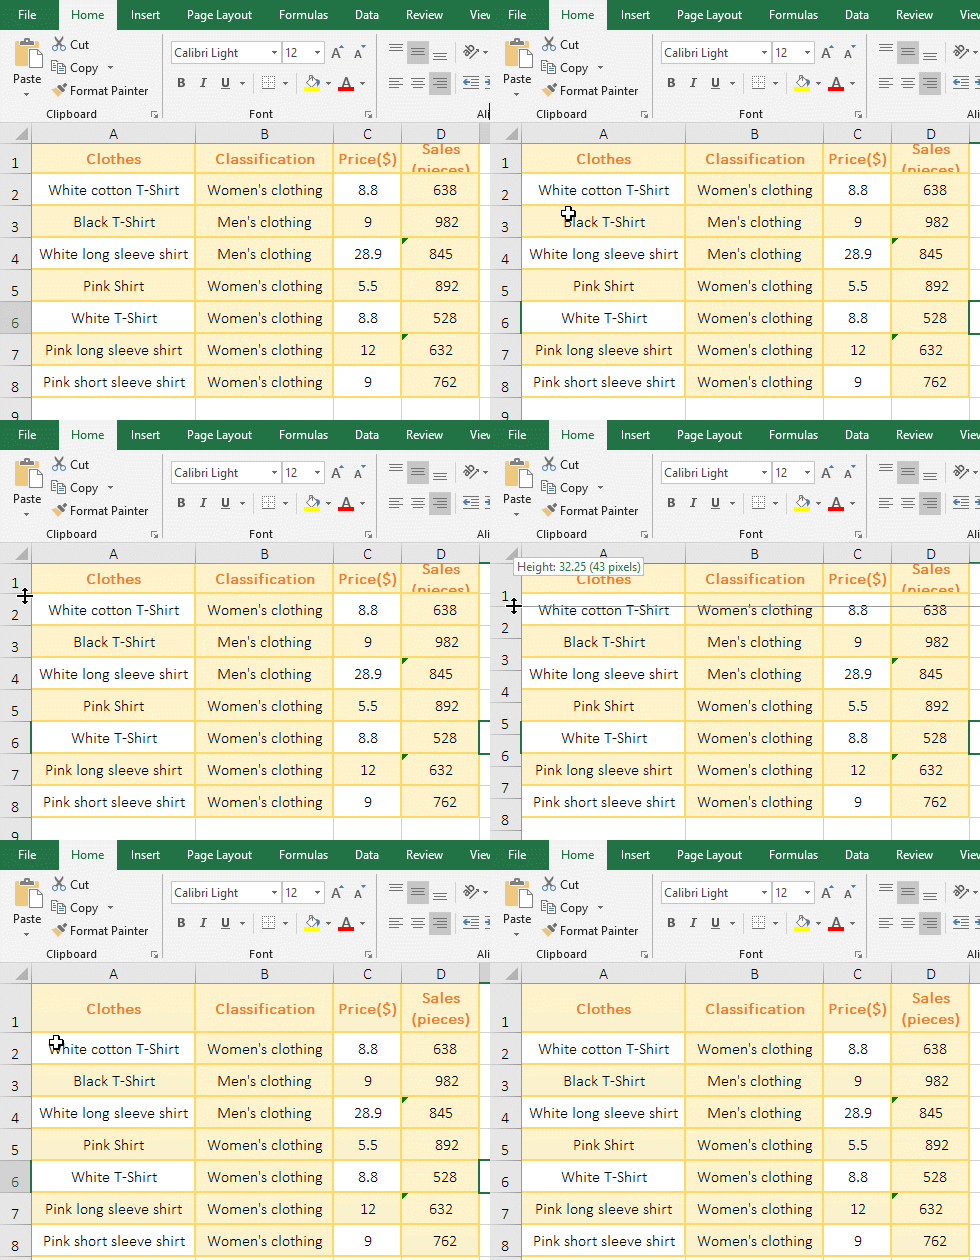
Figure 1
B. Adjust multiple rows at a time. Move the mouse to the second row number 2, hold down the left mouse button, drag down, drag until the 6th line, select the 2nd to 6th rows, and move the mouse to the sixth row below the row number 6, after the mouse changes to the cross with arrow in the vertical direction, hold down the left button and drag down a short distance, the row height of all selected rows will become higher, the operation steps, as shown in Figure 2:
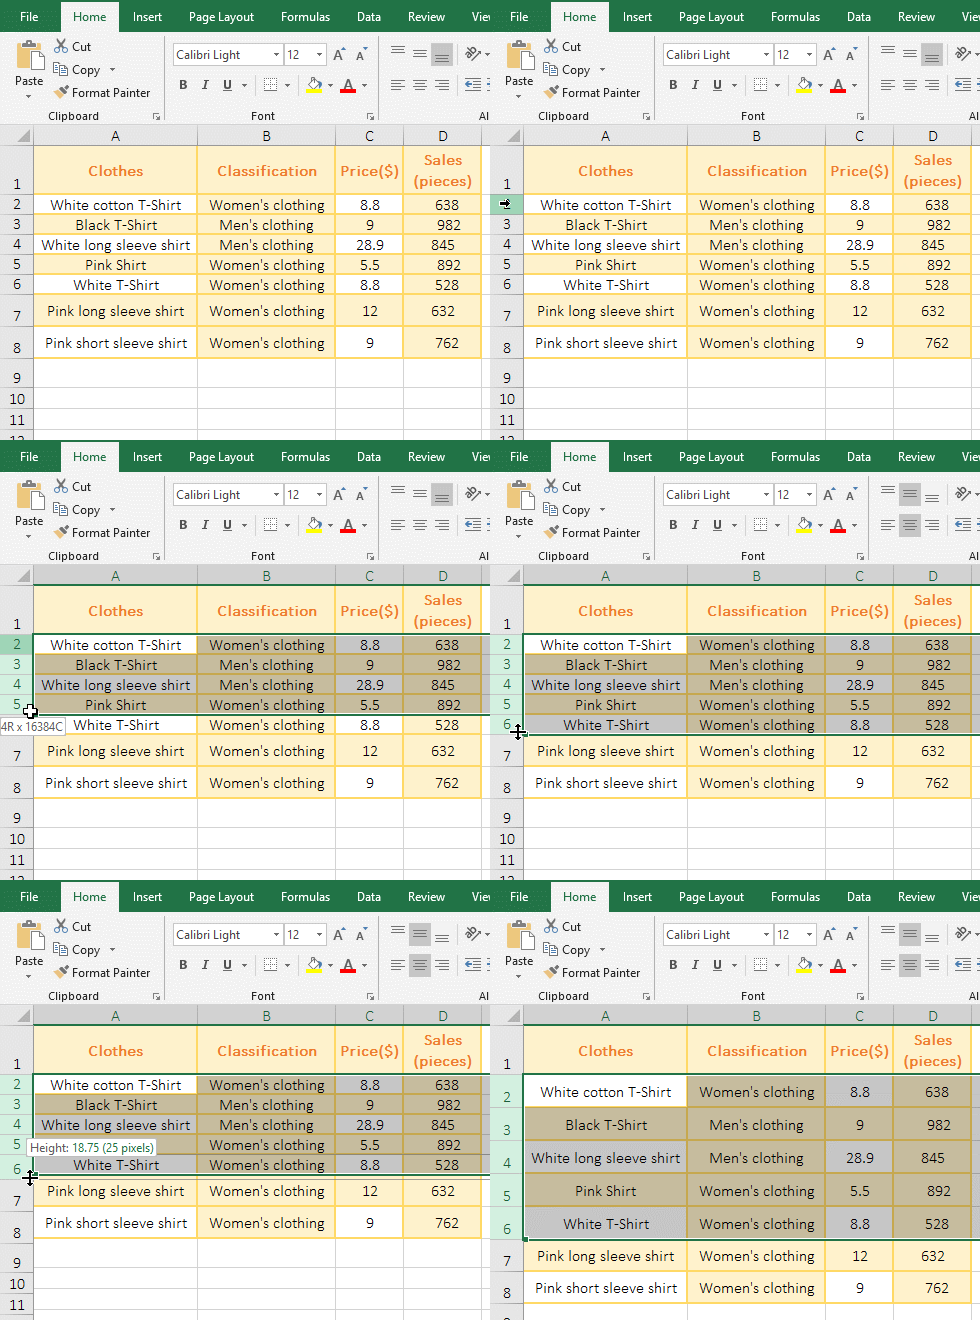
Figure 2
2. Set the numerical method(Such as adjust multiple rows at a time). Select the 2nd to 9th rows, right-click the selected rows, select "Row Height" in the pop-up menu, enter the row height value to be set, for example, 24, then the height of selected rows will all become 24; the operation steps, as shown in Figure 3:
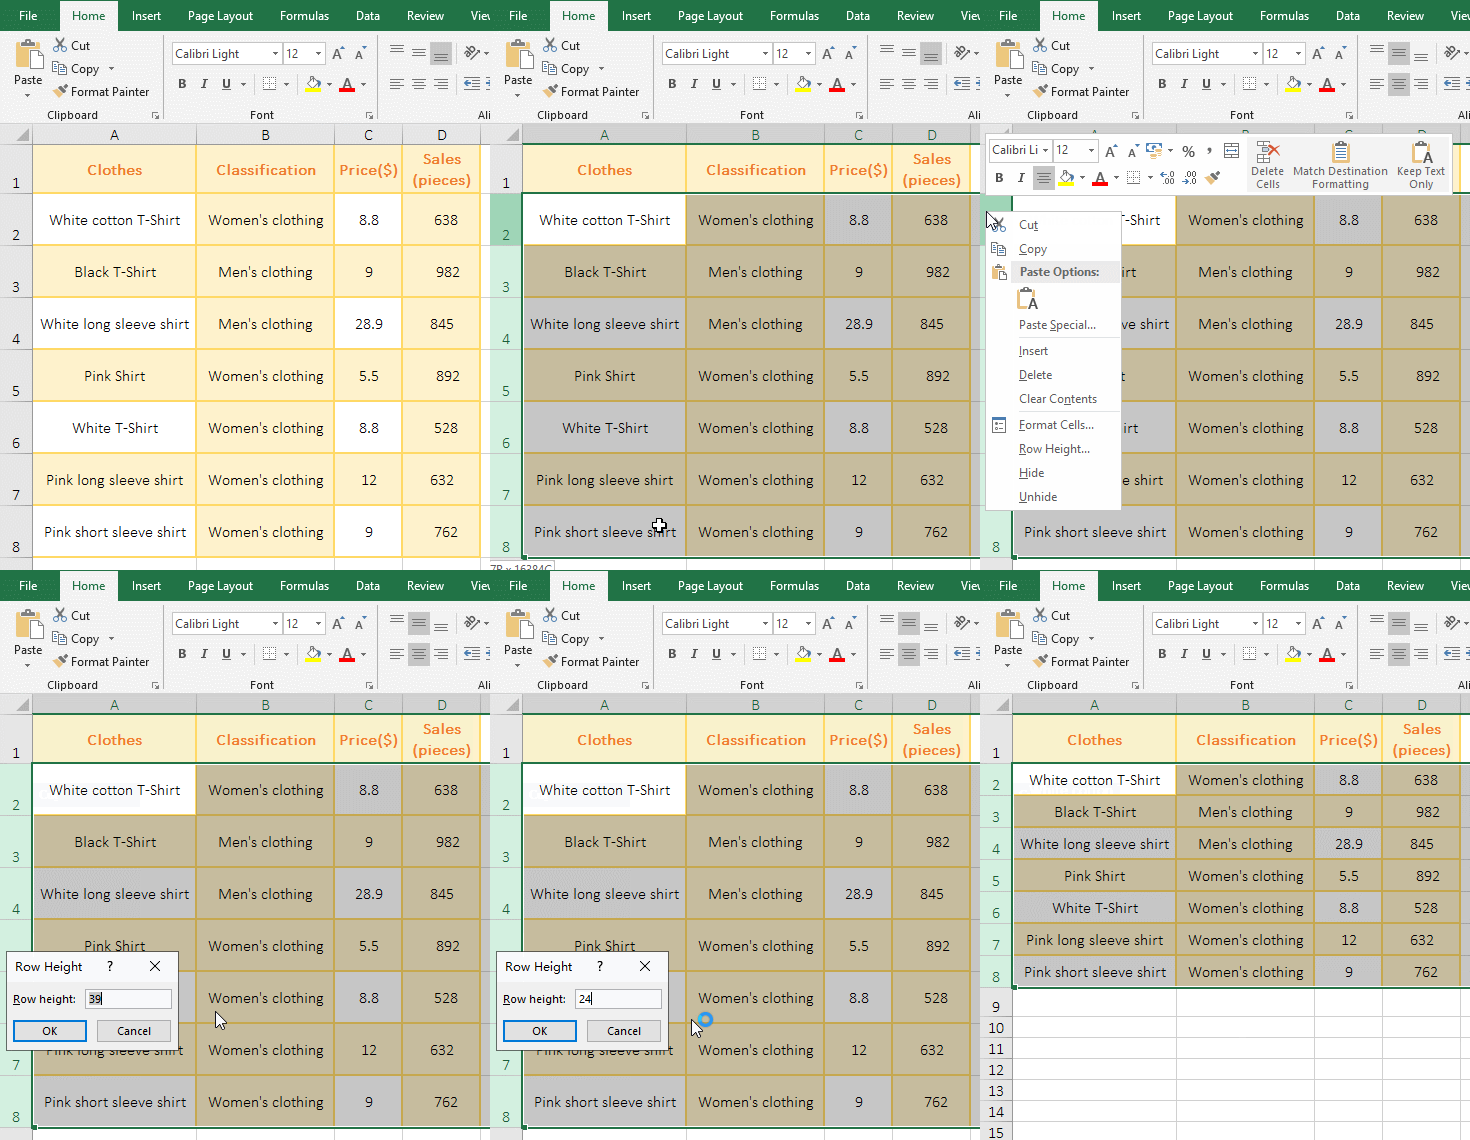
Figure 3
3. Set the row height with shortcut keys. Select the 4th to 7th rows, hold down Alt, press H once, press O once, press H once, open the "Row Height" dialog, enter 24, click "OK", then all selected row heights become 24; operation process steps, as shown in Figure 4:
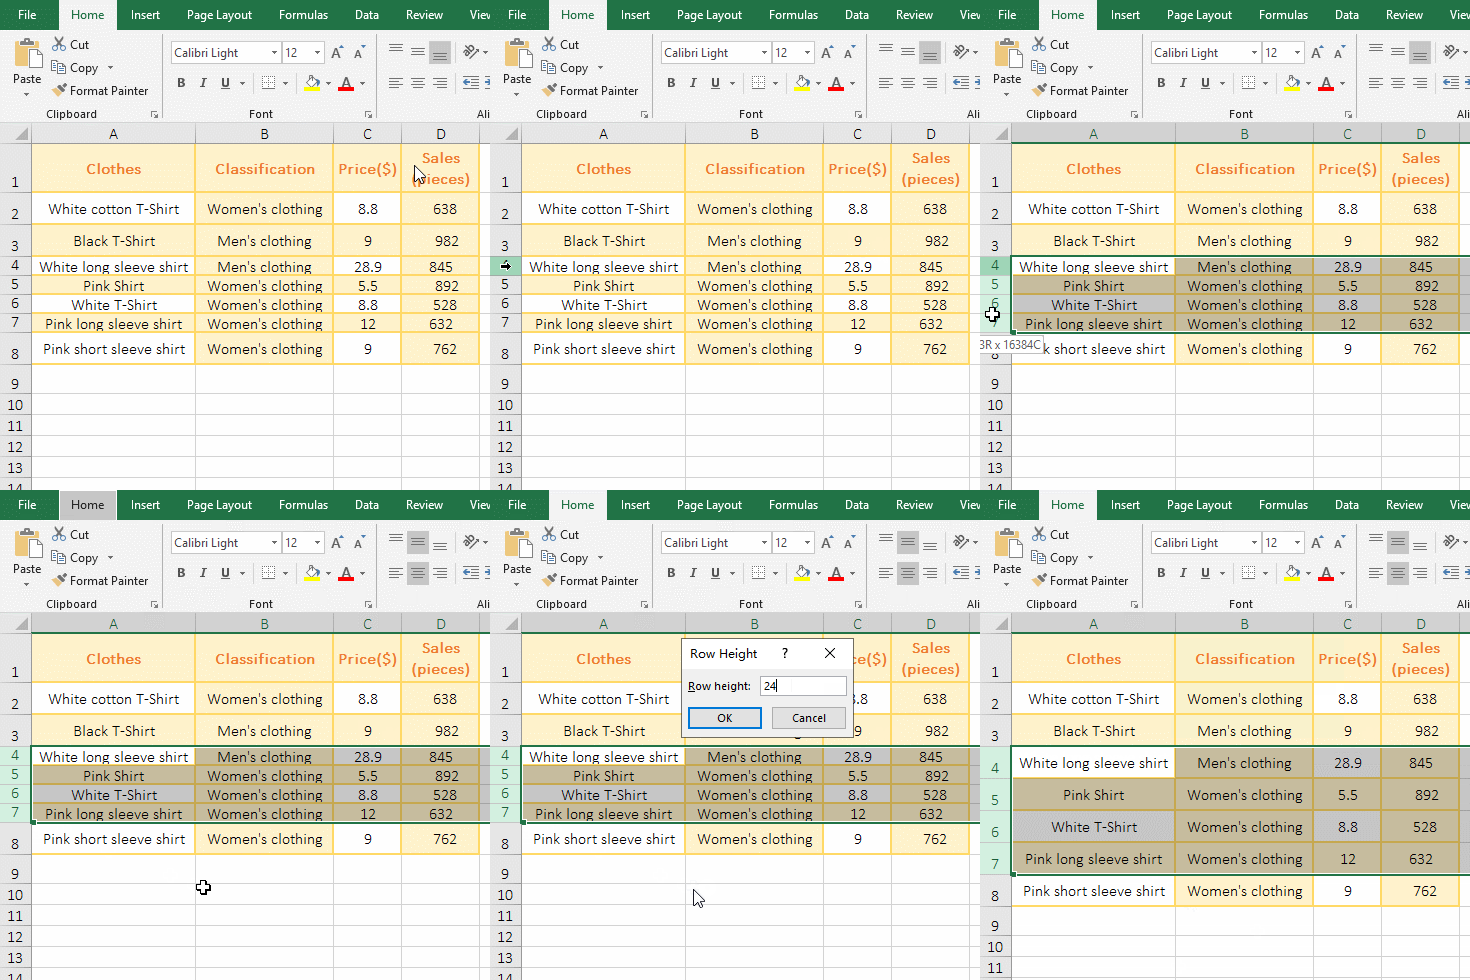
Figure 4
(II) How to change width of column in excel
1. Drag the adjustment method.
A. Adjust one column at a time. Move the first column width; move the mouse to the right line of column number A, the mouse becomes the cross with arrow in the horizontal direction, hold down the left button, drag to the right until all words are displayed, the column width is adjusted, the operation steps , as shown in Figure 5:
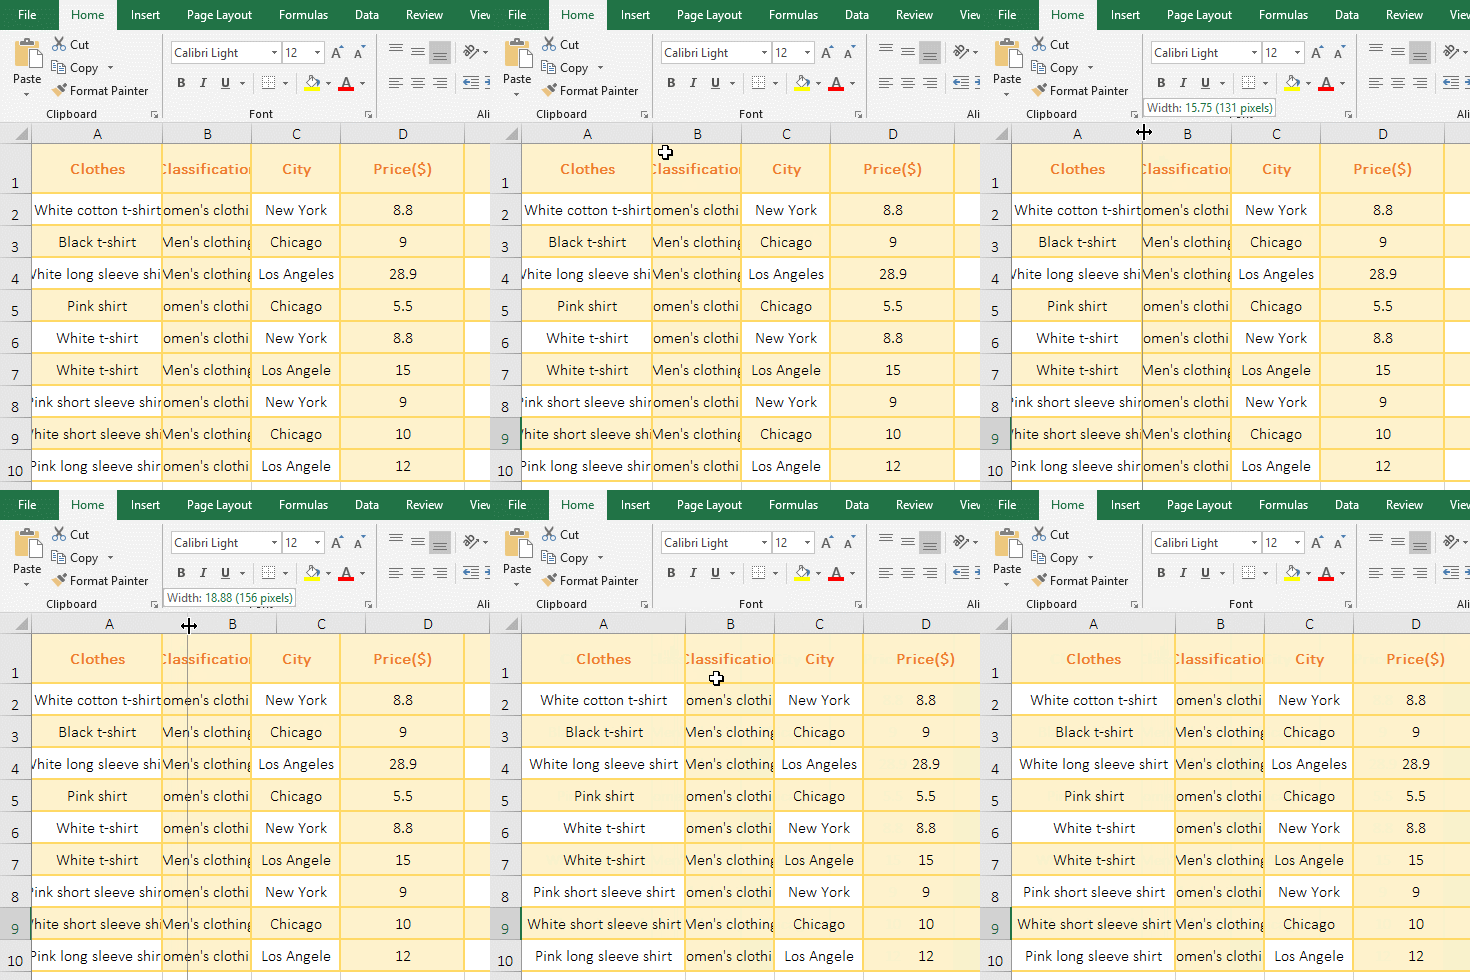
Figure 5
B. Adjust multiple columns at once. Select columns B to C, move the mouse to the right line of column C, after the mouse becomes the cross with arrow in the horizontal direction, and hold down the left button, drag to the right until all the texts in all the selected columns are shown, then their column widths are adjusted, the process steps are as shown in Figure 6:
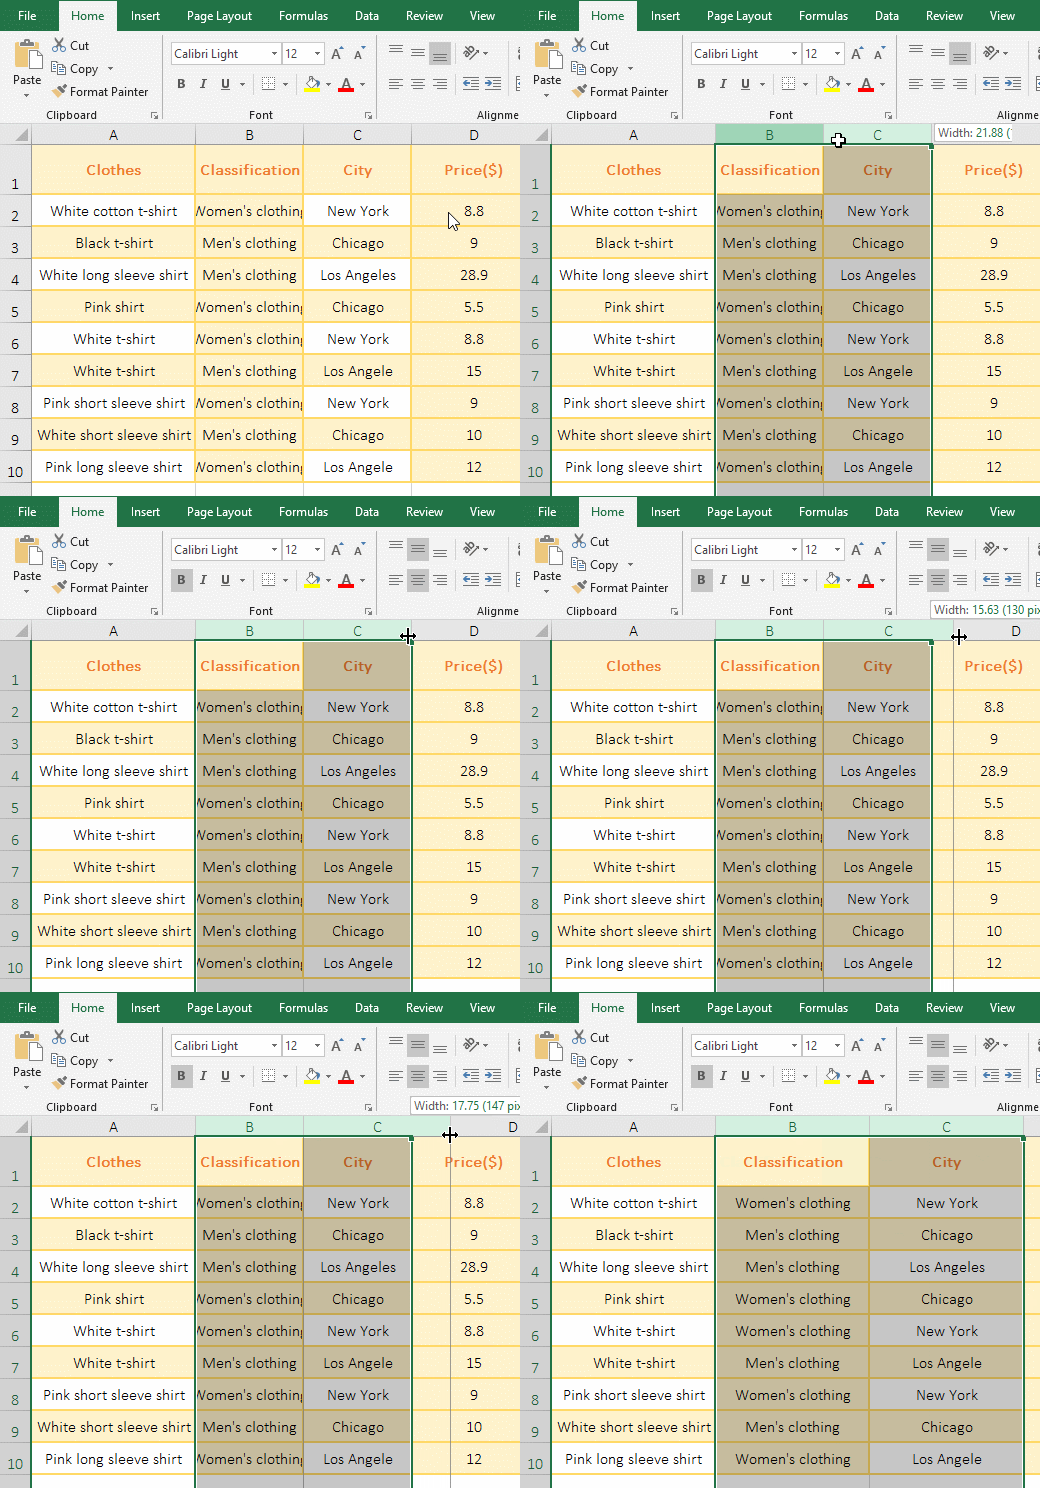
Figure 6
2. Set the numerical method(take the adjustment of multiple columns at a time as an example). Select the C to E three columns, right-click the selected column number, select "Column Width" in the pop-up menu, enter 9 in the open dialog, click "OK", then column widths of the selected three columns becomes 9, the operation process steps are shown in Figure 7:
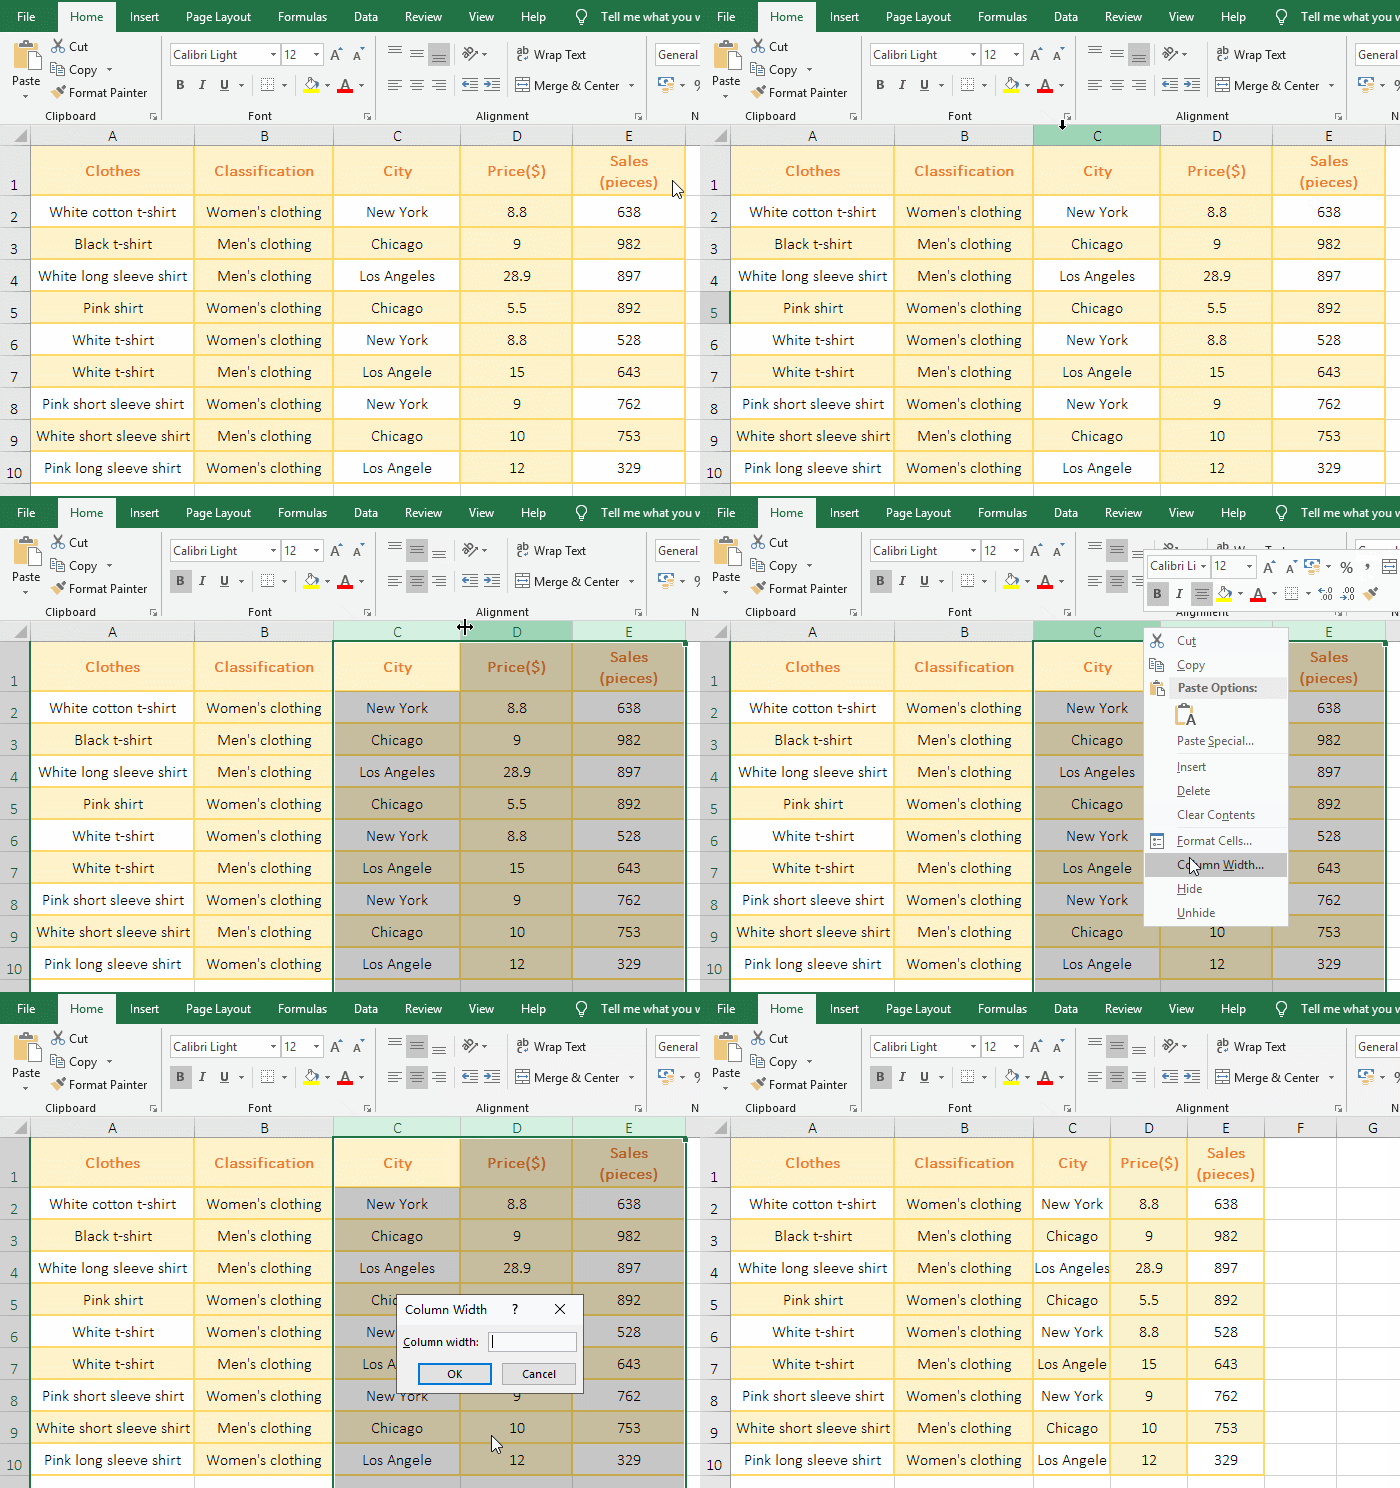
Figure 7
3. Excel column width shortcut: Alt + H + O + W. The button method is: press and hold Alt, press H, O and W respectively, pay attention to pressing in order.
II, How to convert Excel row height or column width to inches, centimeters(cm) or millimeters(mm)
(I) How to convert Excel row height in inche or millimeters(mm)
1. Select the "View" tab, click "Page Layout" in the upper left corner of the screen, select the 2nd to 8th rows, right-click the row number to be selected, select "Row Height" in the pop-up menu to open the "Row Height" dialog, change 0.85cm to 0.5", press Enter, the row height of all selected rows becomes 0.5 inch; open the "Row Height" dialog again, change 1.27cm to 12mm, press Enter, then the height of all selected rows becomes 12 mm; the operation steps are as shown in Figure 8:
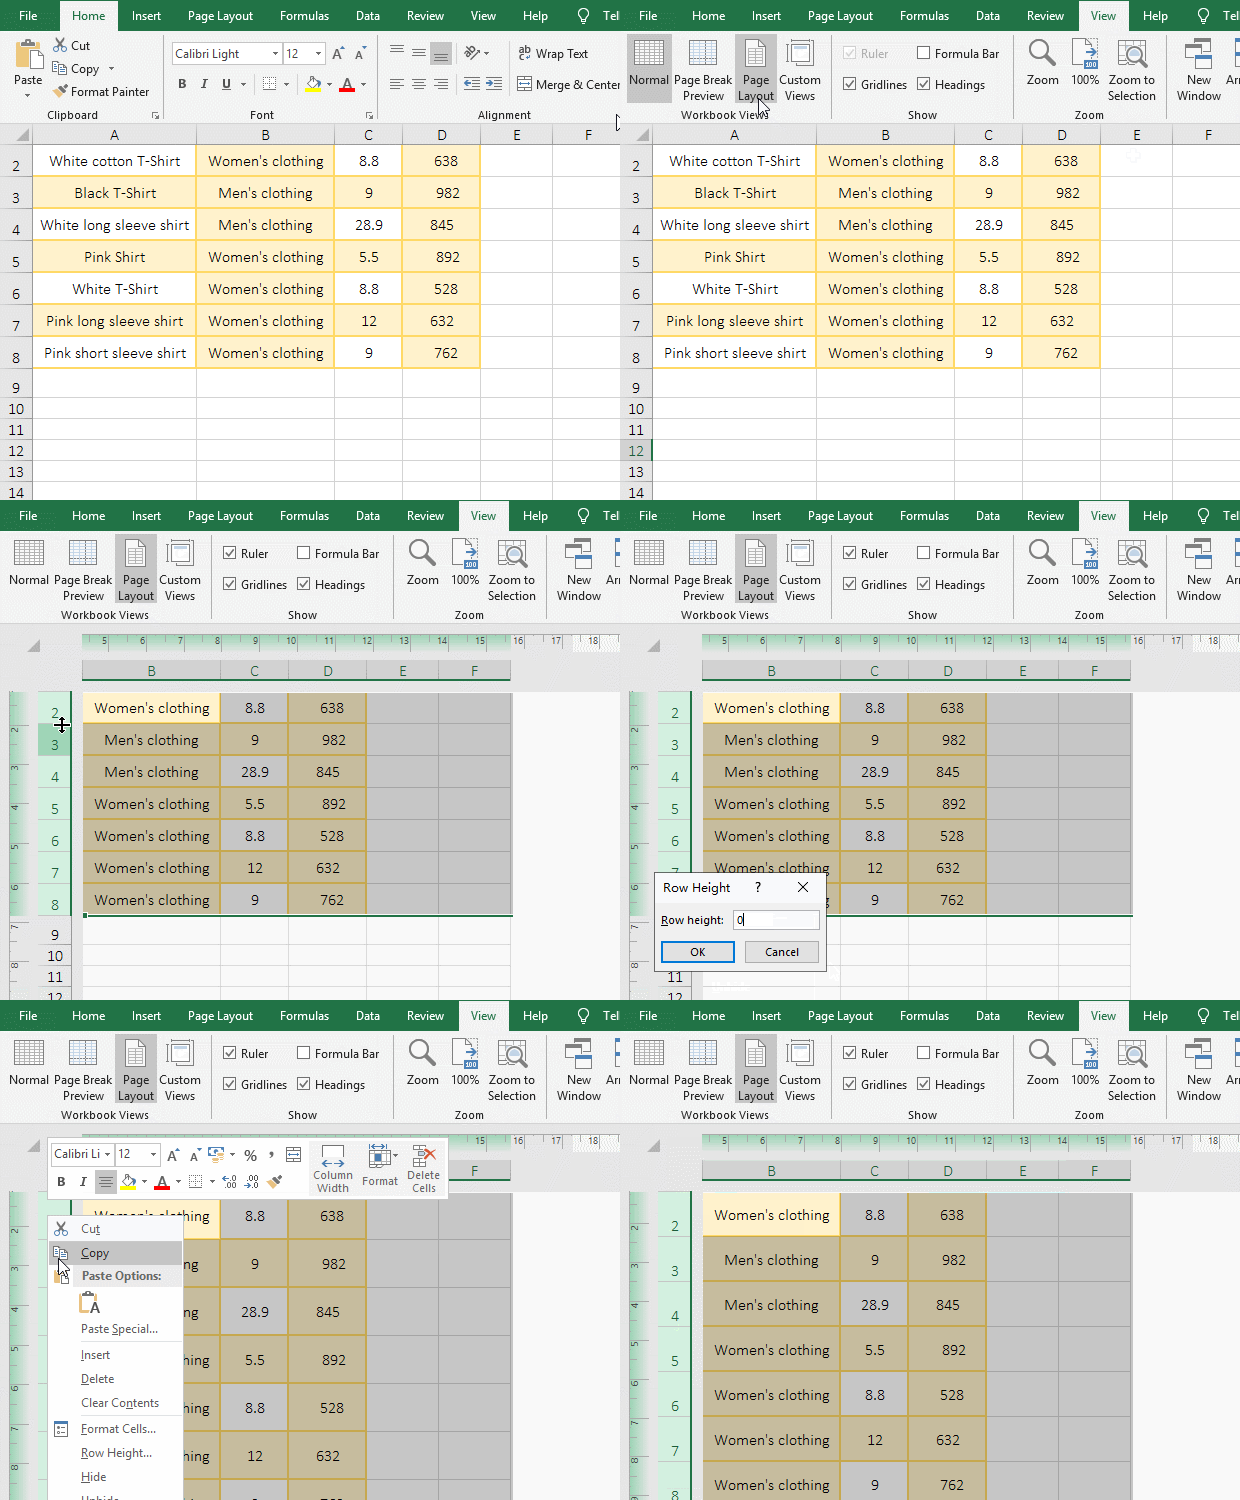
Figure 8
2. Description: After switching from the "Normal" to the "Page Layout", the unit of row height defaults to centimeters, and you can customize the unit after the value. For example, change 0.85cm to 0.5" in the operation, change the unit of row height to inch.
(II) Convert Excel column width in inches or millimeters(mm)
Select column C to D, right-click the selected column number, select "Column Width" in the pop-up menu, open the "Column Width" dialog, change cm to 1", press Enter, then the width of all selected columns become 1 inch; open the "Column Width" dialog again, change 2.54cm to 24mm, press Enter, then the width of all selected column becomes 24 mm; the operation steps are as shown in Figure 9:
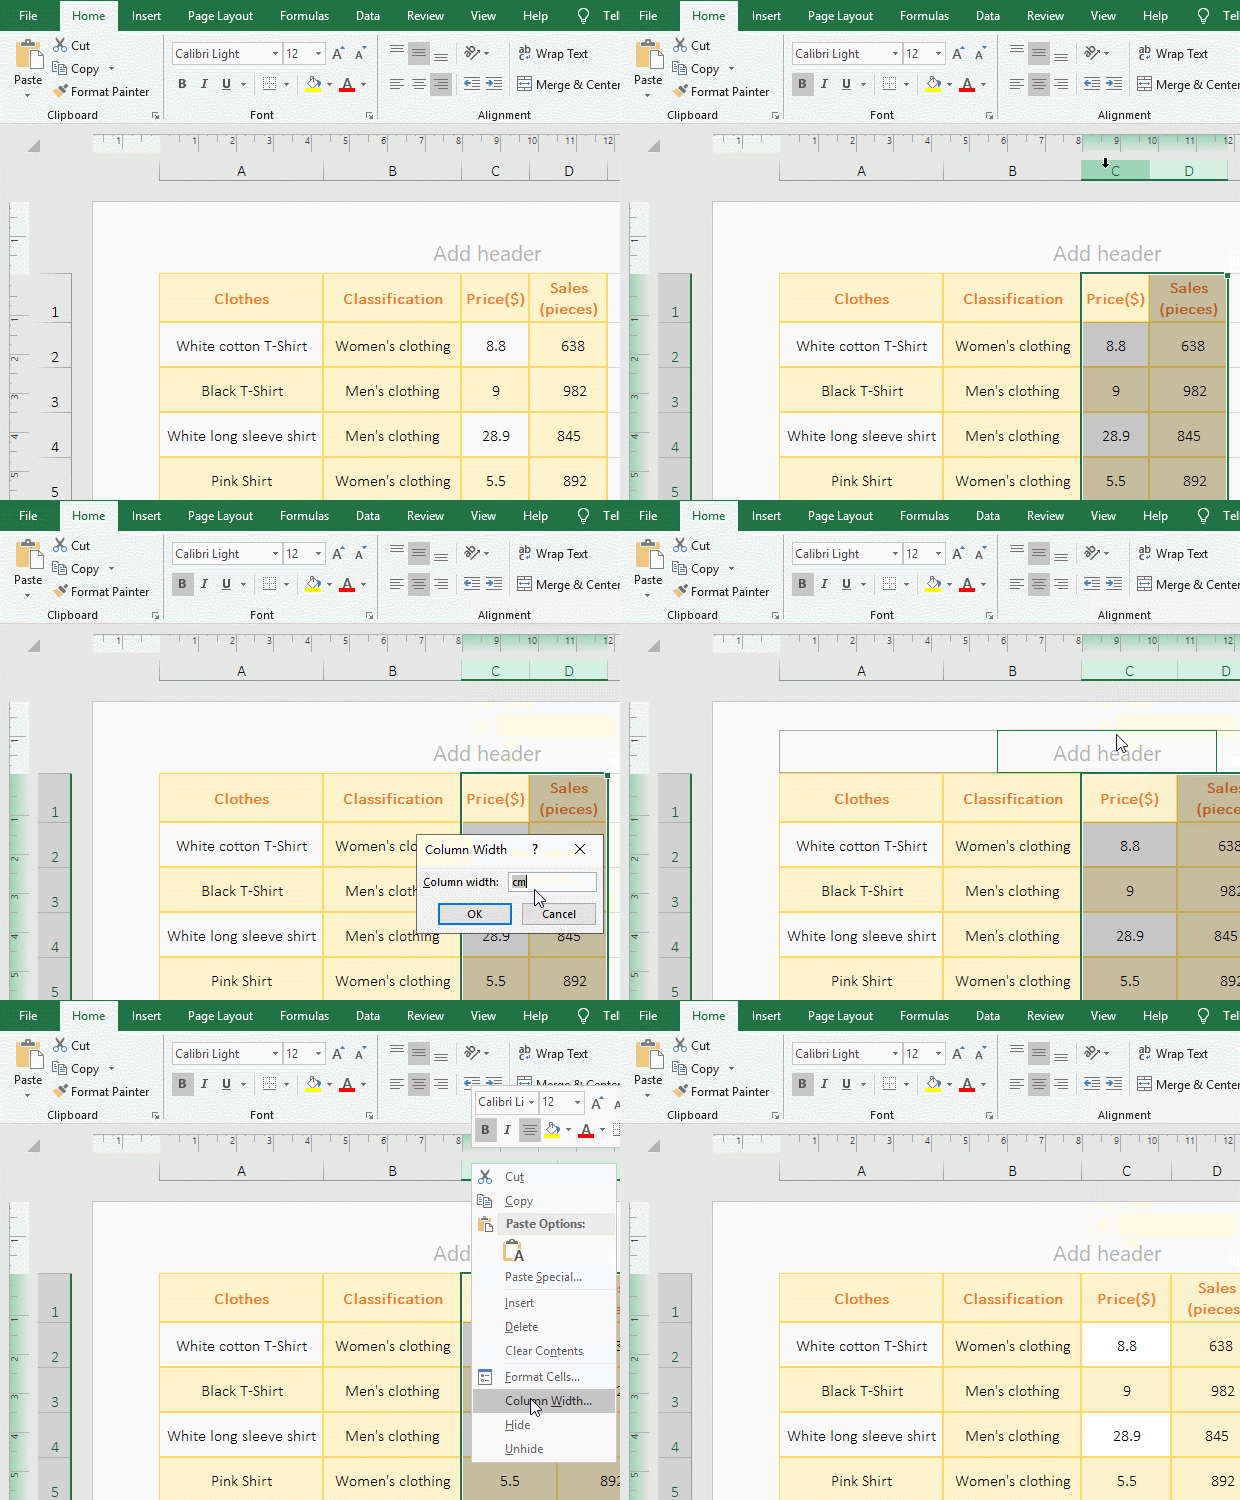
Figure 9
(III) Change the default units of Excel to inches, centimeters(cm) or millimeter(mm)
Right-click any blank space in the function area, select "Customize the Ribbon..." in the pop-up menu, open the "Exce Options" dialog, select "Advanced" on the left, drag the scroll bar down until you see "Ruler Units", click the drop-down list box on the right side of the "Ruler Units", select "inches" in the pop-up menu. If you want to set it to millimeter, select it and click "OK" to change the default unit of Excel to the selected unit. As shown in Figure 10:
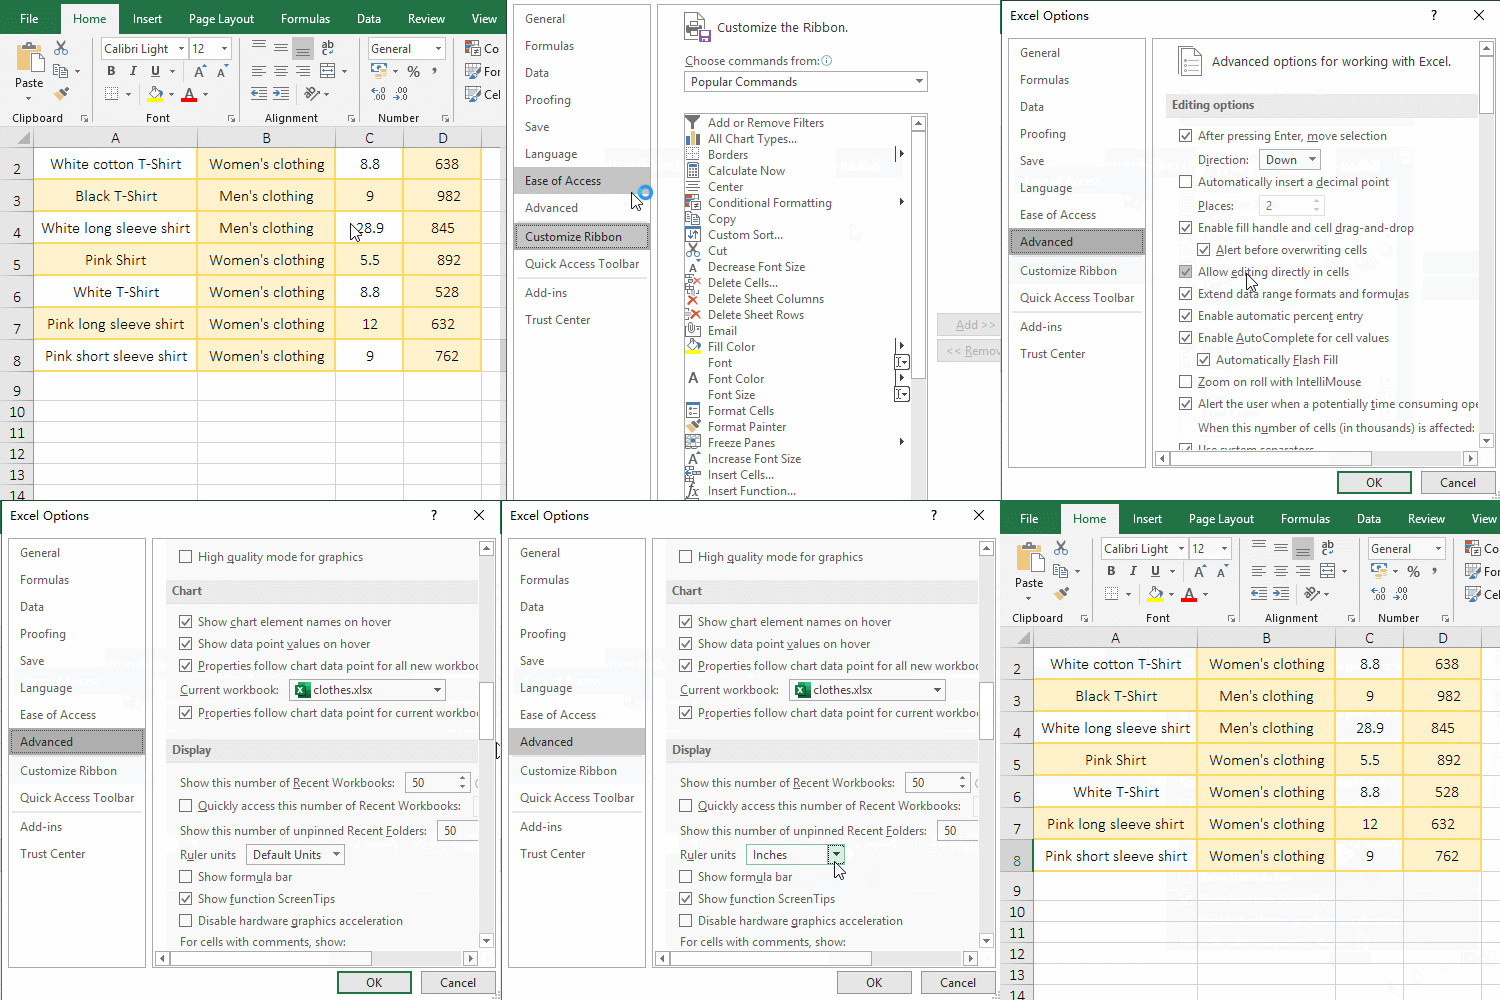
Figure 10
III, How to set the row height and column width equal, ie the cell becomes square in Excel
After switching from the "Normal view" to the "Page Layout", the default units of row height and column width are all changed to centimeters. To set the row height and column width to be equal, just set them to the same value. For the operation method, refer to "II, How to convert Excel row height or column width to inches, centimeters(cm) or millimeters(mm)".
IV, Excel fixed row height and column width
1. Select A1, hold Alt, click the last cell D8, selcect the table to fix the row height and column width. Press Ctrl + 1 to open the "Format Cells" dialog, select the "Protection" tab, and click "Locked", does not check it, Click " OK". Press and hold Alt, press H once, press O once, press P once, open the "Protect Sheet" dialog, uncheck "Format Columns and Format Rows", click "OK". Double-click the cell B2, you can also edit, then move the mouse to the right line of column A, the mouse does not change to a cross with a horizontal arrow, indicating that the column cannot be adjusted, and then move the mouse to the lower line under the first row number 1, the mouse does not become an icon for adjusting the row height; the operation process steps are as shown in Figure 11:
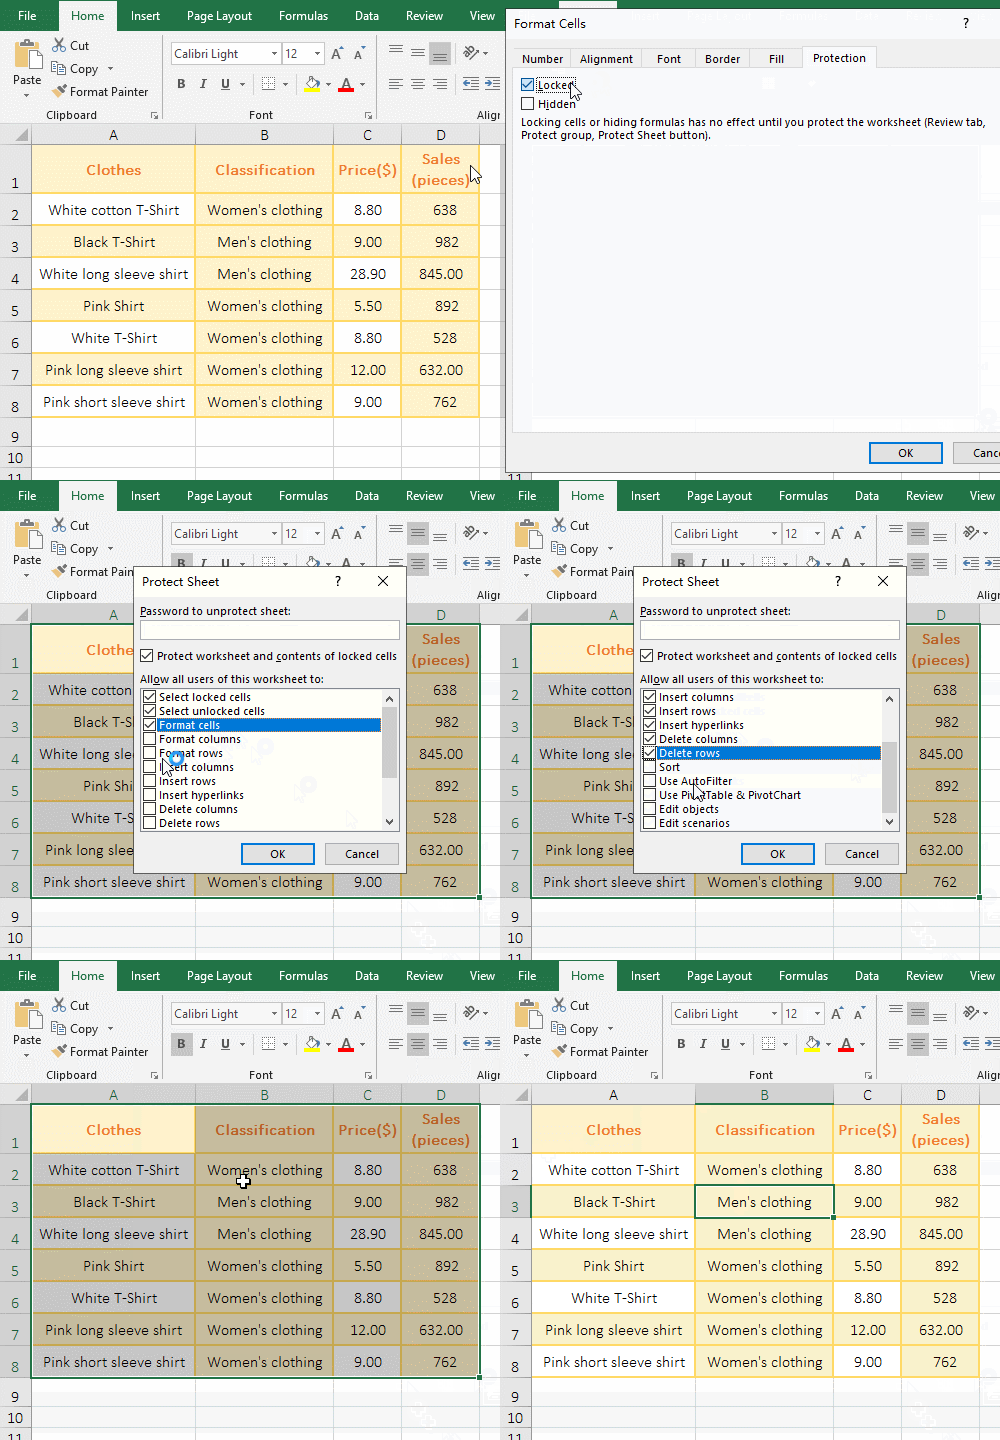
Figure 11
2. Tip: If you only fix the row height, do not check "Format Rows"; if you only fix the column width, do not check "Format Columns". In addition, open the "Protect Sheet" dialog, you can also click "Format" under the "Home" tab, select "Protect Sheet..." in the pop-up menu.
-
Related Reading
- Excel Len and LenN function usage(7 examples, with I
- Excel Search function and SearchB usage(13 examples,
- Excel CountA and CountBlank function usage examples(
- Excel lookup function usage(Multiple conditional and
- How to use Replace function in excel(9 examples, wit
- Excel AverageIfs fuction usage(7 examples, include m
- 8 examples of Excel Match function, include it and S
- How to use offset function in excel, include it and
- How to use Excel rank function(11 examples, with Ran
- How to use Excel frequency function(6 examples, with
- Excel SumProduct function(multiple criteria, with if
- How to calculate standard deviation in excel(6 funct