How to make a table in Word, with inserting and drawing it and eraser a line
Tables are frequent visitors in the process of making documents, so making table is one of the important contents in Word, and there are many features related to it. How to make a table in Word? There are two ways to make a table, one is inserting, the other is drawing; inserting is simpler and faster, drawing also has its advantages, that is, it is flexible. There are two ways to insert a table in Word, one is the selection insertion, the other is the input insertion. The former only needs to select the number of columns and rows in the table menu to insert the corresponding table. The latter only need to enter the number of columns and rows to insert.
What is draw table in Microsoft Word? Drawing a table is like drawing a table on paper with a pen. The difference is that the lines are very easy to draw straight and the outer border of the table must be drawn first. In addition to drawing a line with a pen in Word, you can also insert a line, and you can insert both a straight line and a horizontal line. The method of insertion: you can insert a line every time you click, and the position of insertion can be up, down, left, and right of the current line.
I. How to insert table in Word (How to create a table in Word)
(I) Selection insertion
1. After creating or opening a new document, select the Insert tab, click the Table icon in the upper left corner of the screen, and in the pop-up menu, select the grid under the Insert Table. A preview table will also appear when you select in the document, the word Insert also becomes the selected number of columns x number of rows. Select 5 columns and 4 rows, click the left button of mouse, a table with 5 columns and 4 rows is inserted into the document, and Word also switches to the Design tab at the same time. The operation steps are shown in Figure 1:
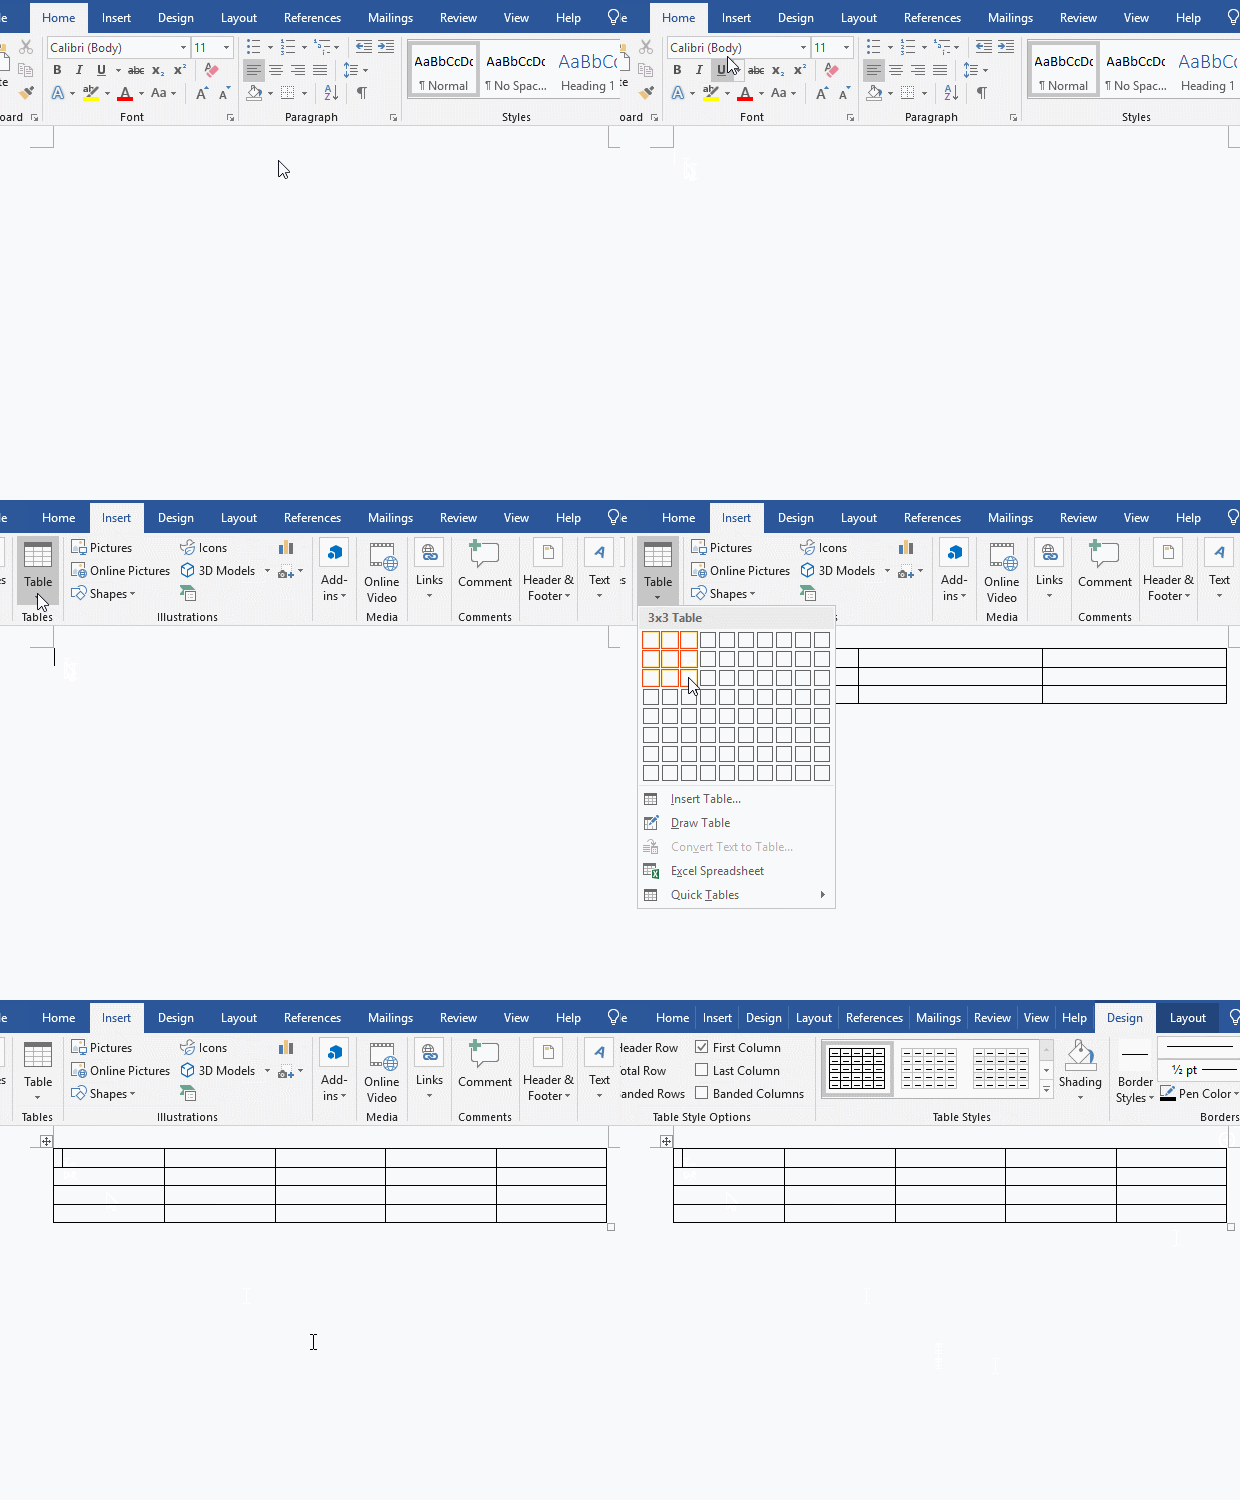
Figure 1
2. A table is inserted in this way, and then you can add content to it and set the style of table.
(II) Input insertion
1. Click Table under the Insert tab, and select Insert Table in the pop-up menu, open the Insert Table window. There is Number of Columns and Numbers of Rows under Table Size. There are input text boxes behind them. You can directly fill in the number of columns and rows of the table you want to insert, or you can click the Up Arrow and Down Arrow to increase or decrease. For example, to insert a table with 6 columns and 6 rows, enter 6 after the Number of columns and Number of Rows;
2. There are three options for adjusting the width of table under AutoFit behavior, which are: Fixed column width, AutoFit to contents and AutoFit to window. After Fixed column width, there is a text input box, the default value is Auto, that is to adjust the column width according to the content; you can also enter the column width, for example, enter 1.2";
3. There is no special requirement, just keep the default value Auto for the column width; AutoFit to contents means that the content increases and the column width automatically increases; Fixed column width means that the window becomes larger, the table becomes larger, the window becomes smaller, and the table becomes smaller.
4. After clicking OK, a table with 6 columns and 6 rows is inserted into the document. The operation steps are shown in Figure 2:
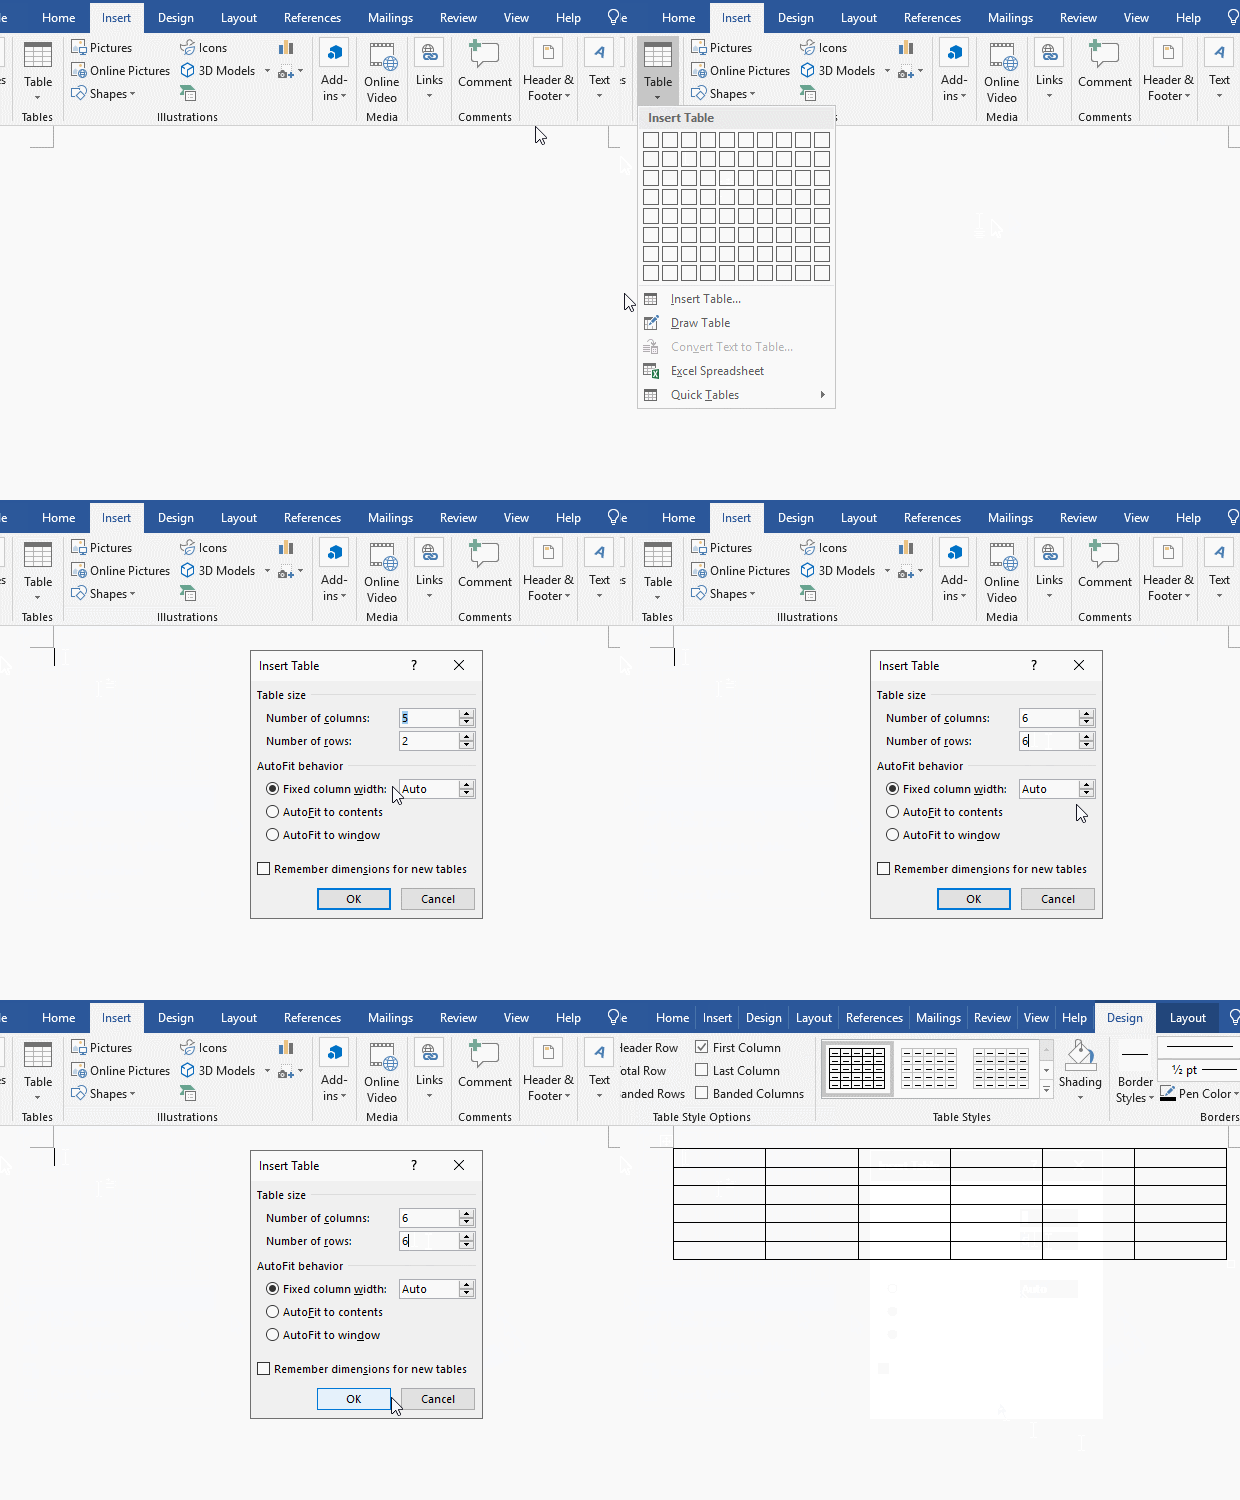
Figure 2
The above two methods of inserting tables are very fast. You can choose an insert method that suits your habits.
II. How to draw a table in Word
(I) How to draw table in MS Word
1. After creating or opening a document, select the Insert tab, click the Table icon in the upper left of the screen, and select Draw Table in the pop-up menu. The pointer becomes a pencil, move it to the starting point of the table to be drawn, hold down the left button and drag to the lower right corner. When the drawn outline is long and wide enough, release the left button to draw the outline of the table. The operation steps are shown in Figure 3:
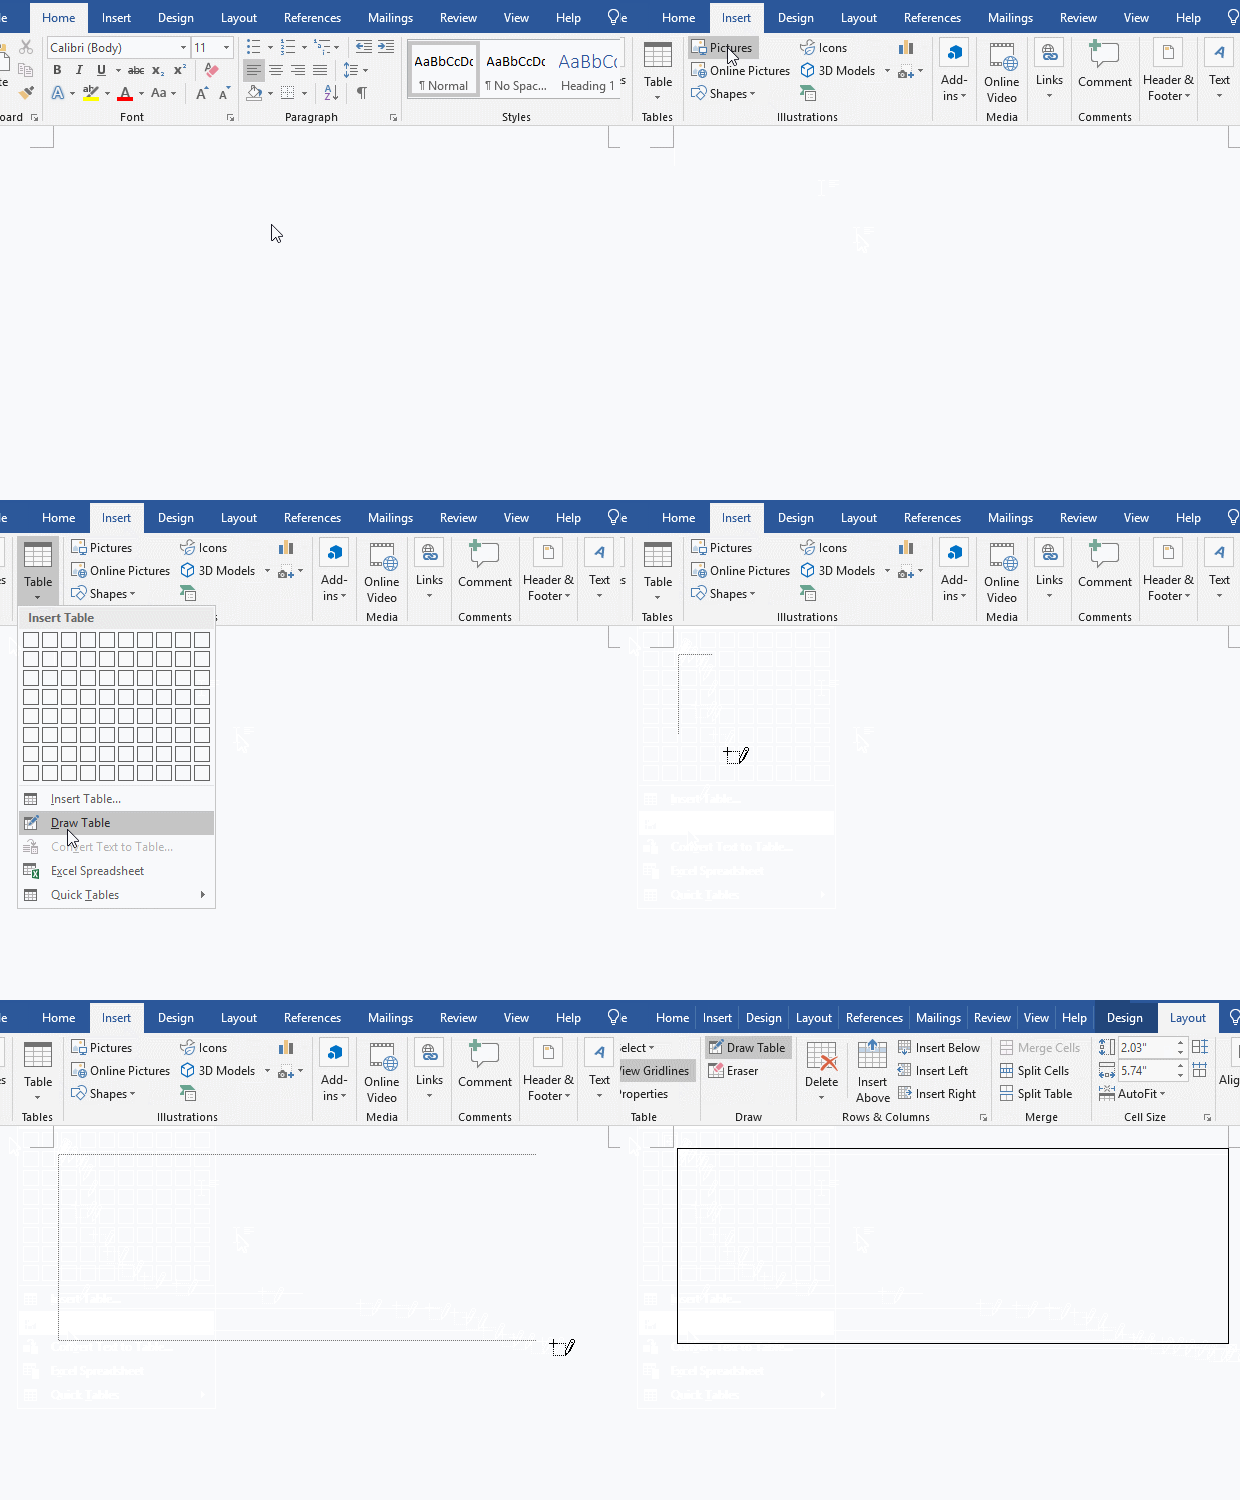
Figure 3
2. The next step is to draw horizontal and vertical lines. (How to draw a line in a table in Word?) Draw a horizontal line first, move the pointer to the starting pointer of the first horizontal line (the left line slightly below the upper left corner of the outer border), hold down the left button and drag to the right, after dragging a certain distance, one horizontal line is drawn, and other straight lines are drawn in the same way. The operation steps are shown in Figure 4:
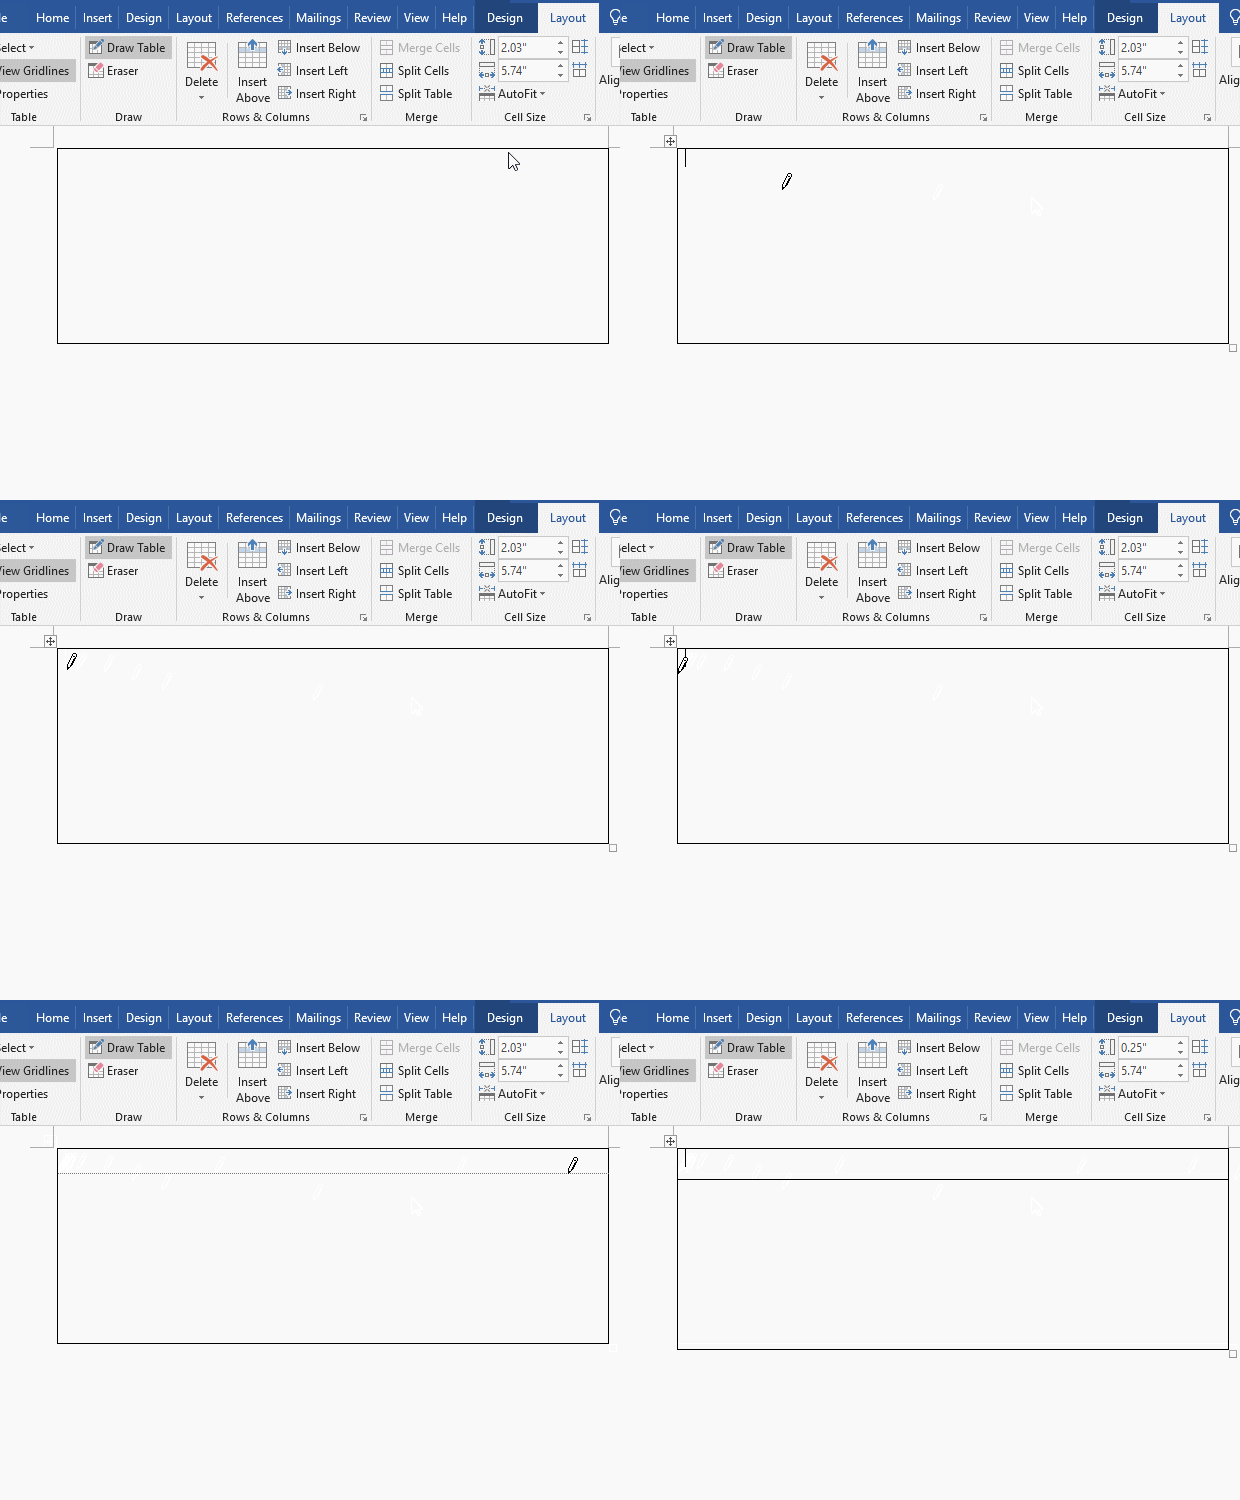
Figure 4
3. The method of drawing a vertical line is the same as that of drawing a straight line. Move the pointer to here next to the upper line of the upper left corner of the table, hold down the left button and drag it down. After dragging for a certain distance, a vertical line will be drawn. Draw other vertical lines in the same way. The operation steps are shown in Figure 5:
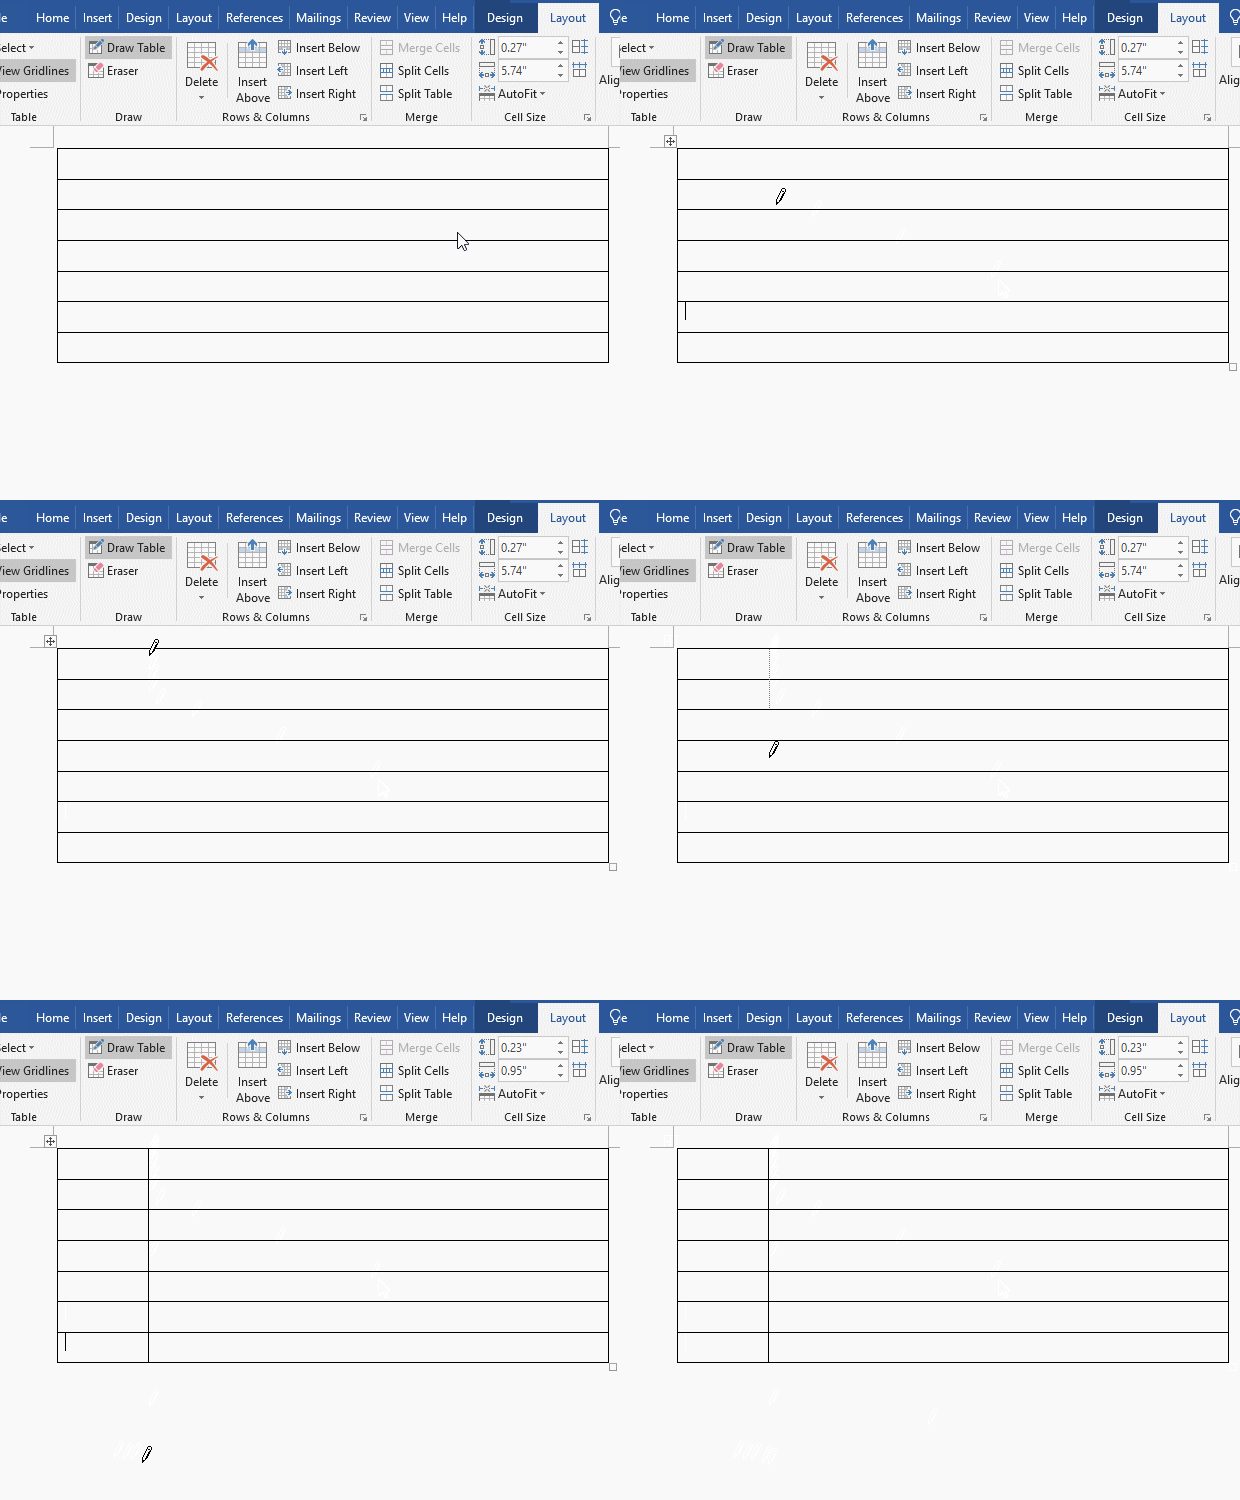
Figure 5
(II) How to insert a line in a table in Word?
1. There are Insert Above, Insert Below, Insert Left and Insert Right in the Layout tab, which are used to insert lines (i.e. rows and columns); Insert Above means Insert a line above the current line (the line where the cursor is). For example: Position the cursor on the last row of the first column, click Insert Above, and immediately insert a row above the current row. The selected row (the row filled with gray) is the one just inserted. The operation steps are shown in Figure 6:
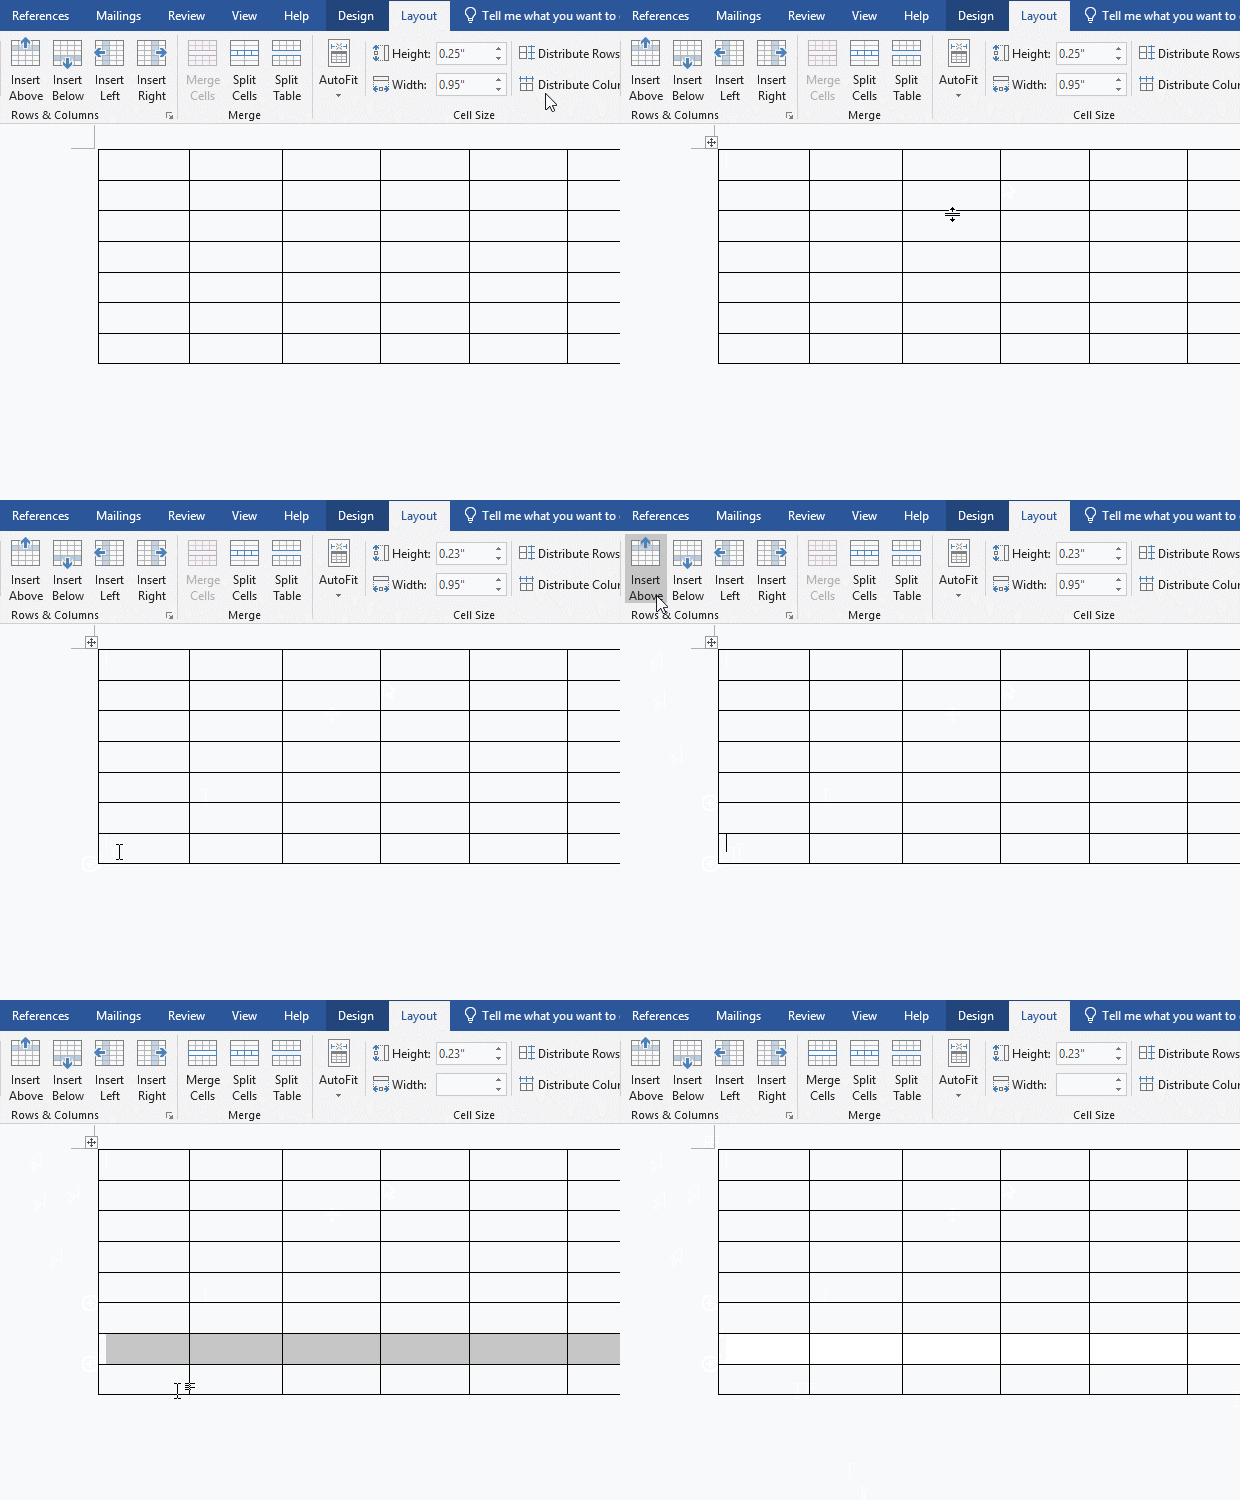
Figure 6
2. Insert a column. Position the cursor on the last column of the first row and click Insert Right to immediately insert a column to the right of the current column. The operation steps are as shown in Figure 7:
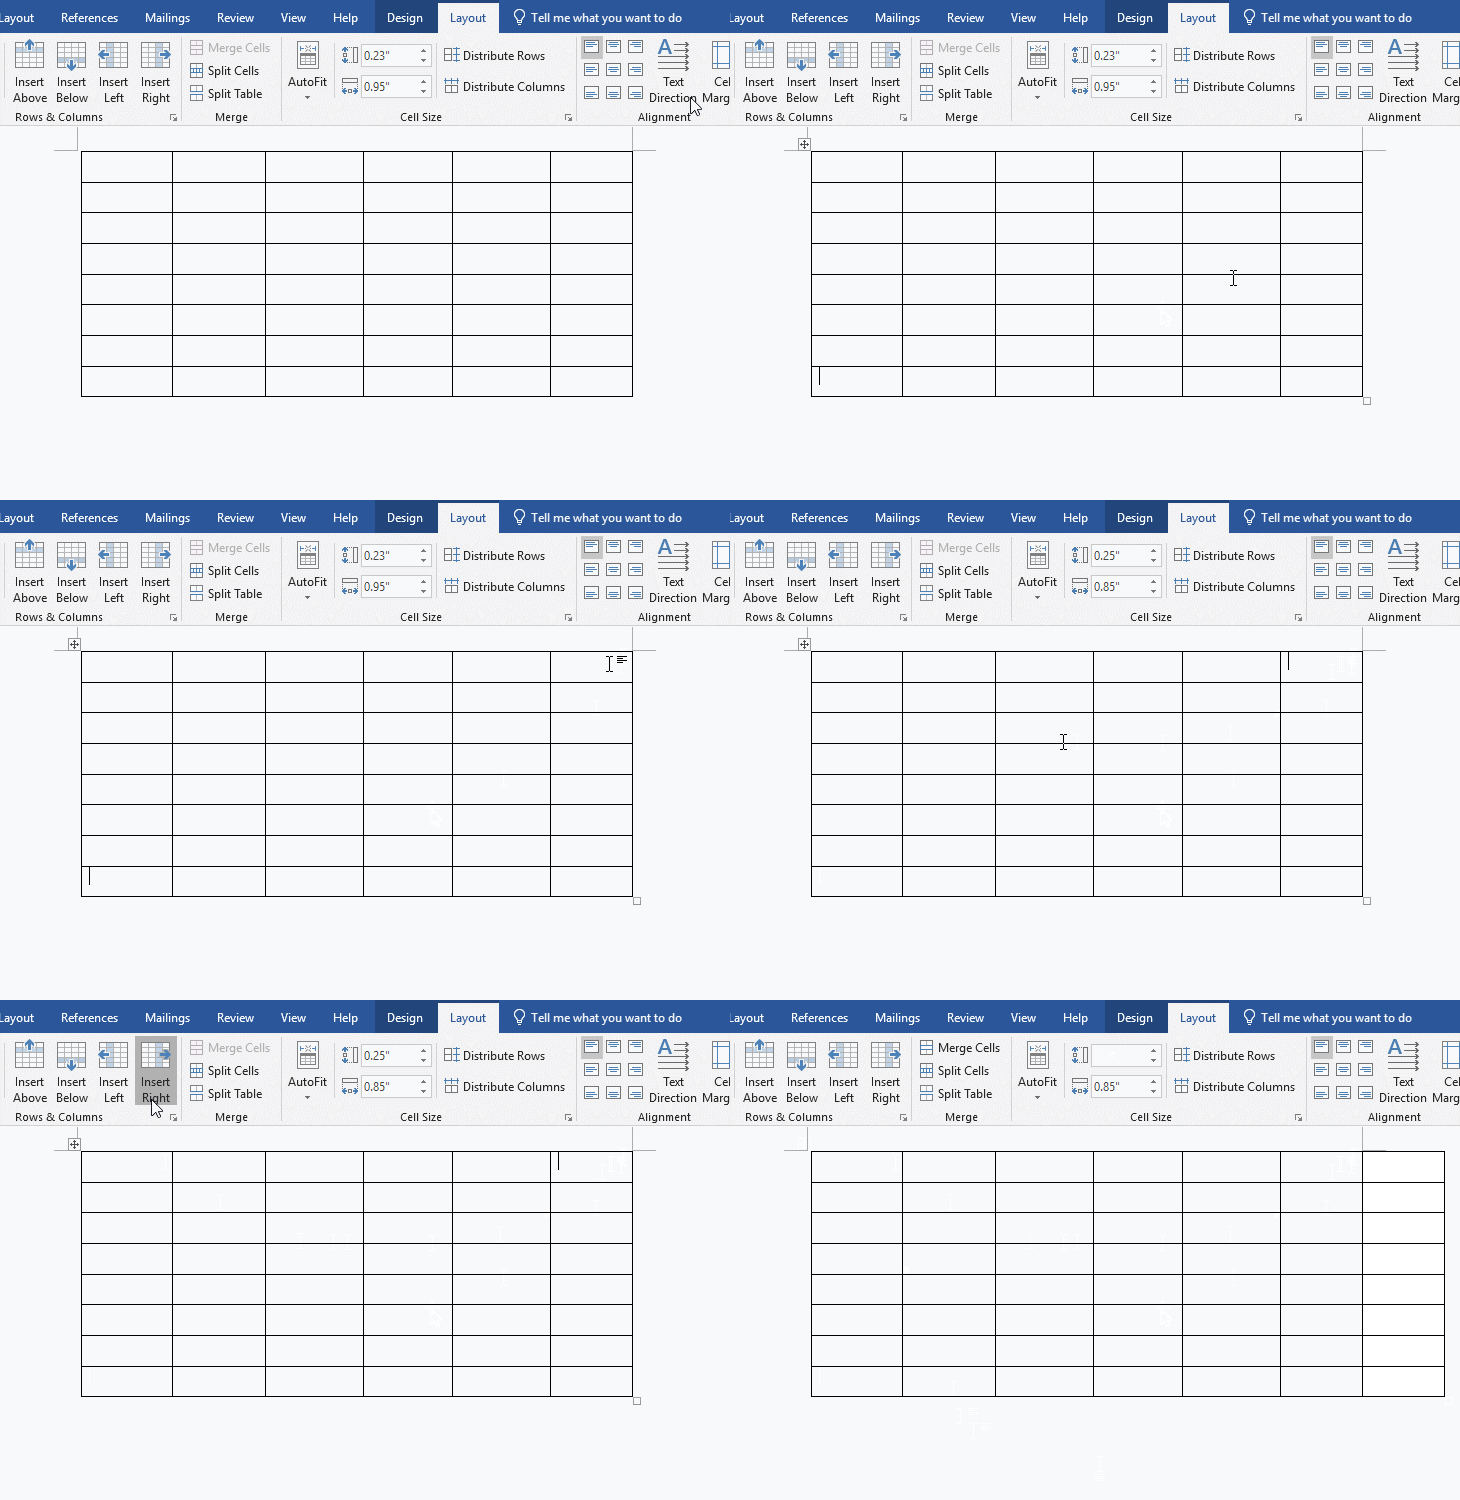
Figure 7
3. The inserted column is too wide and has exceeded the right side of the document, indicating that the small square in the lower right corner of the table has moved outside the document. Insert other lines in accordance with the above method.
(III) How to erase table lines in Word
1. If a line is drawn wrong, you can erase it. Select the Layout tab, click the Eraser icon, the pointer becomes the shape of an eraser, move it to the line you want to erase (for example: the last inner line), hold down the left button and drag to select a part of the line to be erased, the line will be erased. The operation steps are shown in Figure 8:
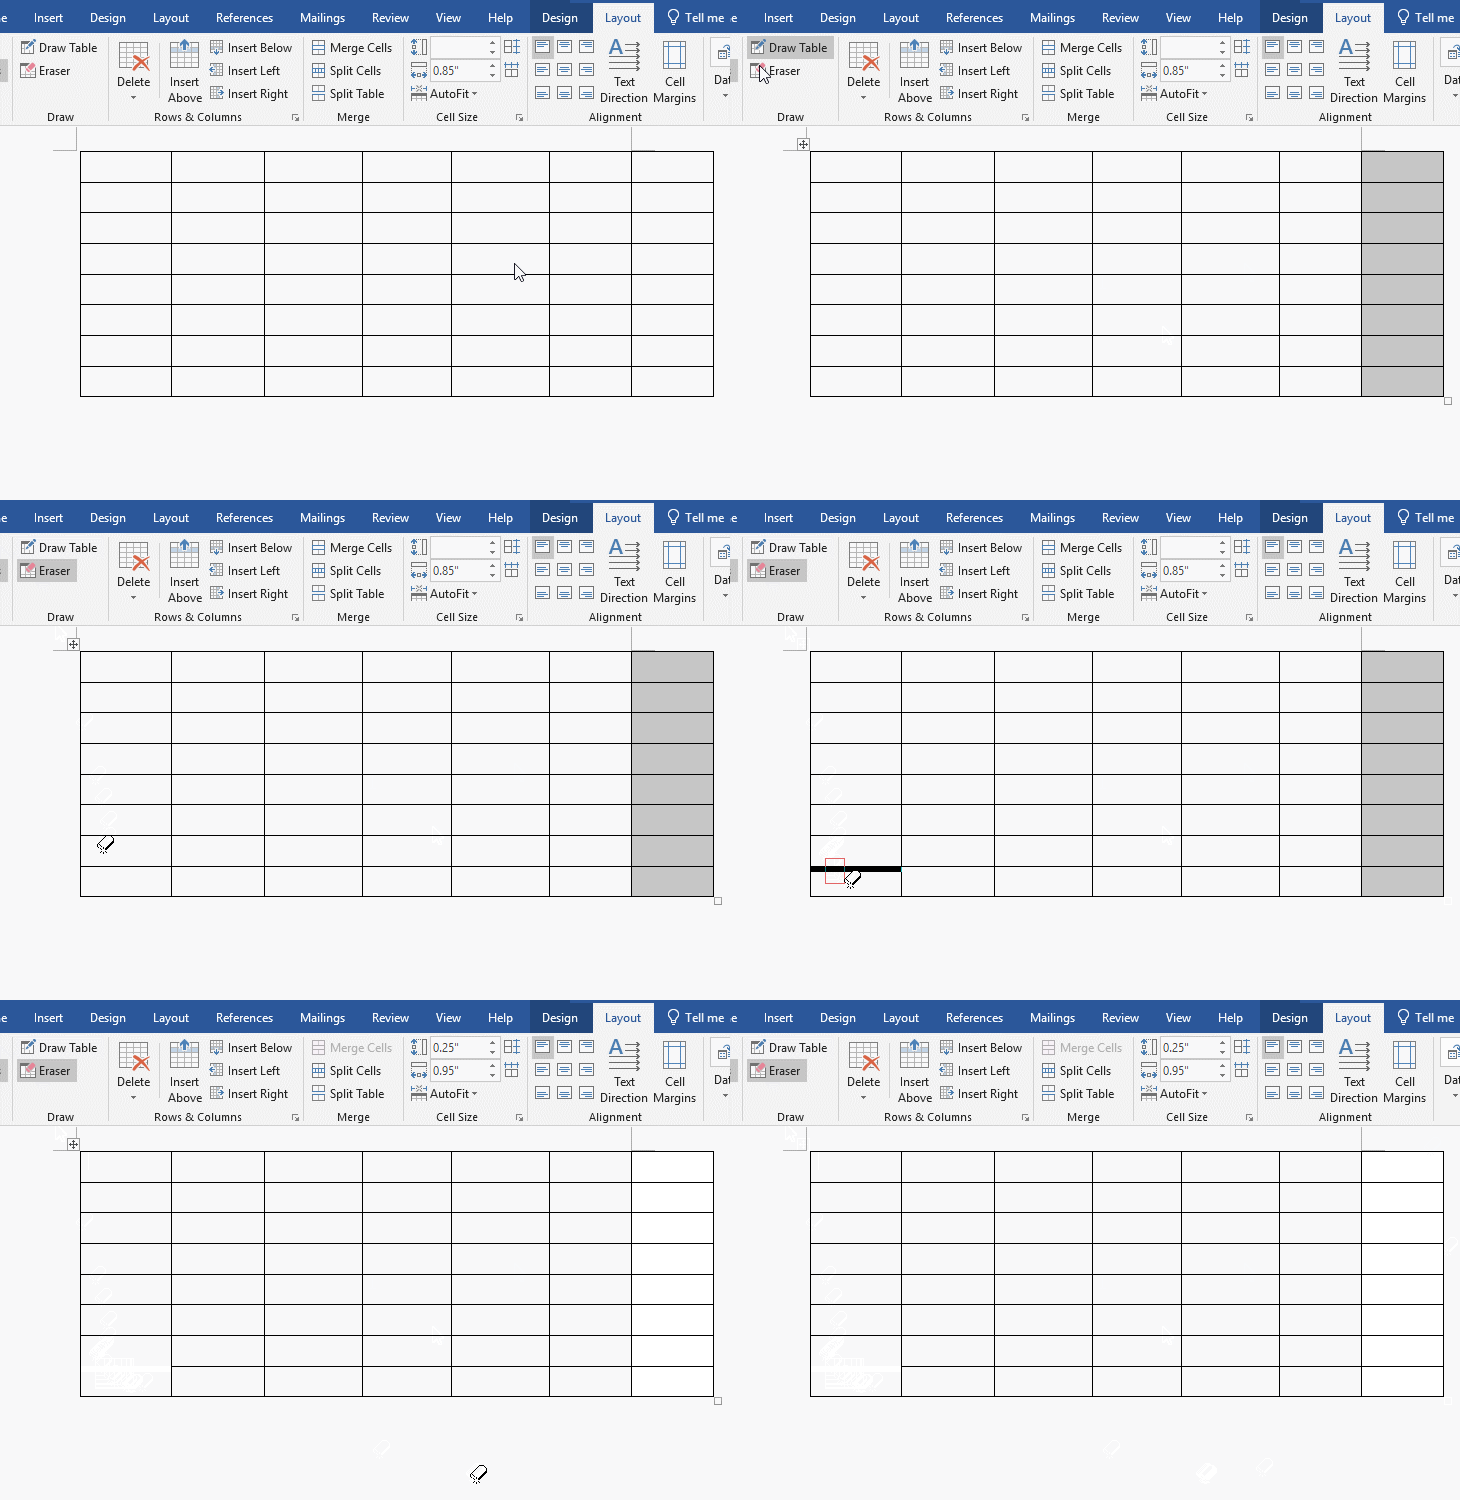
Figure 8
2. The section of the first inner line from the bottom is erased in the lower left corner of the table.
-
Related Reading
- How to delete table lines in Word (one line, remove
- How to set Header and footer in word(13 examples), i
- C# hashtable synchronized and SyncRoot(cost comparis
- How to move rows,columns,cells,table in excel(there
- How do I rotate a page 90 degrees in Word, with rota
- How to insert symbol in Word (degree celsius, copyri
- How to insert bullets in Word, with adjusting spacin
- C# Hashtable create, add, update, remove and removed
- Combine multiple excel sheets into one pivot table w
- How to create a pivot table in excel(15 examples, wi
- Excel pivot table percentage of grand total(parent r
- How to make a table of contents in word and change,
