How to insert bullets in Word, with adjusting spacing, horizontal bullets and changing default type
The default bullets in Word is a list, that is, there is only one bullet before each line. If you require multiple bullets per line, you need to use the input or insert method to achieve. When entering a bullet, you can only enter the default bullet. If you want to enter a bullet that is not the default, you need to set it as the default first.
The space between the bullet and text can be adjusted, mainly through the Bullet position, Text indent and Nothing. Modifying them, you can set different formats; the text and bullets are not aligned by default, and you can also modify them to align. If you want to remove bullets, you can remove one or multiple at a time.
I. How to insert bullets in Word
1. How to add bullets in Word
Select a list you want to add bullets, select the Home tab, click the Bullets icon, and add the default bullet dot to the selected list. If you want to use other bullets, click the Down Arrow next to the Bullets icon, and select a bullet from the pop-up menu, such as Right-pointing black and white arrow. The demonstration is shown in Figure 1:
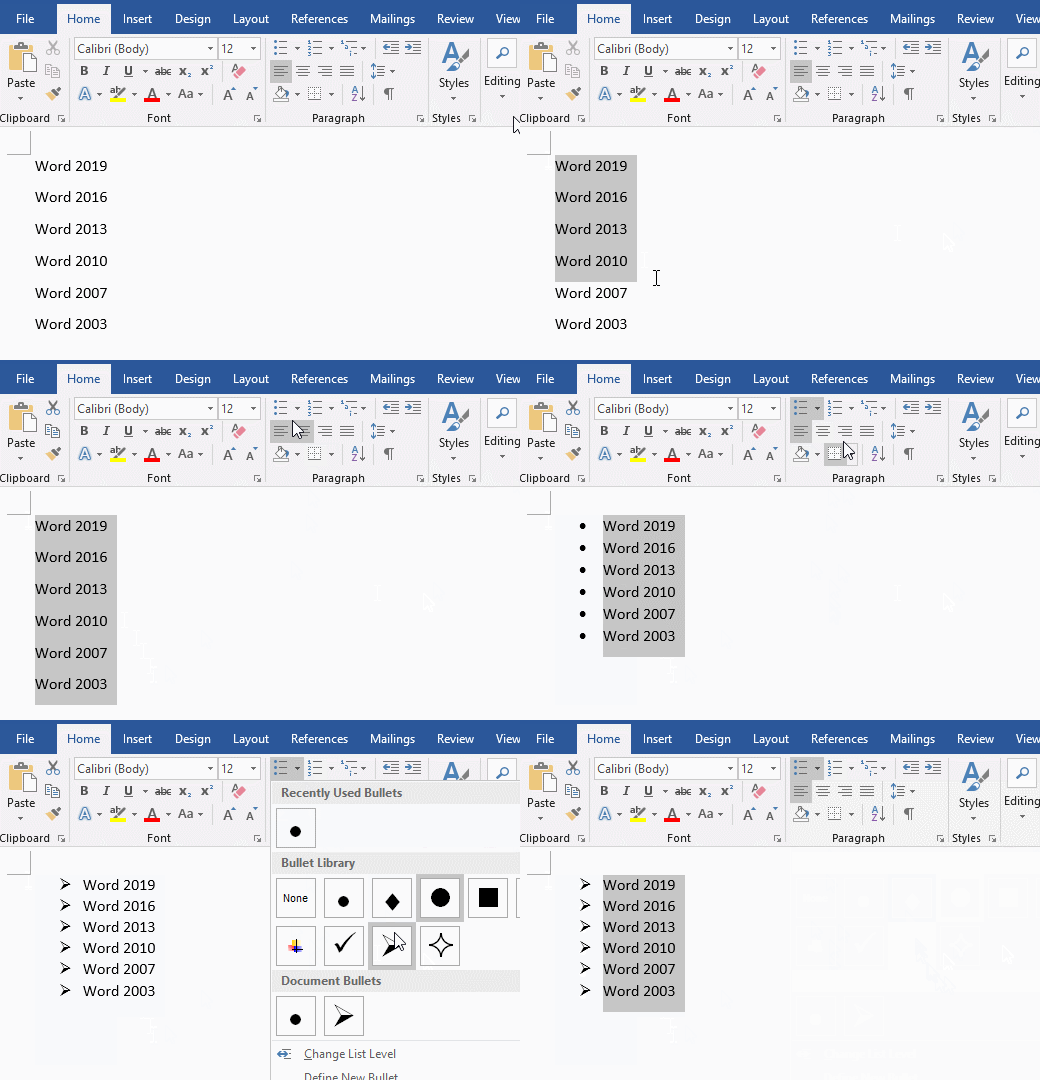
Figure 1
Note: You can also select a bullet first, and then enter the text.
2. How to add horizontal bullets in Word
Position the cursor in front of the text you want to add bullet, hold down the Alt key on your keyboard, enter 0149 on the numeric keyboard, release the Alt key, enter a default dot, and continue to enter other bullets in the same line. The demonstration is shown in Figure 2:
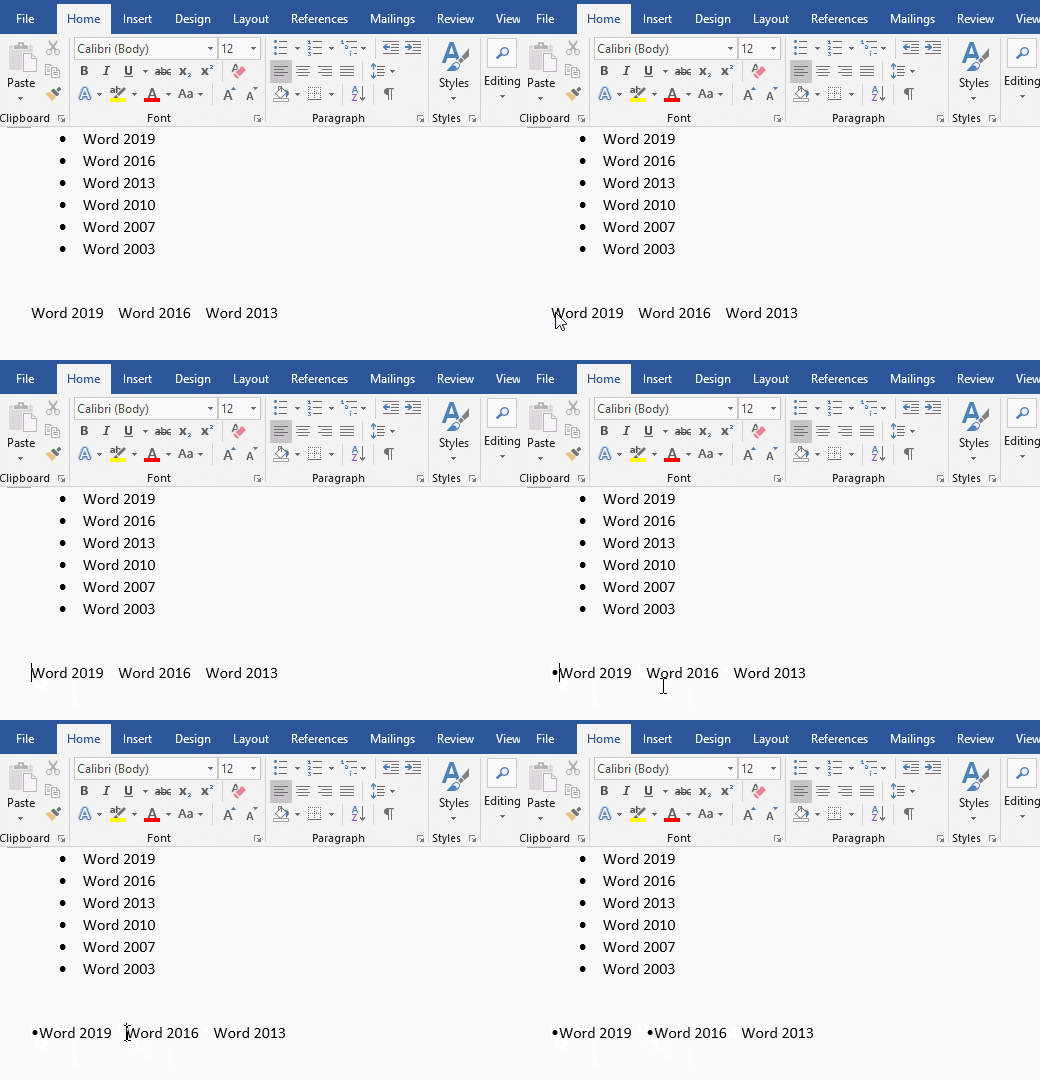
Figure 2
Note: If you want to enter other bullets, you can set them as the default bullets or insert them from the Symbols window.
II. How to make all bullet points the same size in Word
The bullet cannot be resized independently, it is integrated with the text, and the size of text needs to be adjusted to adjust its size. Select the text you want to adjust the bullet size, select the Home tab, click the Font Size drop-down list box, and select one of the font sizes that pop up, such as 12. All bullet points become the same size with the text. The demonstration is shown in Figure 3:
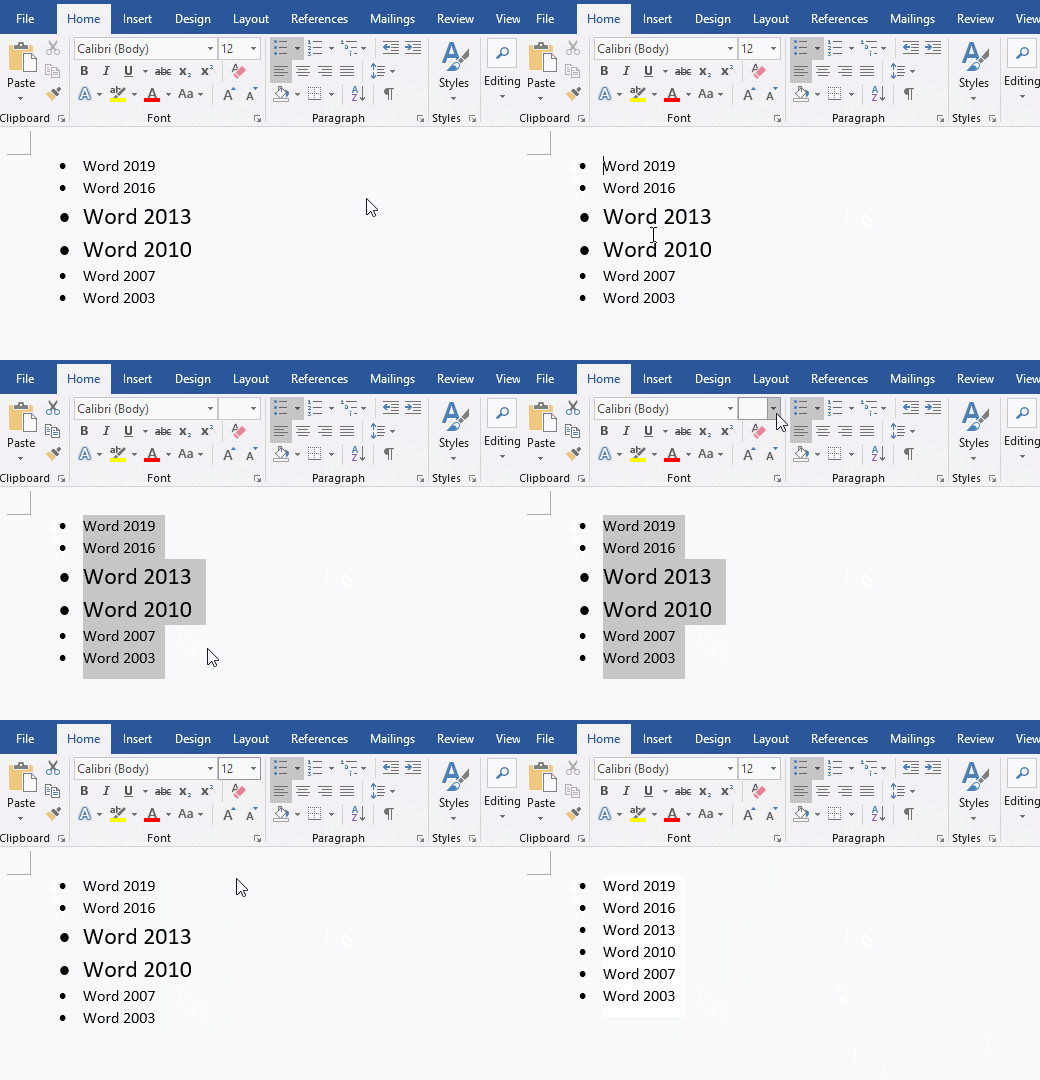
Figure 3
III. How to adjust bullet spacing in Word (How to reduce space between bullet and text in Word)
1. How to adjust bullet point spacing in Word? Select the bullets to be adjusted, then right-click them (or directly right-click them), and select Adjust List Indents from the pop-up menu, open the Adjust List Indents window. Decrease the Text indent. for example, change it to 0.1 inch, click OK. the space between the bullets and text becomes smaller. The demonstration is shown in Figure 4:
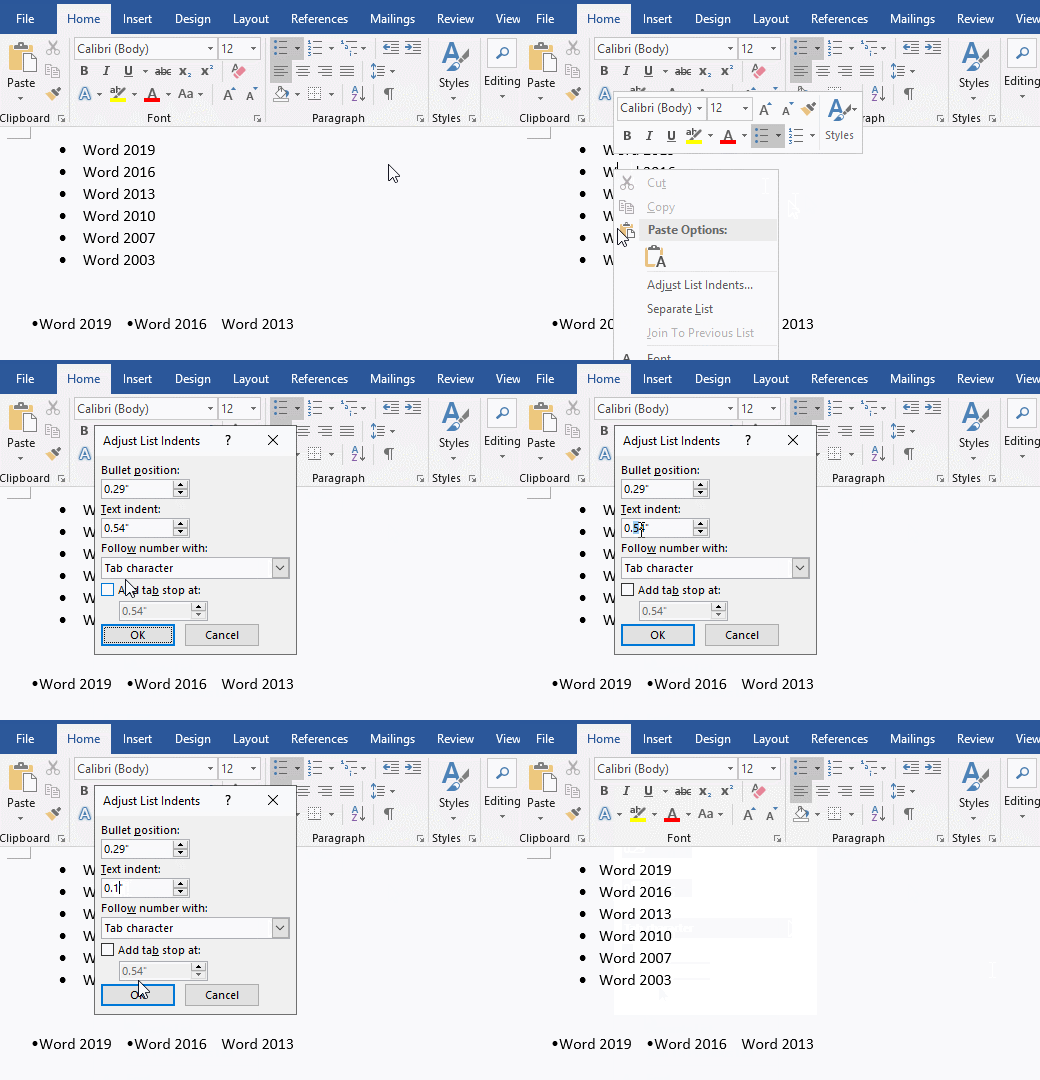
Figure 4
2. How to adjust the bullet position? Open the Adjust List Indents window in the same way, change the Bullet Position to 0.1 inch, click OK. and the space between the bullet and the page margin becomes 0.1 inch. The demonstration is shown in Figure 5:
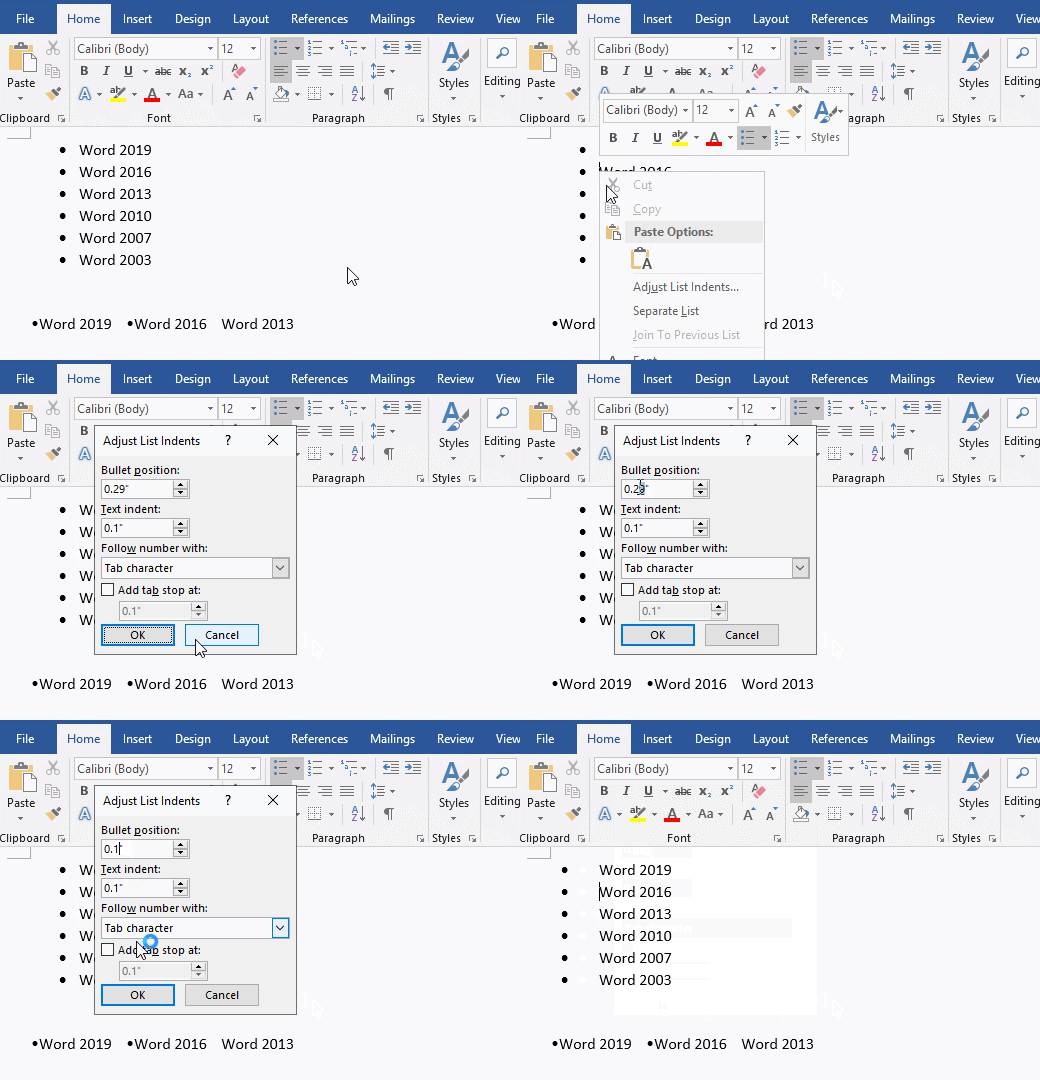
Figure 5
3. The space between bullets and text can be selected as Tab character, Space, and Nothing. Select Tab character. you can adjust the space between them by changing the Text indent. select Space. there is a space by default and can only increase or decrease their space by pressing the Space Bar; select Nothing. there is no space by default, but you can adjust their spacing by pressing the Space Bar. The demonstration is shown in Figure 6:
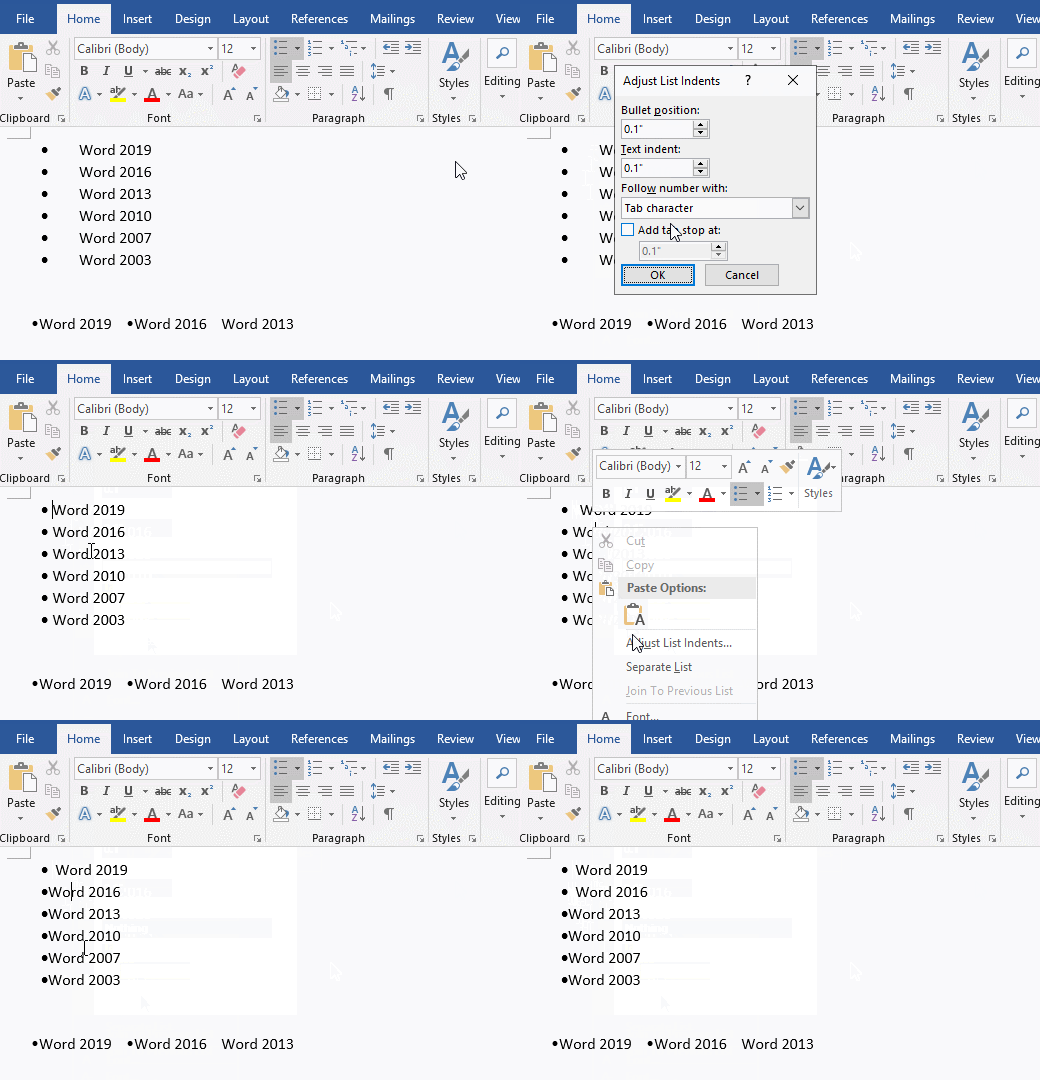
Figure 6
Because the position of the bullets are moved to the left, but the text is not moved, the space between the bullets and the text becomes larger. In the case of selecting Tab character. even if the Text Indent is adjusted to 0.1 inch, they spacing is still too large. After selecting Space. their spacing will become smaller.
IV. How to align bullets in Word
1. Adjust the alignment of the bullet and the text after the second line
Right-click the bullets to be adjusted, and select Adjust List Indents from the pop-up menu, open the Adjust List Indents window. Change the Bullet position and Text indent to 0, click OK. the bullets and the text after the second line of it have been aligned, but their spacing is too large. In the same way, open the Adjust List Indents window again, click the Follow number with drop-down list box, then select Space. click OK. and their spacing becomes appropriate. The demonstration is shown in Figure 7:
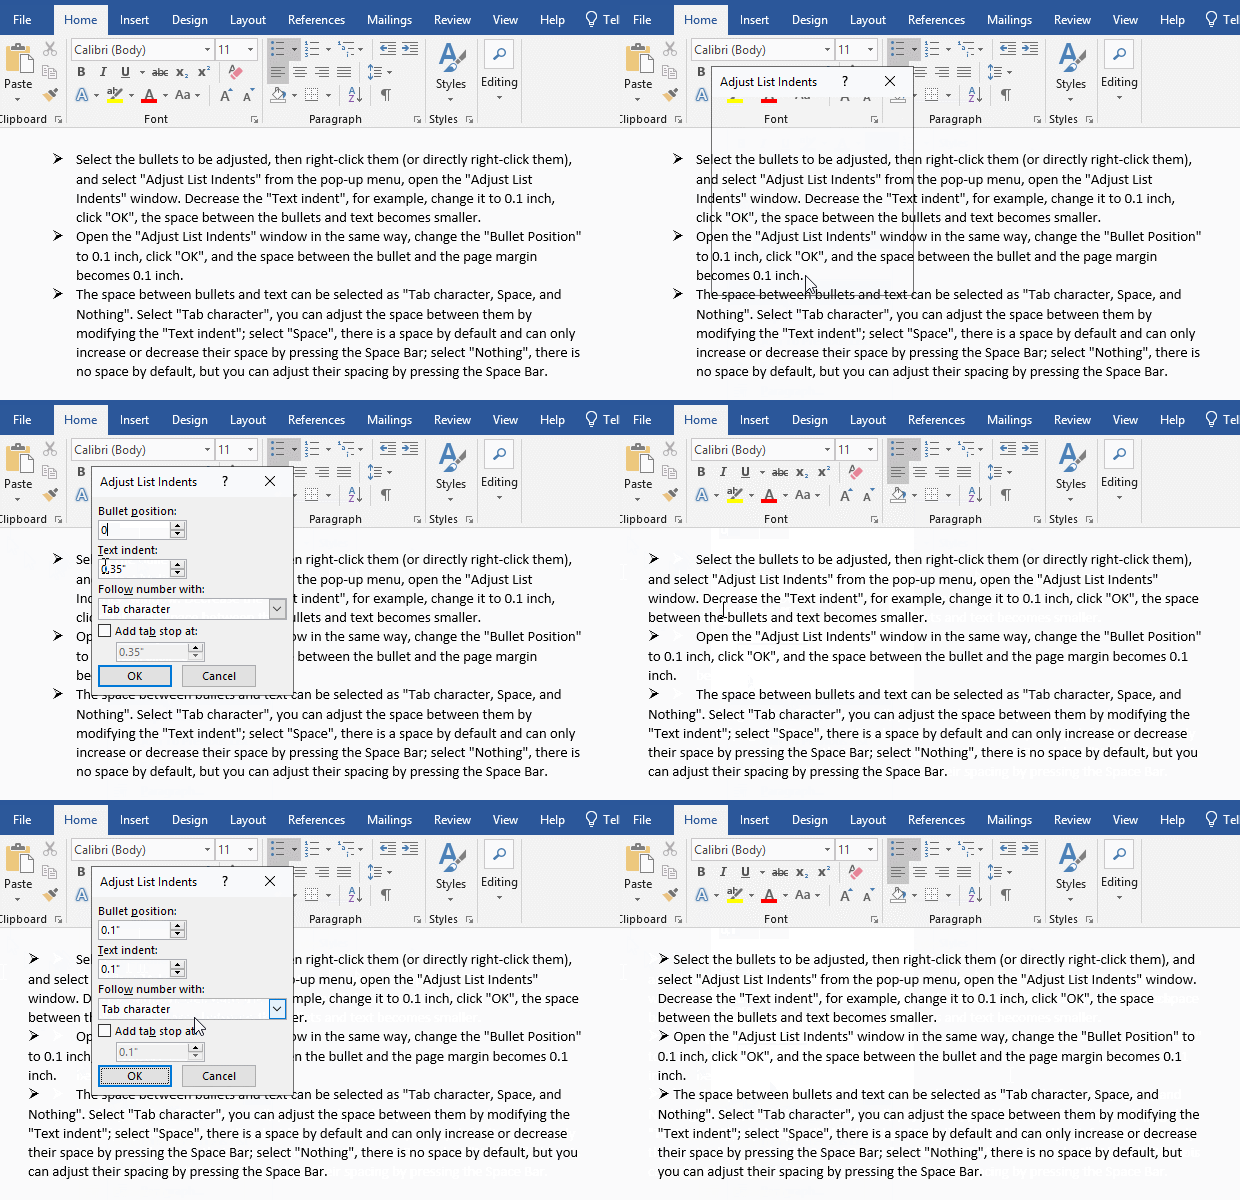
Figure 7
Bullet position and Text indent are changed to 0, they are automatically changed to 0.1 inch, because their default minimum value is 0.1 inch.
2. Set the bullets to First line indent
In the same way, open the Adjust List Indents window, change the Bullet position to 0.6 inches, click OK. and the bullets will have been indented. The demonstration is shown in Figure 8:
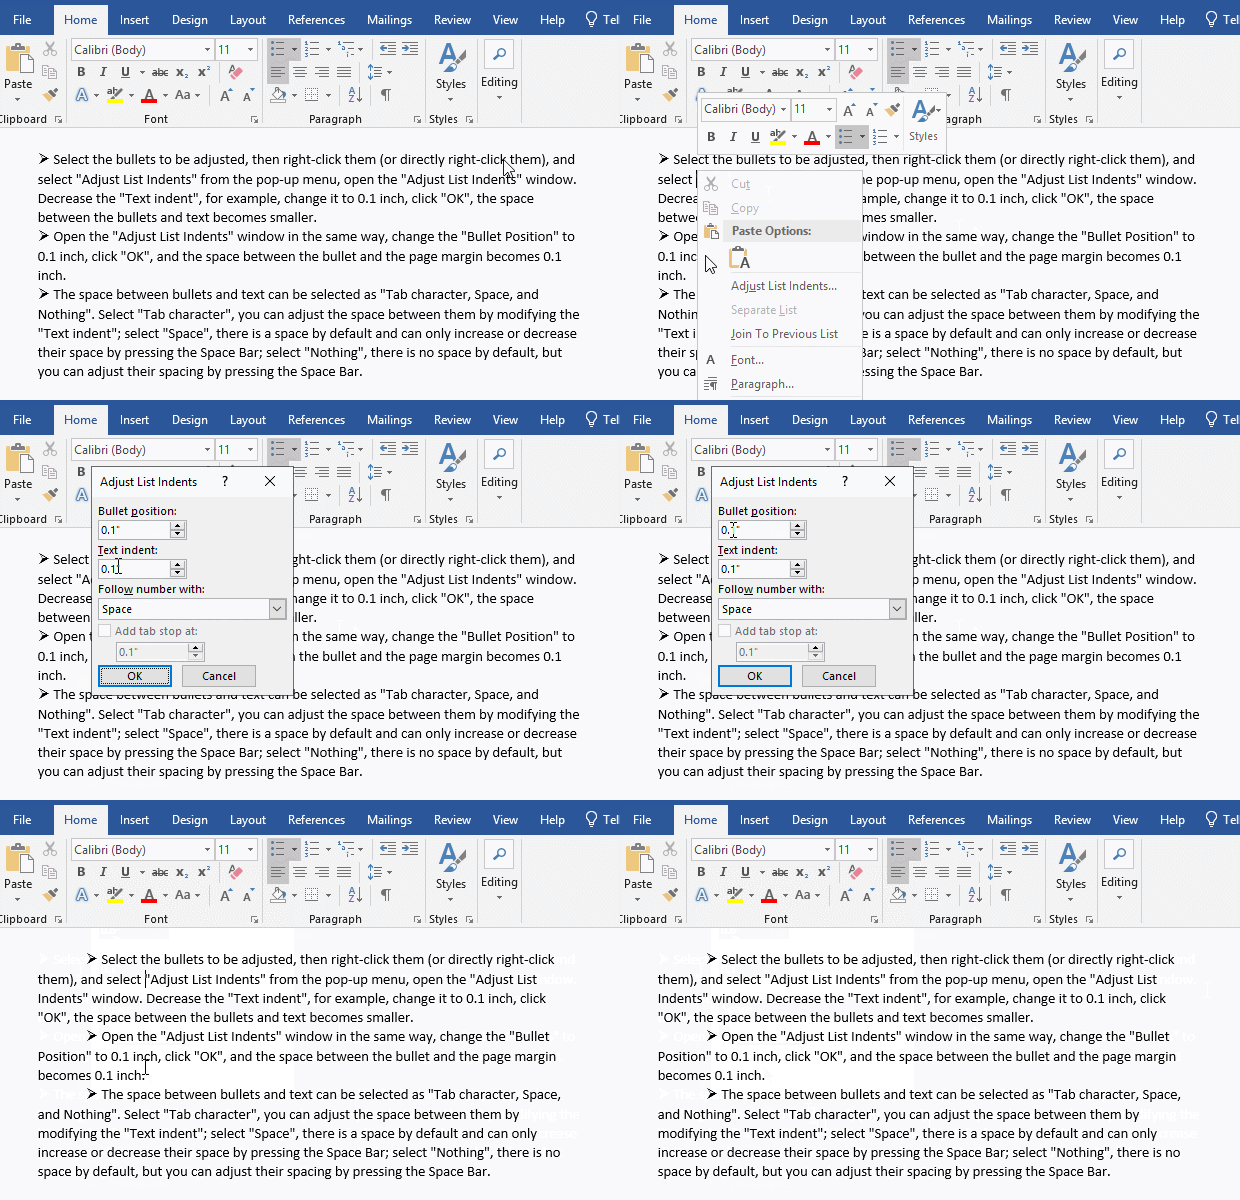
Figure 8
Note: You can adjust different formats by changing the Bullet position, Text indent and Follow number with. In addition, you can also set the bullets to indent by changing First line indent.
V. How to change default bullet type in Word
1. With a symbol in Word
Select the Home tab, click the Down Arrow next to the Bullets. select Define New Bullet in the pop-up menu, open the Define New Bullet window. Click the Symbols button to open the Symbols window, and select a symbol , Such as Hand pointing to the right. after clicking OK. the added symbol will already be displayed in the preview window. The demonstration is shown in Figure 9:
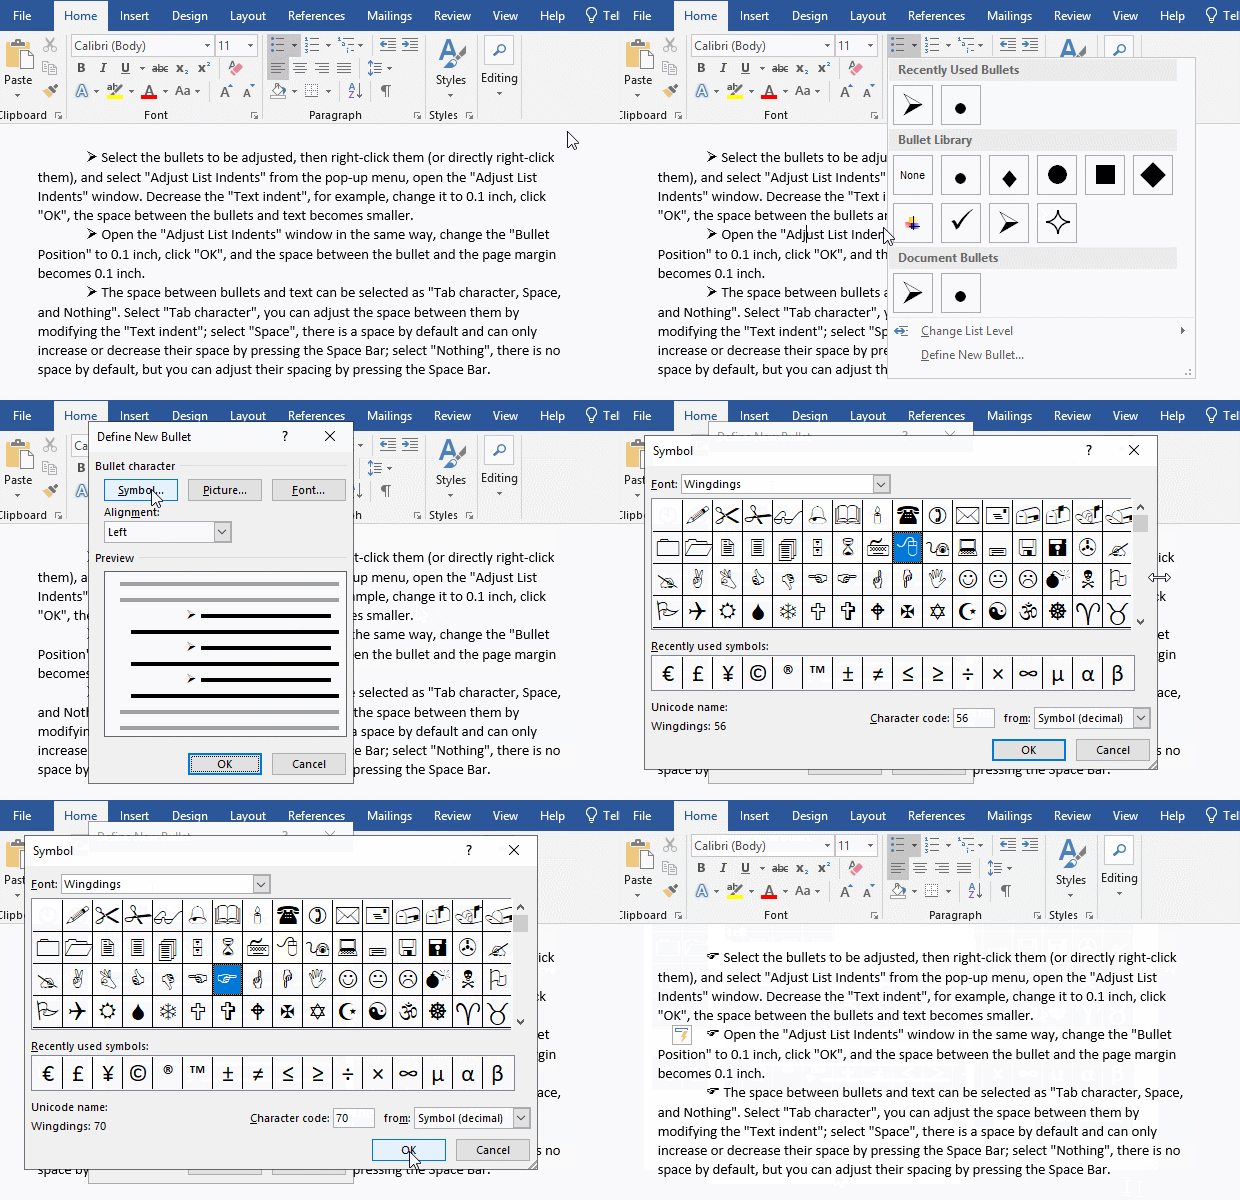
Figure 9
2. Set the picture as the default bullet
Open the Define New Bullet window in the same way, click the Picture button. Since the picture is selected from the Internet by default, it is not currently connected to the Internet, so it is prompted to connect to the Internet, do not worry about it, click Work offline to open Insert Picture window, navigate to the folder where the pre-prepared picture is located, for example: F:\temp, double-click the picture you want to insert (or select the picture to be inserted, and then click the Insert button), the selected picture is inserted into the Define New Bullet window, click OK. and the selected picture is taken as a bullet. The demonstration is shown in Figure 10:
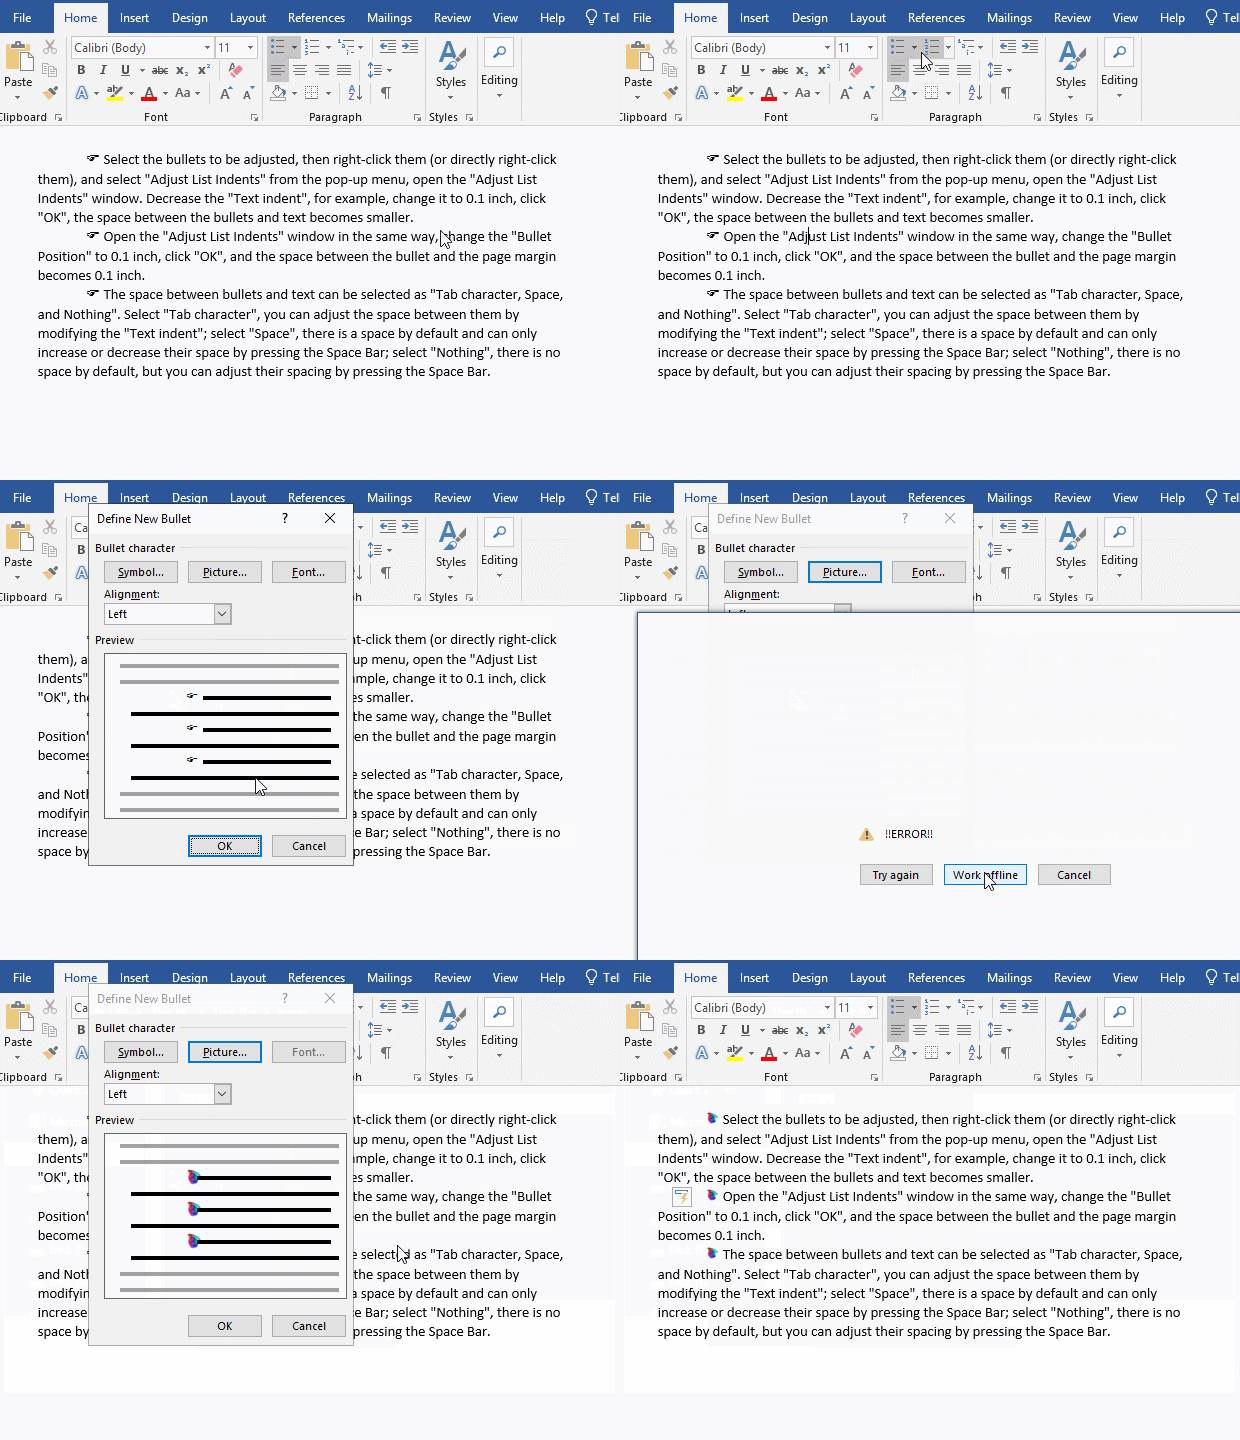
Figure 10
Note: If the picture is not displayed immediately, click Insert again to display it. The image has a height of 23px and a width of 25px, which is too small because it is reduced after insertion.
VI. How to remove bullets from a Word document (How to delete bullets in Word)
Delete a bullet. After positioning the cursor on the bullet to be deleted, click the Bullets icon to delete the bullet. Delete multiple bullets. Select the bullets to be deleted, click the Down Arrow next to the Bullets icon, and then select None. then all the selected bullets will be deleted. The demonstration is shown in Figure 11:
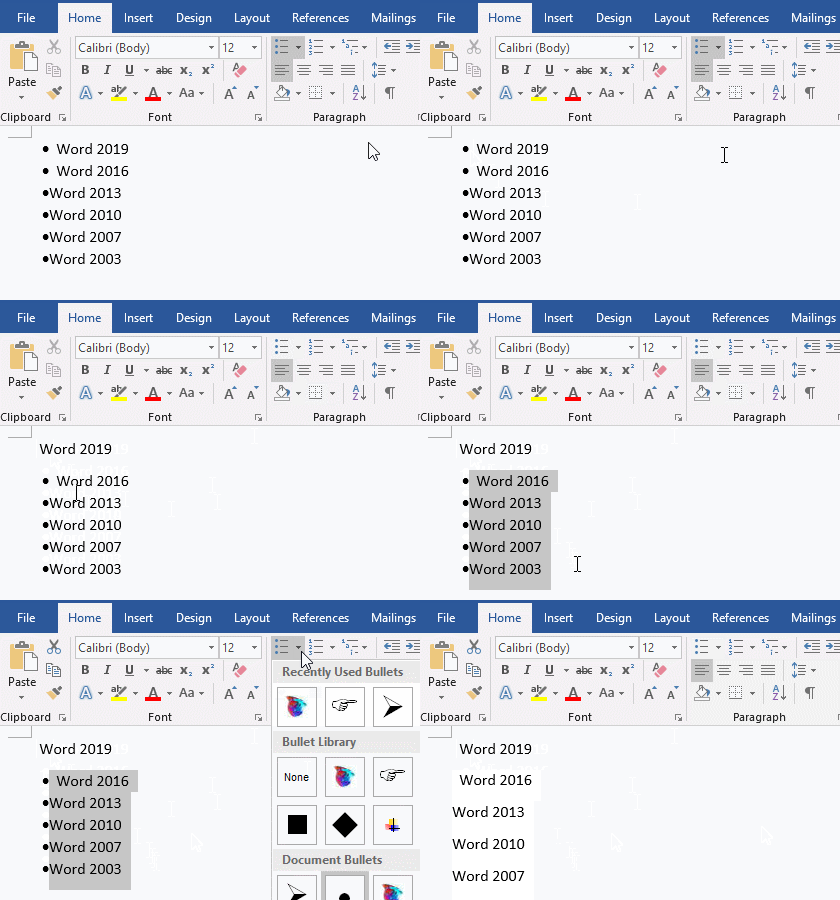
Figure 11
VII. How to change list level in Word
1. Select the list that you want to change list level, click the Down Arrow next to the Bullets icon, select Change List Level in the pop-up menu. The first line is the first level, and the level is gradually increased by one, and the last line is the level 9, select the second level, the demo is shown in Figure 12:
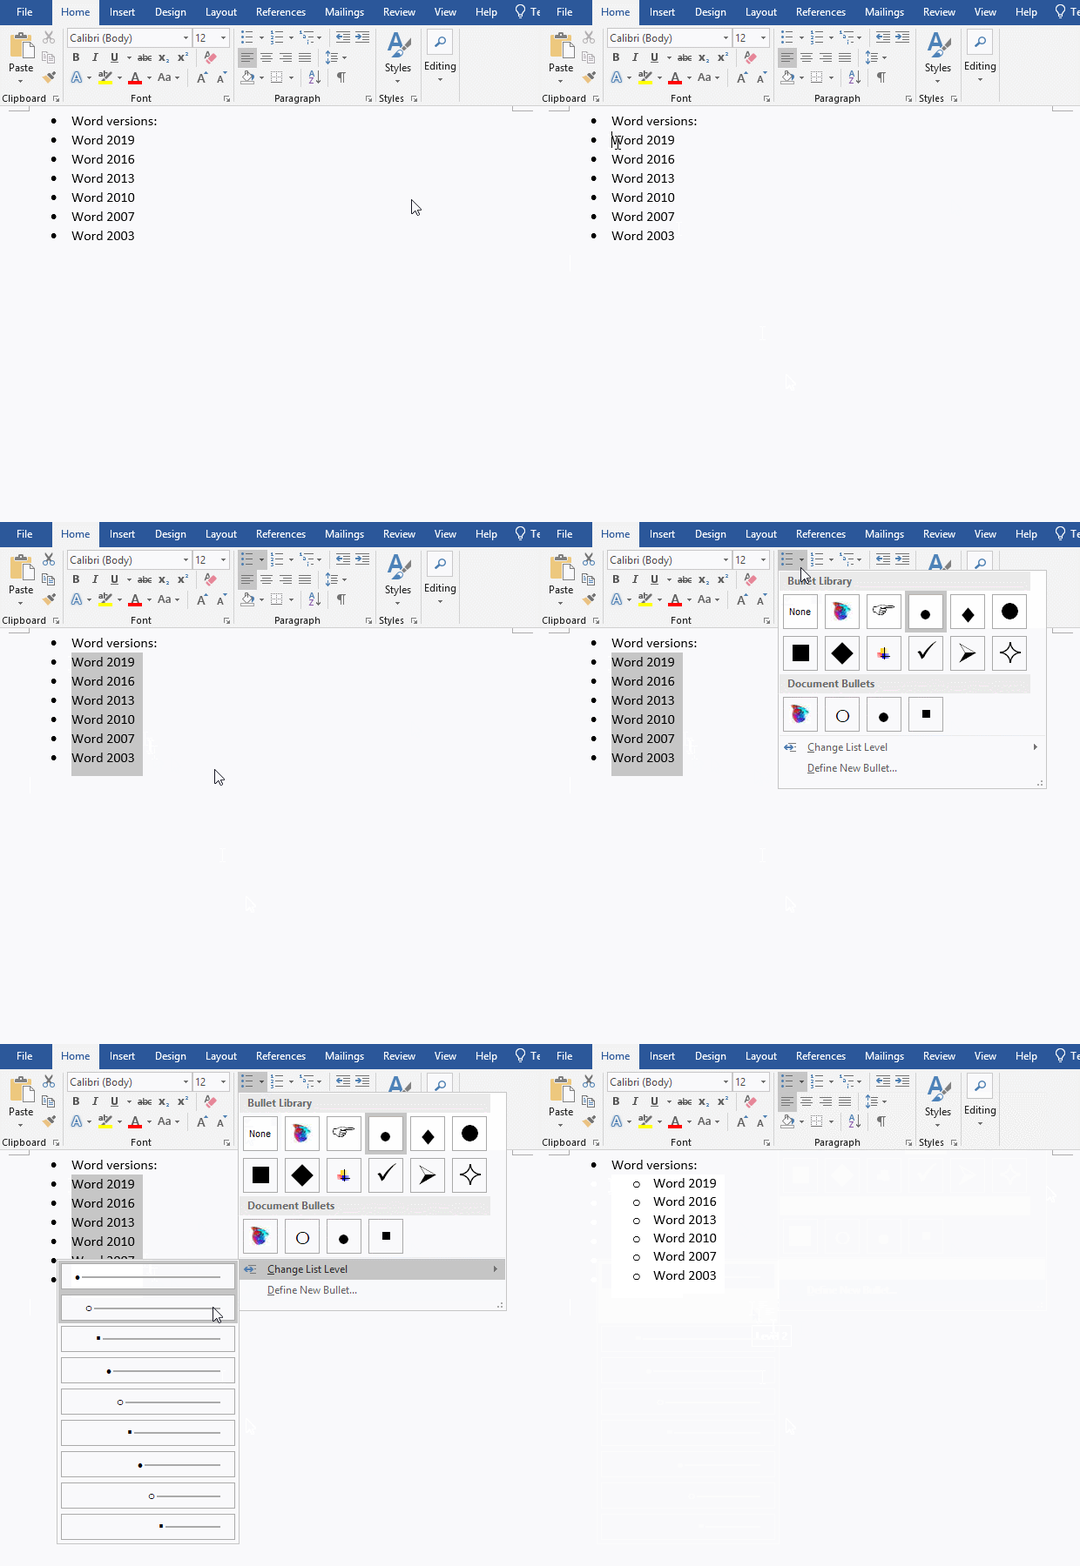
Figure 12
2. It can be seen from the demo that each line is indented a bit, if you choose the third level, each line is indented a bit more, and so on.
Note: If you want to cancel Change List Level. just select the first level, but you must cancel before canceling the bullets, otherwise you cannot cancel. The demo is shown in Figure 13:
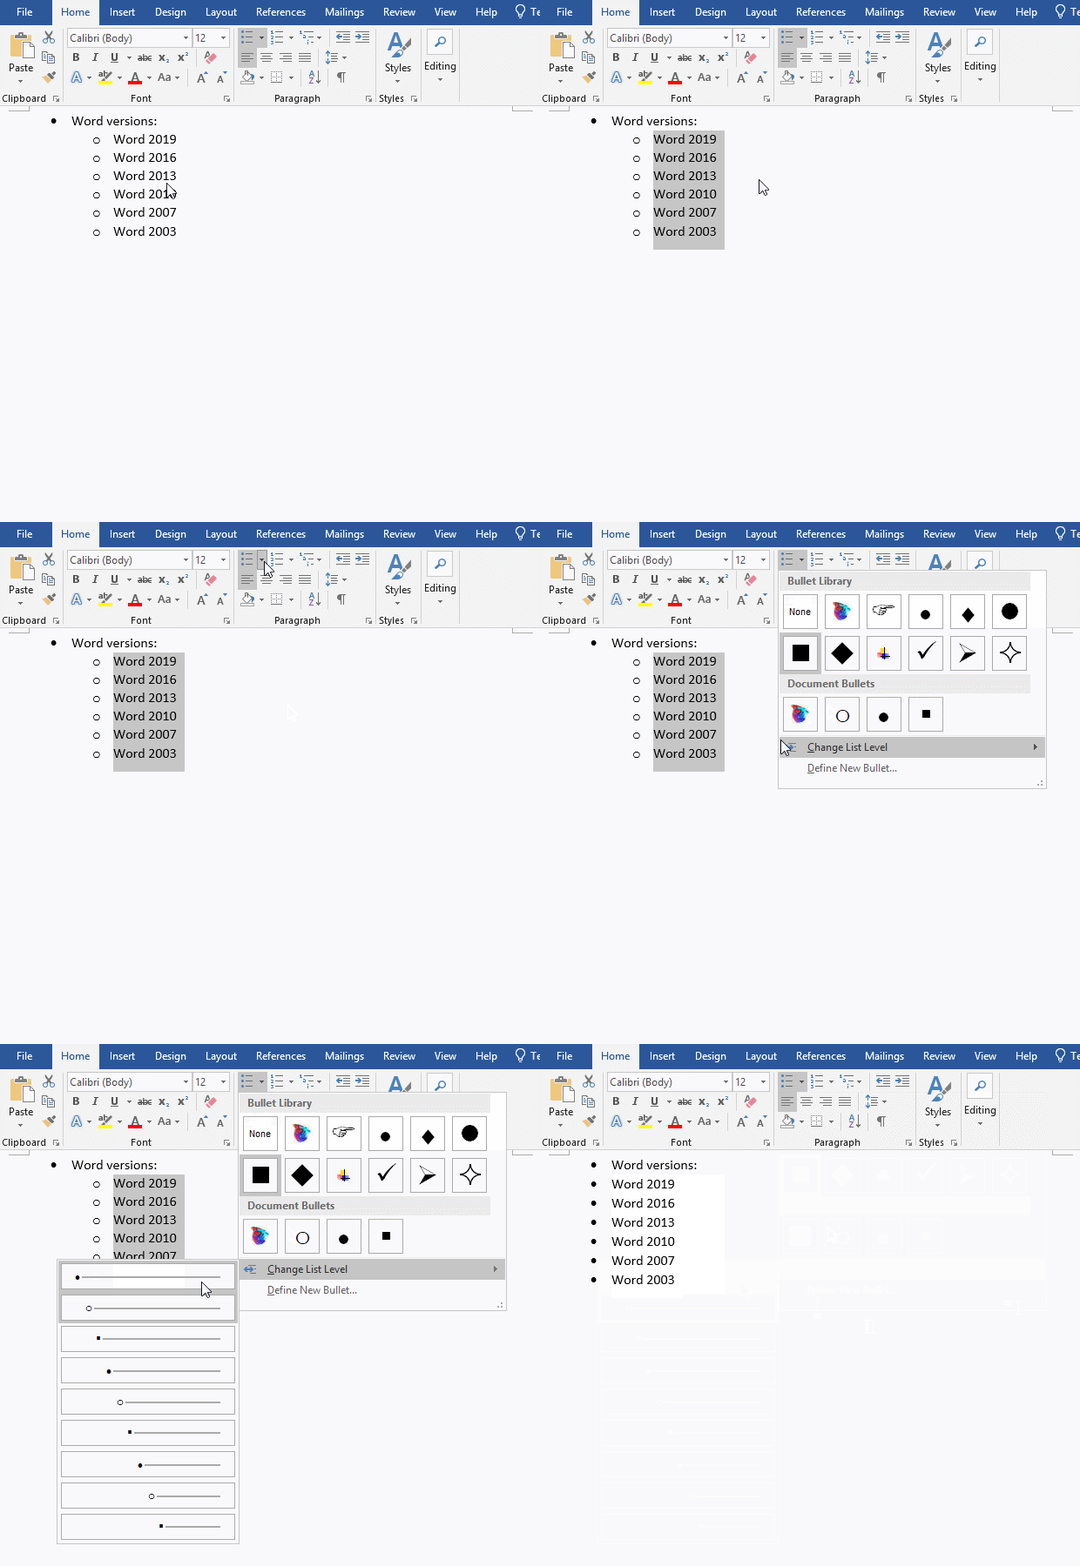
Figure 13
-
Related Reading
- How to delete table lines in Word (one line, remove
- How to add cross symbol and tick mark in Word, with
- How to create and save as a new document in Ms Word,
- How to select multiple photos in Word and why is it
- Find ProPlusww.msi when opening Office(Word/Excel),
- How to set Header and footer in word(13 examples), i
- Word art transform text effect (Follow Path, Warp, A
- How to convert PowerPoint to word(4 examples), inclu
- How do I rotate a page 90 degrees in Word, with rota
- Can't print from microsoft Word (6 possible reasons)
- How to set default Printer in Microsoft Word when se
- How to change MS Word autorecover file location and
