 operating system > Windows > Windows 10 > Content
Virtual memory settings(How to change virtual memory) in Windows 7/8/10, Windows Server 2003 - 2019
Generally speaking, personal computers do not need to set up virtual memory. Now the memory is relatively large(generally 4G, slightly better 8G, better than 16G), such a high memory is enough. Servers are not the same. On the one hand, the price of servers will increase significantly with the increase in memory; on the other hand, the tasks handled by servers are much higher than that of personal computers and require more memory. Therefore, it is essential to set virtual memory on the server. Otherwise, an exception will occur soon due to insufficient memory.
No matter what version of the Windows operating system, the virtual memory setting method is the same. The specific difference is that XP(Windows Server 2003) and Windows 7(Windows Server 2008 R2) and above systems have different steps in opening the virtual memory setting window. See the specific setting steps of latter.
I. Virtual memory settings(How to change virtual memory) in Windows 7/8/10 (Windows Server 2008 R2 - 2019)
1. Right-click "Computer" on the desktop (or open a folder, right-click "Computer or This PC" on the left) → Properties, as shown in Figure 1:
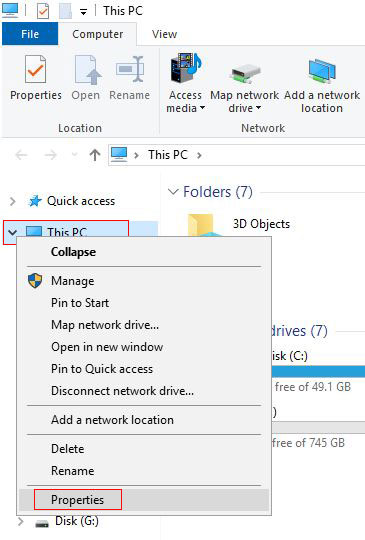
Figure 1
2. Open the "System" window, as shown in Figure 2:
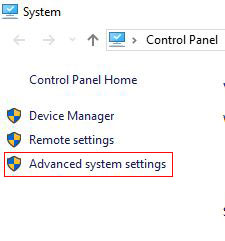
Figure 2
3. Click "Advanced system settings", and select the "Advanced" tab, as shown in Figure 3:

Figure 3
4. Click "Settings" to the right of "Performance", open the "Performance Options" window, and select the "Advanced" tab, as shown in Figure 4:
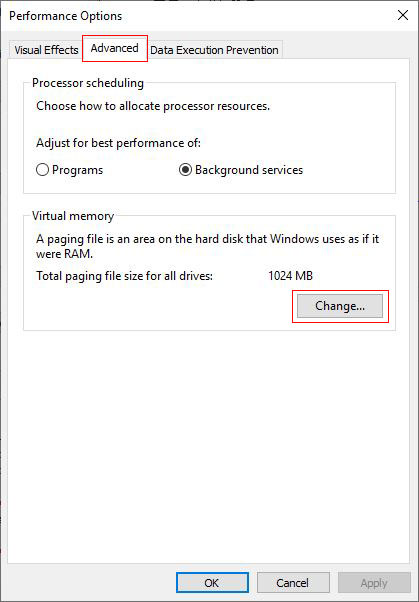
Figure 4
5. Click "Change", open the "Virtual Memory" window, uncheck "Automatically manage the paging file size for all drives", and select the disk to which "Virtual Memory" is set (such as C drive, C drive has not much free space), you can choose other disks), select "Custom size", enter "Initial size" and "Maximum size", as shown in Figure 5:
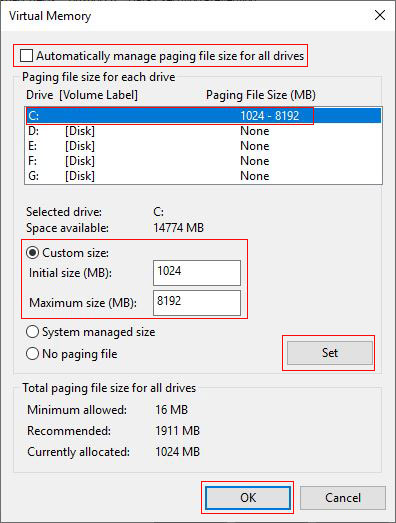
Figure 5
Tip: The virtual memory is generally set to twice the memory. For example, if the ram is 2G, the virtual memory is set to 4G, and the "Initial size" and "Maximum size" can be the same.
5. Click "Set", the virtual memory size entered takes effect, and finally click "OK".
II. XP virtual memory settings (Changing virtual memory in xp ,XP or Windows Server 2003)
1. Select "My Computer" → Properties → "Advanced" tab → "Settings" to the right of "Performance" → "Advanced" tab, refer to Figure 4.
2. Click "Change", open the "Virtual Memory" window, refer to Figure 5.
3. Select the disk to which "virtual memory" is set (such as C drive, C drive is not much available, you can choose other disks), select "Custom size", enter "Initial size (such as 1024)" and "Maximum size (E.g. 2048)" respectively".
4. After setting, click "Set" to take effect, and finally click "OK" to complete the setting.
-
Related Reading
- Where to find run on windows 10 (Start, shortcut key
- Mozilla Firefox cache location and change it in Wind
- How to find motherboard model in Windows 7, 8, 10 an
- Prevent programs from starting automatically in wind
- Do you have to reinstall windows with a new motherbo
- How to start IIS manager in XP, Windows 7, 8, 10 and
- How to install iso file(setup it in Windows 7, 8, 10
- Windows update file location (applicable to all vers
- Why does Windows 10 black screen on boot for a long
- Batch rename files Windows 10/8/7(Rename multiple fi
- How to fully shutdown Windows 10(4 methods, with sho
- How to copy and paste in command prompt in Windows 7