How to merge cells in Word, with merge and center, cannot merge and entire row misses after merging
How to merge cells in Word table? There are three ways to merge cells in Word, they are merged with Merge Cells command, shortcut key and Eraser. You can merge two into one, or three or more, one row or one column into one when merging cells, but they must be continuous, otherwise they cannot be merged. In addition, unlike Excel, there is an command to center after merging. If you want to center after merging, you must merge first and then set to center in Word.
When merging cells in Word, sometimes it cannot be merged. It may be caused by the cell borders not overlapping with the table borders, or it may be caused by the destruction of the Word template. Sometimes the entire row disappears or the part behind the table becomes messy after the merge. It may be caused by the destruction of the table format or Word template. See below for specific reasons and solutions.
I. How to merge cells in Word (How do you merge cells in Word)
Method 1: Use Merge Cells command to merge
Select the cells you wang to merge, select the Layout tab, and click Merge Cells in the Merge group in the Ribbon, then the two selected cells will be merged into one. Continue to select two cells with text and merge them in the same way; after merging, the contents of the two cells are merged into one cell, and the contents of the latter cell are not deleted. The operation steps are shown in Figure 1:
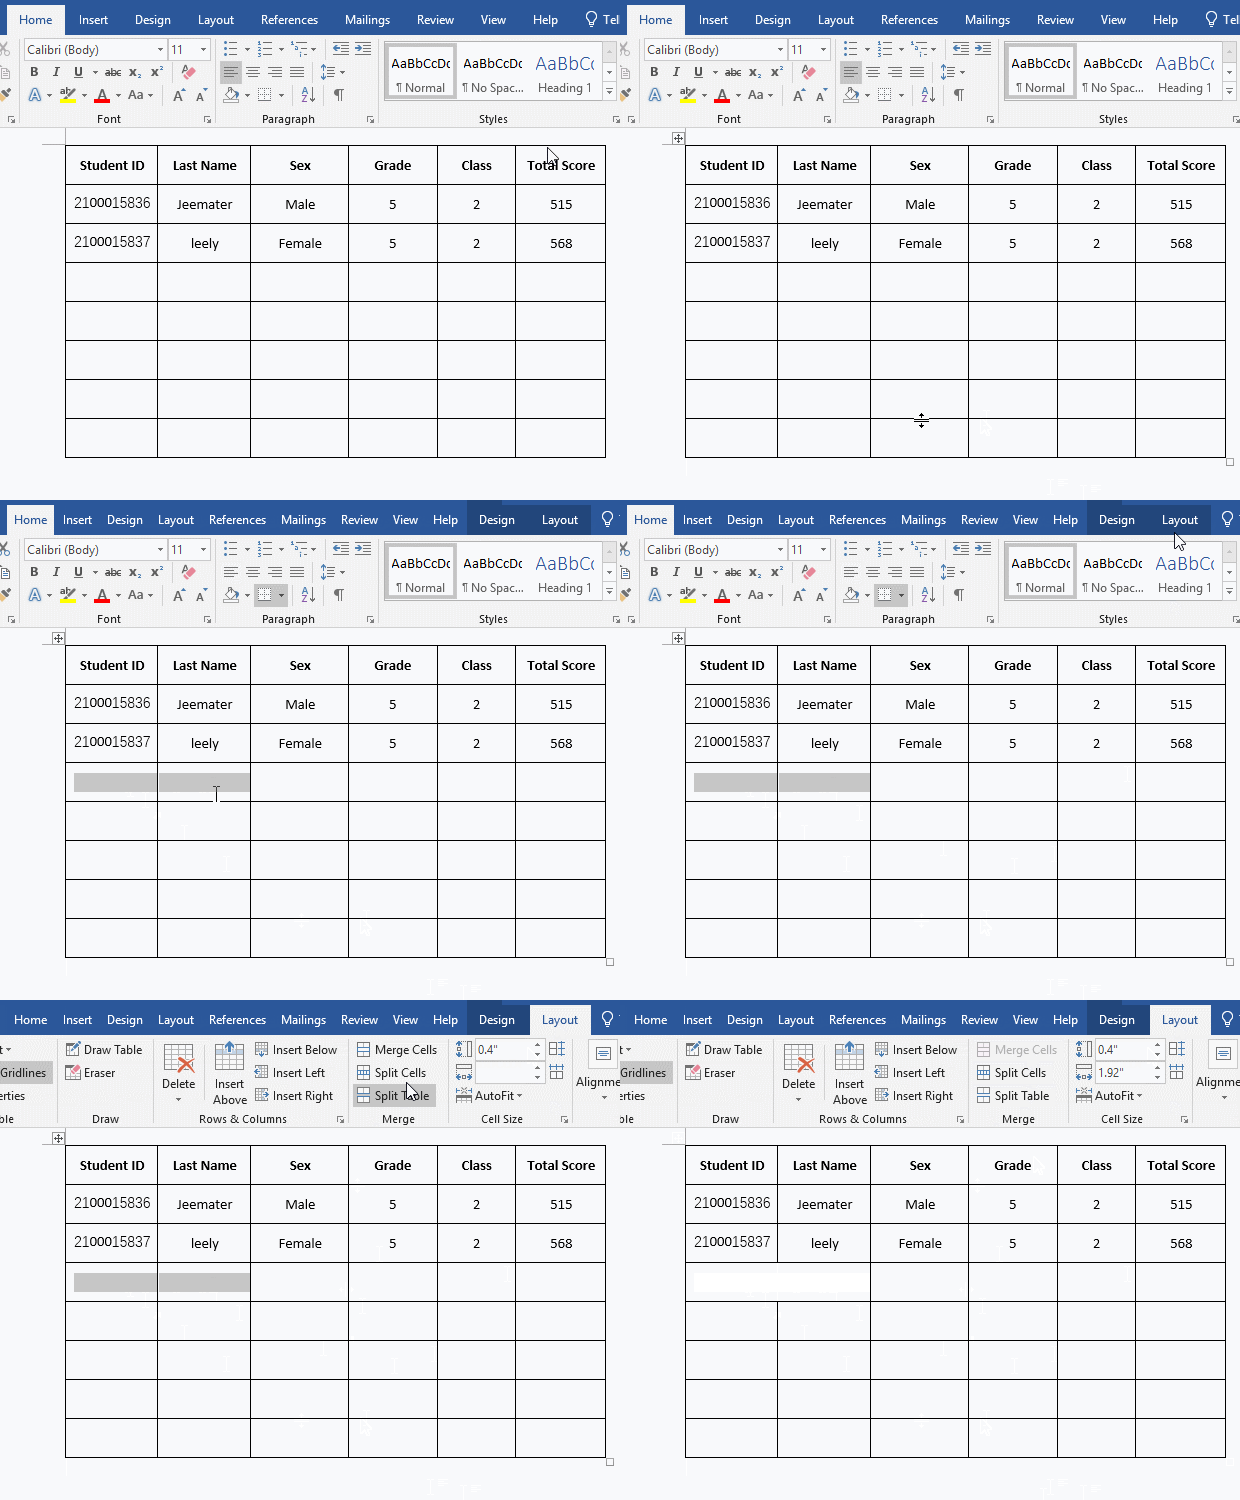
Figure 1
Method 2: How to merge cells in word shortcut key (Shortcut key to merge cells in word is Alt + A + M)
Select the cells to be merged, for example, select the first three cells in the fourth row, hold down Alt, and press the A and M keys in turn, the three selected cells will be merged into one. The operation steps are shown in Figure 2:
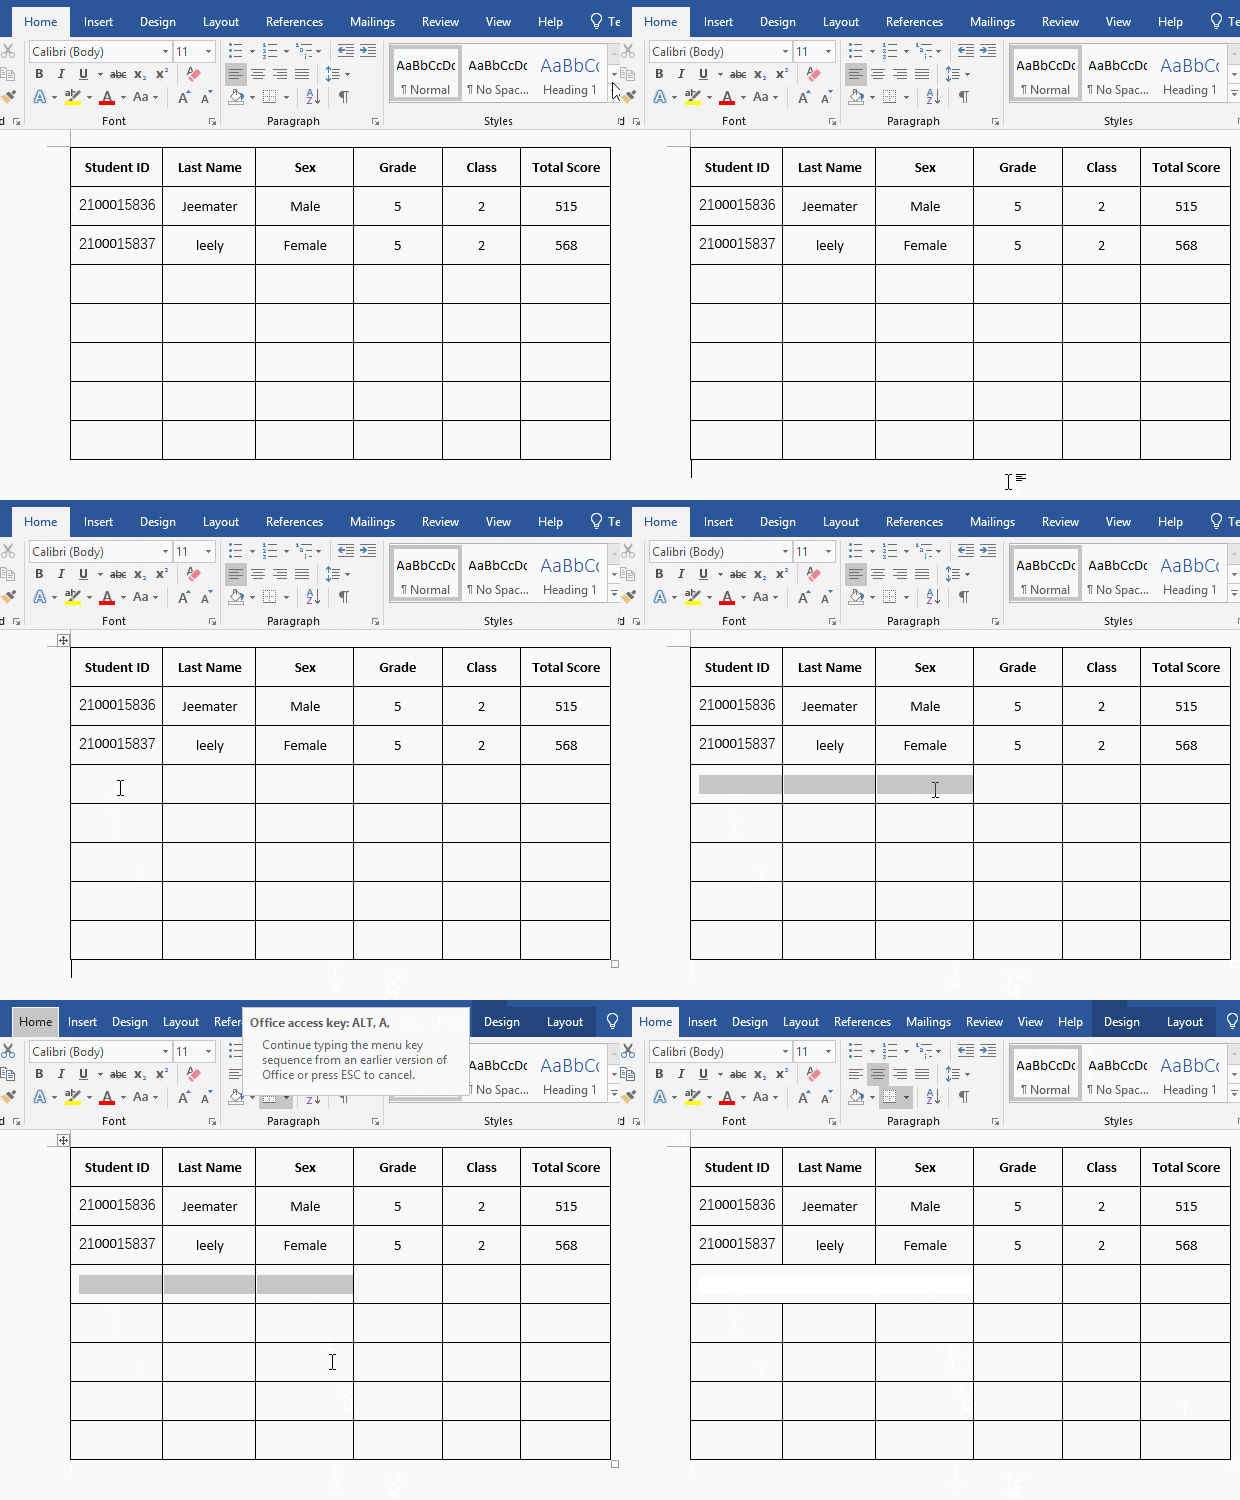
Figure 2
Method 3: Merge with an eraser
Click any cell of the table to show the Layout tab, select it, click Eraser in the Draw group, the pointer becomes an eraser, move it to the line between the two cells you want to merge, hold down the left button of mouse and move, and pull out a red box that encloses a part of the line to be erased, and the two cells are merged into one. The demonstration is shown in Figure 3:
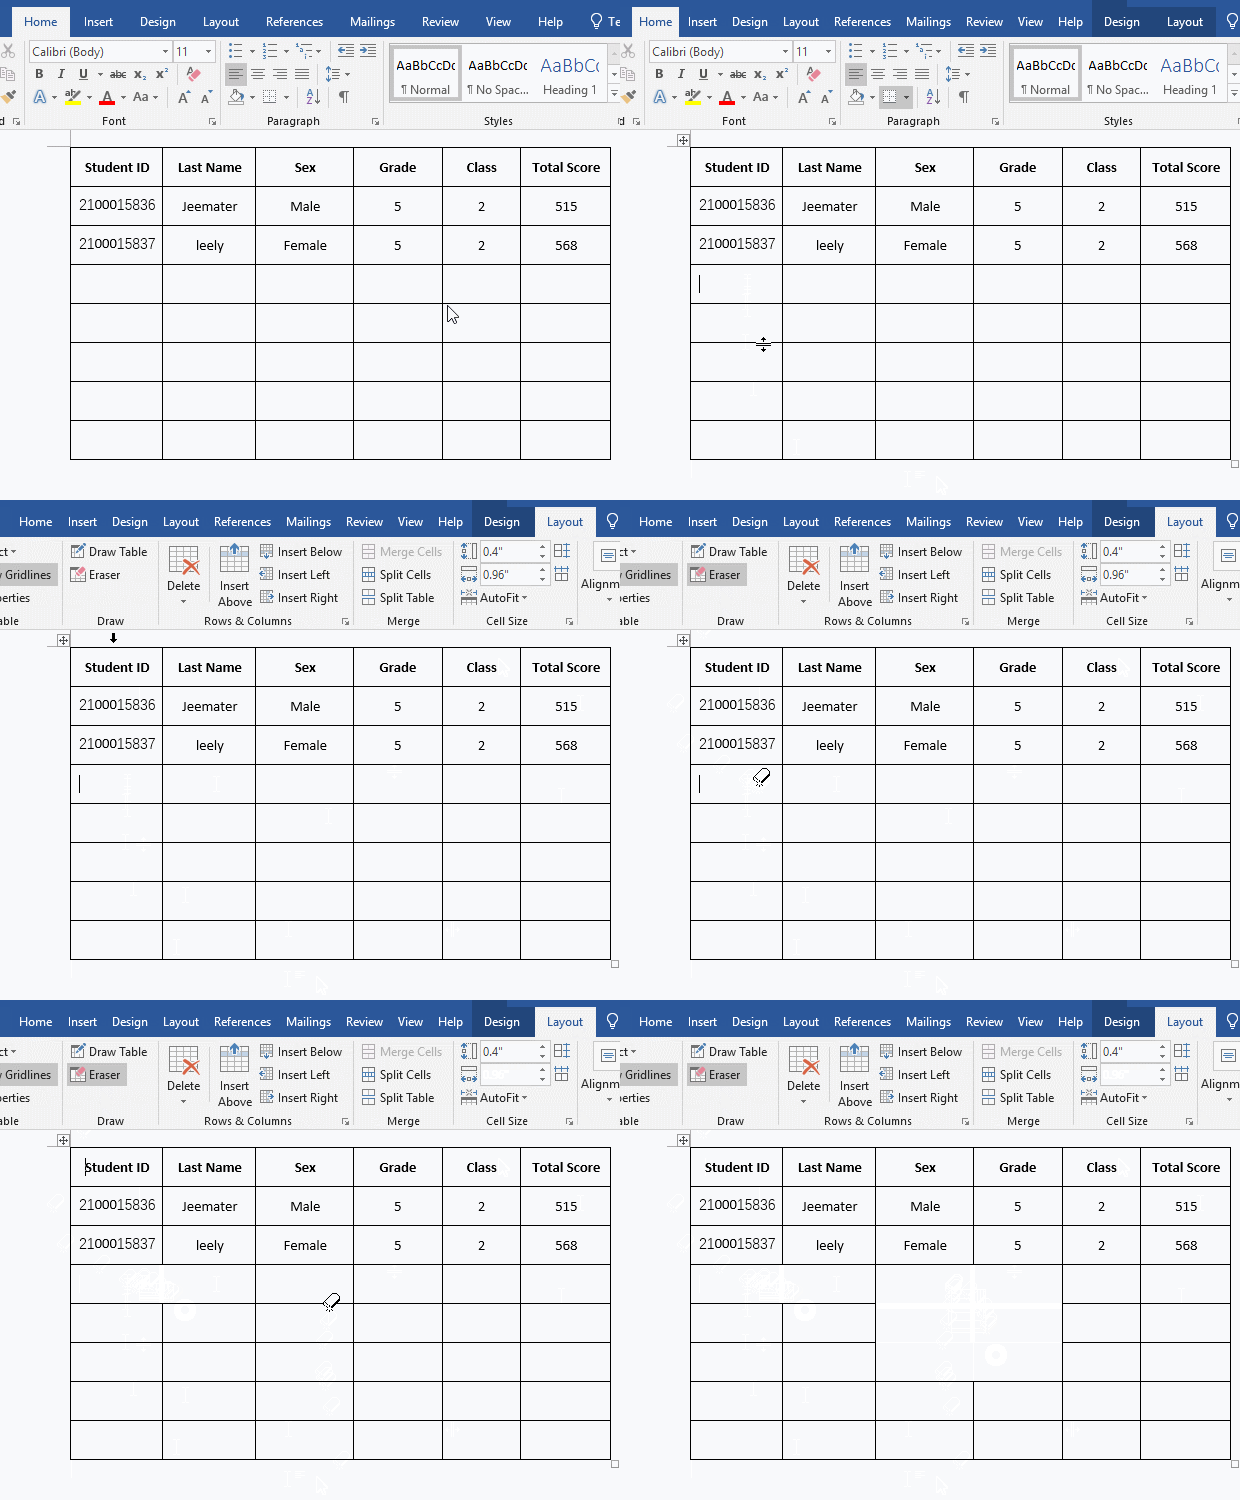
Figure 3
Erase any line between the four cells, and the four are merged into one. But sometimes it can, sometimes it can't. If not, you need to erase the two lines between the four cells separately.
II. How to merge and center in Word
There is no command of merging cells and centering in Word. You need to merge first, and then set the cells to be centered. If the cells to be merged have been set to be centered, they will be centered automatically after merging. The demonstration is shown in Figure 4:
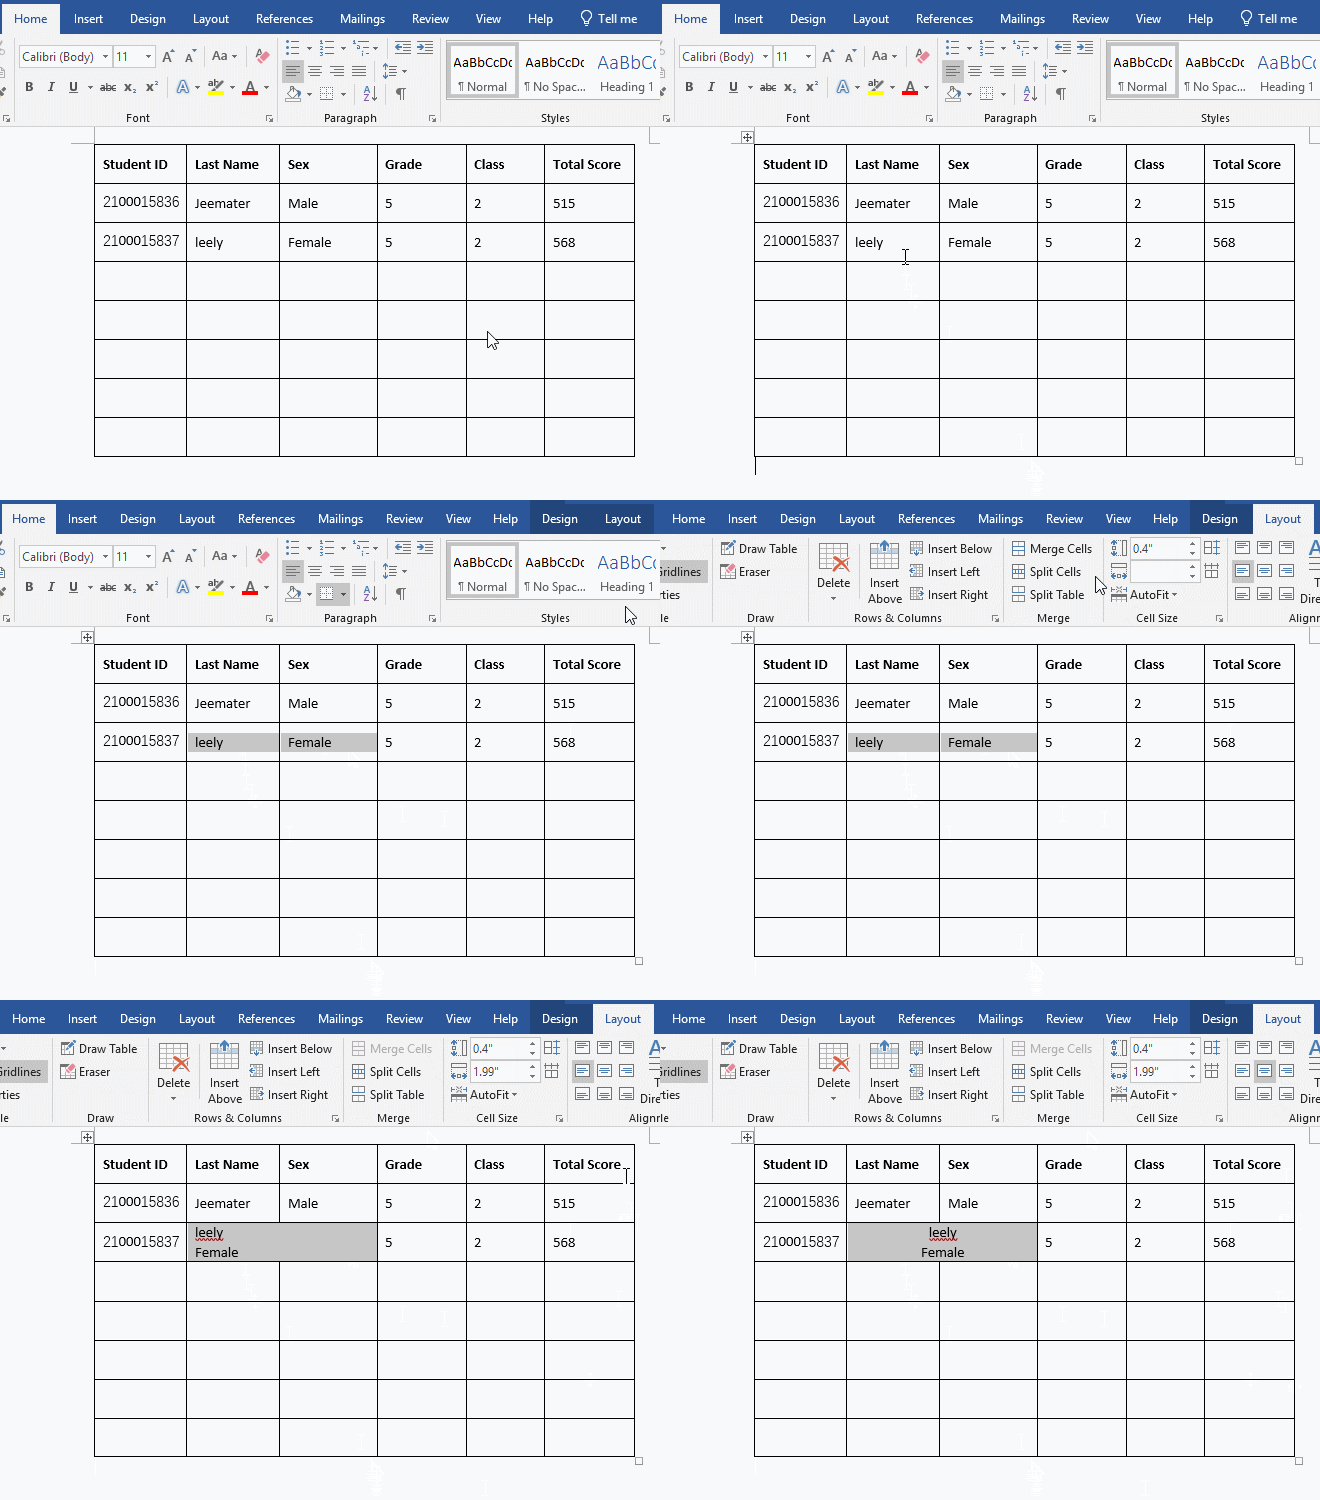
Figure 4
III. Cannot merge cells in Word (Cells won't merge in Word)
If one of the borders of some cells in the table do not coincide with one of the borders of the table, the cells cannot be merged in versions prior to Word 2019. For example, if the right line of one of the cells does not coincide with the right line of the table, you need to make it coincide with the right line of the table first. Move the pointer to the right line of the cell, the pointer will become a double vertical lines and double arrows icon, hold down the left button of mouse and move it to the left until it coincides with the right line of the table. Now the merged cells can be merged. The demonstration steps are shown in Figure 5:
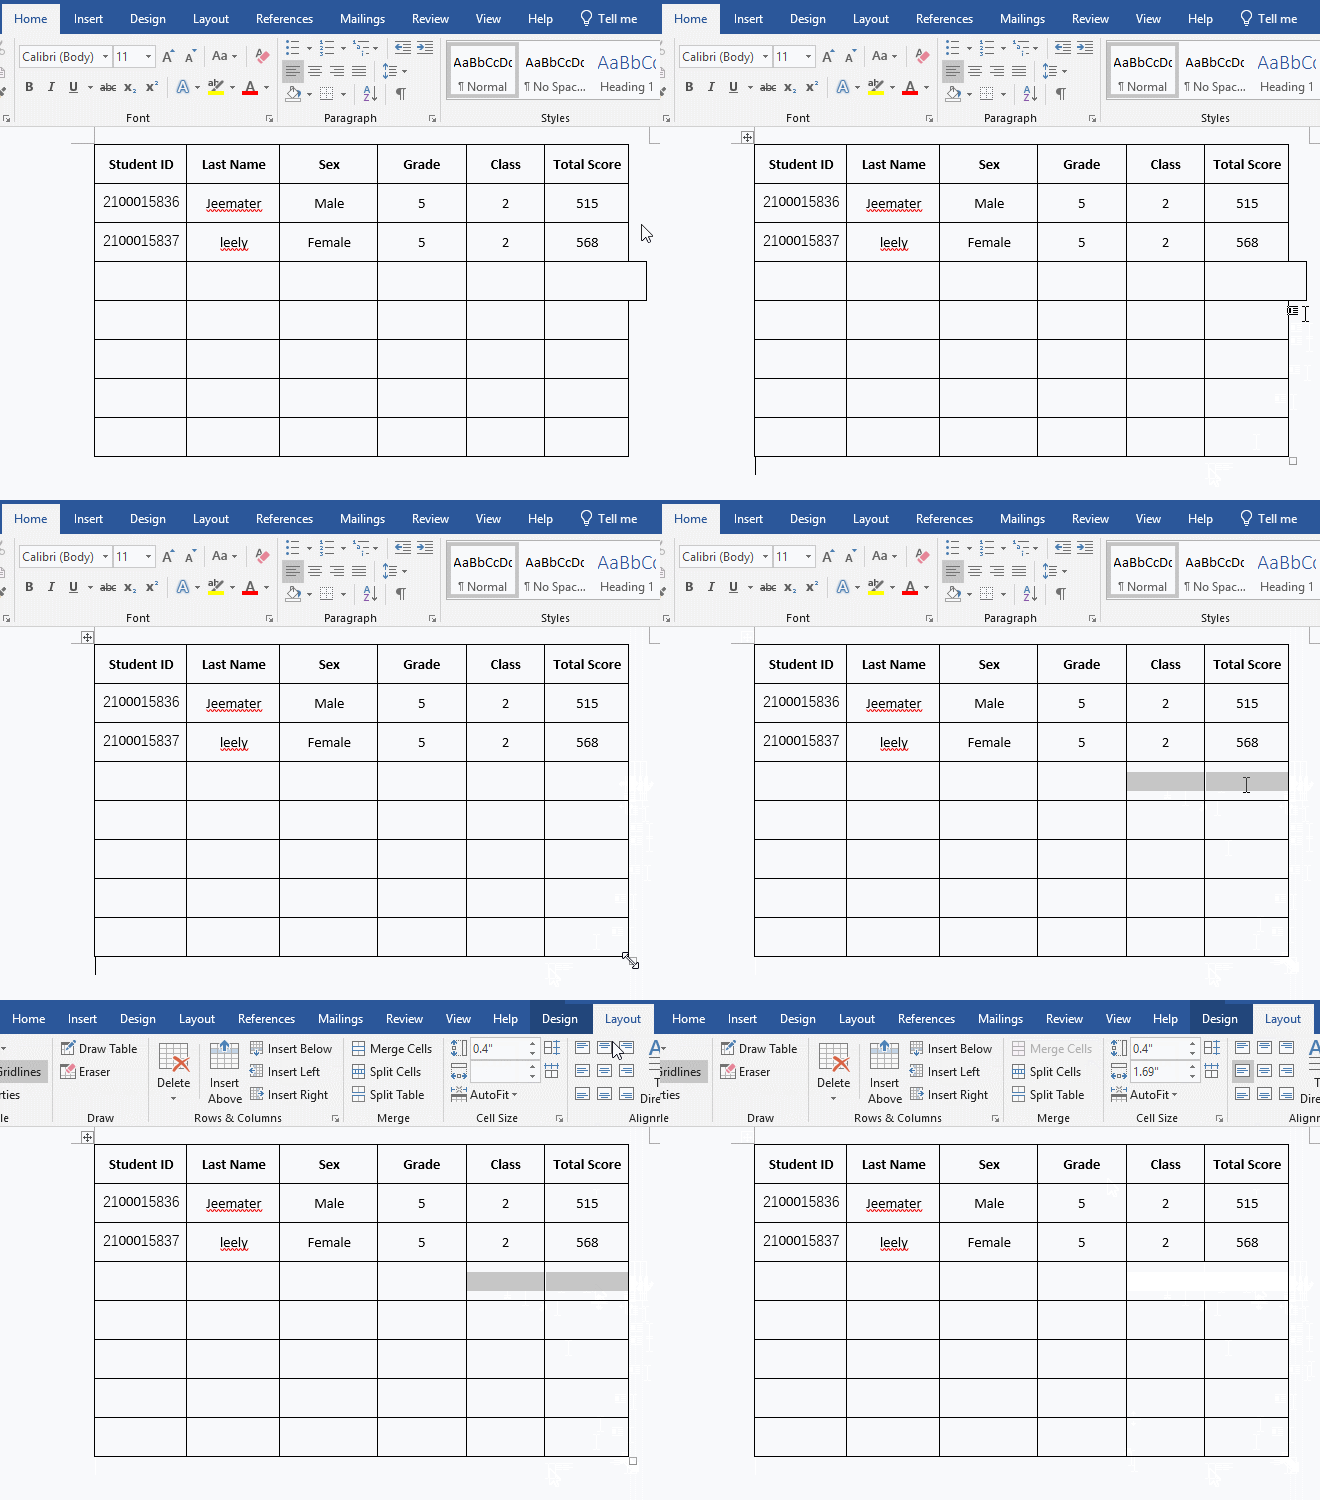
Figure 5
If two cells are merged arbitrarily, their rows will also be merged. Please see the following solution for the disappearance of the entire row after merging cells.
IV. The entire row of table misses, or the next page of table becomes messy after merging cells
Solution 1:
If this is not the case for every table, you can create another table with the same number of rows and columns as the original table, and then copy the contents of the original table into it. The method is: select the Insert tab, click Table, select Insert Table in the pop-up menu, enter the number of columns and rows of the table, and click OK to create a new table with the same number of columns and rows as the original table. Select all the contents of the original table, press Ctrl + C to copy, position the cursor to the first cell of the new table, select the Home tab, click Paste in the upper left corner of the screen, and select Paste in the pop-up menu Overwrite Cells under Paste Options, then all the contents of the original table will be copied to the new table. The operation steps are shown in Figure 6:

Figure 6
Solution 2:
If there are few styles used in the table, it is easy to reset, and it's not that merging cells causes the entire row to disappear or the next page is messed up to appear in each table. You can clear the style of table and reset it after merging cells. The method to clear the table style is: select the Home tab and click the Clear All Formatting icon, then all the formattings of table will be cleared. At this time, you can merge the cells according to the above method. The operation steps are shown in Figure 7:
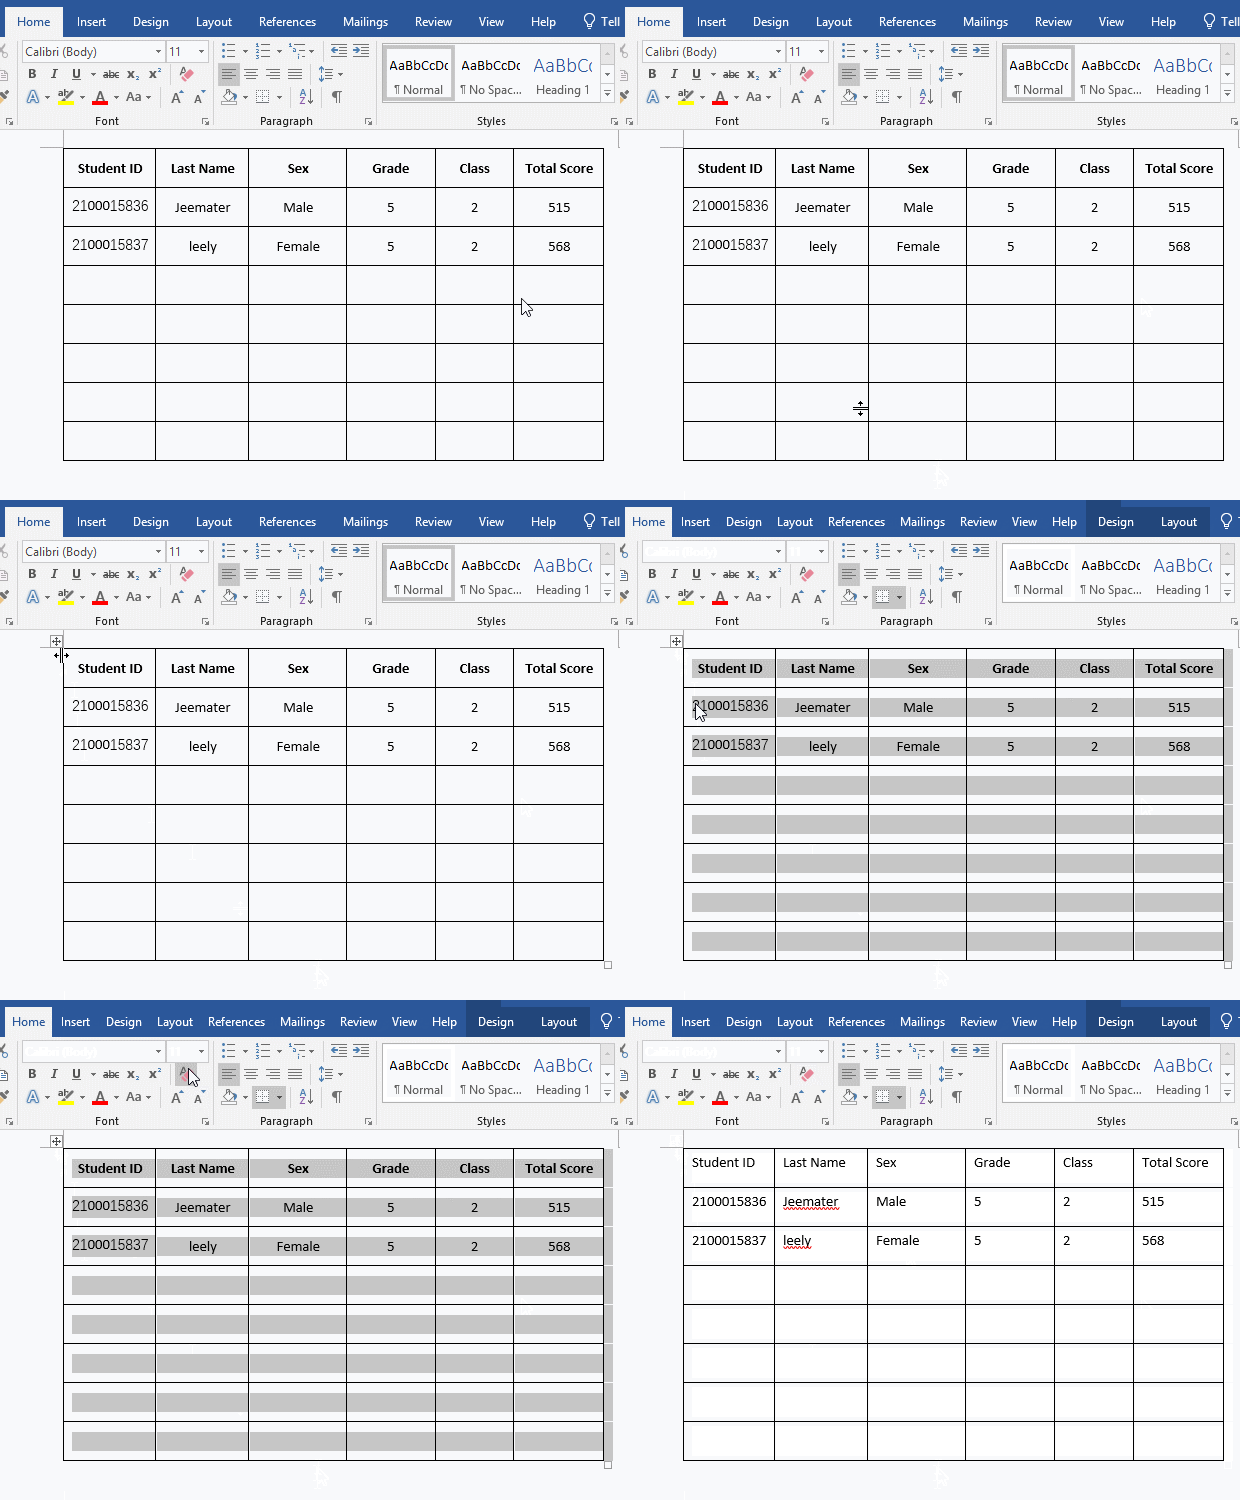
Figure 7
Solution 3:
If the merged cells appear in all tables, the entire row disappears or the next page of the table becomes messy, it should be that the Word template Normal.dot (or Normal.dotm) is damaged. You need to close all Word windows, and delete it, and reopen Word and create a new blank document, Word will automatically create a new template.
The method to delete the Word template is:
Select Start → Run (or press Windows key + R, the four squares to the right of the left Ctrl key is the Windows key), open the Run window, copy %appdata%\microsoft\templates and paste it into the input box in the Run window, and press Enter on your keyboard, Open the folder where the Normal template is located, and delete it.
-
Related Reading
- How to delete table lines in Word (one line, remove
- C# hashtable synchronized and SyncRoot(cost comparis
- How to move rows,columns,cells,table in excel(there
- How do I rotate a page 90 degrees in Word, with rota
- How to select, move, copy and remove a table in Word
- Input text and Word can't type in table cell, select
- How to align tables in Word, with aligning text and
- C# Hashtable create, add, update, remove and removed
- Combine multiple excel sheets into one pivot table w
- How to create a pivot table in excel(15 examples, wi
- Excel pivot table percentage of grand total(parent r
- How to make a table of contents in word and change,
