
Grid and Guide Settings in Word (horizontal and vertical every)
Grid lines are not displayed by default in Word. When drawing a shape, it cannot be accurately drawn to a predetermined point without a parameter line. On the other hand, if multiple shapes are drawn, it is not conducive to the alignment between shapes or between shapes and text. In this case, you can display grid lines as a reference. Only horizontal grid lines are displayed by default, and the interval between the lines is relatively small. Sometimes it may not meet the requirements. In this case, you need to Make adjustments. Or sometimes you need a vertical reference line, you need to display it.
In addition to grid lines, there are guide lines. The guide line does not directly display the line, but uses the page, margin and paragraph as a reference. When the shape moves to the guide line, a green line will be automatically displayed for us to guide. After releasing the left button of mouse, the green line will be hidden.
I. Grid Settings in Word
1. There is the Gridlines option in the View tab, but you can only check it to display grid lines, and you can't set it. There is the option to set the grid line in the Format tab, but it is not displayed by default. Select a shape and it will be displayed.
Select a straight line, select the Format tab, click Align, and select Grid Settings in the pop-up menu, open the Grid and Guides window. There are three items for Grid Settings, namely Grid Settings, Grid origin, and Show grid. Check Display gridlines on screen under Show grid, other settings are meaningful; check Display gridlines on screen, only horizontal grid lines are displayed by default, and Vertical every is also checked. Horizontal every is 1 by default. After clicking OK, the effect is shown in Figure 1:
Figure 1
2. If the spacing between grid lines is too small, you can increase it, and adjust the Horizontal every to 6 (you can also adjust the Vertical Spacing under Grid Settings, but note: if two increase the values ??at the same time, then they will be superimposed), and then adjust the Vertical Spacing under Grid Settings to 0.4 inch. ??After clicking OK, the spacing between grid lines becomes very large, as shown in Figure 2:
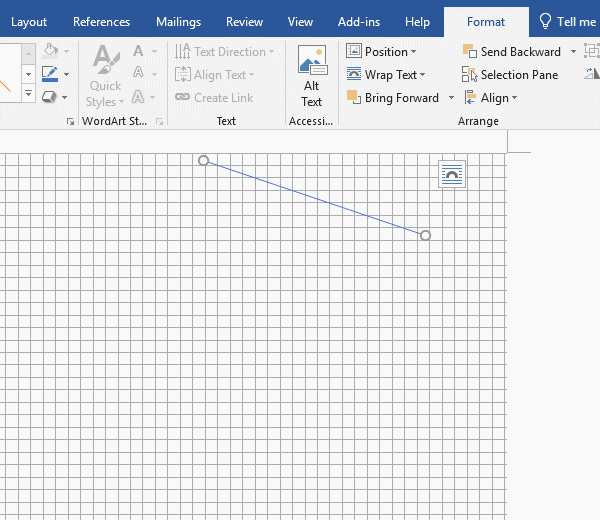
Figure 2
3. Set the value of Vertical every to 6, after clicking OK, the effect is shown in Figure 3:

Figure 3
4. The value is also set to 6, the Vertical Every is much smaller than the Horizontal Every, which is enough to show that the value under Grid Settings will be superimposed with the value under Show grid. If you want the Horizontal Every to be as large as the Vertical Every, you can also set the Horizontal every under Grid Settings to 0.4 inch. One thing to note: the Horizontal every under Show grid corresponds to the Vertical every under Grid Settings.
5. There is also a Grid origin, the Use margin is checked by default, if you don't check it, you can set the Horizontal origin and Vertical origin, as shown in Figure 4:

Figure 4
6. The Horizontal origin is 1.25 inch, and the Vertical origin is 1 inch by default. They are both the default values ??of the page margin; take the Horizontal origin as an example, the horizontal grid line starts from 1.25 inch on the page. If the grid line needs to start further inward, you can increase 1.25
II. Guide settings in Word
1. Open the Grid and Guides window again, and click Display alignment guides to check it. You can only choose one of the grid lines and Guides. After checking the Display alignment guides, the check before Show gridlines on screen is automatically removed.
2. There are three options under Display alignment guides, which can be selected at the same time, or only one or two. We keep the default selection of three, click OK, the grid lines are gone, The guides will be used as a reference when aligning shapes.
3. We align a shape to see how the guides work; move a cube to the left and when it approaches the left margin, a green guide line automatically appears. As shown in Figure 5:

Figure 5
4. With this green line as a guide, we know whether the cube is aligned with the left margin.
-
Related Reading
- How to delete table lines in Word (one line, remove
- How to add cross symbol and tick mark in Word, with
- Find ProPlusww.msi when opening Office(Word/Excel),
- How to set Header and footer in word(13 examples), i
- C# gridview checkbox cannot get value(reason and sol
- Word art transform text effect (Follow Path, Warp, A
- How to convert PowerPoint to word(4 examples), inclu
- How do I rotate a page 90 degrees in Word, with rota
- Can't print from microsoft Word (6 possible reasons)
- How to set default Printer in Microsoft Word when se
- How to fix Microsoft Word has stopped working (sever
- Word temporary files location (Msocache folder takes