 Office > Excel > Excel 2019 > Content
How to put slash in Excel and make a single slash or double slashes header of table(color of lines)
The table headers with a lot of contents are often drawn with slashes in Excel, there are two main types, one is a single slash, and the other is a double slash, no matter which slash is drawn, it's the same. So how to draw the Excel table slash? There are many shapes built into Excel, and there are slashes, which can be used to draw slashes.
After you draw a slash on the header in the table, you can set the style and color for line. In addition, you need to add the corresponding text above and below the slash. There are three main methods for adding, one is direct input, and the other is to use the superscript and subscript, the third is to use the textbox. In general, the first two methods is used to draw the single slash of header in table, and the third method is used for the double slash and the three slash and more slash. Let's first look at how to draw a slash in Excel, and then see how to draw a slash(diagonal line), add text and color and style settings to the header.
I, How to put slash in Excel
1. How to put a slash through a cell in excel(draw any diagonal line)
Select the "Insert" tab, click "Illustrations", select "Shape" → the slash below the "Line" in the pop-up menu, the mouse becomes the plus(+) shape, move the mouse to starting point where you want to draw the slash, press and hold the left button, drag to the end point where you want to draw the slash, release the left button, and draw a diagonal line; the operation steps are as shown in Figure 1:
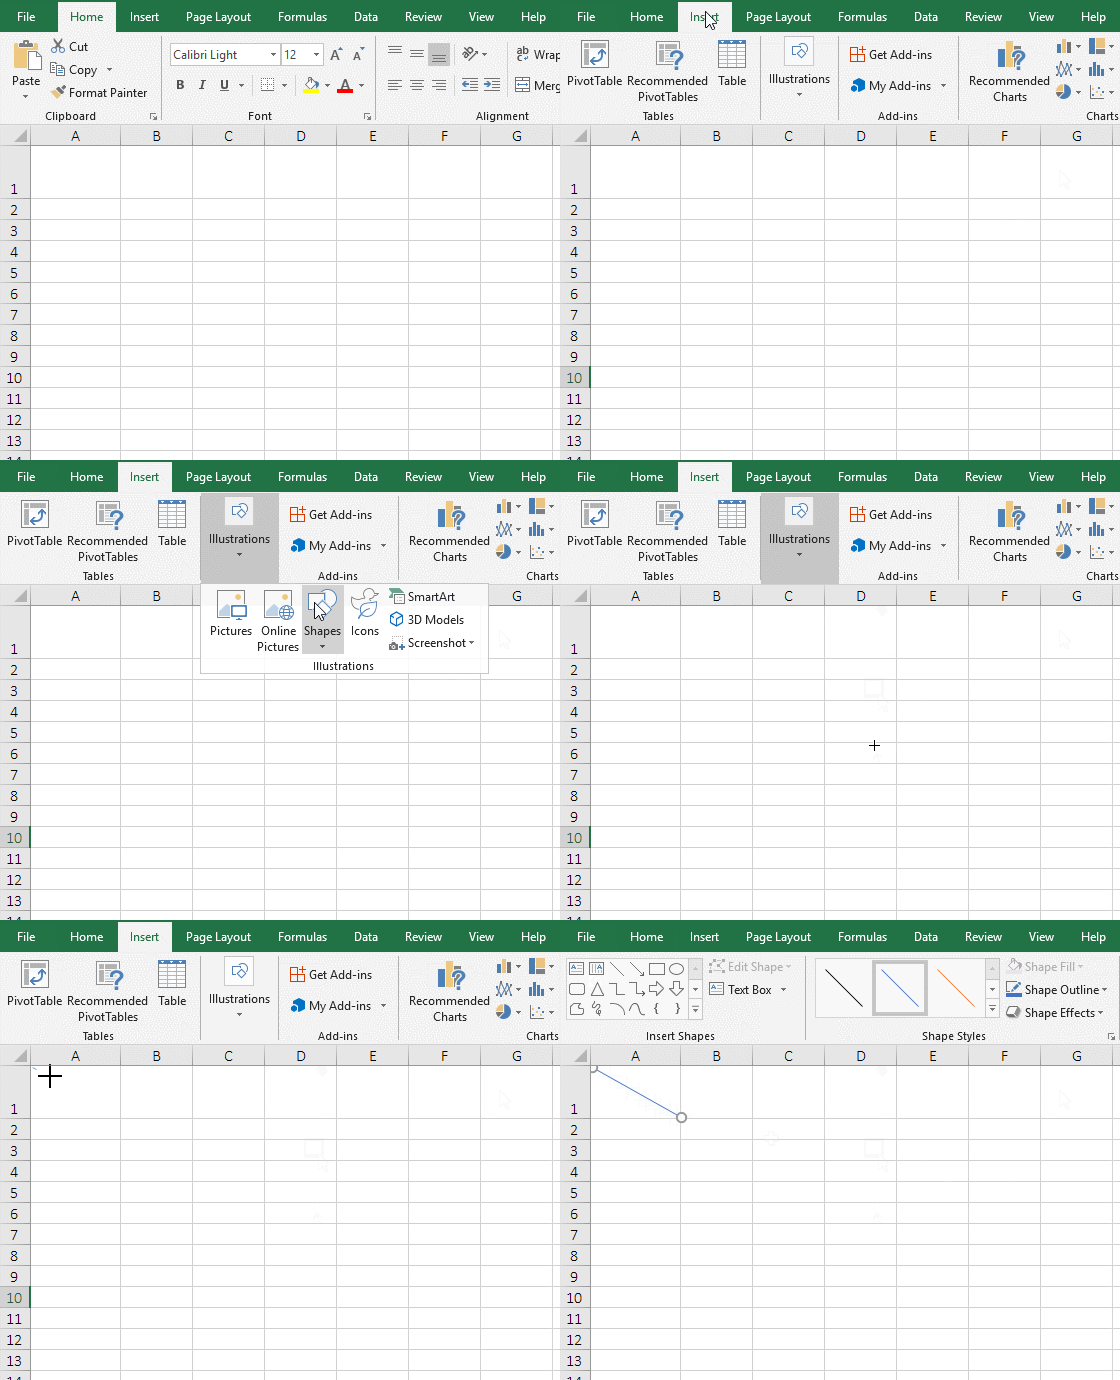
Figure 1
Tip: Press the shortcut keys Alt + N + S + H to pop up the "Shape" style menu. The key press method is: hold down Alt and press N, S and H respectively.
2. How to draw a specific oblique slash
The tab is "Insert", click "Illustrations", select "Shape" → the slash below the "Recently Used Shapes" in the pop-up menu, the mouse becomes a plus sign, and move the mouse to the starting point where you want to draw a slash at the same time, hold down Shift and the left button of mouse, when dragging to the position near and above the diagonal of cell B1, draw a straight line; when dragging the diagonal of cell B1 to the bottom direction, you can only draw a slash pointing to the bottom edge; the operation steps, see screenshot in Figure 2:
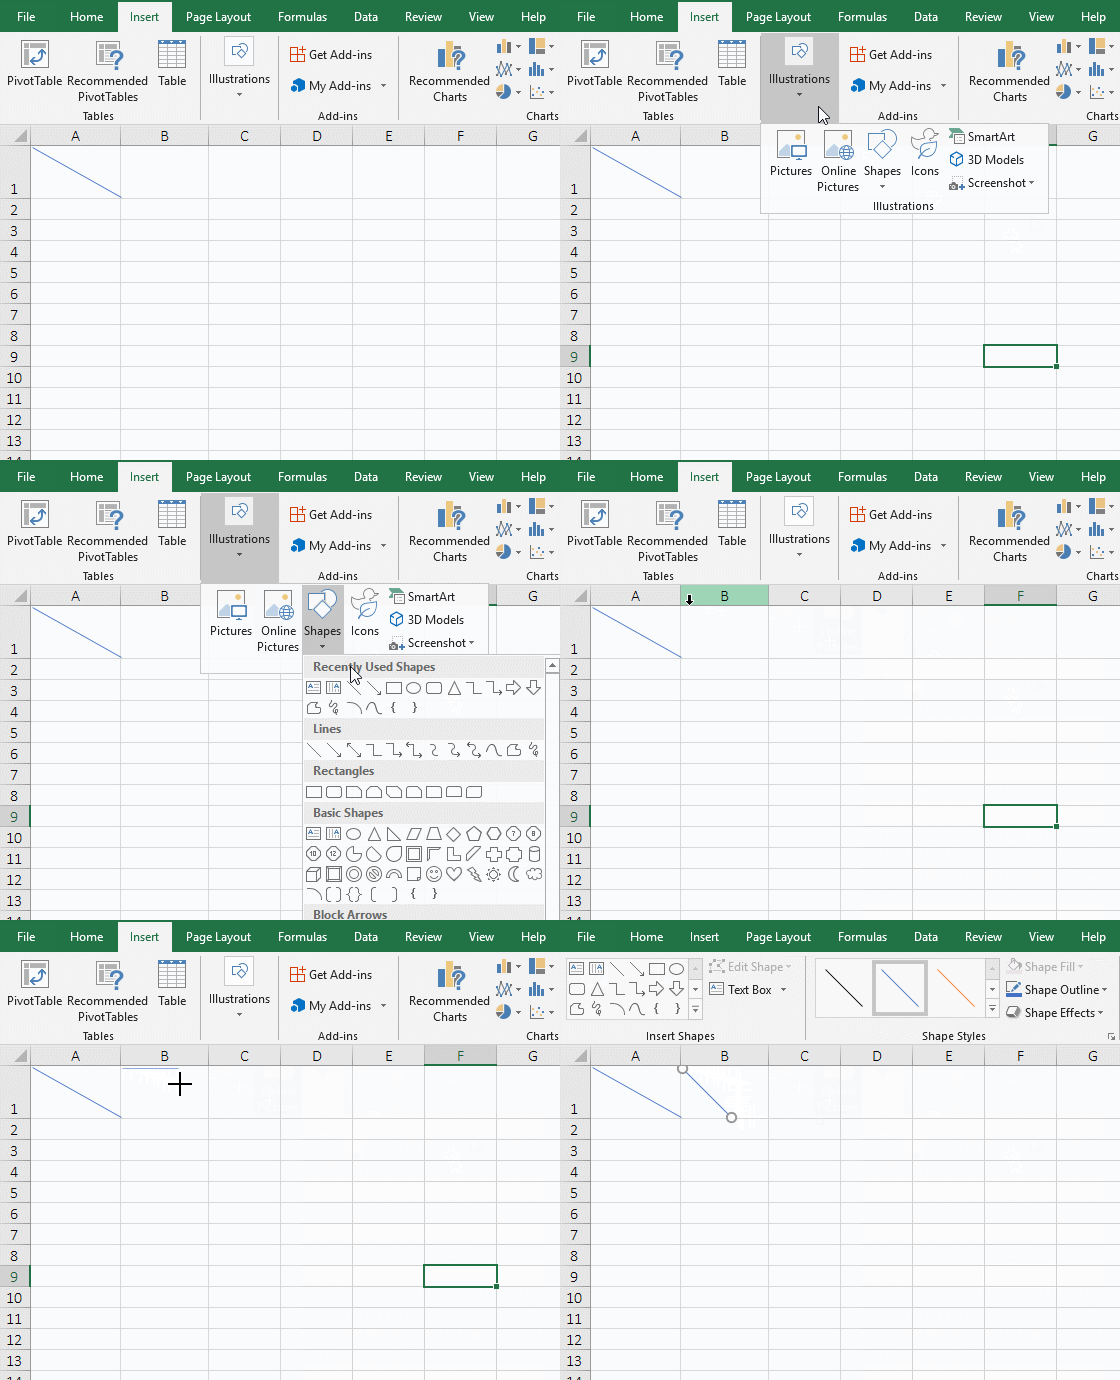
Figure 2
Tip: Use this method to draw a slash, the deviation of the line is related to the height and width of the cell in which you want to draw the slash.
II, How to put slash in Excel table
(I) How to put a single slash in the header of table
The method of drawing the slash has been introduced above. Here are some ways to input text above and below the slash.
1. Directly enter the text method. According to the above method, draw a slash to the cell A1, double-click the blank space of A1 to position the cursor inside, enter "Item", press Alt + Enter to wrap, continue to enter the "EmpNo", press Enter to exit enter; select A1 again, the current tab is "Home", click the "Align Left" icon to align the text to the left; double click before "Item" to position the cursor in front of it, press the Space on the keyboard until the "Item" is right-aligned; the operation steps, as shown in Figure 3:
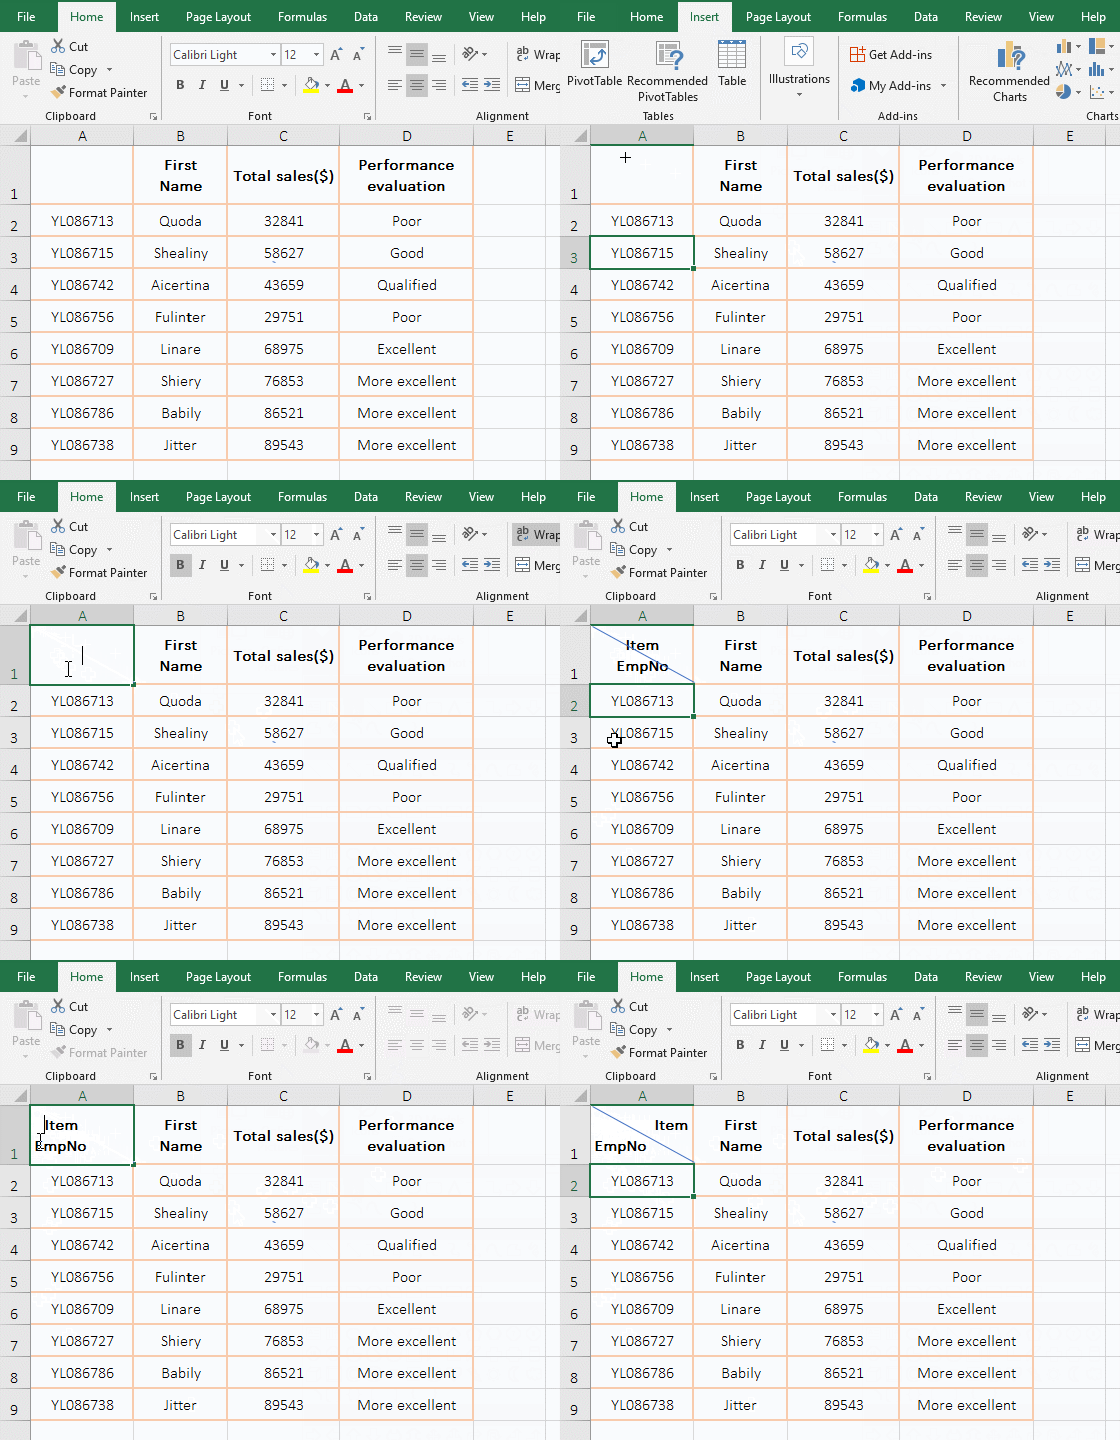
Figure 3
2. Use the superscript and subscript. Double-click any blank space in the cell A1, enter the word "EmpNoItem", select "Item", press the shortcut keys Ctrl + 1, open the "Format Cells" dialog, only one "Font" option, check "superscript", click "OK", set the "Item" to superscript; then select the "EmpNo", the same method to set it to "subscript", click A2 to exit enter; select A1 again, click the "Middle Align and Center" icon to set the text to be vertically and horizontally centered; click the "Font Size" drop-down list box, select 20, set the font size of the cell A1 to 20; the operation steps are as shown in Figure 4:
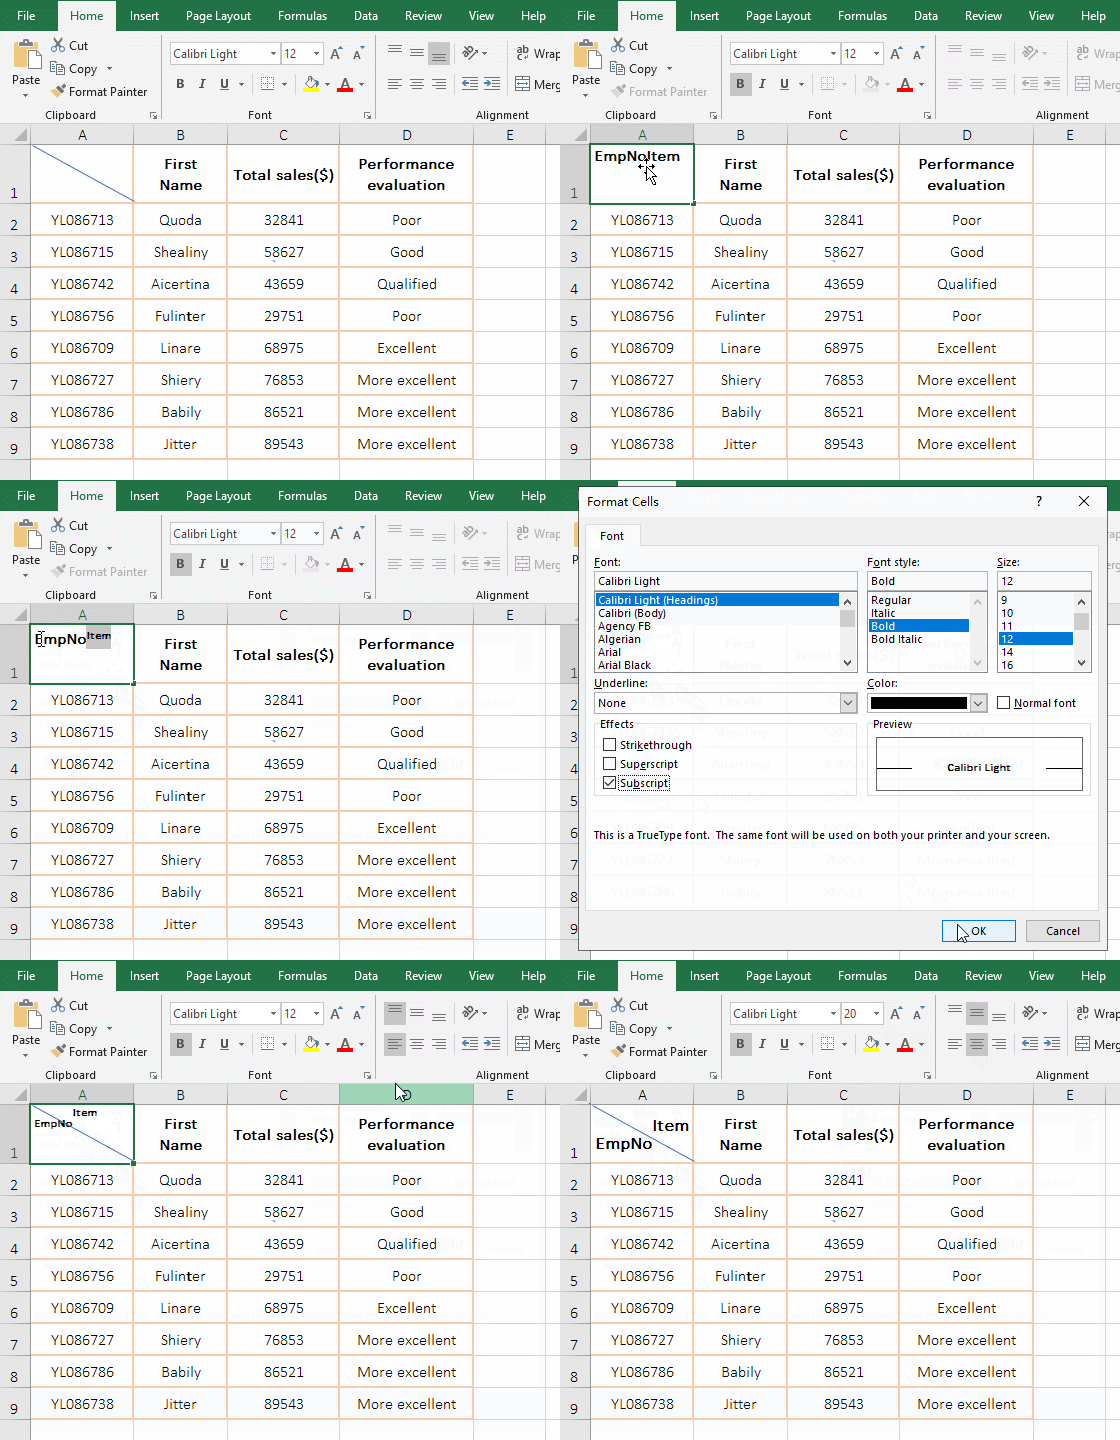
Figure 4
(II) How to draw the double slashes in the header of table
1. Draw double diagonal lines. Select the "Insert" tab, click "Illustrations", select "Shape" → the slash below the "Recently Used Shapes" in the pop-up menu, the mouse becomes a plus sign, move it to the top left vertex of A1, hold down the left button, drag to the right position on the right border of A1, release the left button, then draw a diagonal line, and automatically switch to the "Format" tab; select the "slash" in the upper left corner of the screen, the same way to draw a slash from the top left corner of A1 to the bottom border of it; the operation steps are as shown in Figure 5:
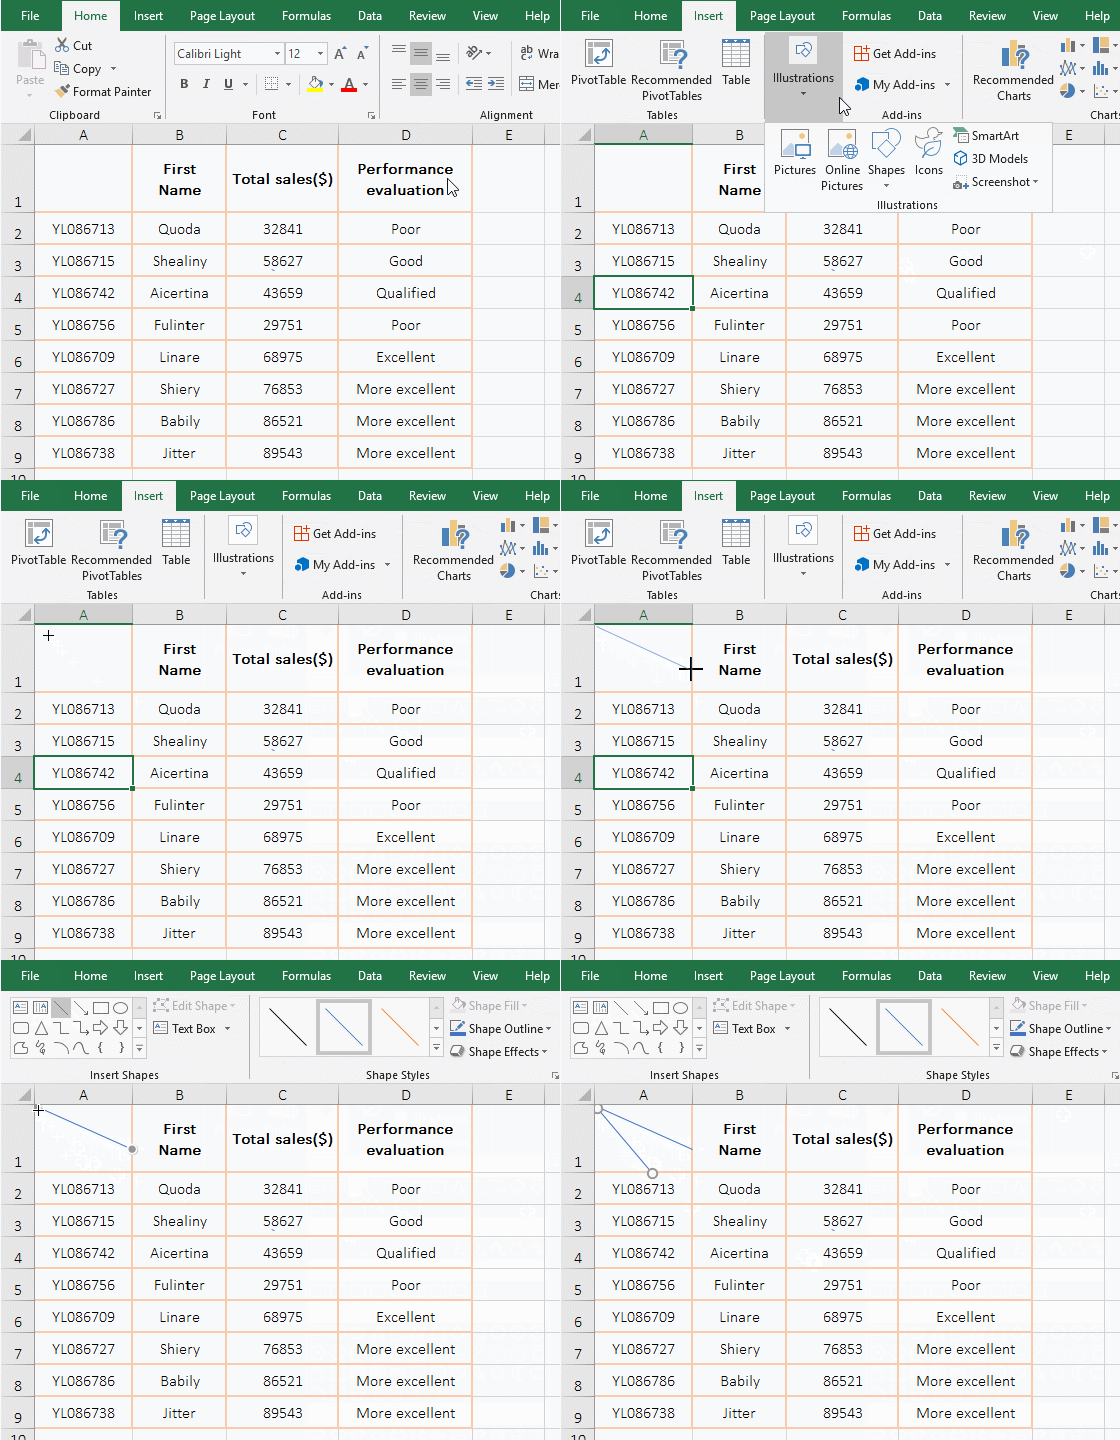
Figure 5
2. Add text using a text box.
A. The current tab is "Insert", click the "Text Box" icon, click the icon above "Text Box" in the pop-up menu, the mouse will change to the shape of "vertical line + Small Plus", move it to the starting point which the text box is drawn, hold down the left button and drag to the lower right corner, after the size is appropriate, release the left button and a text box is drawn.
B. Enter the word "Item", the current tab is "Home", click the "Middle Align and Center" icon, make the text in the text box vertical and horizontally centered; select the "Format" tab, click "Shape Fill", select "No Fill" in the pop-up menu, remove the fill color of the text box; then click "Shape Outline" select "No Outline" in the pop-up menu, remove the border of the text box;
C. Move the mouse to the border of the text box, and the mouse changes to the cross icon with four arrows, click to select the text box, press Ctrl + C to copy, then press Ctrl + V to paste the text box; move the mouse to the edge of the pasted text box, after the mouse changes to the cross icon with four arrows, hold down the left button and move it, move the text box down, select "Item" and enter "Performance"; then move the mouse to the circular arrow of the text box, after the mouse turns into a black circular arrow, hold down the left button and move to rotate the text box to align the text with the slash;
D. In the same way, copy the text box where the "Item" is located, then drag it to the lower left corner of A1, and change the text inside to "EmpNo", then the double slash header is made well; steps, see screenshot in Figure 6:
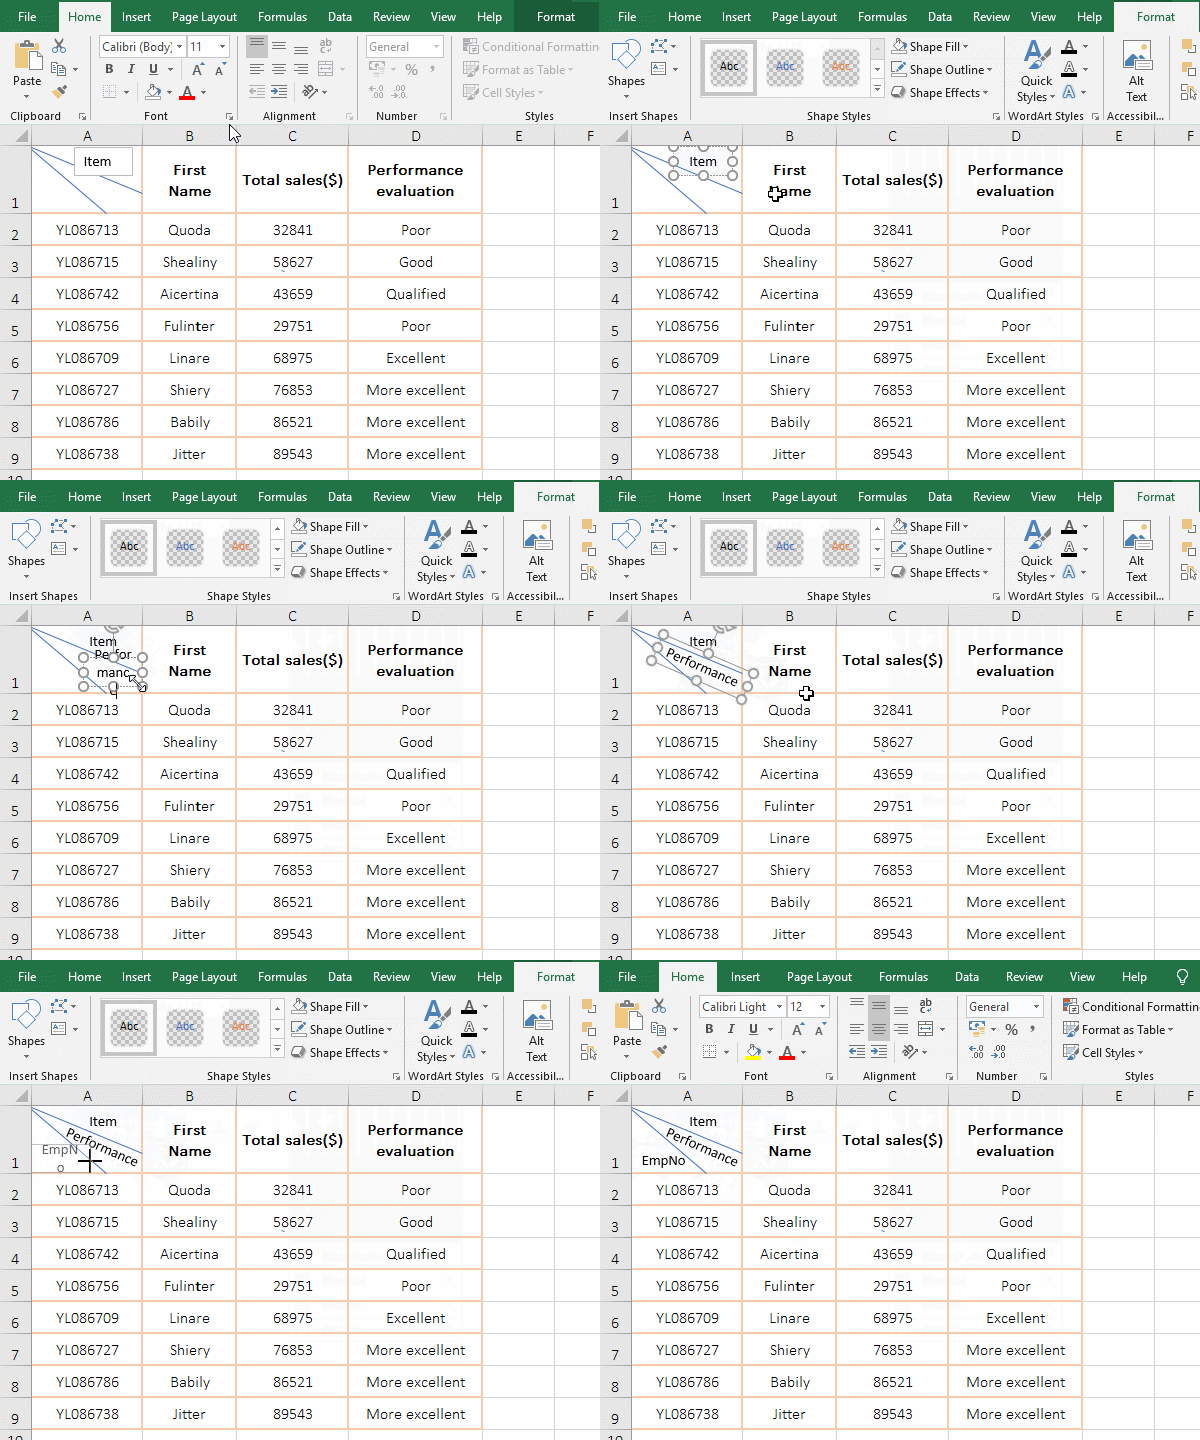
Figure 6
III, Excel slash style how to set
(I) Quickly set up with Excel built-in style
1. Click on the diagonal line above to select it. select the "Format" tab, click "Subtle Line - Accent 2" on the "Shape Style", then select the slash to change to the selected style; then select the slash below, click the "short horizontal + down arrow" icon, select a style (such as "Subtle Line - Accent 2") in the expanded slash style, then the selected slash also becomes the selected style; the operation steps are as shown in Figure 7:
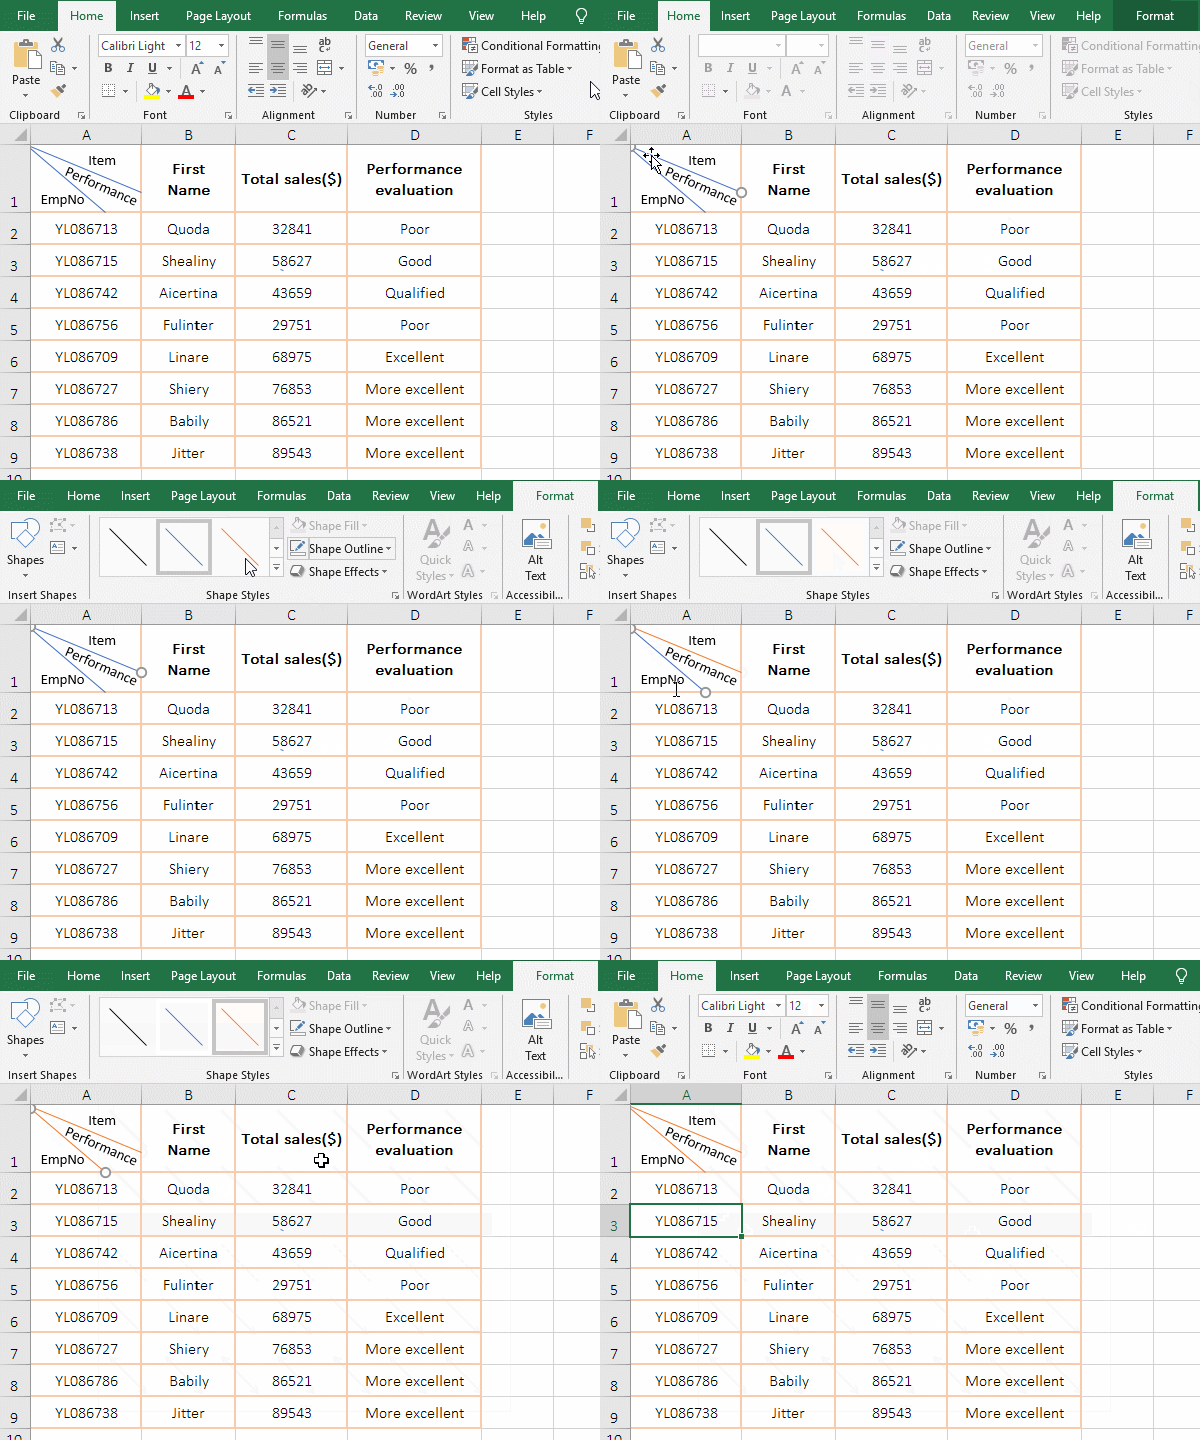
Figure 7
2. If you want to select two or more slashes at a time, you can hold down Shift and click the slash you want to select.
3. The cancellation method of the arrow for the slash that was set by Excel built-in style. Select the blue slash, click the "short horizontal + down arrow" icon, select the "Single Arrow - Accent 1" under "Presets" in the expanded slash style, then select the "Subtle Line - Accent 1" under the "Theme Styles" in the same way, and the arrow with the selected slash is still there, indicating that the slash without the arrow under "Thematic Styles" cannot remove the arrow of the line. Click "Shape Outline" and select "Arrow" → "Arrow Style 1" in the pop-up menu, then the arrow with the selected diagonal line is removed; the operation steps are as shown in Figure 8:
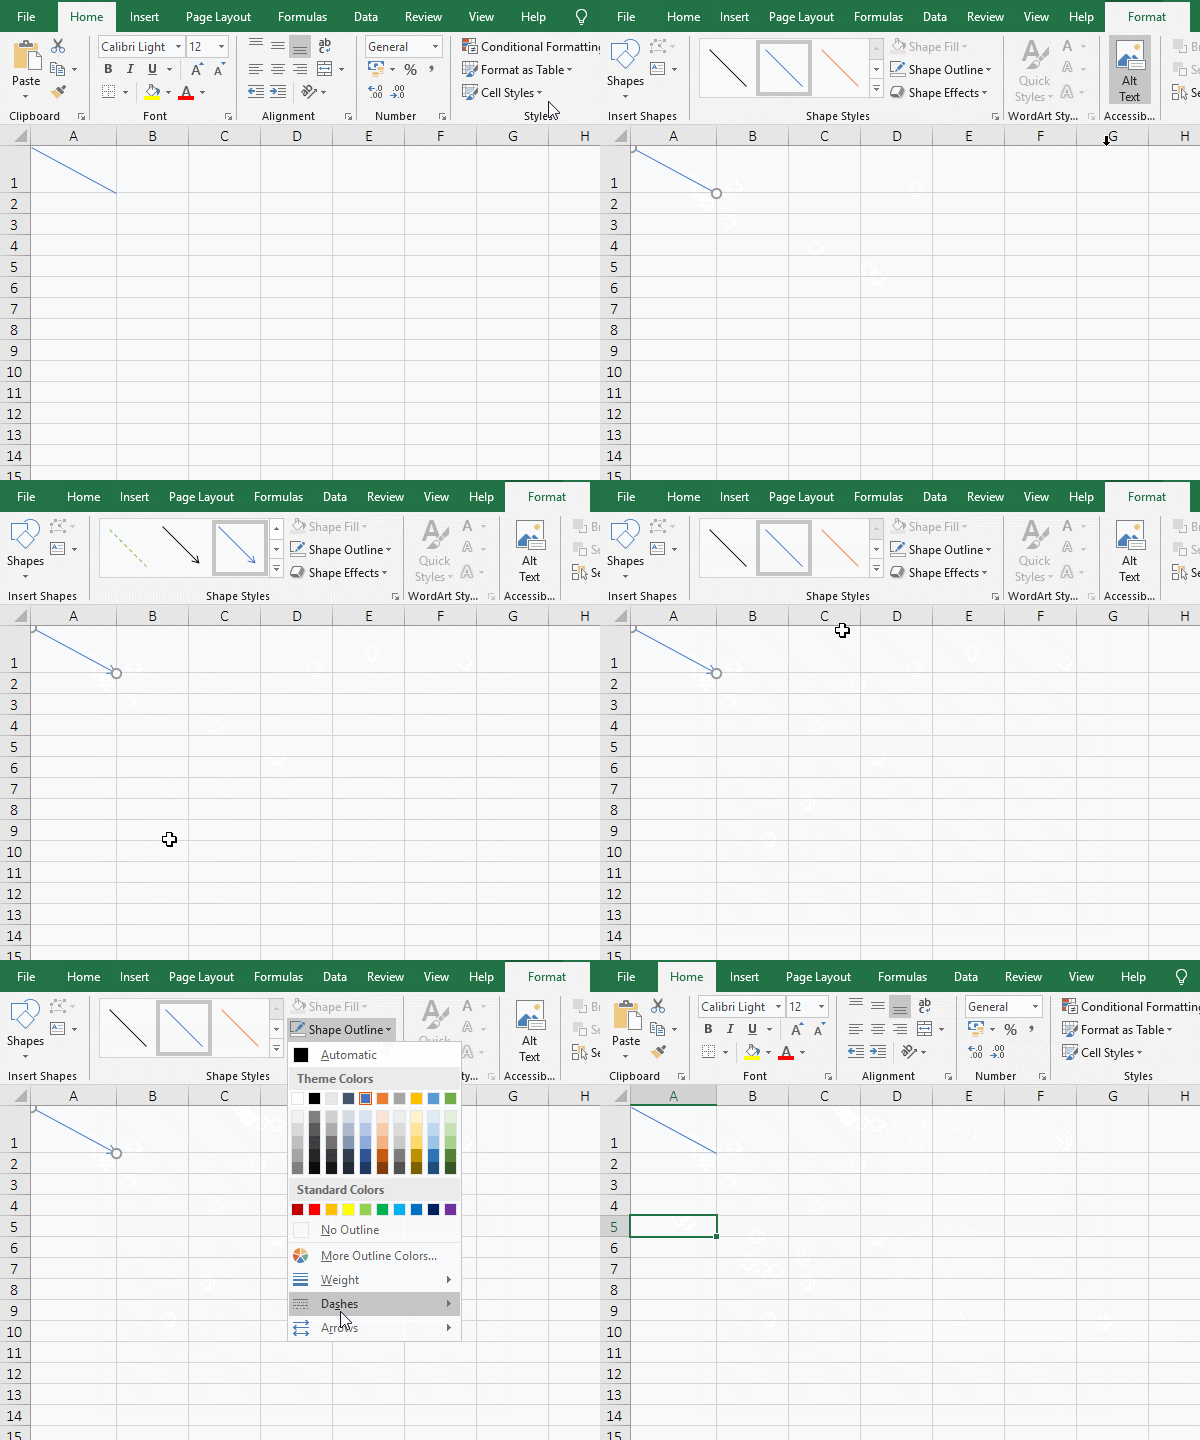
Figure 8
You can also remove the arrow of the line in the slash style that is expanded by clicking the "short horizontal + down arrow" icon, but you need to select the dotted line without the arrow under "Presets".
(II) Set the color, weight and dashes for lines in excel
Double-click on the diagonal line above to select it, hold down Shift, click the diagonal line below, select both diagonal lines, the current tab is the "Format", click "Shape Outline", and select "Orange, Accent 2, Lighter 60%" in the pop-up menu, set the slash to this color; click "Shape Outline", select "Weight" → 11/2 pt, set the slash to 11/2 pt; expand "Shape Outline" again, select "Dashes → Round Dot", the slash is set to this style; the operation steps are as shown in Figure 9:
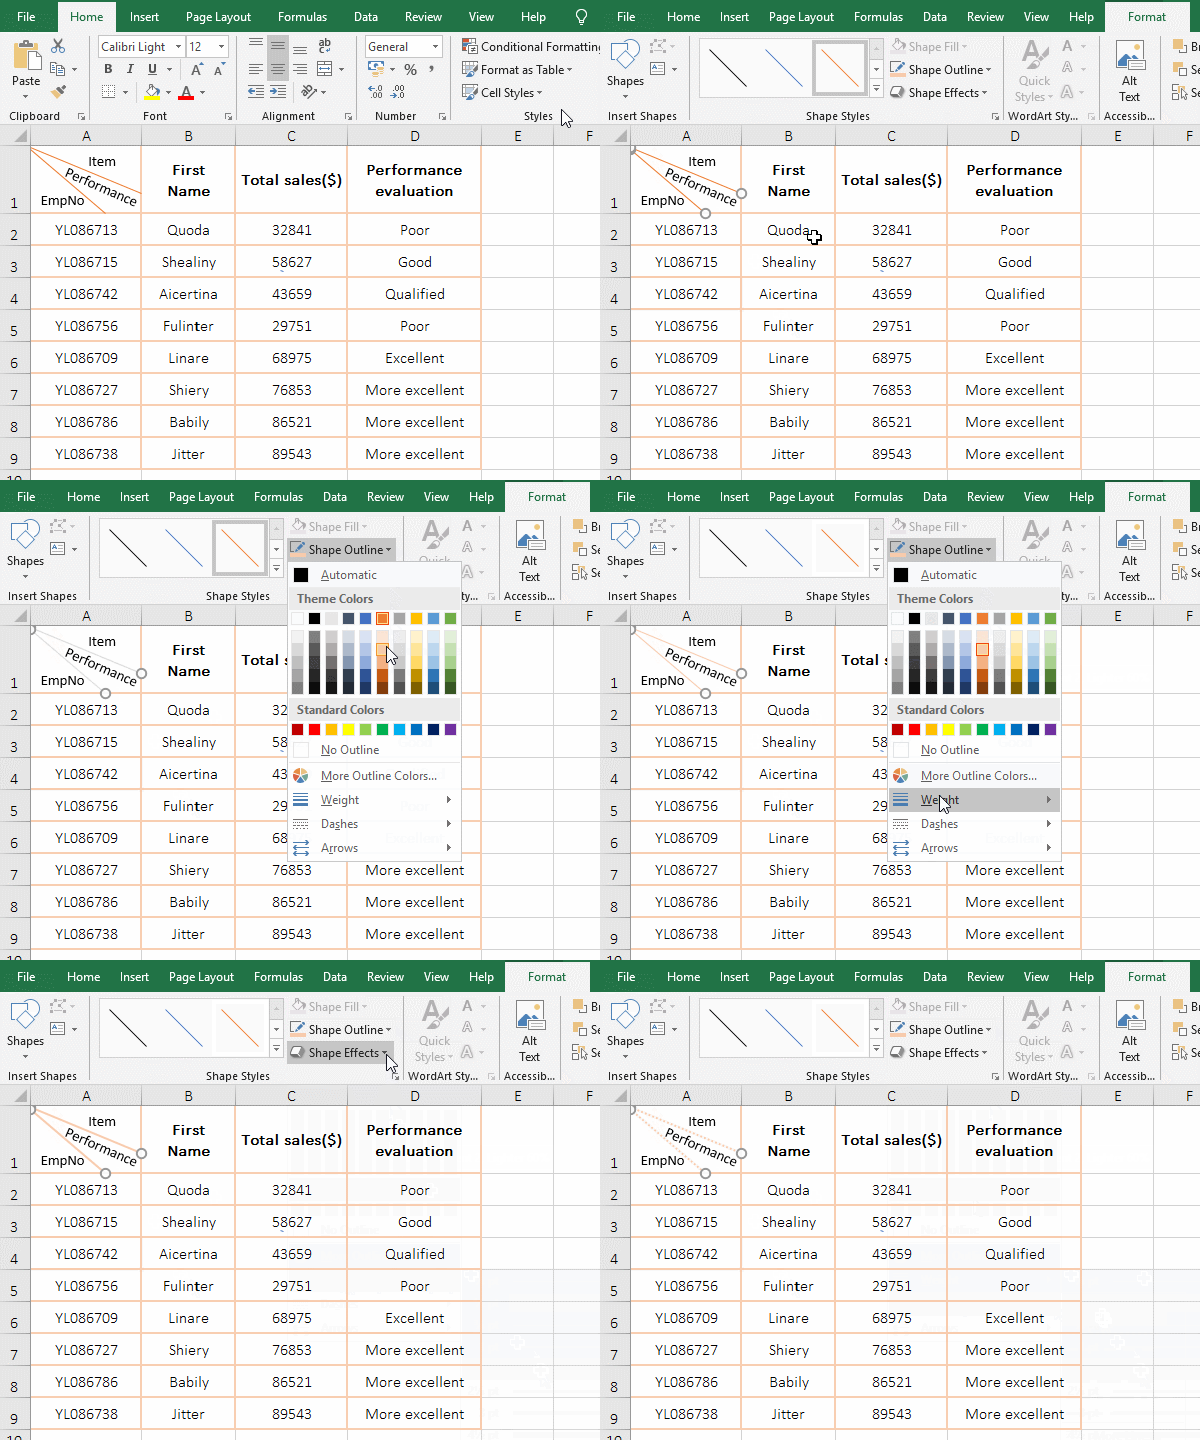
Figure 9
(III) Set the shape effect
Take the example of setting the "Reflection" effect for a slash. Move the mouse to the diagonal line, turn the mouse into a cross with four arrows, double-click the left button, automatically switch to the "Format" tab, click "Shape Effects", select "Reflection → Reflection Variations → Full Reflection, Touching" in the pop-up menu, then select a symmetrical reflection on the slash; the operation steps, see screenshot in Figure 10:
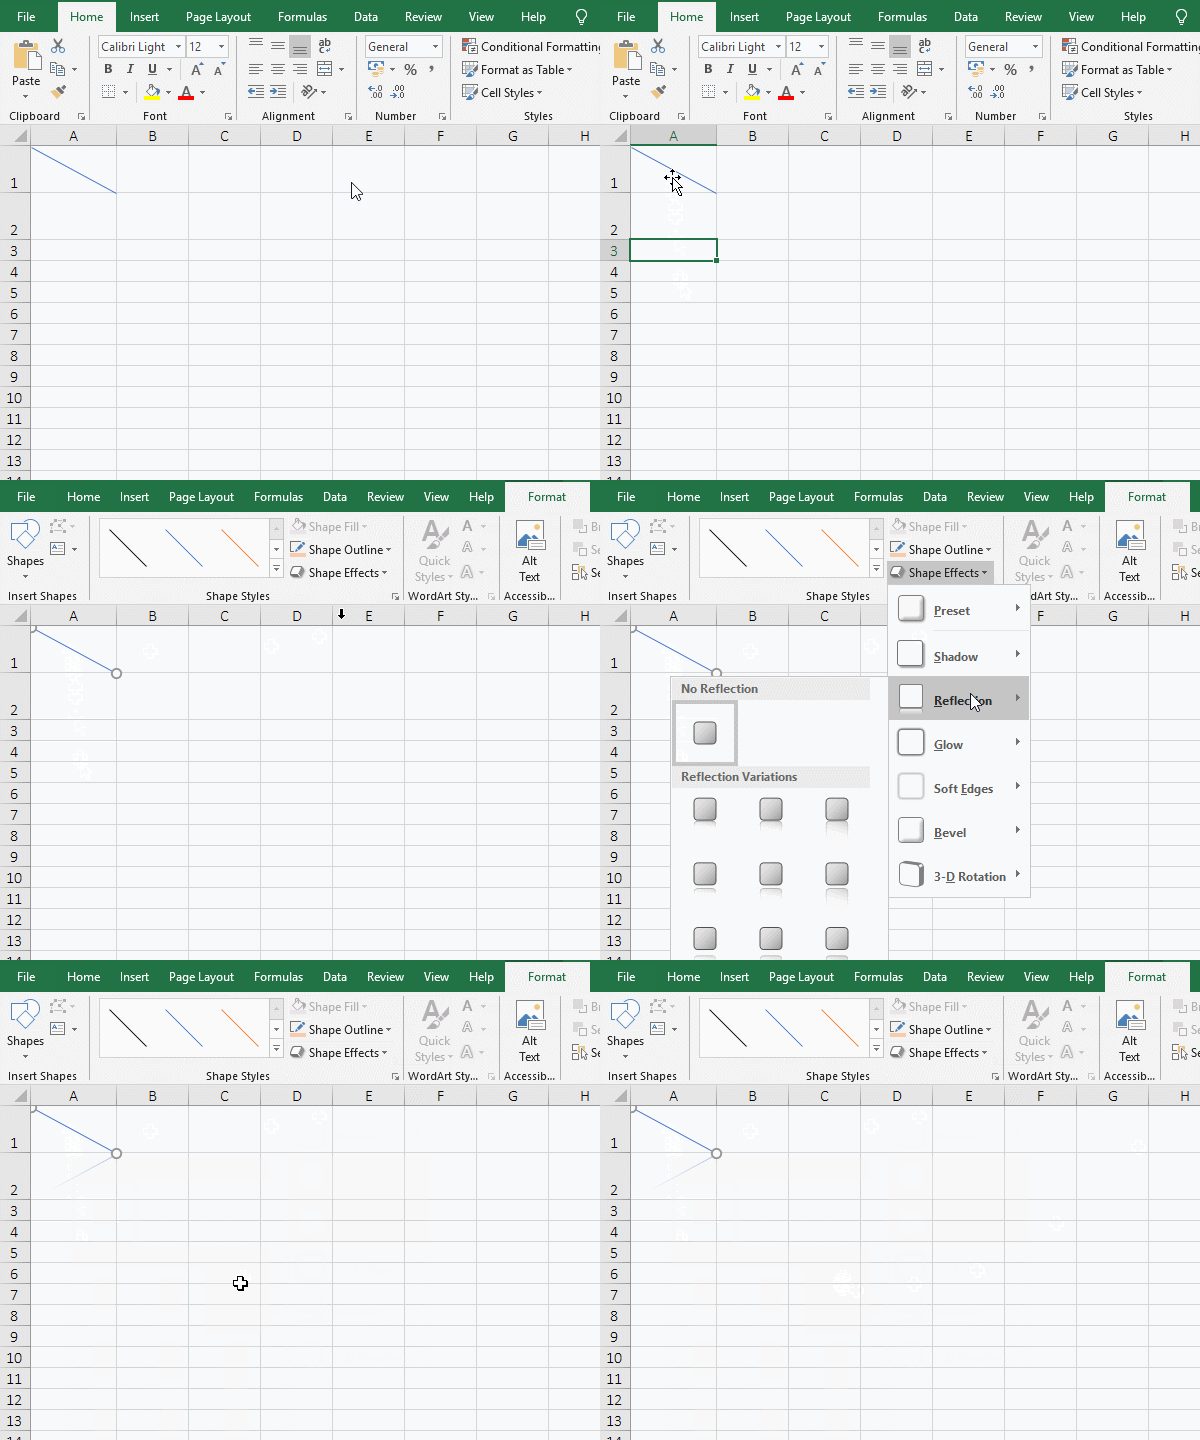
Figure 10
In addition to the "Reflection" effect, there are shadow, glow, soft edges, bevel, and 3-D rotation, all of which can be applied to lines, but the soft edges can only be seen when the lines are set thicker.
-
Related Reading
- How to move rows,columns,cells,table in excel(there
- Combine multiple excel sheets into one pivot table w
- How to create a pivot table in excel(15 examples, wi
- Excel pivot table percentage of grand total(parent r
- How to make a table of contents in word and change,
- How to convert excel to pdf(6 examples, with selecti
- How to calculate average in excel, with quickly find
- How to make an excel spreadsheet, with the top 10 kn
- How to generate multiple reports from one pivot tabl
- How to merge cells in excel(three ways to combine, w
- How to split cells in excel, with unmerge cells and
- How to use advanced filter in excel(7 examples, mult