How to align, rotate and lock Text Box position in Word, with wrapping text and select multiple
The position of text box in Word can be locked, but it is only relative to the text, that is, the text box does not move with it, but it can be moved with the mouse. The text box can also be rotated, you can choose to rotate 90 degrees, or set any degree of rotation. There are nine ways to wrap text in the text box and eight ways to align.
Multiple text boxes can be selected at once in Word, and there are two selection methods, one is to hold down the Shift key on your keyboard to select, and the other is to hold down the Ctrl key on the keyboard in the Selection Panel to select. But they can only select all text boxes on one page.
I. Adjust and lock Text Box position in Word
(I) Adjust the position of text box
1. Move the mouse to the border of the Text Box you want to select. After the mouse becomes a cross-hair symbol with four arrows, click the Text Box to select it. Word will automatically display the Format tab, click Position in the Arrange group, a drop-down menu will pop up, as shown in Figure 1:
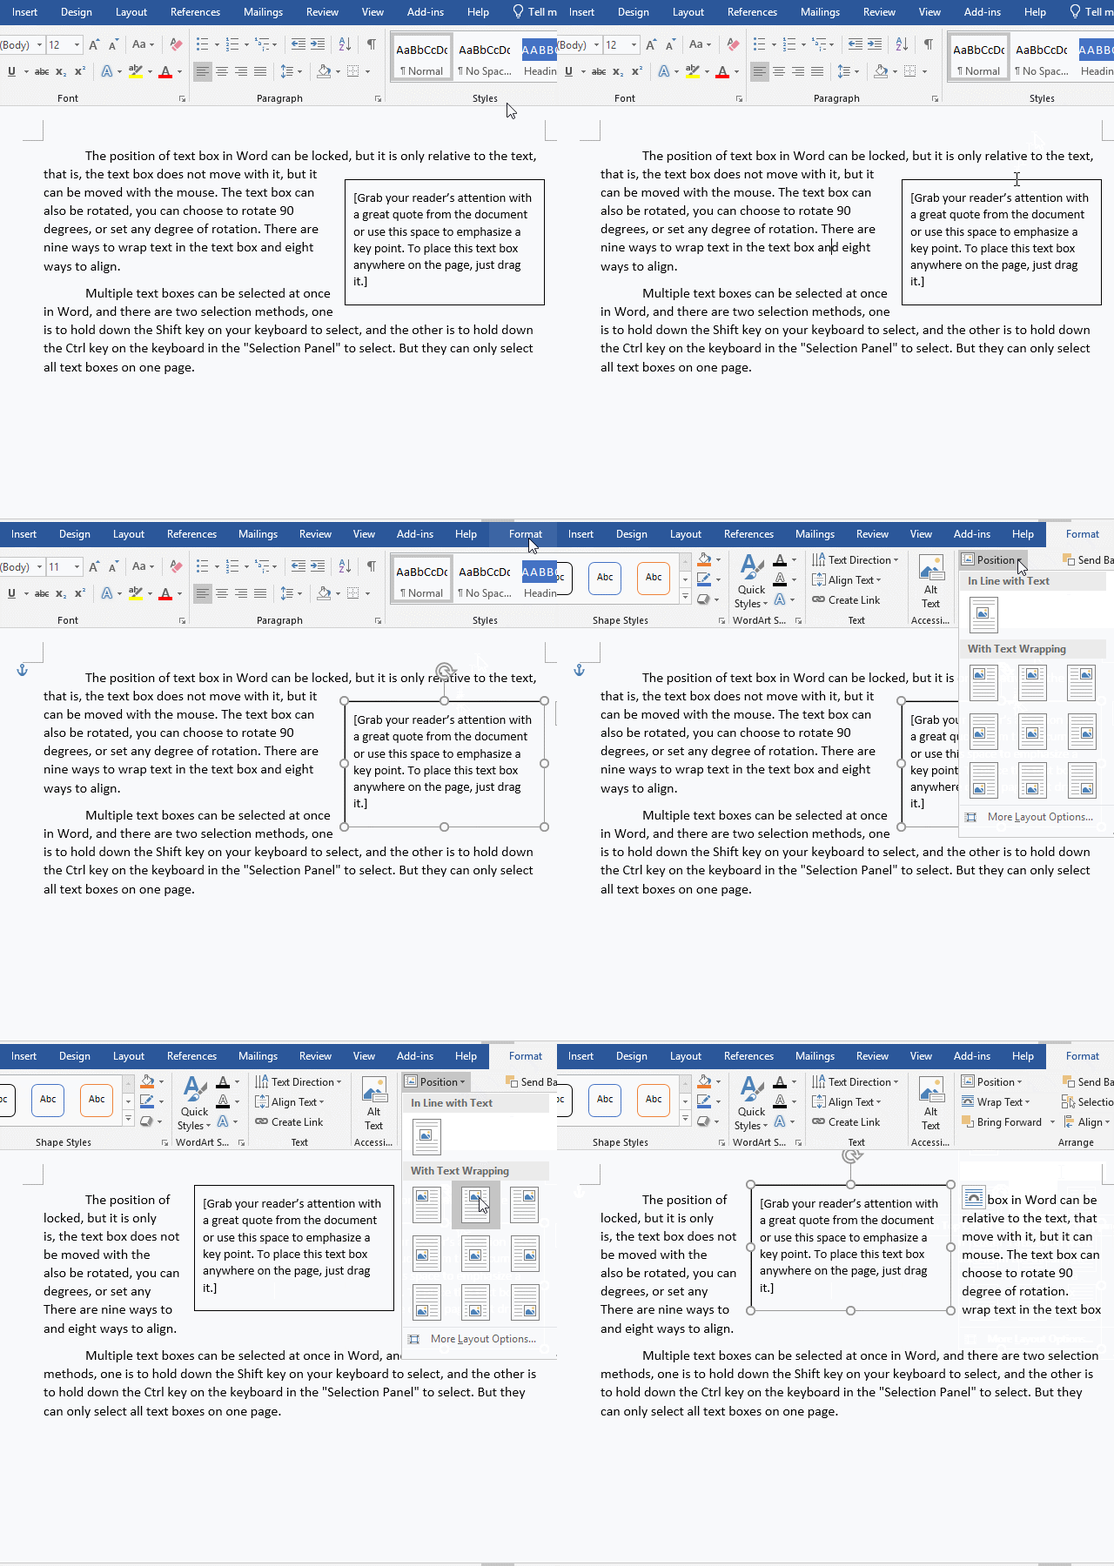
Figure 1
2. The position of the text box is mainly divided into two categories, namely embedded text line and text wrapping. The latter is divided into nine types, namely: Position in Top Left with Square Text Wrapping, Position in Top Center with Square Text Wrapping, Position in Top Right with Square Text Wrapping, Position in Middle Left with Square Text Wrapping, Position in Middle Center with Square Text Wrapping, Position in Middle Right with Square Text Wrapping, Position in Bottom Left with Square Text Wrapping, Position in Bottom Center with Square Text Wrapping, and Position in Bottom Right with Square Text Wrapping. We choose the Position in Top Center with Square Text Wrapping in Figure 1.
3. If the above nine positions cannot meet the requirements, click More Layout Options to open the Layout window. Here you can set the position of the Text Box arbitrarily, for example, select Absolute position for Horizontal and Relative position for Vertical, and enter values ??respectively, as shown in Figure 2:
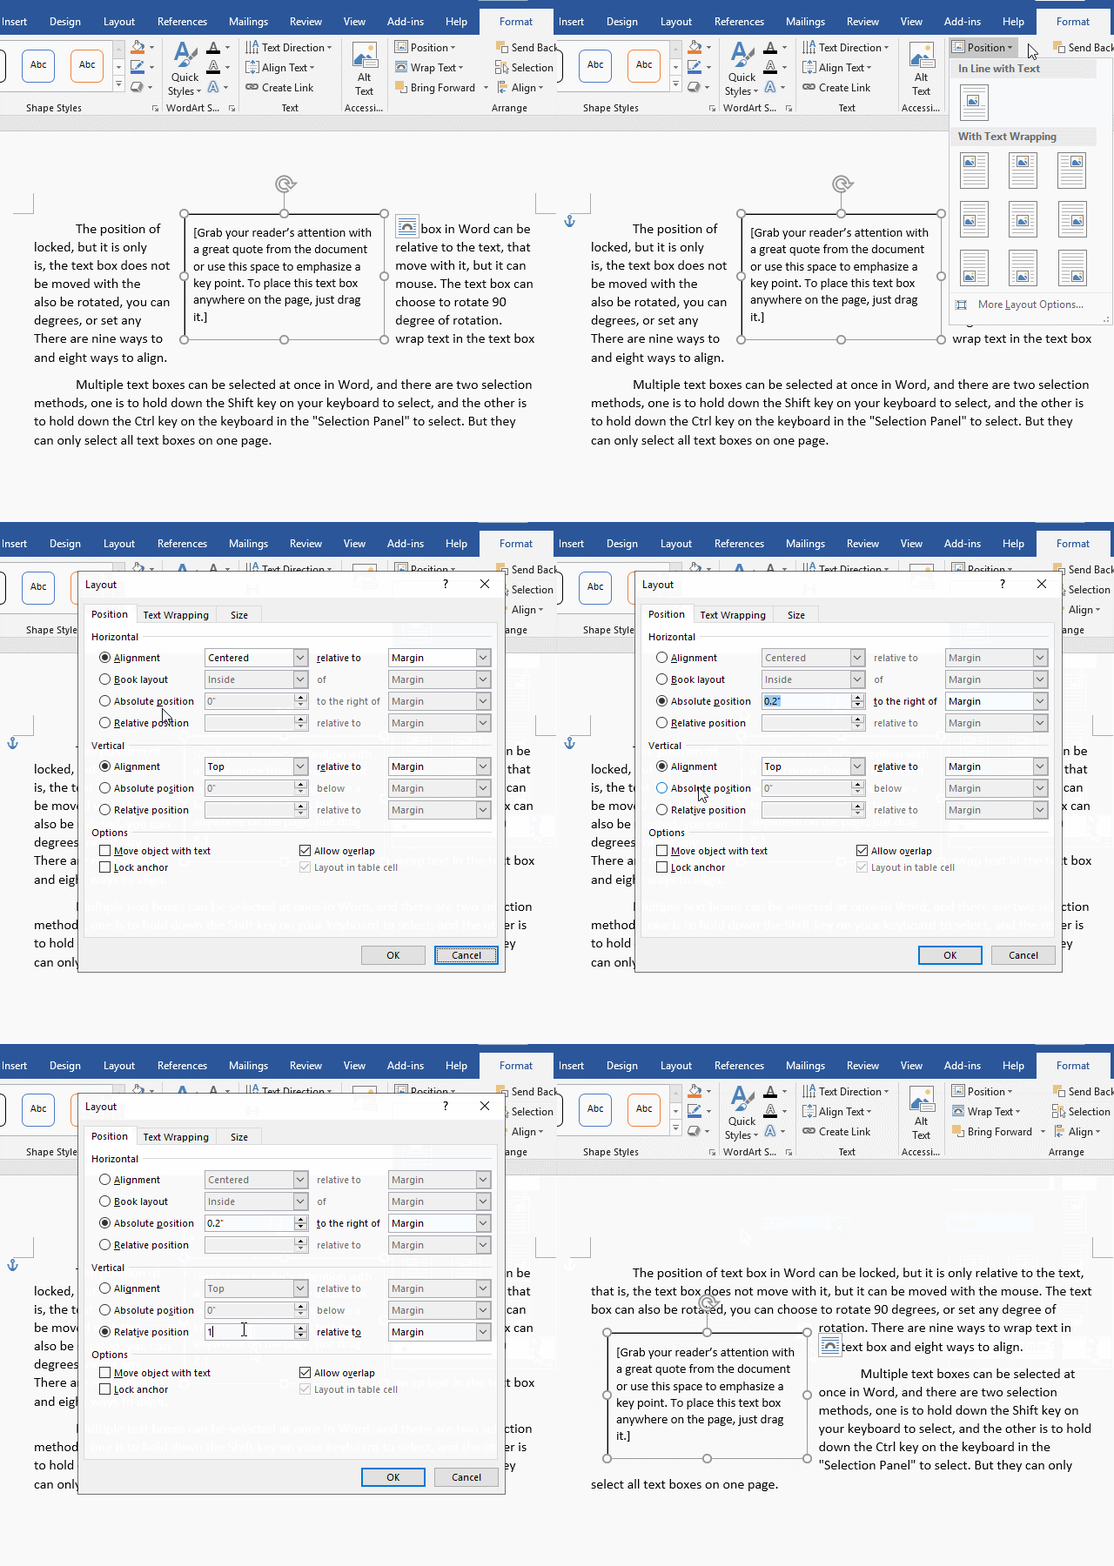
Figure 2
(II) Lock Text Box position in Word
To lock the Text Box is to specify that the Text Box does not move with the text in Word, that is, when you press Enter on your keyboard to move the text down, it is fixed at the original position; if you use the mouse, you can still move it. The method of locking the Text Box position is as follows:
Method 1: Move the mouse to the border of the Text Box you want to select. After the mouse becomes a cross-hair symbol with four arrows, click the Text Box to select it. At this time, there is a Layout Options icon in the upper right corner of the text box, click it, Select Fix position on page in the pop-up panel, position the cursor in front of the text on the left of Text Box, and press Enter repeatedly, the text moves down, and the Text Box does not move, indicating that it has been fixed. As shown in Figure 3:
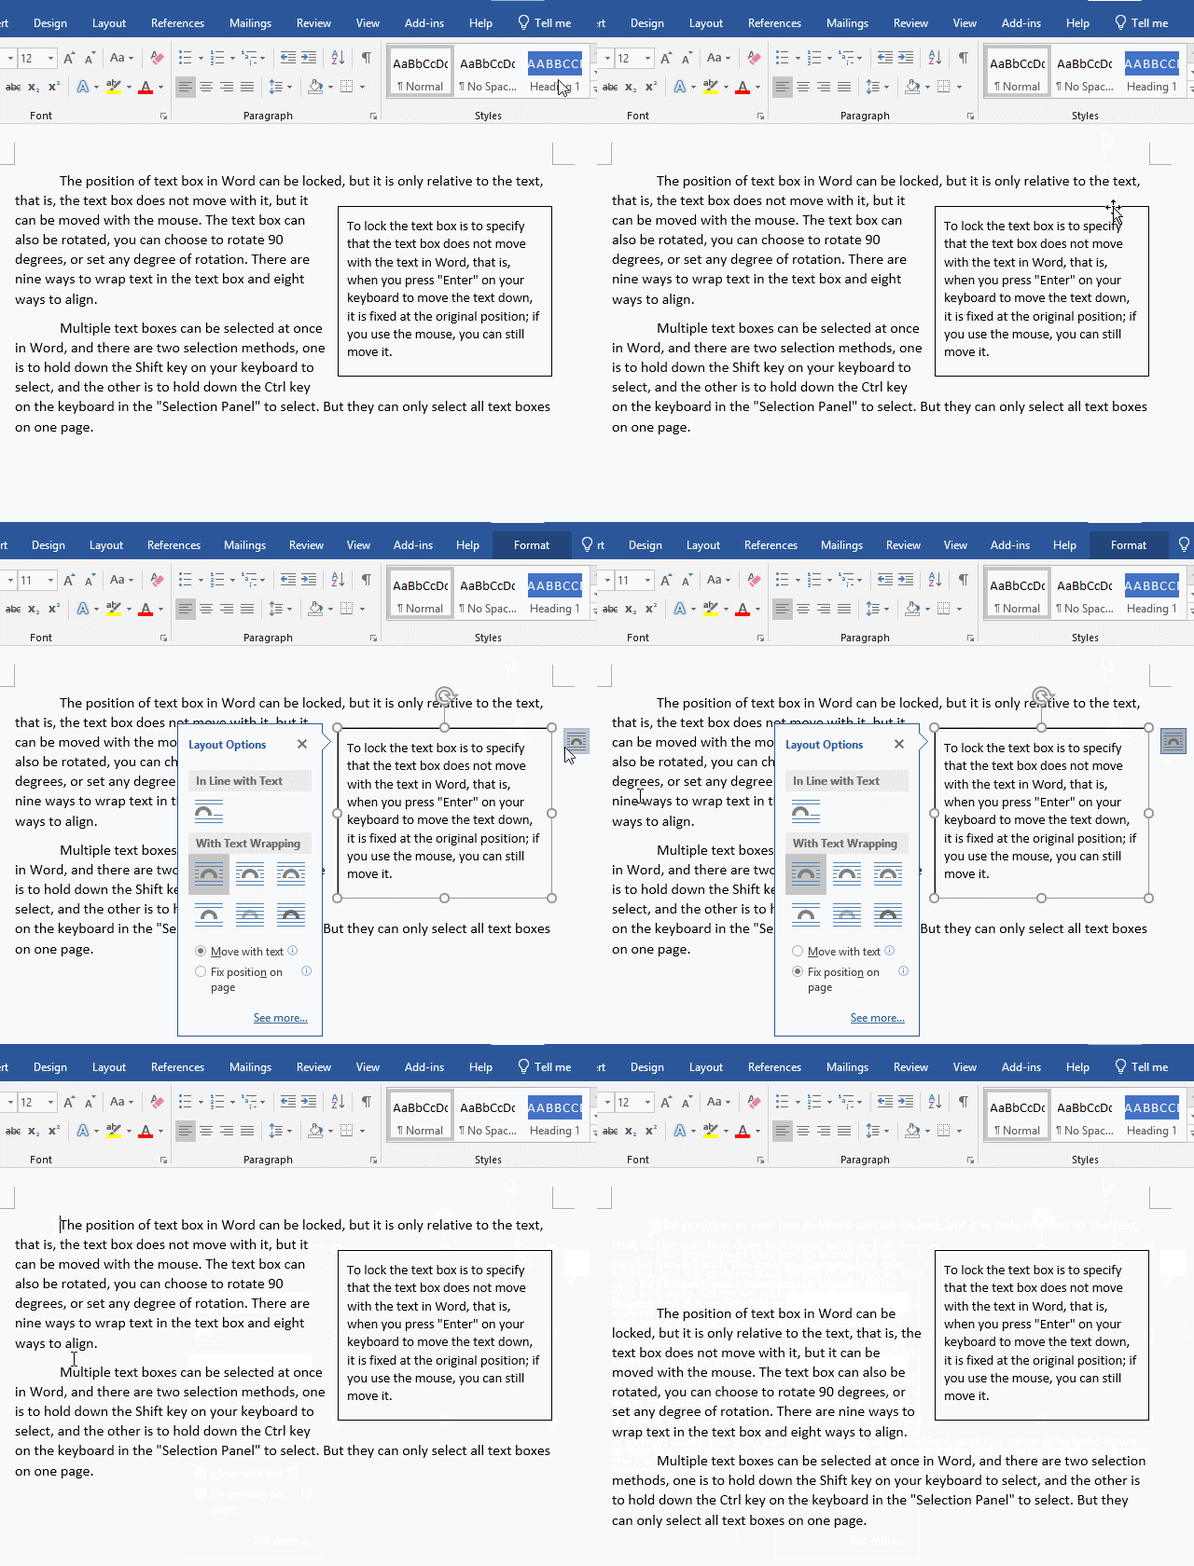
Figure 3
Method 2: Move the mouse to any border of the Text Box, after the mouse becomes a cross-hair symbol with four arrows, click the Text Box to select it, select the Format tab, click Position in the Arrange group, and select More Layout Options from the pop-up menu, open the Layout window, click Move object with text to uncheck it, then click OK; position the cursor in front of the text on the left of Text Box, and press Enter repeatedly, the text moves down, but the Text Box does not move, indicating that it has been fixed. The demonstration is shown in Figure 4:
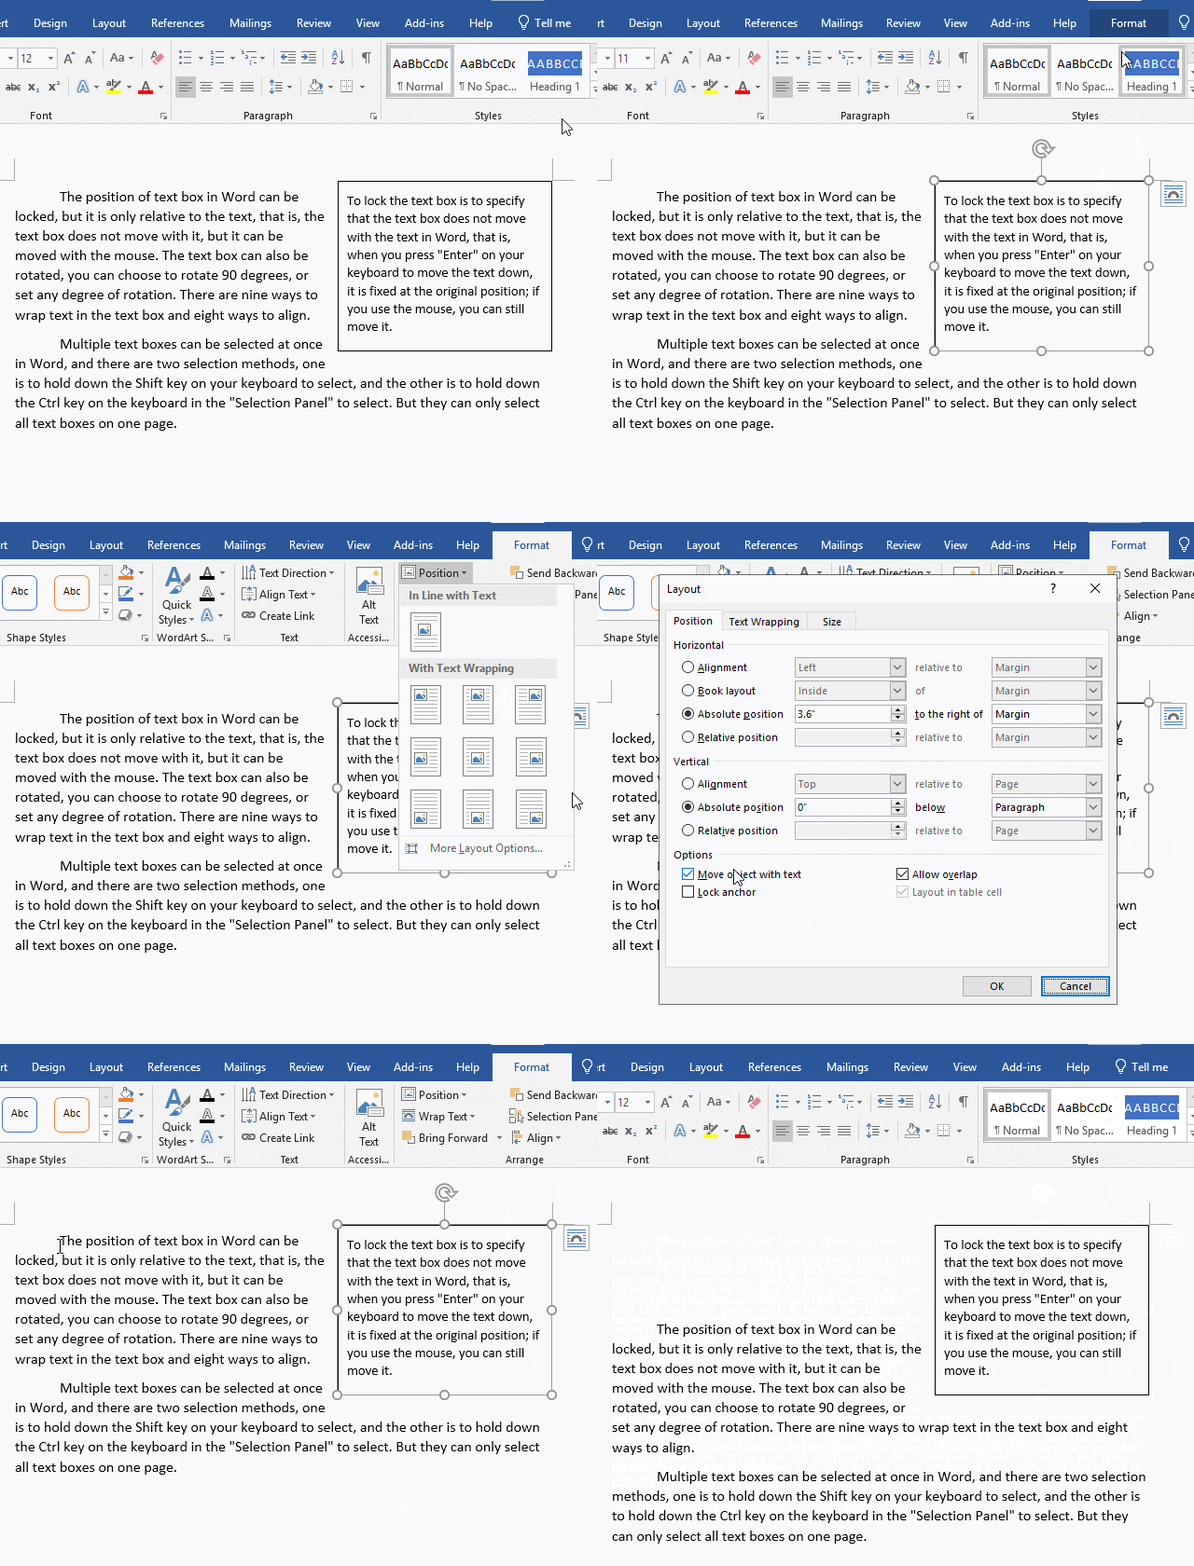
Figure 4
II. Wrap Text in Text Box in Word
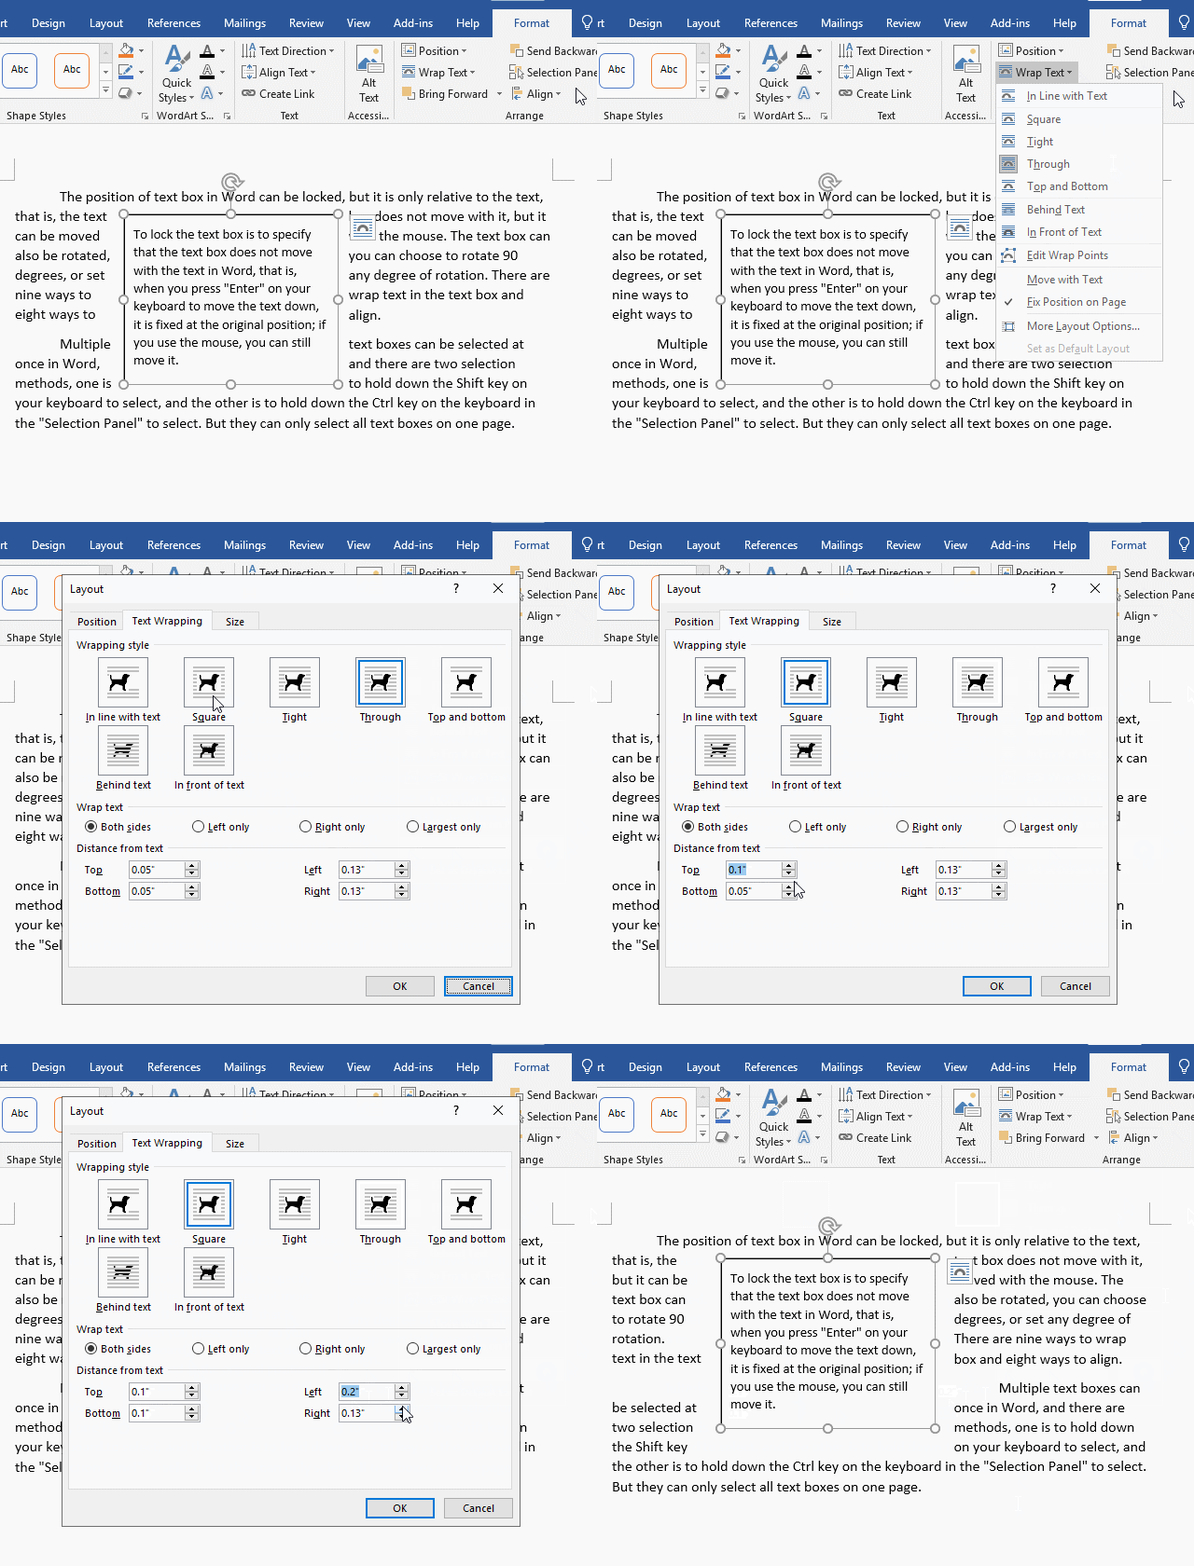
1. Select the Text Box, click Wrap Text, the pop-up drop-down list box is shown in Figure 5:
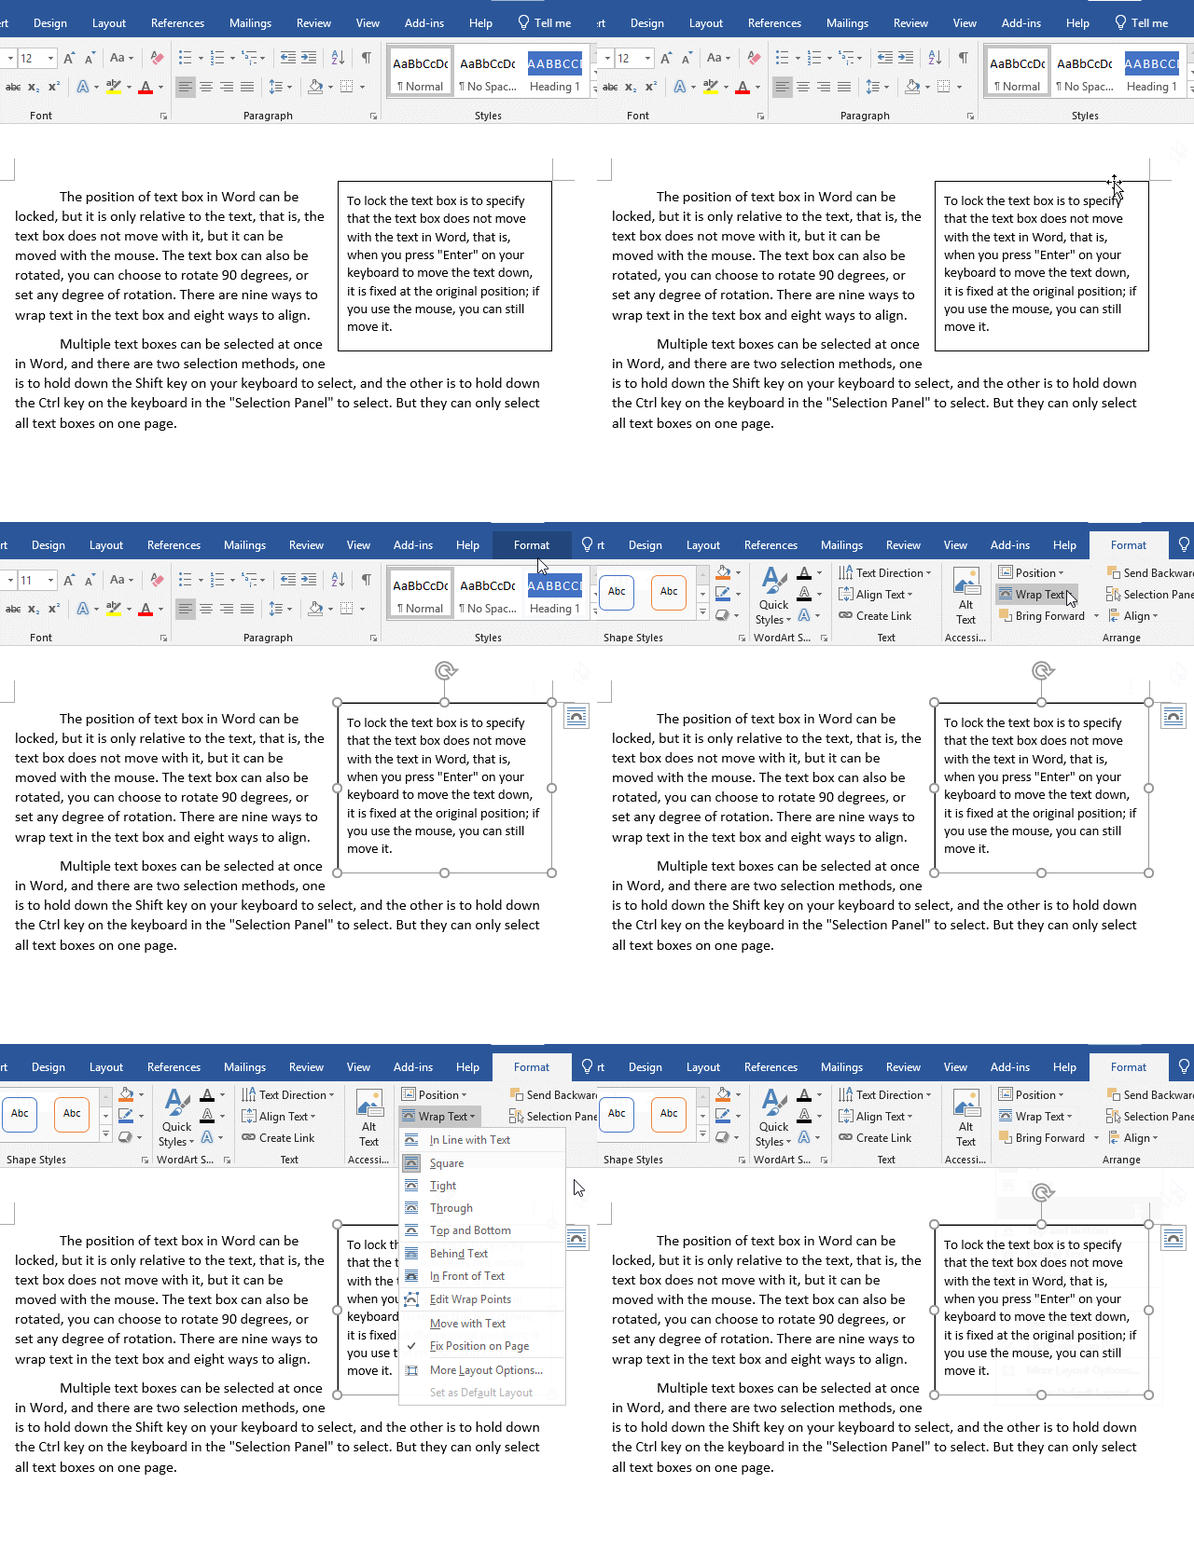
Figure 5
2. It can be seen from the figure that there are eight kinds of Wrap Text. In fact, there are several kinds of similar effects, such as In Line with Text, Square, Tight and Through. The Through is chosen in the above figure. The effect of Behind Text and In front of Text is shown in Figure 6:

Figure 6
3. If the above Wrapping Text does not meet the requirements, click More Layout Options to open the Layout window, select the Text Wrapping tab. There is not only a wrapping method, but also you can set the wrapping text on that side and the precise distance from top, bottom, left, and right. For example, set the Top and Bottom under Distance from text to 0.1 inch, and Left and Right 0.2 inch. After clicking OK, the effect is shown in Figure 7:
Figure 7
4. It is worth noting that the left and right distance cannot be set too large, otherwise the Text Box will go to the next page.
III. How do I rotate a Text Box in Word
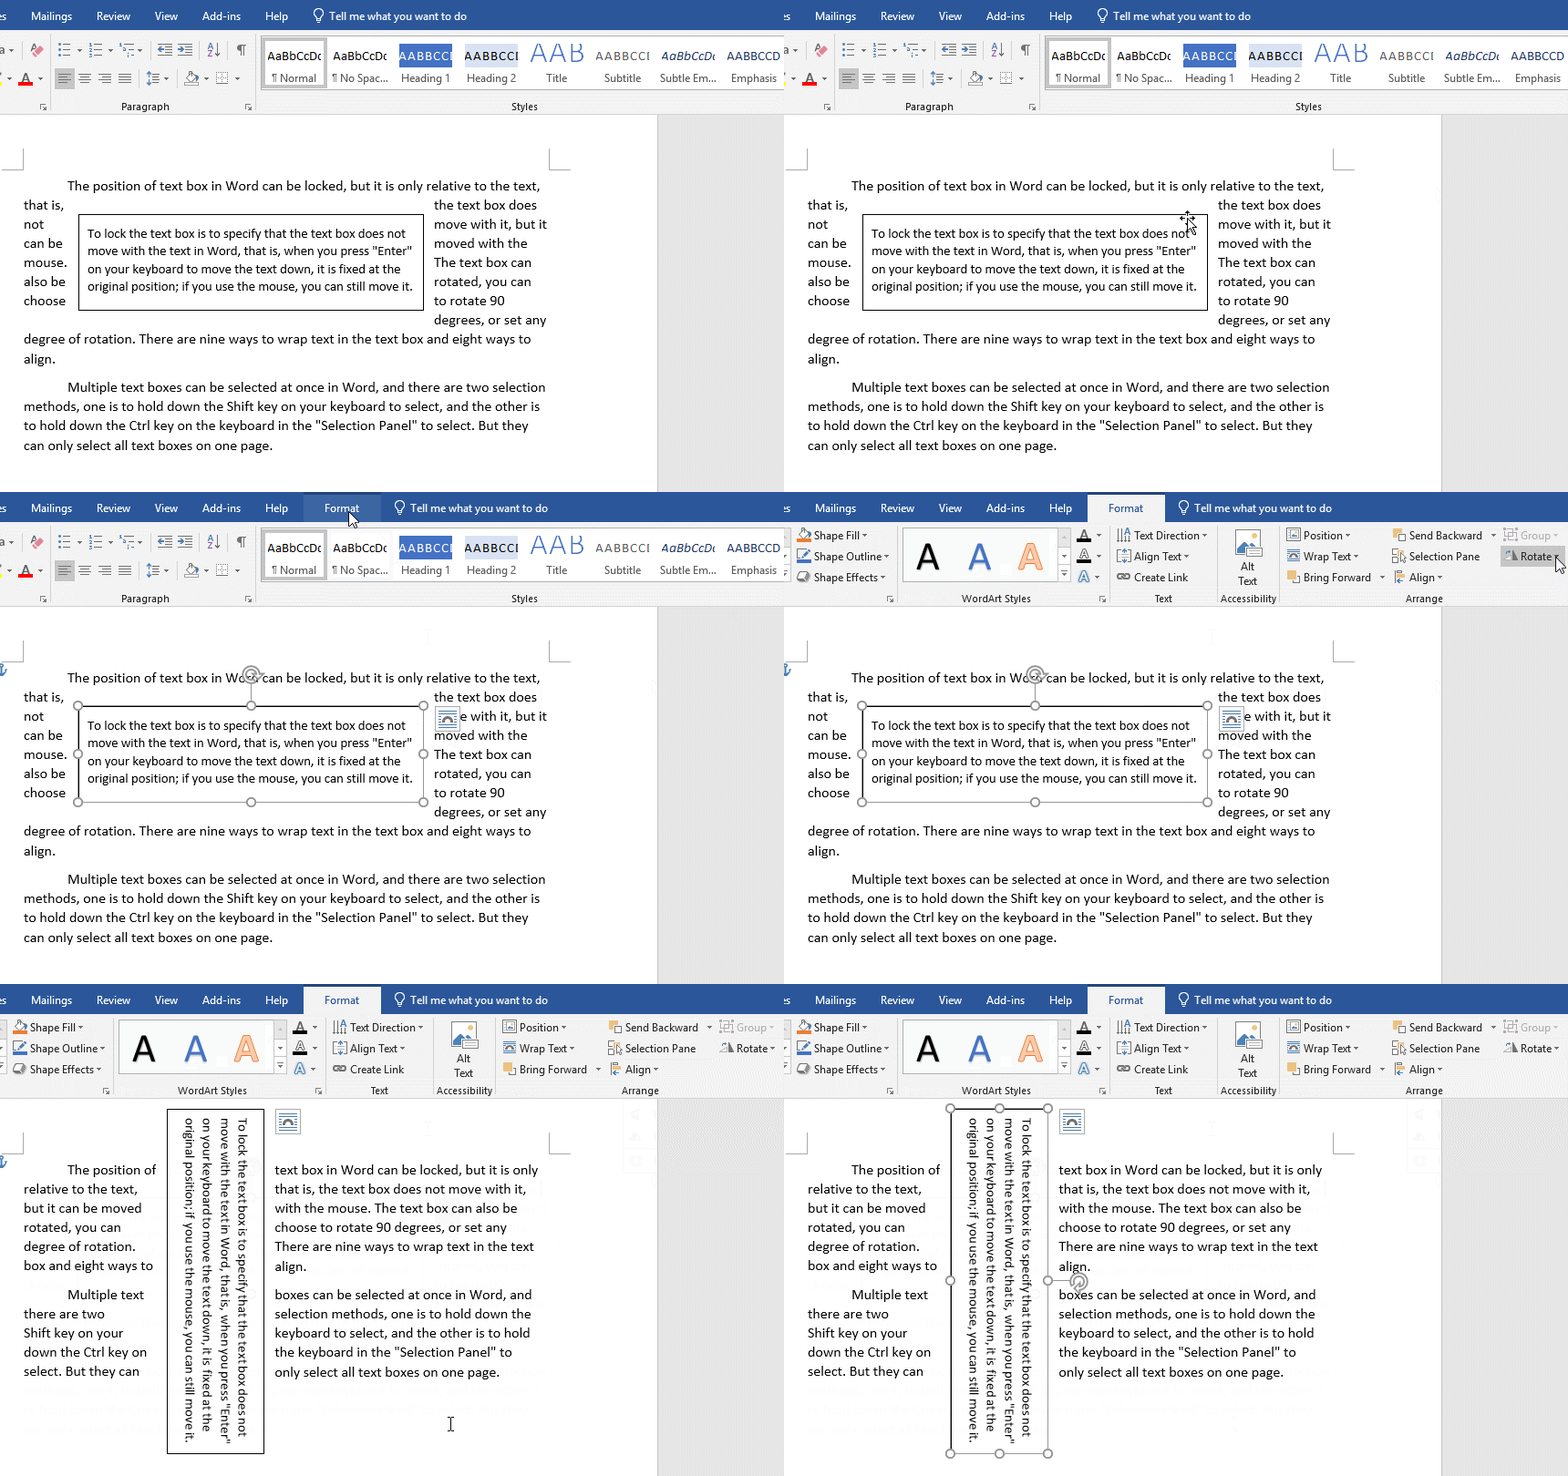
1. Select the Text Box you want to rotate select Format tab, click Rotate in the Arrange group. There are four rotation methods, namely: Rotate Right 90 degrees, Rotate Left 90 degrees, Flip Vertically and Flip Horizontally, select Rotate Right 90 degrees. The effect is shown in Figure 8:
Figure 8
2. If the above four rotation methods cannot meet the needs, click More Rotation Options, open the Layout window, and select the Size tab. Here you can set the Height, Width, Rotation and Scale of the Text Box. For example, set the rotation angle to 30 degrees. Because the width of the box is too large and the position is too left, move the position to the left, width and height set both to small. Otherwise, after the rotation, the angle is too large and it will go to the next page. The setting value and effect is shown in Figure 9:
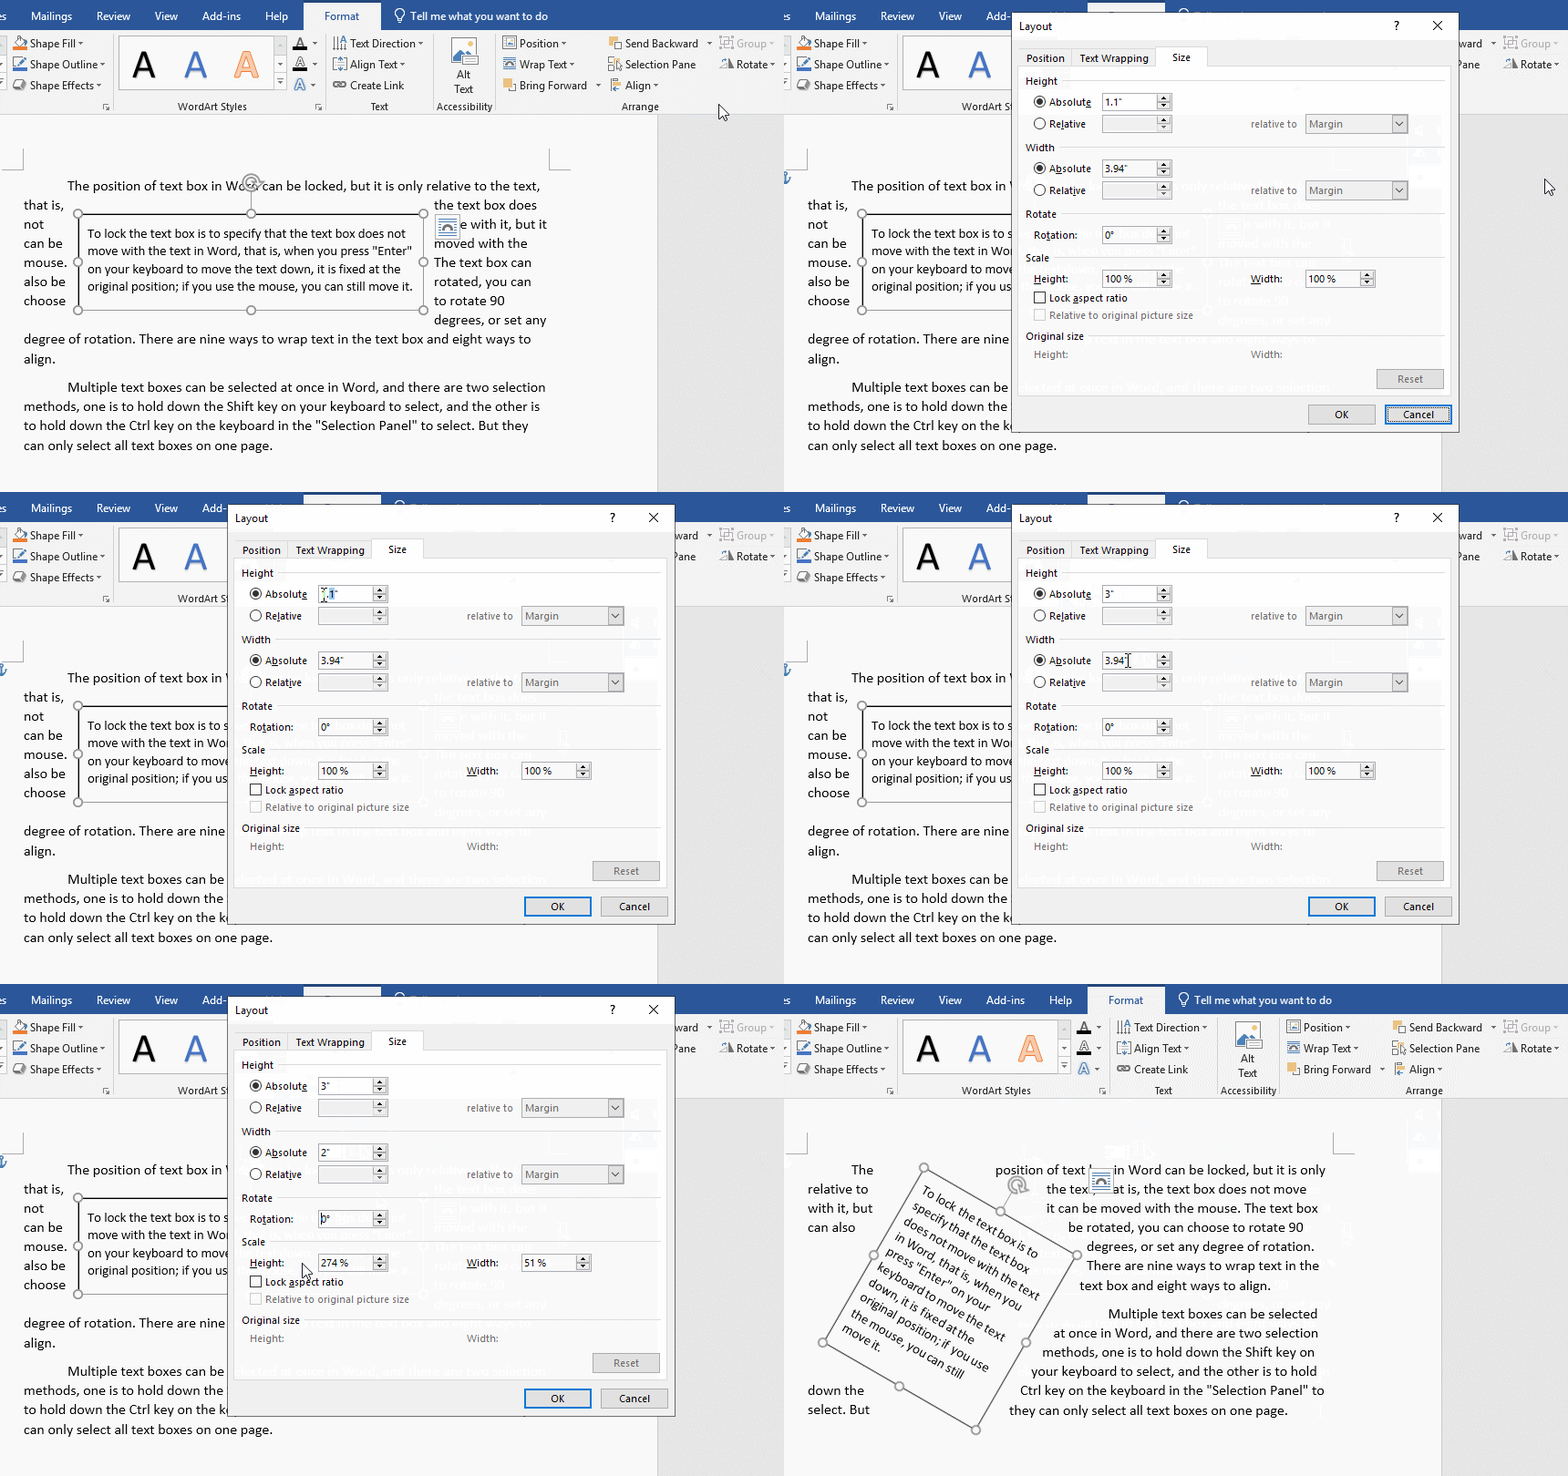
Figure 9
IV. How to align Text Boxes in Word
1. Select the Text Box you want to align, click Align in the Arrange group, select Align Center in the pop-up menu. The demonstration is shown in Figure 10:
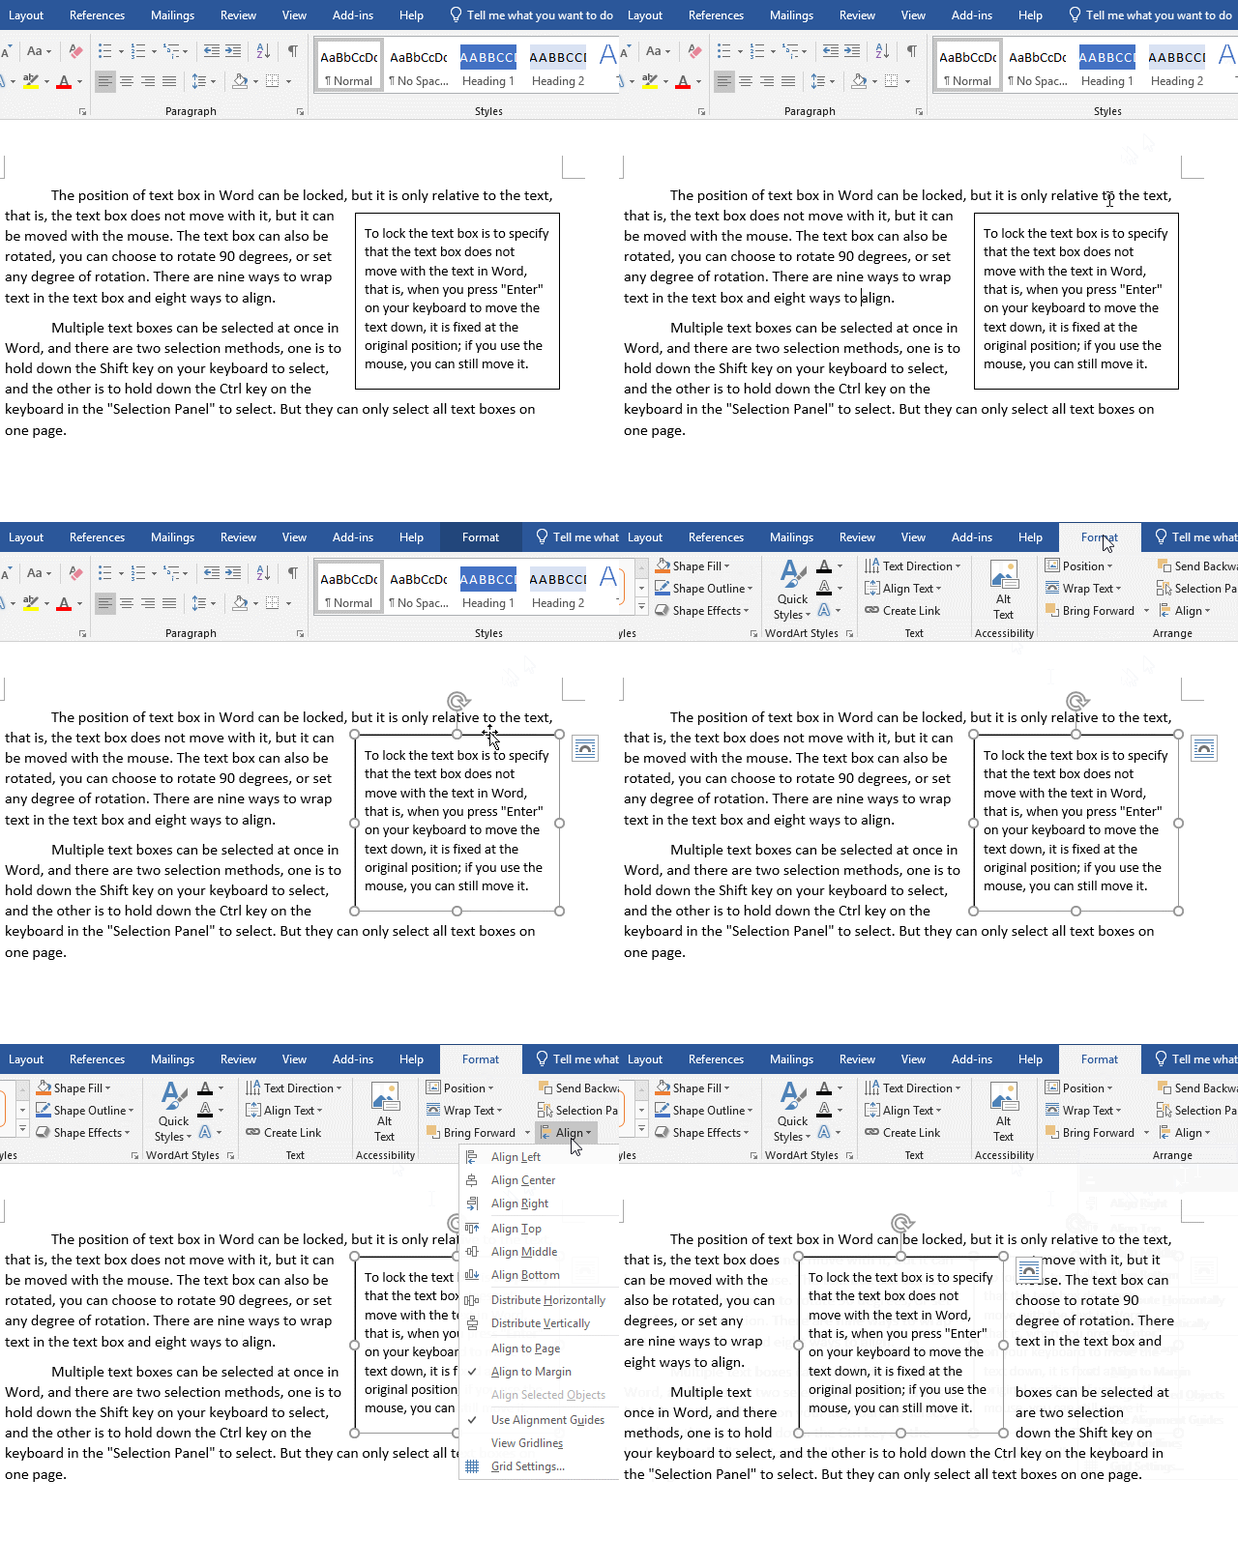
Figure 10
2. It can be seen from the figure that there are eight alignment methods, namely: Align Left, Align Center, Align Right, Align Top, Align Middle, Align Bottom, Distribute Horizontally and Distribute Vertically. There are sample small icons before each alignment, which can be used as reference.
3. There are two types of alignment: page alignment and margin alignment. Generally, you can keep the default.
V. Selection of multiple Text Boxes
If there are multiple Text Boxes on a page that need to be selected at the same time under certain circumstances, how should they be selected? It's actually very simple, just hold down the Shift key on the keyboard and click the Text Box one by one to select multiple. You can also select the Home tab, click Select in the upper right corner of the screen, select Selection Pane from the pop-up menu, open the Select panel, hold down Ctrl key on your keyboard, and click the Text Boxes to be selected one by one.
-
Related Reading
- How to delete table lines in Word (one line, remove
- How to add cross symbol and tick mark in Word, with
- Find ProPlusww.msi when opening Office(Word/Excel),
- How to set Header and footer in word(13 examples), i
- Word art transform text effect (Follow Path, Warp, A
- How to convert PowerPoint to word(4 examples), inclu
- How do I rotate a page 90 degrees in Word, with rota
- Can't print from microsoft Word (6 possible reasons)
- How to set default Printer in Microsoft Word when se
- How to fix Microsoft Word has stopped working (sever
- C# label control, with winforms label transparent ba
- Word temporary files location (Msocache folder takes

