
How to change default font in Word, with setting font and font size, adding fonts to Word
How to set font in Word? There are two ways to set it in Word, one is to use the Commands setting in the Ribbon, and the other is to use the shortcut key to open the font setting window. How to set font size in Word? There are three ways to set it, the first two are the same as setting the font, and the third is to use the Increase and Decrease Font Size. The range of font size is from 1 to 1638 in Word, that is, the maximum font size that can be set is 1638.
You can change default font and font size in Word, just select the appropriate font and font size, and then set them as default values. Sometimes you encounter the situation that Word cannot change the font. It may be caused by the destruction of the Normal template. You need to delete this template, reopen Word, and let it create a new one.
I. How to set font and font size in Word
Method 1:
Move the pointer to the left of the text to be set, such as How to set font in Word. After it turns into A Right-Pointing Arrow, click to select the text. Select the Home tab, click the Font drop-down list box, in the pop-up menu, drag the scroll bar on the right down to select a suitable font, such as Microsoft Yahei UI Light. Click the Font Size drop-down list box, and then select a font size, such as 14. The demonstration is shown in Figure 1:
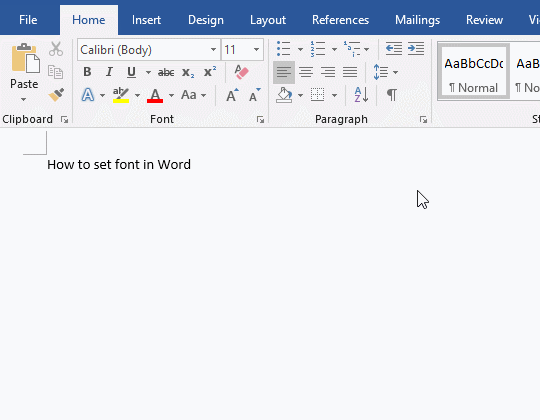
Figure 1
Tips for filtering fonts: Click the blank space behind the text in the Font drop-down list box, select the used fonts, press the Down Arrow key to filter the fonts one by one, and press Enter on the keyboard to confirm after selecting the appropriate one. The demonstration is shown in Figure 2:
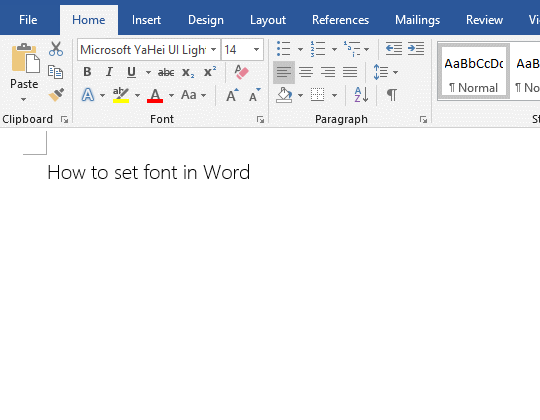
Figure 2
Method 2: Use the shortcut key Ctrl + Shift + F (keyboard shortcut to change font size in Word)
Move the pointer to the left of the text to be set, such as How to set font size in Word. After it turns into A Right-Pointing Arrow, click to select the text. Press the shortcut key Ctrl + Shift + F. open the Font dialog box, select the Font tab, drag the scroll bar on the right of Font list box down, select a appropriate font, such as Microsoft Yahei UI Light. Select a font size in the list box of the Size. such as 14, and click OK. The demonstration is shown in Figure 3:
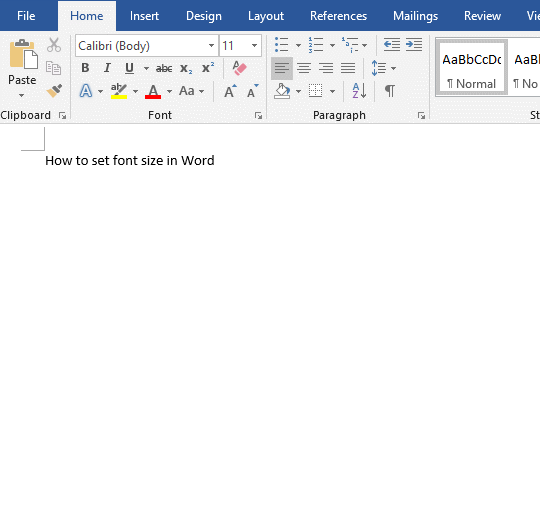
Figure 3
Note: Open the Font dialog box, you can click the Oblique Arrow to the right of Font. the demonstration is shown in Figure 4:

Figure 4
How to change font size in Word with Increase Font Size and Decrease Font Size.
Select the Home tab, move the pointer to the left of the paragraph to be set. After it becomes A Right-Pointing Arrow, double-click to select the paragraph. Click A with Up Arrow in its upper right corner to increase the font size by one size; click A with Up Arrow in its lower right corner to decrease the font size by one size, the demonstration is shown in Figure 5:
Figure 5
The keyboard shortcut to increase font size in word is Ctrl + Shift + >, and the shortcut to decrease font size in word is: Ctrl + Shift + <.
II. The skills for setting font size in Word
1. Maximum font size in MS Word
Word supports font sizes from 1 to 1638 points, that is, the maximum font size supported by Word is 1638. Enter 1638 on the keyboard in the font size drop-down input box, and press Enter on your keyboard. The selected text will use this font size. As the font becomes larger, only a small part of the text can be displayed, so only one point can be seen. The demonstration is shown in Figure 6:
Figure 6
2. Increase the font size and keep the line spacing unchanged in Word (do not change the size of text when reducing the line spacing)
Click the Oblique Arrow to the right of Paragraph. open the Paragraph dialog box, select the Indents and Spacing tab, click the Line spacing drop-down list box, select Exactly in the pop-up options, and changed the At to 24 pt. press Enter on the keyboard to confirm, the size of text remains unchanged, but the line spacing is reduced. The demo is shown in Figure 7:
Figure 7
III. How to set default font in Word (i.e. How to change default font in Word, or How to change the default font and size in Word)
Select the Home tab, click the Diagonal Arrow to the right of Font. open the Font dialog box, select the Font tab, drag the scroll bar of Font list box down, select a appropriate font, such as Microsoft Yahei UI Light. Select a font size in the list box of the Size. such as 14, and click OK. Click Set As Default. open the Microsoft Word dialog box, select All documents based on the Normal template? and click OK. The demo is shown in Figure 8:

Figure 8
IV. How to add fonts to Word
Just copy the font installation file to C:\Windows\Fonts. the font will be installed automatically, if you open Word, close it, and reopen it, the installed fonts will be automatically added to Word. If the system is installed in D drive, change C to D.
V. Font size will not change in Word
This problem occurs if the Normal template is damaged. You need to delete it and let Word recreate a Normal template. The method is: open a folder, copy %appdata%\microsoft\templates to the address bar, press Enter on the keyboard, locate the folder where Normal is located, delete Normal.dotm (or Normal.dot), close all Word windows, just reopen Word. The demo is shown in Figure 9:
Figure 9
-
Related Reading
- How to delete table lines in Word (one line, remove
- How to add cross symbol and tick mark in Word, with
- How to create and save as a new document in Ms Word,
- How to select multiple photos in Word and why is it
- Find ProPlusww.msi when opening Office(Word/Excel),
- How to set Header and footer in word(13 examples), i
- Word art transform text effect (Follow Path, Warp, A
- How to convert PowerPoint to word(4 examples), inclu
- How do I rotate a page 90 degrees in Word, with rota
- Can't print from microsoft Word (6 possible reasons)
- How to set default Printer in Microsoft Word when se
- How to change MS Word autorecover file location and