How to automatic numbering in Word, with turning off it, changing indent after 10,convert it to text
In Word, after setting the numbered list or the text entered is a number plus a period, when we press Enter to wrap, it will be automatically numbered by default. For example: press Enter after the first item, and the number of the second item will automatically appear; if it is to input the next item, this can reduce the input; if it is the same item, the number is not needed, and the automatic numbering is redundant, so it needs to be prohibited auto numbering.
After prohibiting automatic numbering, you can enable it again when you need it. After the automatic numbering is generated, there may be problems such as discontinuity, too large spaces after numbering, etc. These problems can be solved by setting to continue numbering and adjusting the list indentation. In addition, the number can be converted into text. The text description may be a bit vague, let's look at specific examples below.
I. How to automatic numbering in Word
If there is a list with a set number, it can be seen from the demo that there are five items in the list. When we press Enter on the keyboard after each item, it will be automatically numbered. For example, press Enter on your keyboard after the 4th item, and the original 5th item will change to 6th item, the current item 5 is waiting for input; press Enter on the keyboard at the end, and a number is automatically generated. The demonstration is shown in Figure 1:
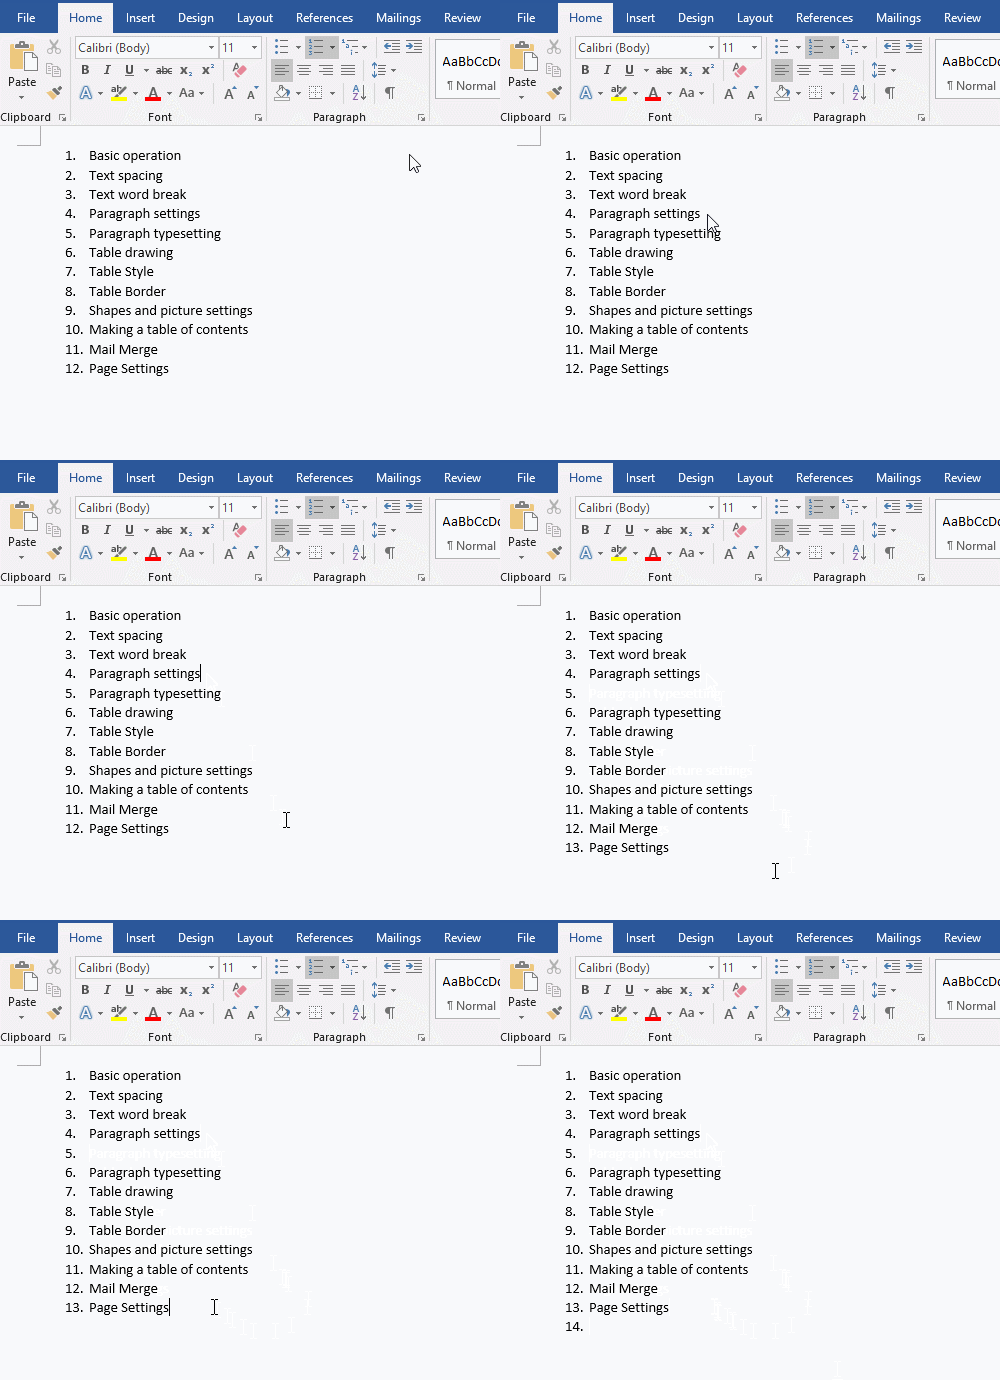
Figure 1
How to automatic paragraph numbering in Word
The automatic numbering of paragraphs is also the same.
II. How to remove auto numbering in Word
Select the automatic numbering to be removed (if you want to remove all automatic numbering in the document, press Ctr + A on your keyboard to select all), click the Numbering icon, and the selected numbers will be removed. The demonstration is shown in Figure 2:
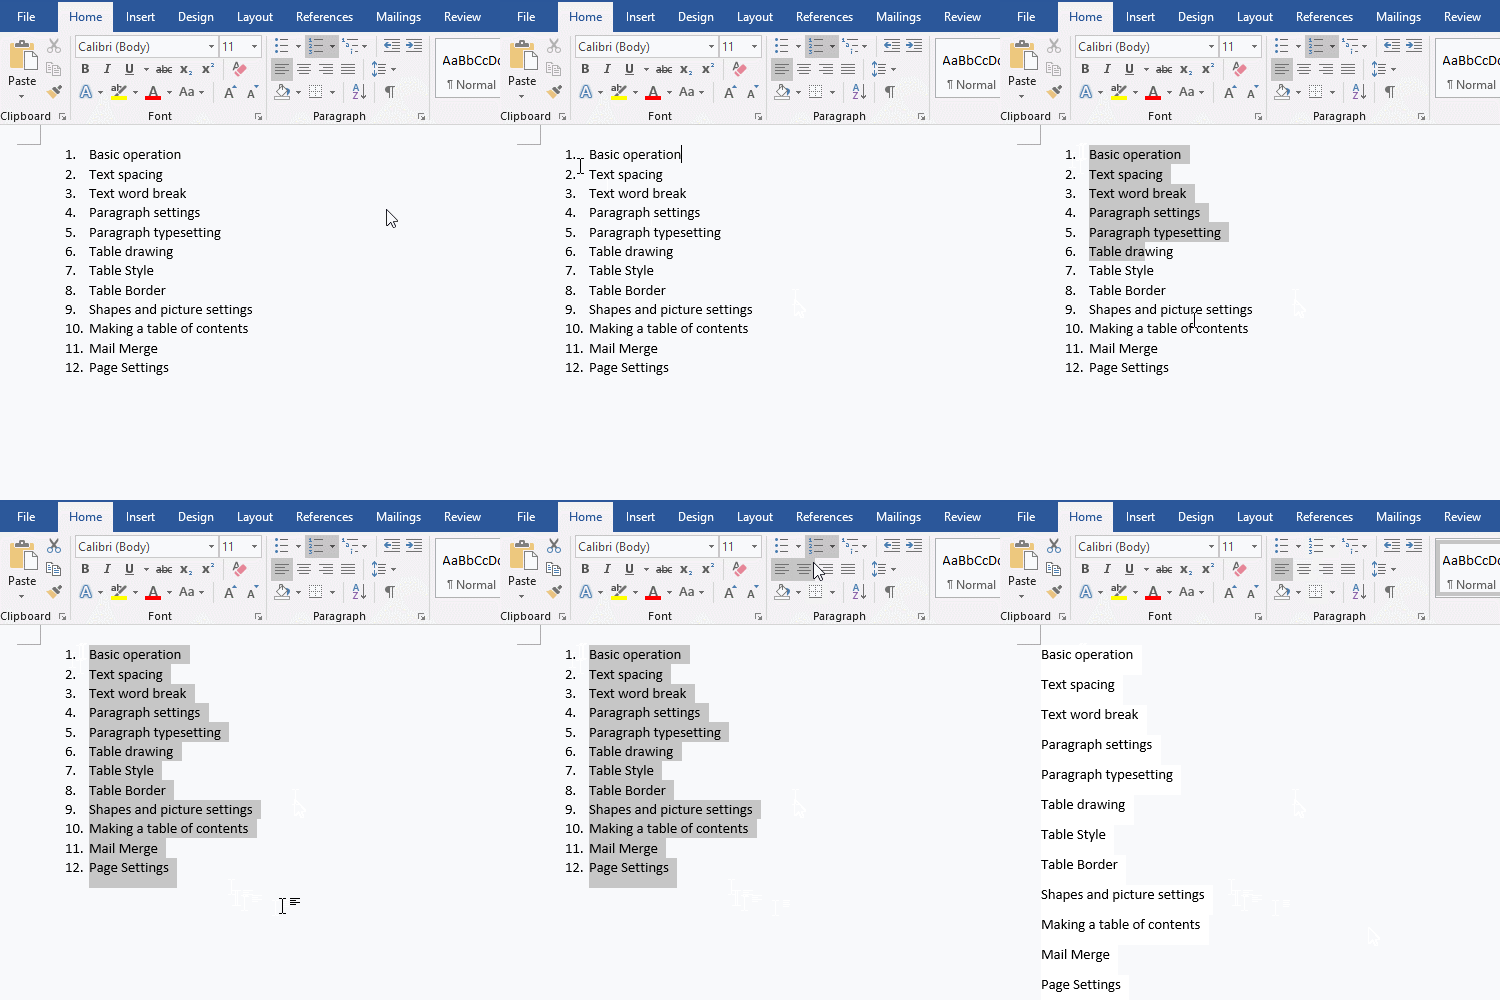
Figure 2
III. How to turn off automatic numbering in Word
Method 1: Press Enter to turn off
1. When you press the Enter key on the keyboard once, the numbered list will be automatically numbered. If you press the Enter key again, the automatic numbering will be turned off. The demonstration is shown in Figure 3:
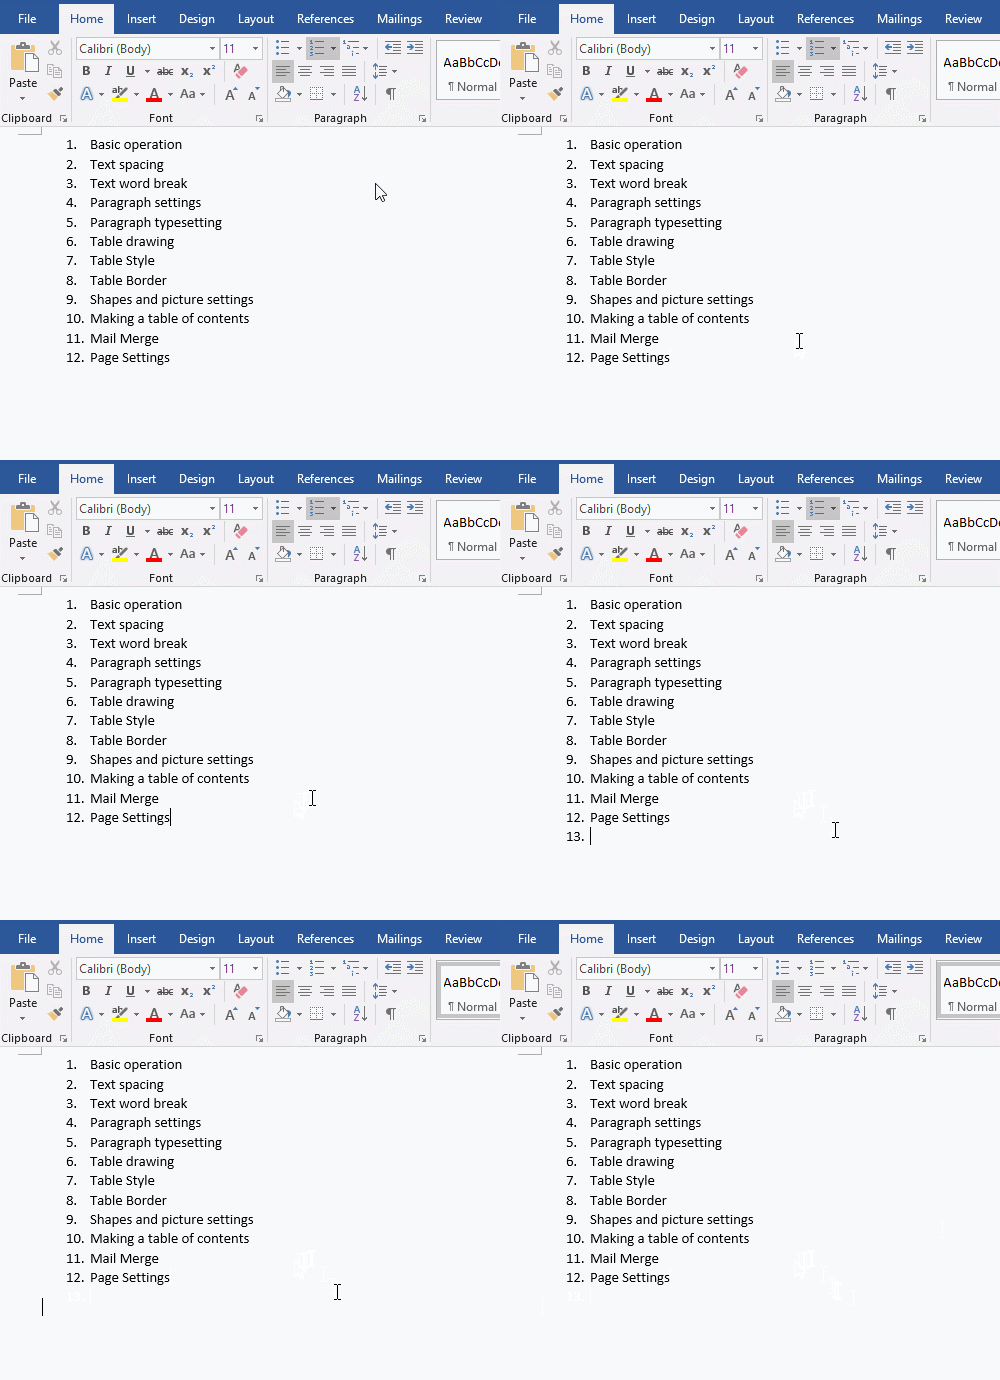
Figure 3
2. This method can be used if the automatic numbering is only temporarily turned off.
Method 2: From the "AutoCorrect Options" (lightning icon), select "Undo Automatic Numbering"
When creating a list, do not select the Numbering icon, but enter number and text, for example: "1. ", press Enter on the keyboard after inputting, an AutoCorrect Options icon (i.e. lightning icon) will appear in front of the numbering, move the mouse over the icon and A Down Arrow will appear, click it, and select Undo Automatic Numbering in the pop-up menu, and Word will no longer automatically number. The demonstration is shown in Figure 4:
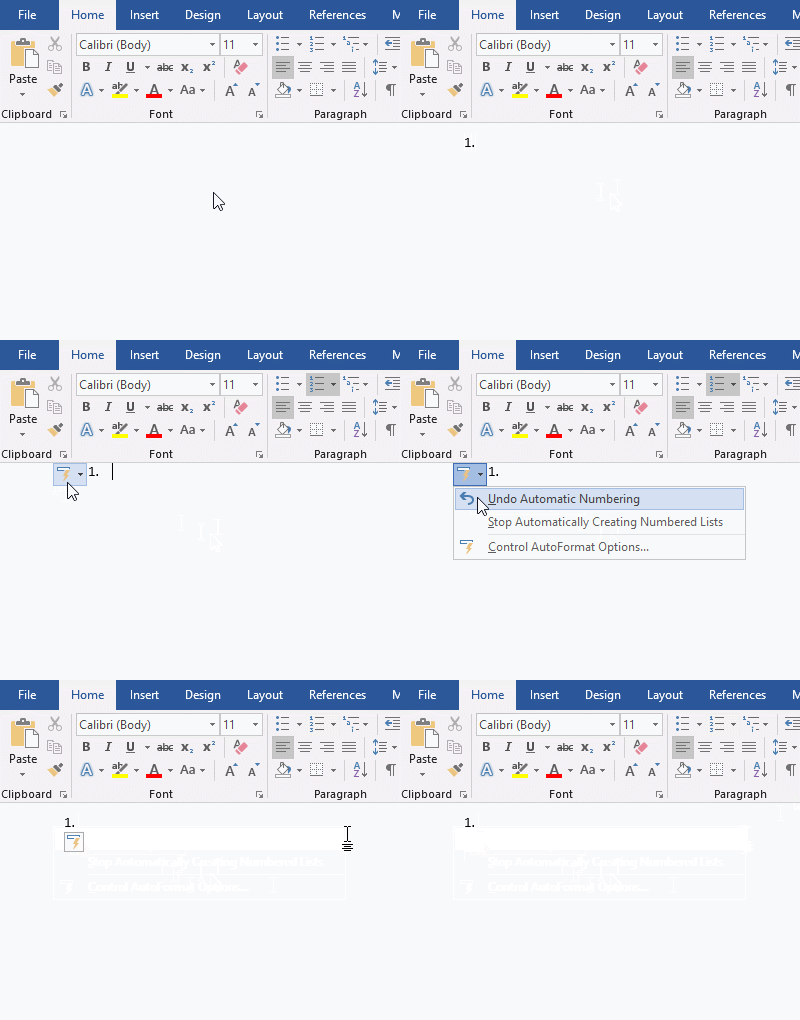
Figure 4
Method 3: Permanently turn off automatic numbering
The two methods described above are only one-time, you turn off this time, Word will automatically number next time. If you want to turn off permanently, you need to make corresponding settings. The setting methods are as follows:
Method one:
Click the AutoCorrect Options icon, select Stop automatically Creating Numbered Lists in the pop-up menu, Word won't automatically number. The demonstration is shown in Figure 5:
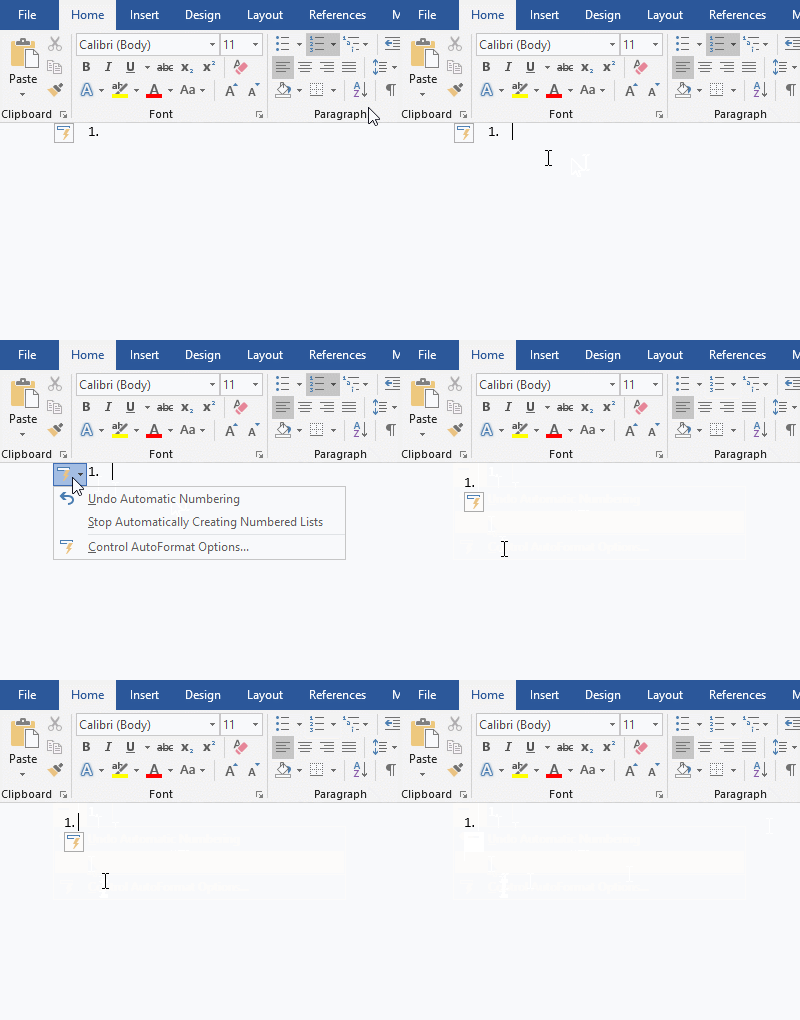
Figure 5
Method Two:
Click the AutoCorrect Options icon, select Control AutoFormat Options in the pop-up menu, open the AutoCorrect window, and automatically select the AutoFormat As You Type tab, click Automatic numbered lists, remove the tick in front of it, click OK, press Enter on the keyboard, Word will not automatically number. The demonstration is shown in Figure 6:

Figure 6
Note: The Lists that have been previously set with Numbering will also be automatically numbered.
Method Three:
Select File → Options → Proofing → AutoCorrect Options → AutoFormat As You Type tab, uncheck Automatic numbered lists and click OK twice. The demonstration is shown in Figure 7:

Figure 7
Note: If you want to re-enable automatic numbering, just check Automatic numbered lists in the same way.
IV. Word won't automatical continue numbering
Right-click the non-continuous numbering, and select Continue Numbering in the pop-up menu, and the numbered list will automatically become continuous, as shown in Figure 8:
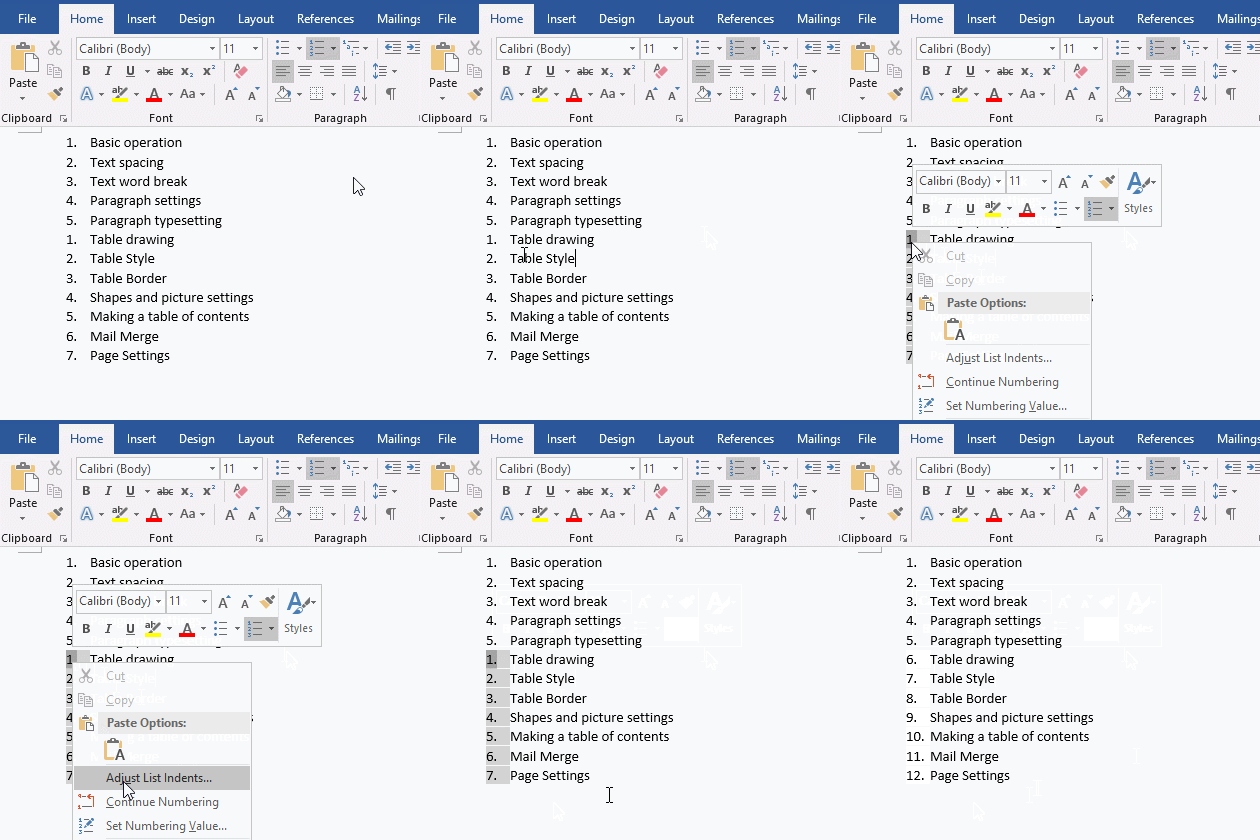
Figure 8
V. How to change indent in word when numbering after 10
1. The number is aligned and the text is not aligned
Right-click a numbering, select Adjust List Indents in the pop-up menu, open the Adjust List Indents window, click the Follow number with drop-down list box, and select Space in the pop-up menu, then the spaces after the numbers become smaller, and the demo is shown in Figure 9:
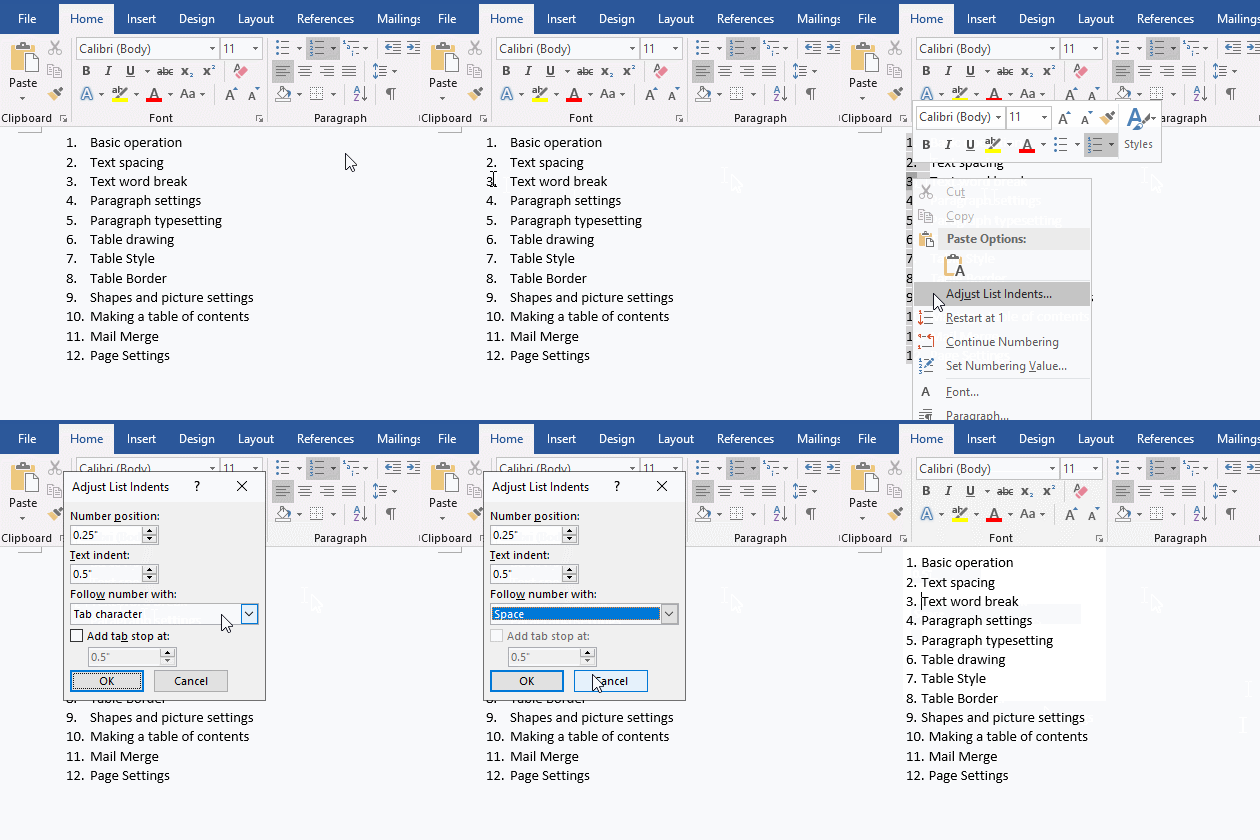
Figure 9
Note: If there is no blank space between the automatic numbering and the text, select Nothing for Follow number with.
2. The number is not aligned and the text is aligned
Click one of the numbers to select all numbers, click the Down Arrow next to the Numbering icon, select Define New Number Format in the pop-up menu, open the Define New Number Format window, and click Alignment drop-down list box, select Right in the pop-up menu, and click OK. Repeat the above operation and set the spacing after the number to Space. The demonstration is shown in Figure 10:
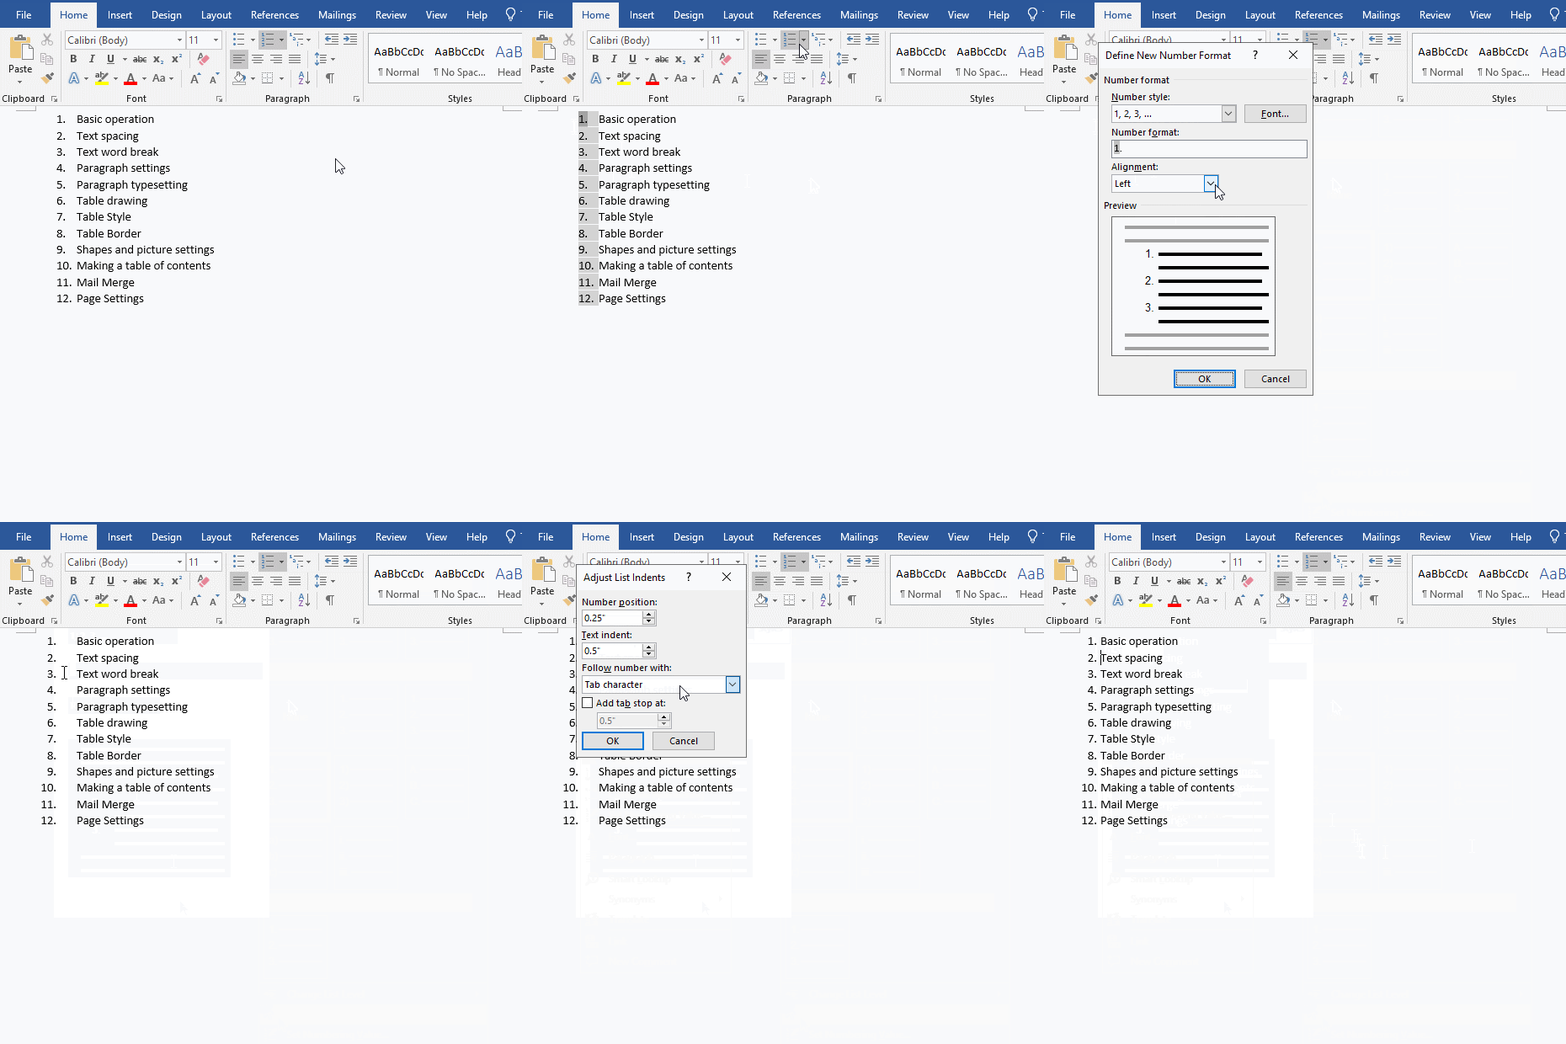
Figure 10
VI. How to convert auto numbering to text in Word
Press Alt + F1.1 on the keyboard, open the VAB editing window, click the Insert tab, select Module in the pop-up menu, create a new module window, and put the following code:
Sub NumberingToText()
Dim lst
For Each lst In ActiveDocument.Lists
lst.ConvertNumbersToText
Next
End Sub
Copy and paste into it, click the Small Green Arrow to execute the code, all automatic numbers in the document are converted to text, and the numbers are also selected. The demonstration is shown in Figure 11:
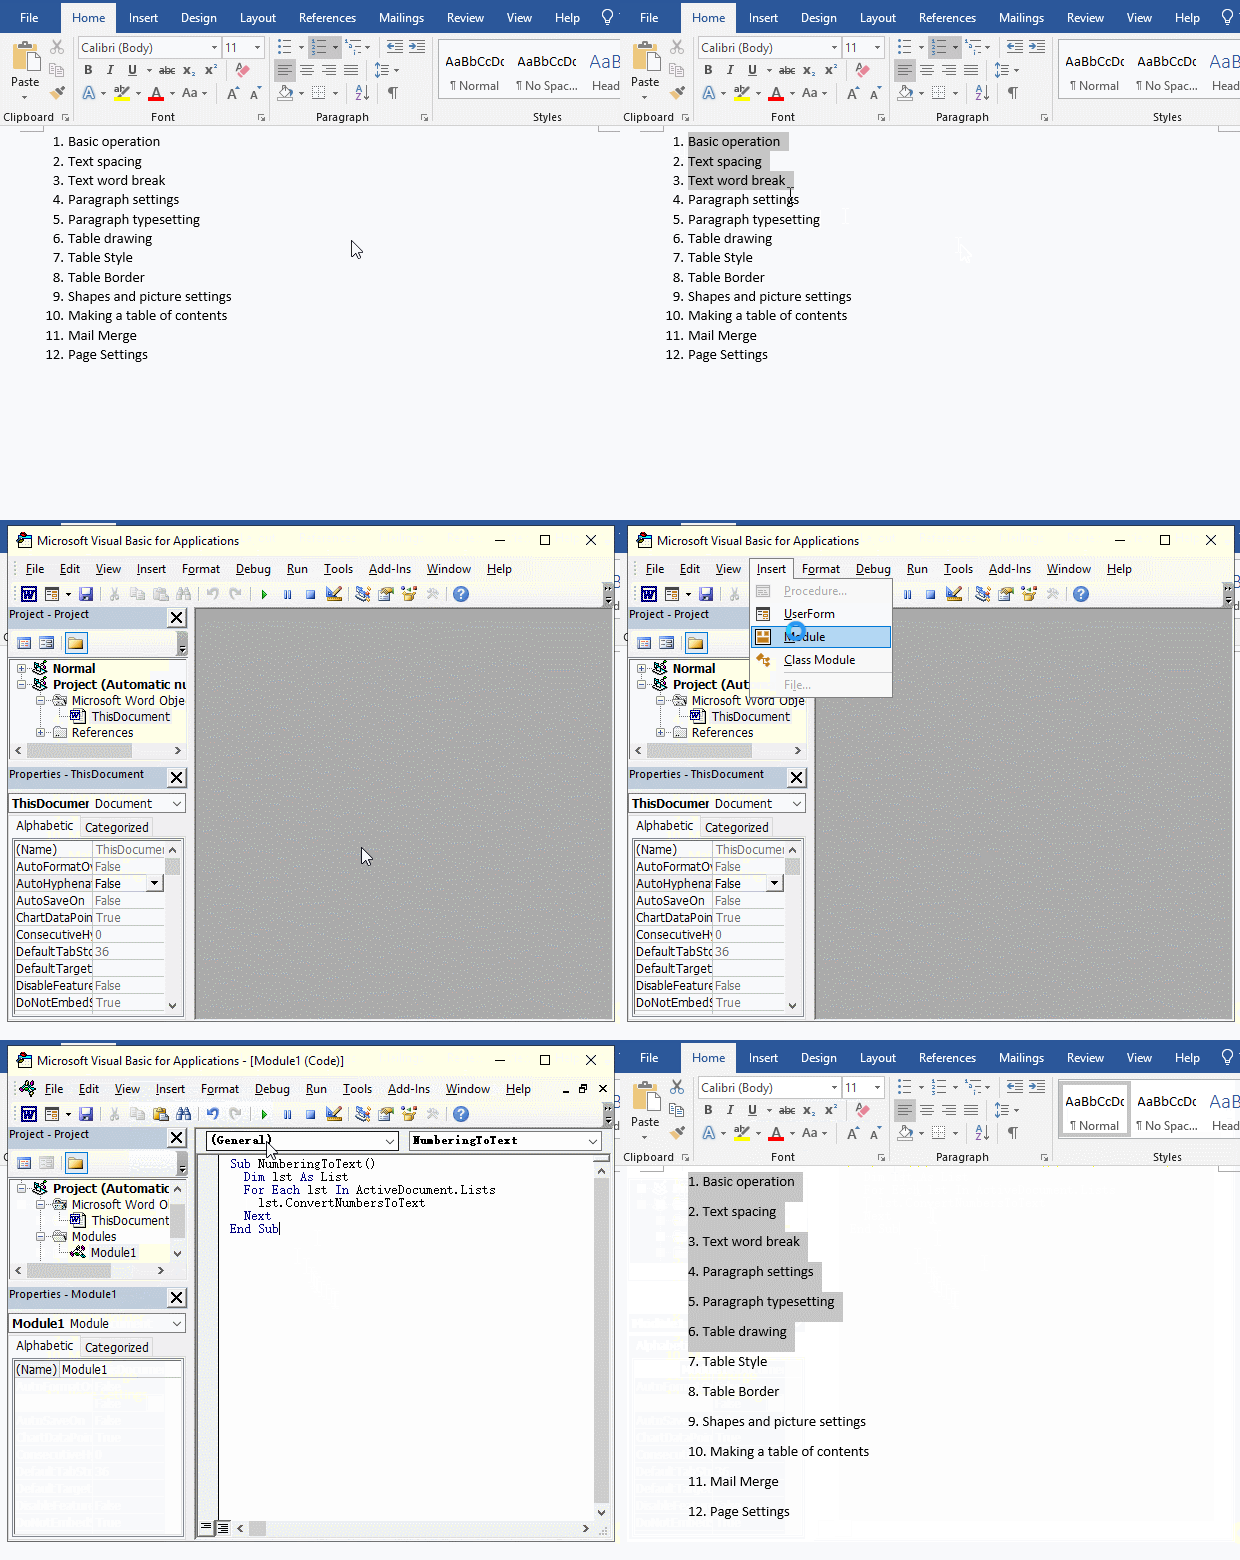
Figure 11
-
Related Reading
- How to delete table lines in Word (one line, remove
- How to add cross symbol and tick mark in Word, with
- How to create and save as a new document in Ms Word,
- How to select multiple photos in Word and why is it
- Find ProPlusww.msi when opening Office(Word/Excel),
- How to set Header and footer in word(13 examples), i
- Word art transform text effect (Follow Path, Warp, A
- How to convert PowerPoint to word(4 examples), inclu
- How do I rotate a page 90 degrees in Word, with rota
- Can't print from microsoft Word (6 possible reasons)
- How to set default Printer in Microsoft Word when se
- How to change MS Word autorecover file location and
