How to manage styles in Word, with editing, sorting, showing and hiding and setting defaults
Both the styles provided by Word or the customized styles can be managed. For example: sorting styles, modifying fonts, showing and hiding, restricting enablement, setting defaults, whether it is used for one document but also used for all documents, etc. In the Styles group in the Home tab, the displayed styles are sorted by Recommended. We can change their ordering method and put the commonly used ones first for ease of use; for some unused styles, we can hide them hide.
Set the default values of the style, the main setting items include: font, font size, color, alignment, indent, spacing, etc. You can set some commonly used styles according to your own needs to facilitate use and improve work efficiency. How to manage styles in Word?
I. Edit style
1. Select Home tab, click the Diagonal Arrow to the right of Styles, open the Styles pane, click the Manage Styles icon, open the Manage Styles dialog box. The current tab is exactly Edit, which is the editing style. The the styles in the list box can be sorted by the Sort order. Currently, they are sorted by As Recommended. If you select Alphabetical, the styles in the list box will be sorted in alphabetical order immediately. The demonstration is shown in Figure 1:
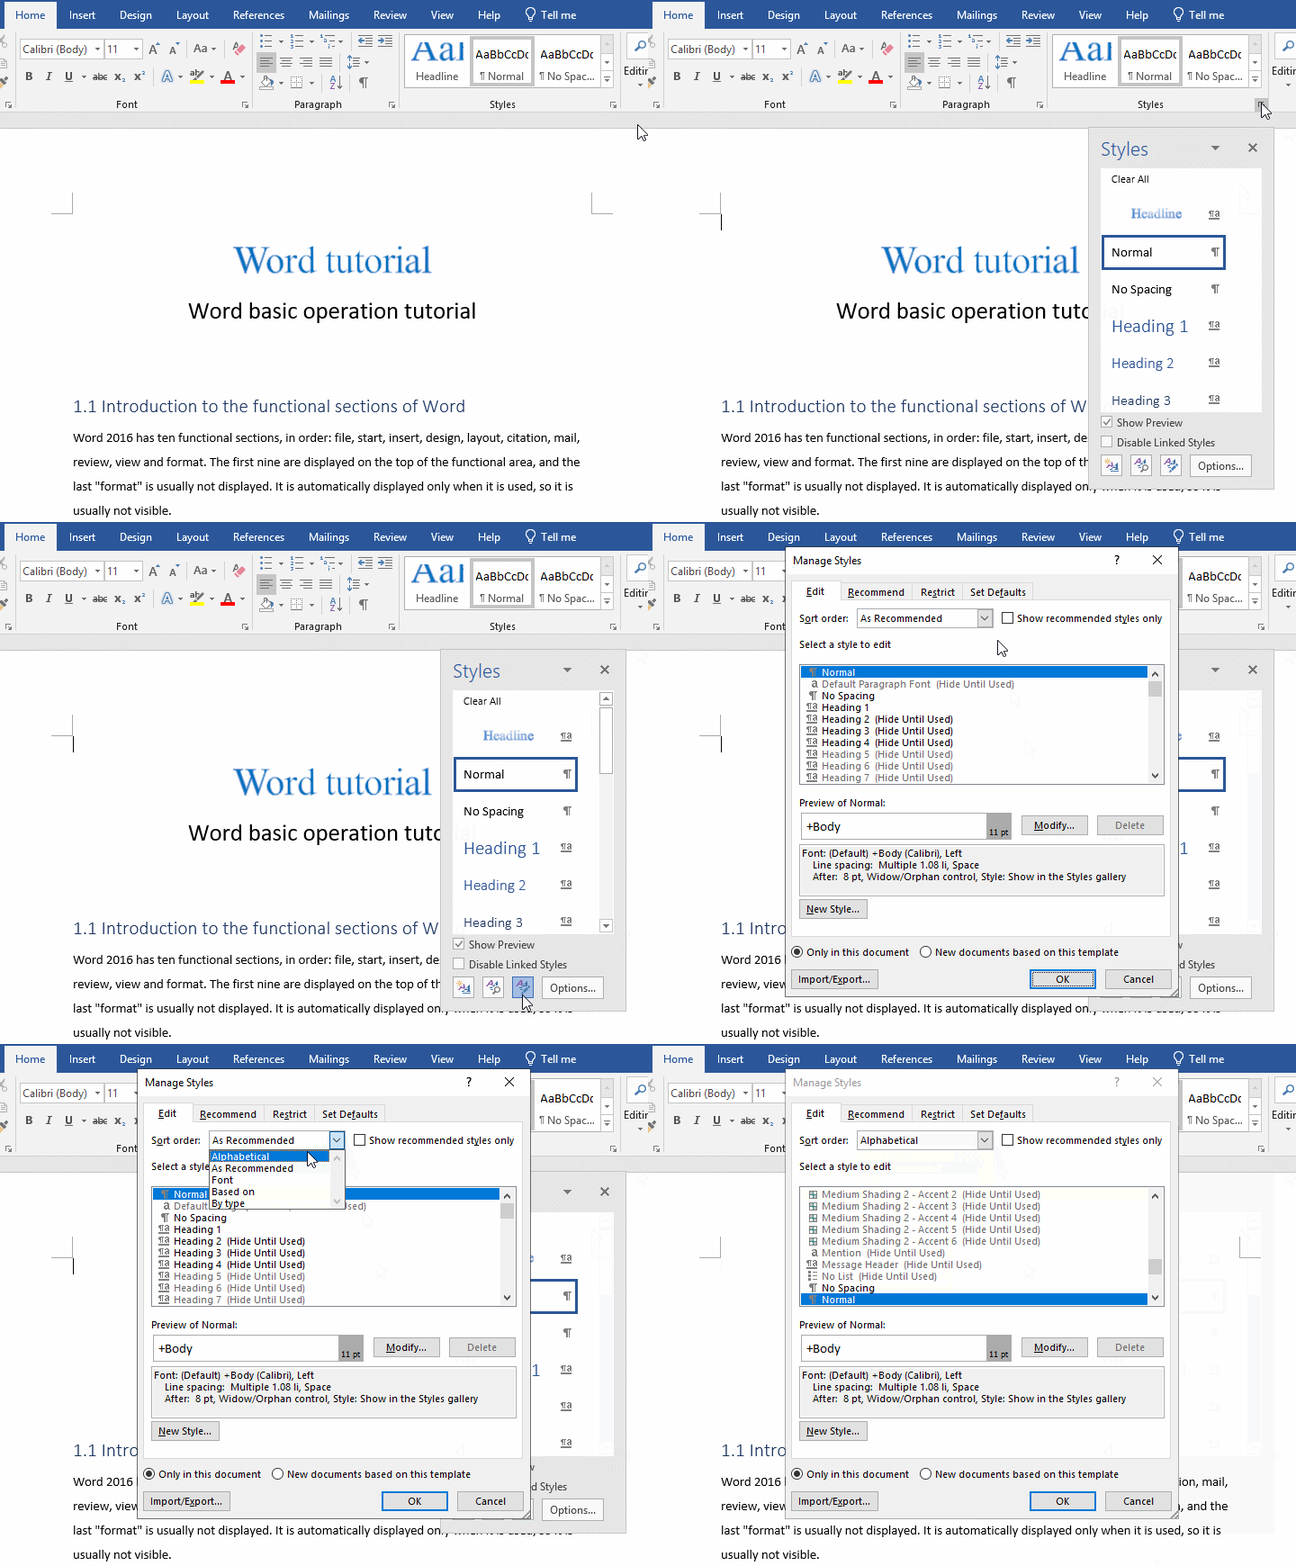
Figure 1
There is an option on the right side of the Sort Order drop-down list box: Show recommended styles only, if you check it, only Word's recommended styles will be displayed in the list box.
2. We sort the styles by As Recommended again, select Heading 1, and the preview effect of Heading 1 will be displayed immediately. The demonstration is shown in Figure 2:
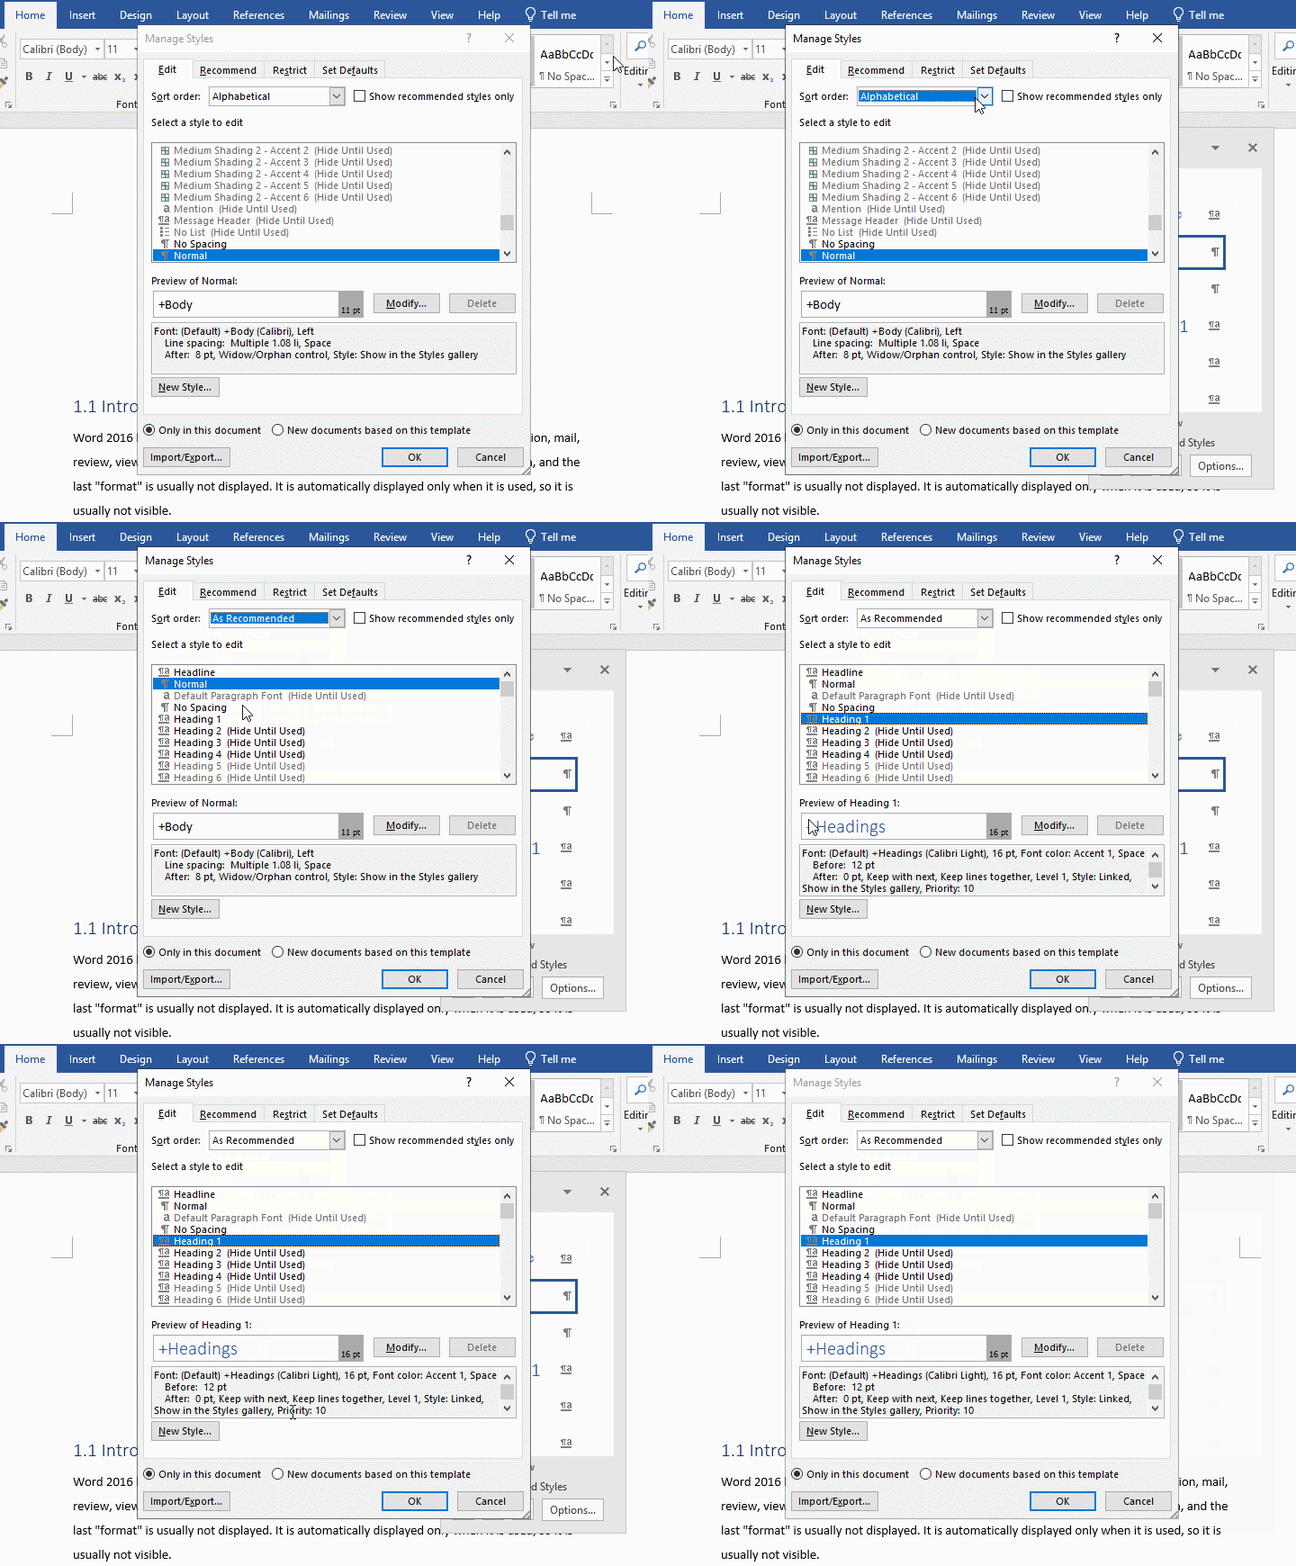
Figure 2
3. Click Modify, open the modify Style dialog box for the selected style, the demonstration is shown in Figure 3:
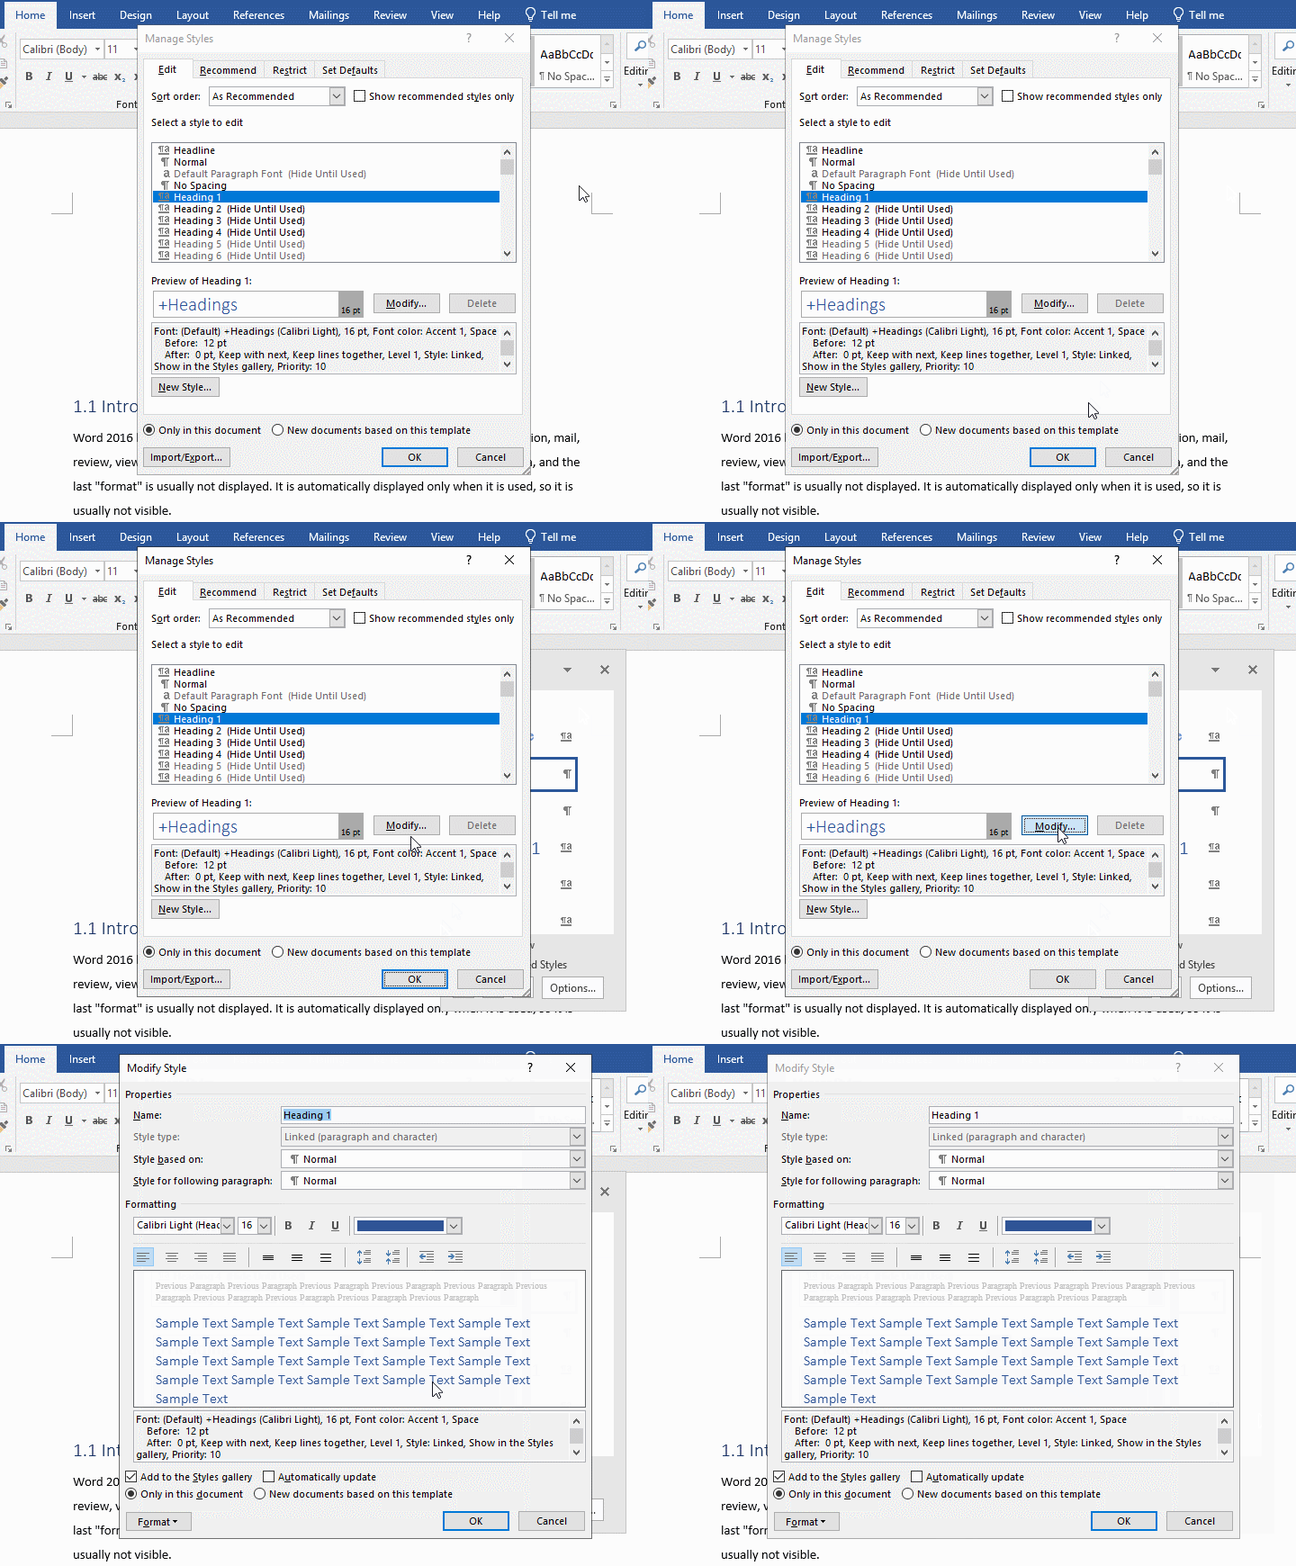
Figure 3
This dialog box is exactly the same as the newly created dialog box, and it can be modified according to the method described above.
II. Sort Styles in Word
1. In the Manage Styles dialog box, select the Recommend tab, the currently selected is the Normal style, click Move Down, the Normal style will move down one position, the demonstration is shown in Figure 4:
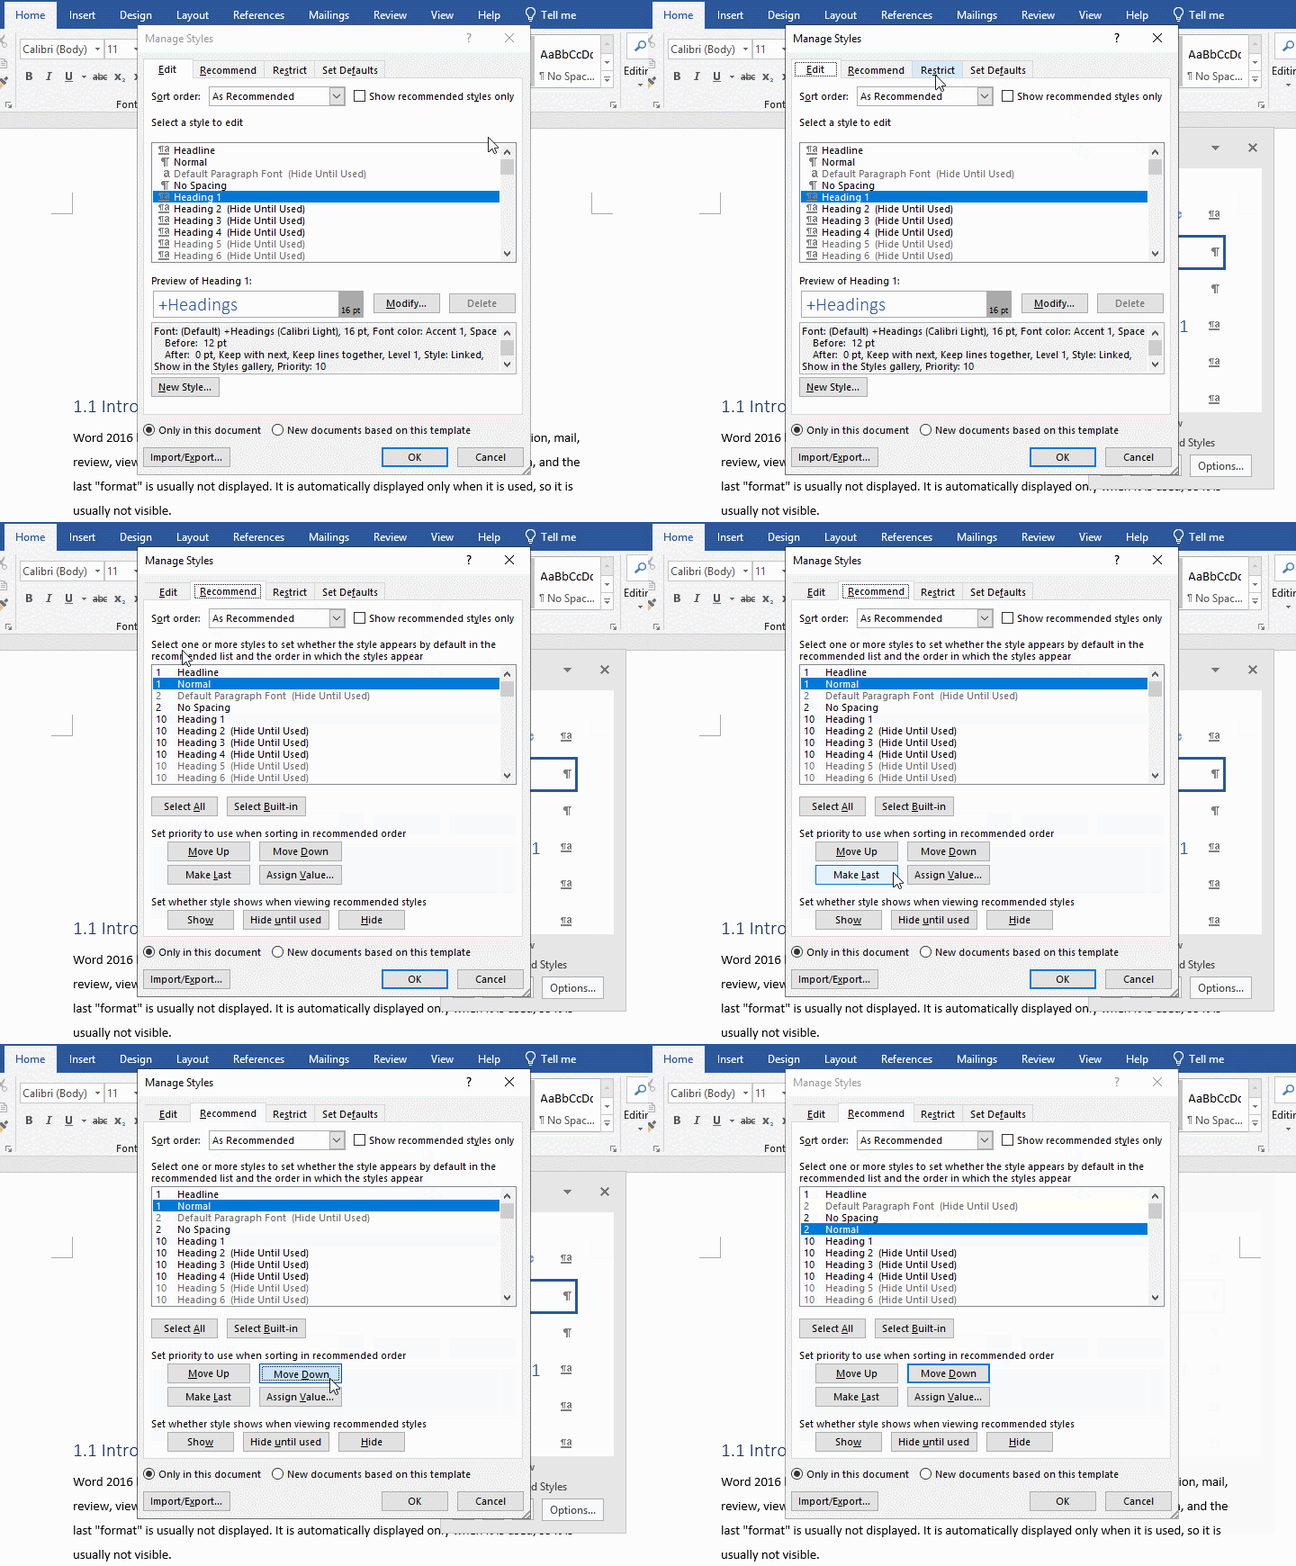
Figure 4
The Normal was under Headline, but it has now been moved to No Spacing. Click Move Up, and the Normal will be moved up again; click Make Last and it will be moved to the end, the demonstration is shown in Figure 5:
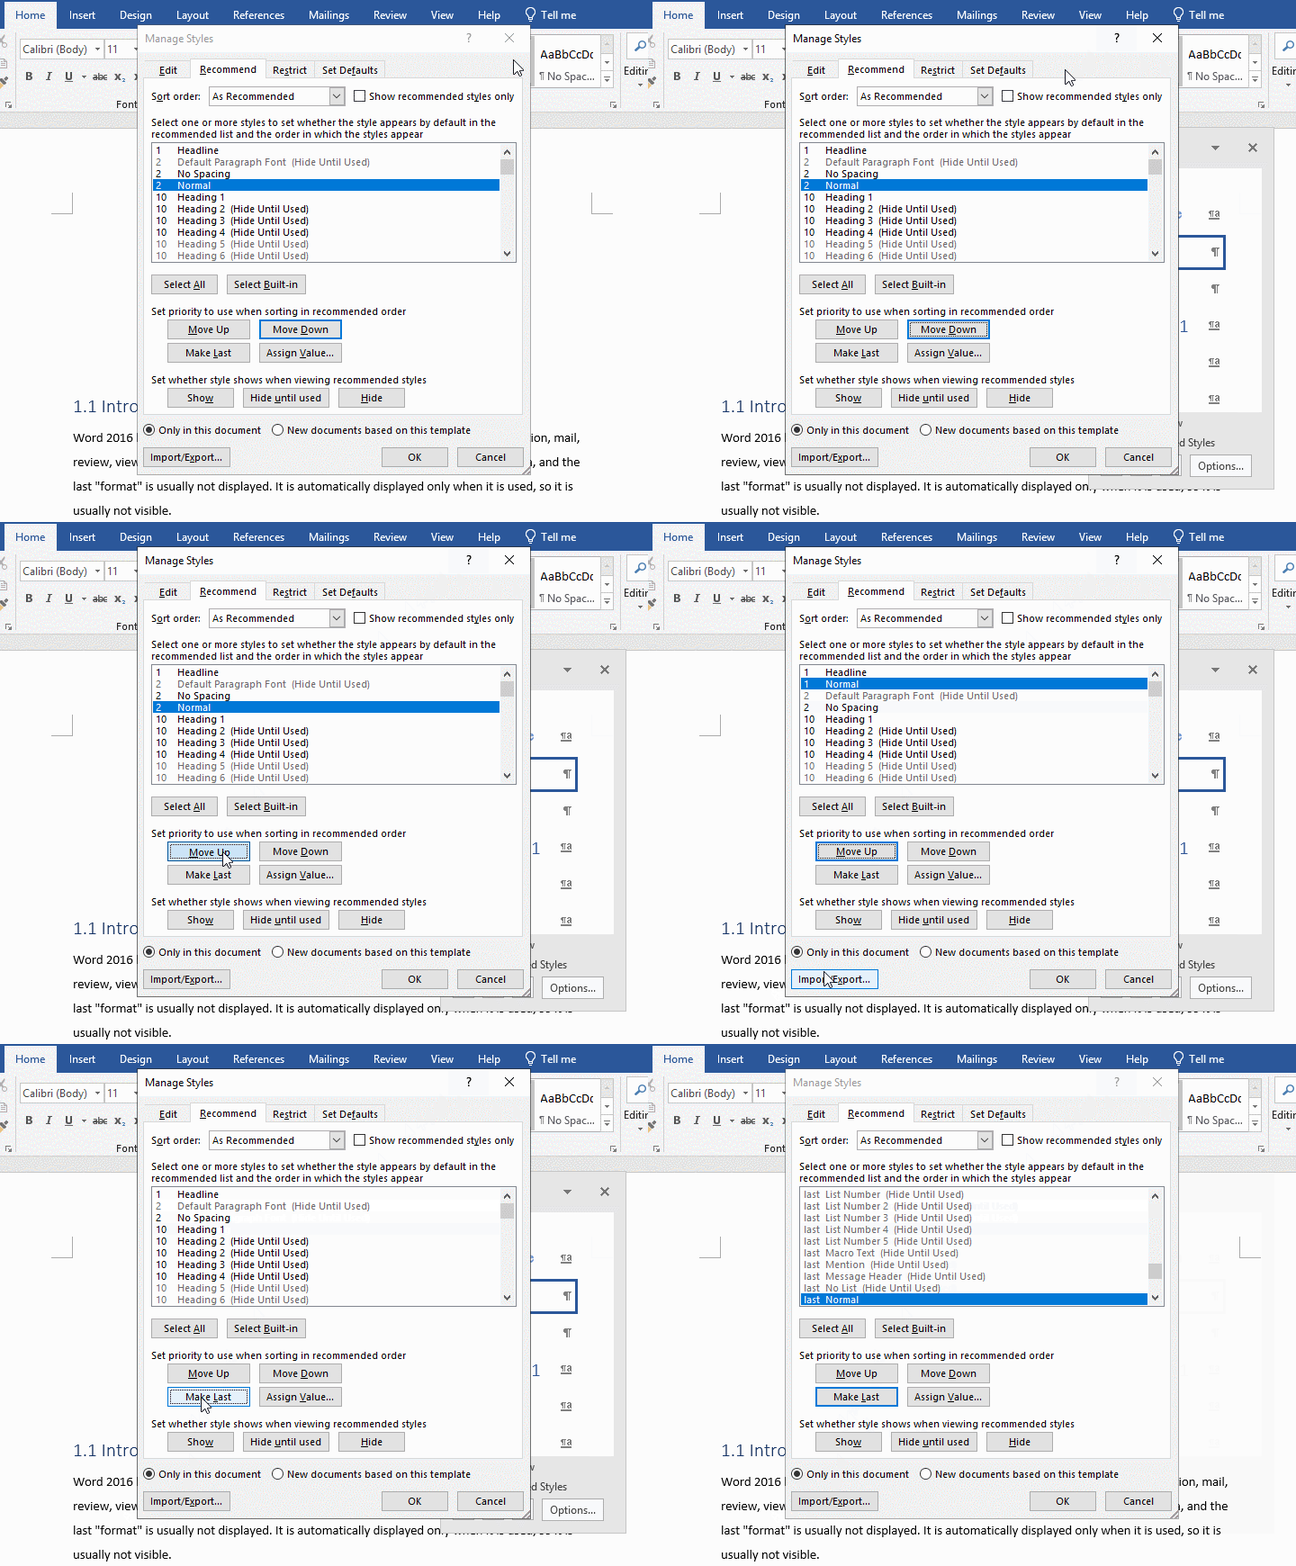
Figure 5
2. Click Assign Value, a small dialog box is popped up, enter a few in the input box, and the currently selected style (Normal) will be ranked in the few position. Of course, it cannot exceed the range of the styles. The current value in the input box is 1, click OK, and the Normal is rearranged to the first position of Built-in styles (that is, the styles provided by Word). The demonstration is shown in Figure 6:
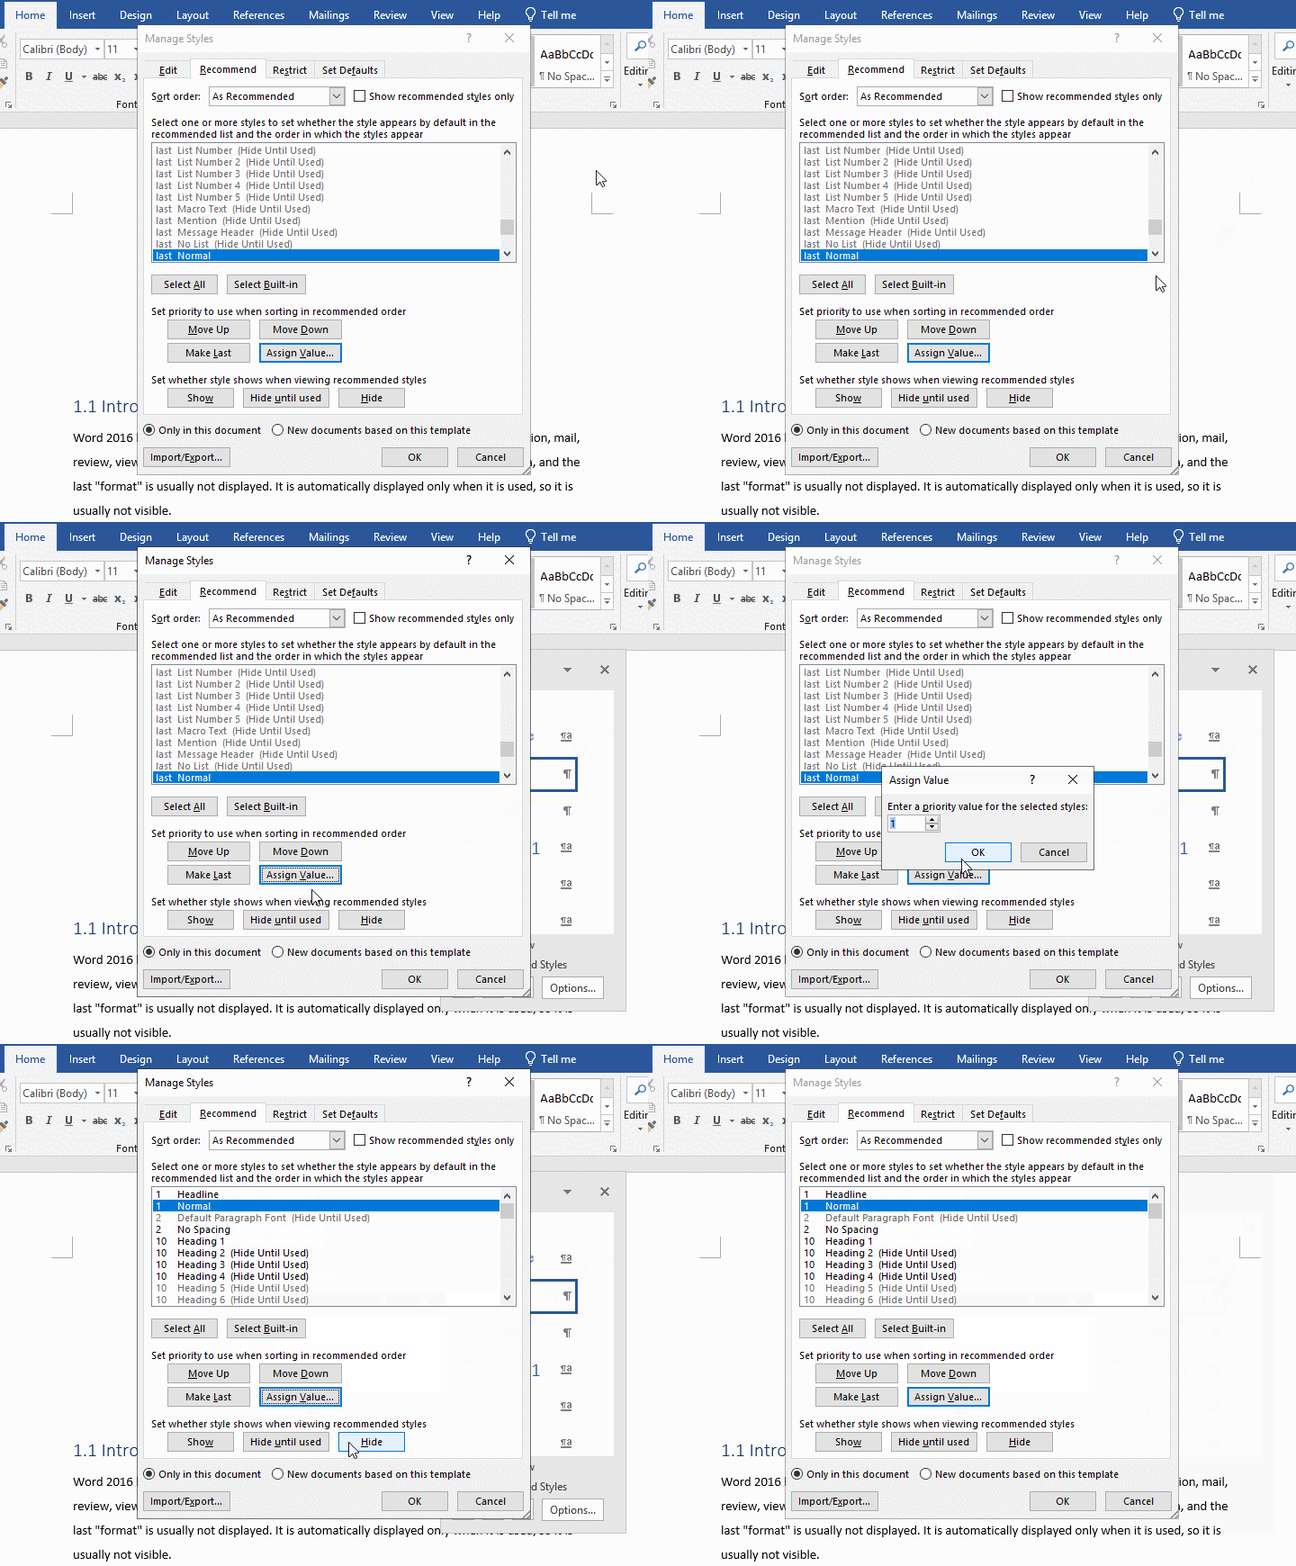
Figure 6
3. Set whether style shows when viewing recommended styles. There is no Hide until used after the currently selected Heading 1, indicating that it is displayed. If you click the Hide until used button, the gray Hide until used appears after Heading 1, indicating that it is displayed. The demonstration is shown in Figure 7:
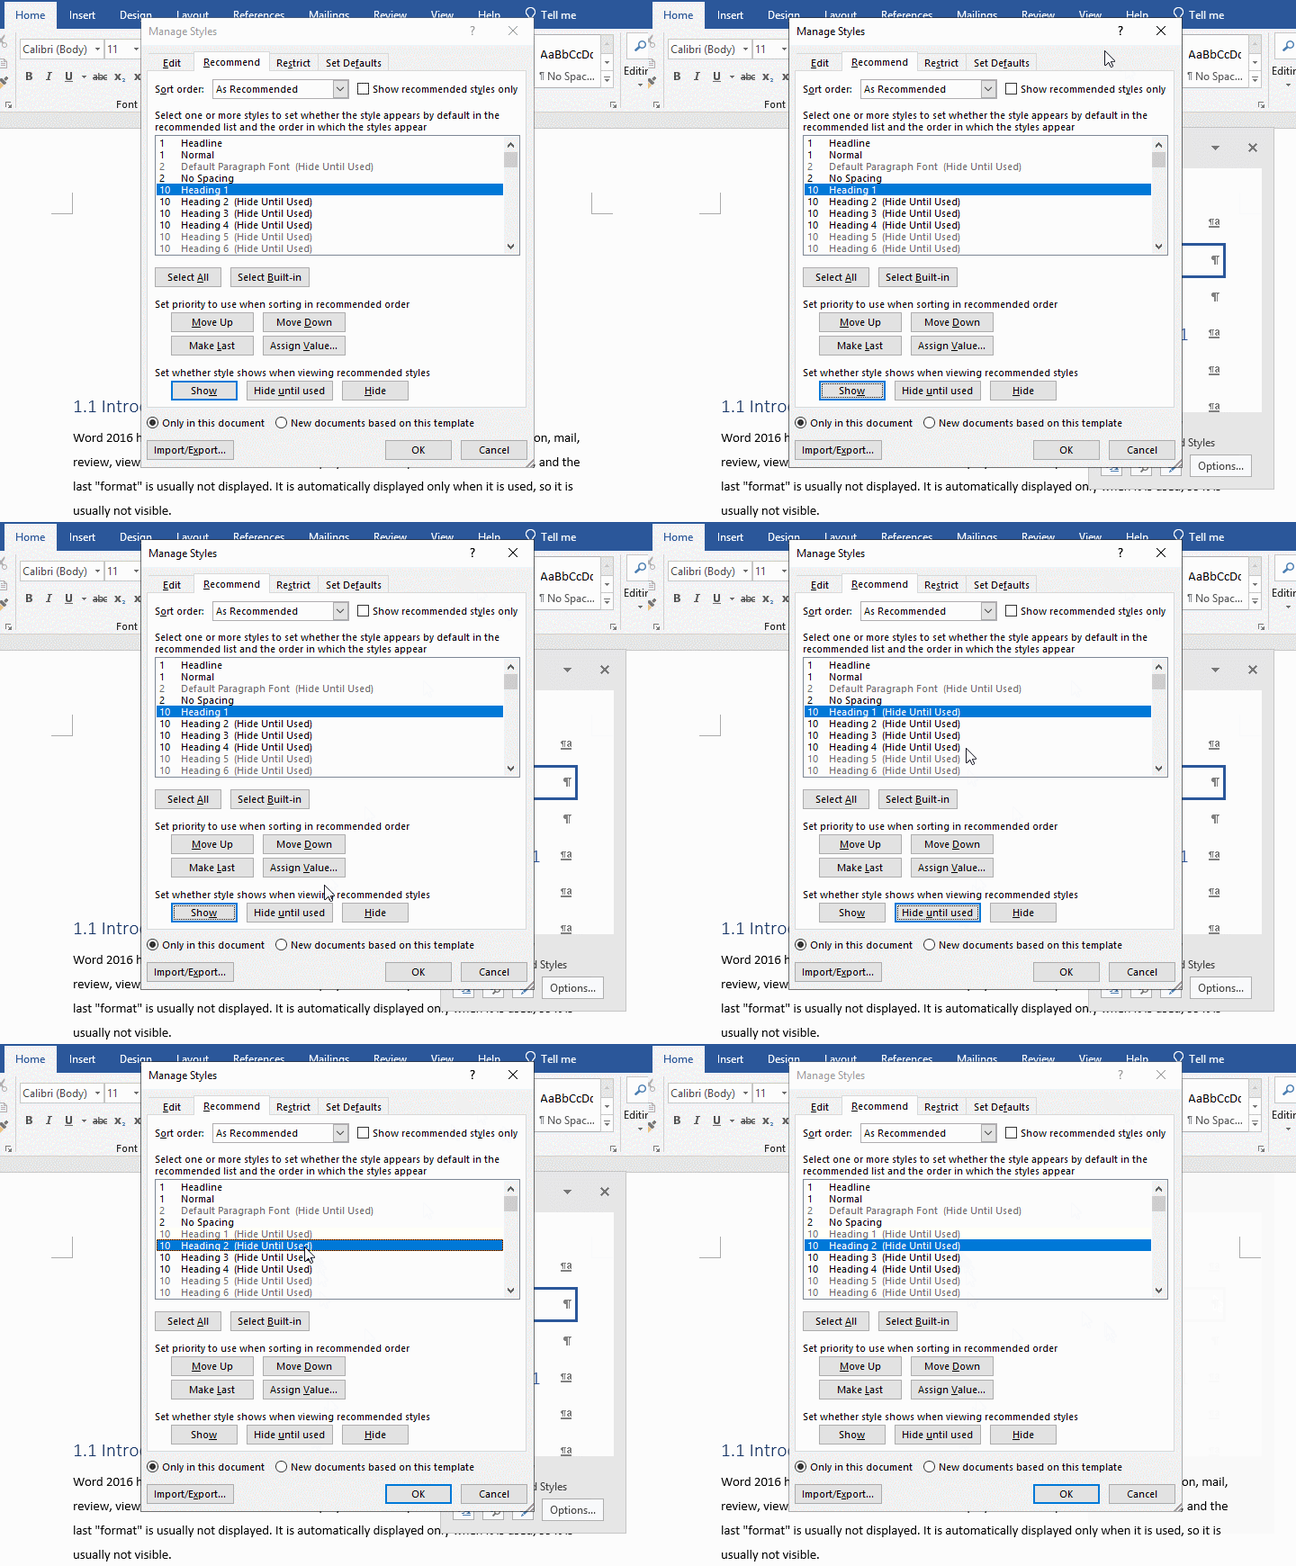
Figure 7
4. If you click Hide, then Always hidden appears and becomes unselectable and grayed out. After clicking OK, there is no Heading 1 in the Style group. The demonstration is shown in Figure 8:
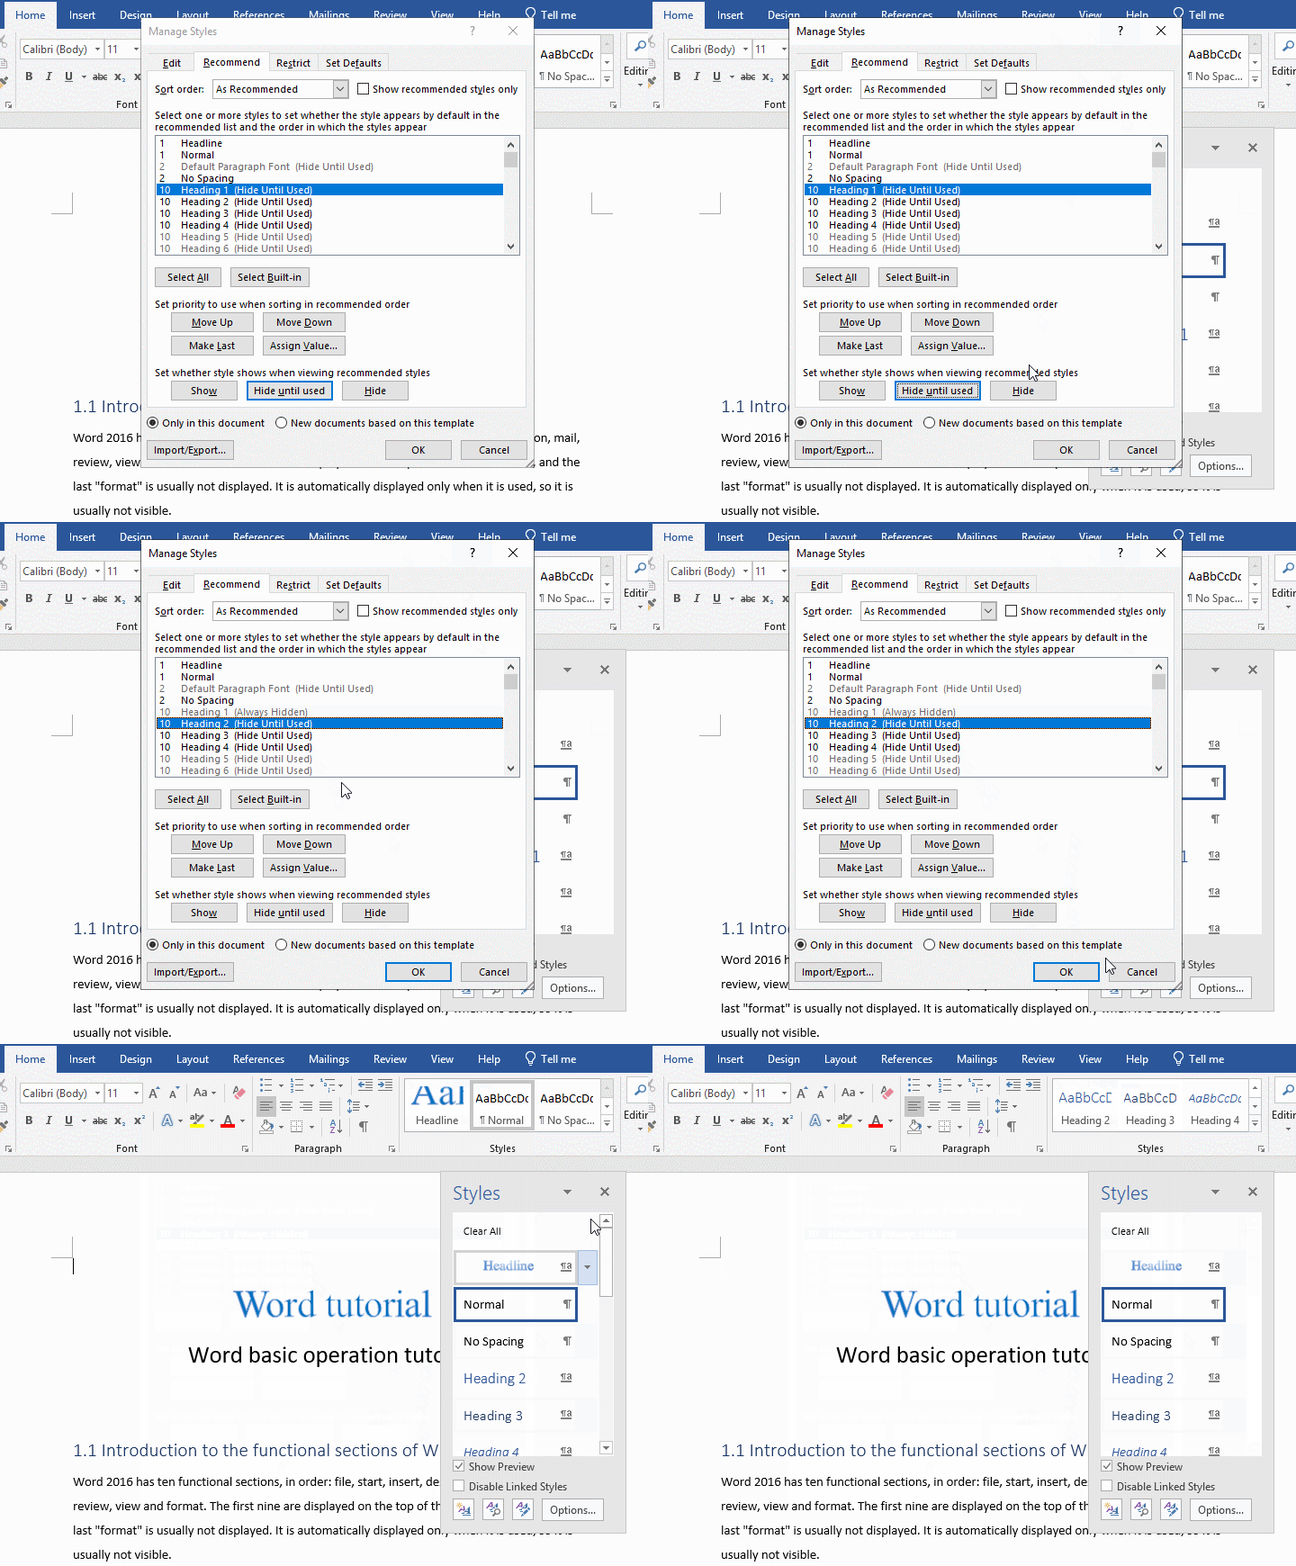
Figure 8
III. Restrict
1. In the Manage Styles dialog box, select the Restrict tab, Permit here refers to whether the style is allowed to be modified when the document is protected; if it is set to Permit, the modification is allowed, otherwise, the modification is restricted. Select Heading 1 and click Restrict, then A small lock icon appears before it. The demonstration is shown in Figure 9:
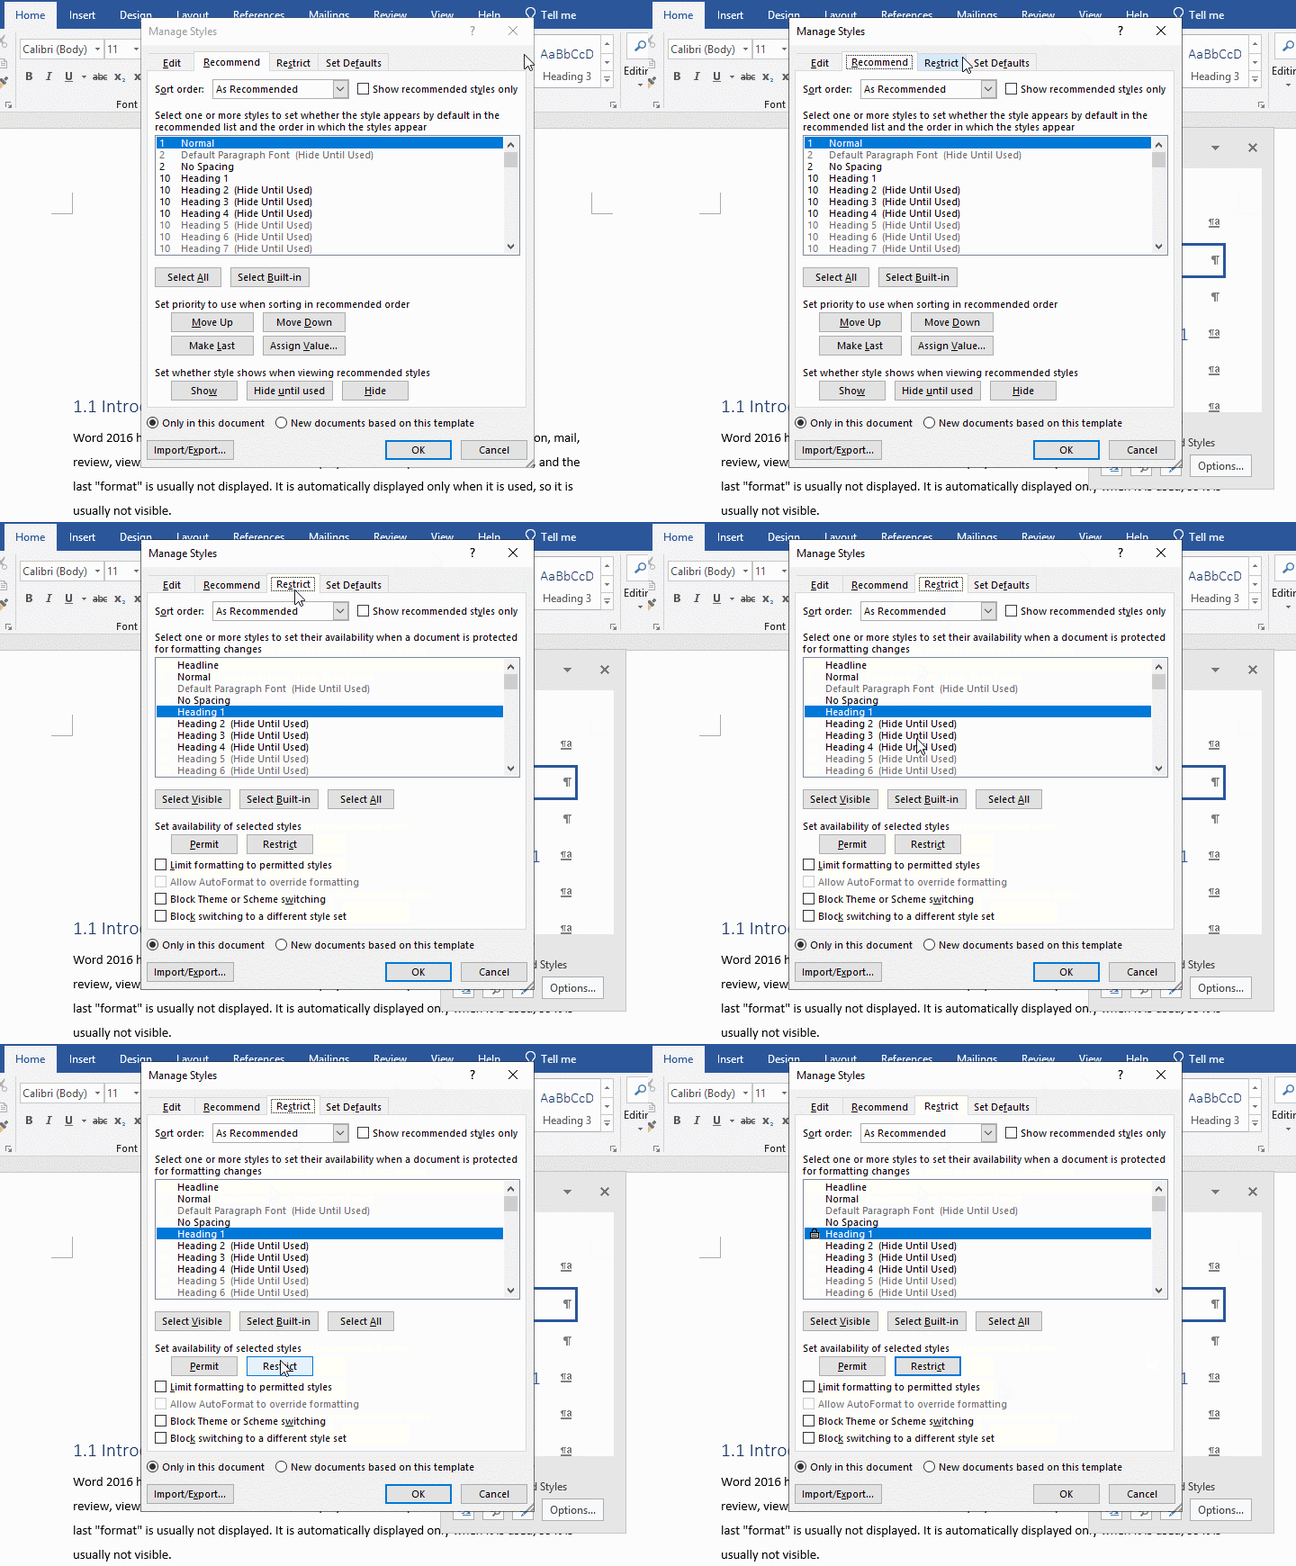
Figure 9
2. In order to select multiple styles at once, there are three buttons under the list box: Select Visible, Select Built-in styles and Select All, click Select Visible. Then you can set Permit or Restrict in batches. The demonstration is shown in Figure 10:
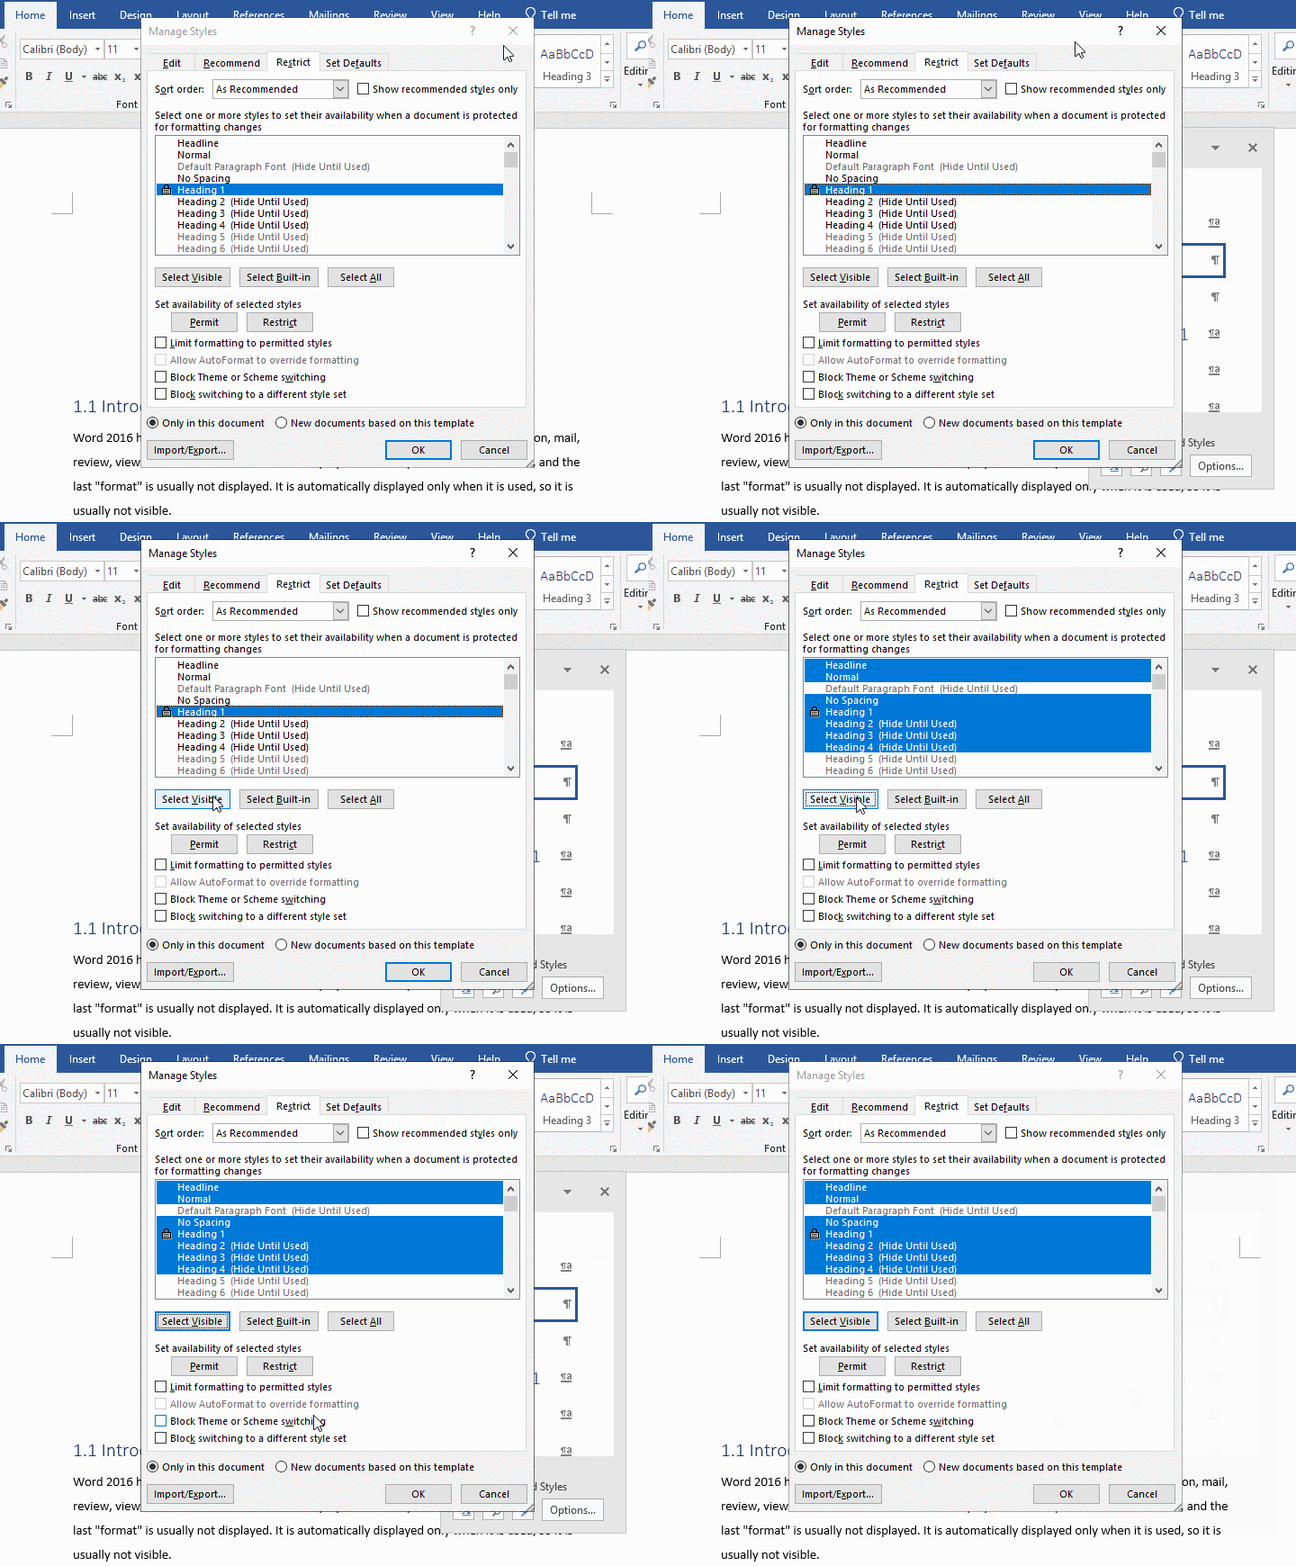
Figure 10
IV. Set defaults
In the Manage Styles dialog box, select the Set Defaults tab. The setting items in the dialog box have been introduced before, and can be set according to the introduced method. The demonstration is shown in Figure 11:
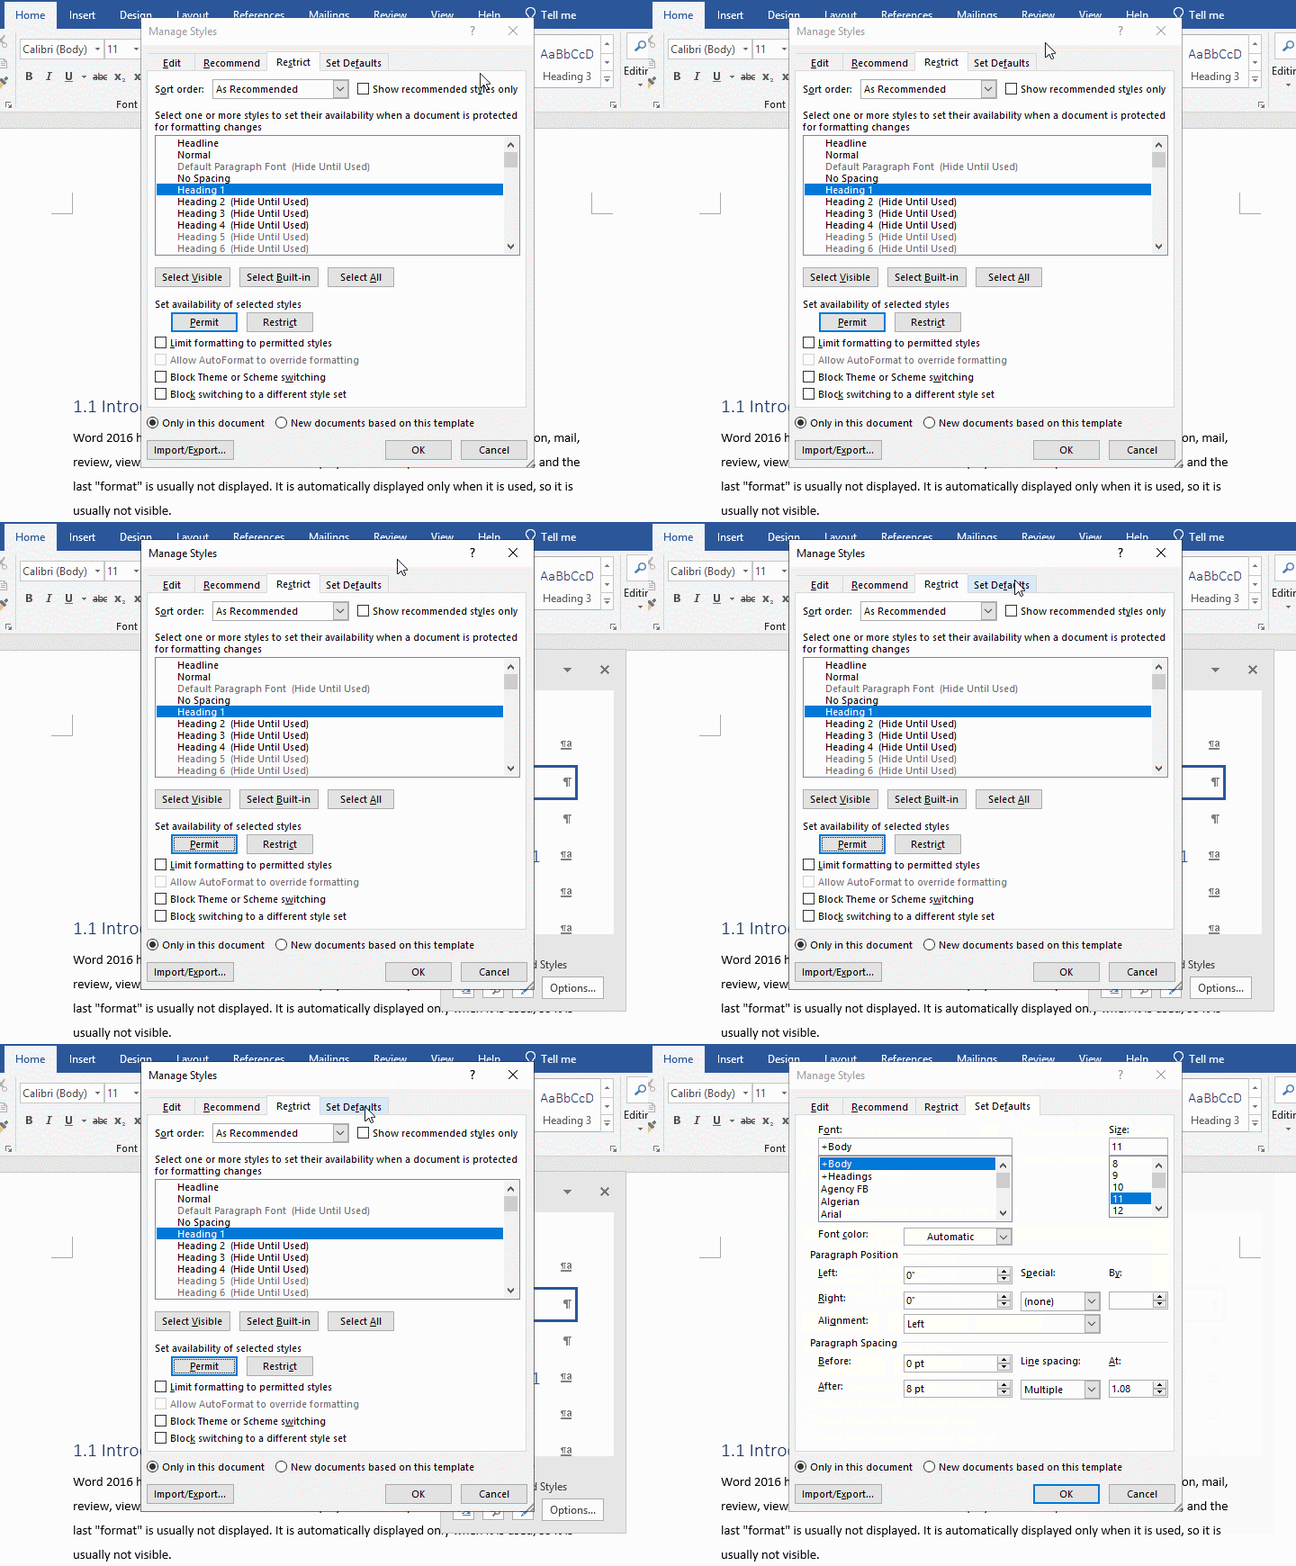
Figure 11
V. Word styles import and export
1. In the Manage Styles dialog box, click the Import/Export button at the bottom, open the Organizer dialog box. select one of the styles on the left (such as Heading 3), click the Copy button, and then Heading 3 will be copied to the right list box (that is, added to the common template Normal). The demonstration is shown in Figure 12:
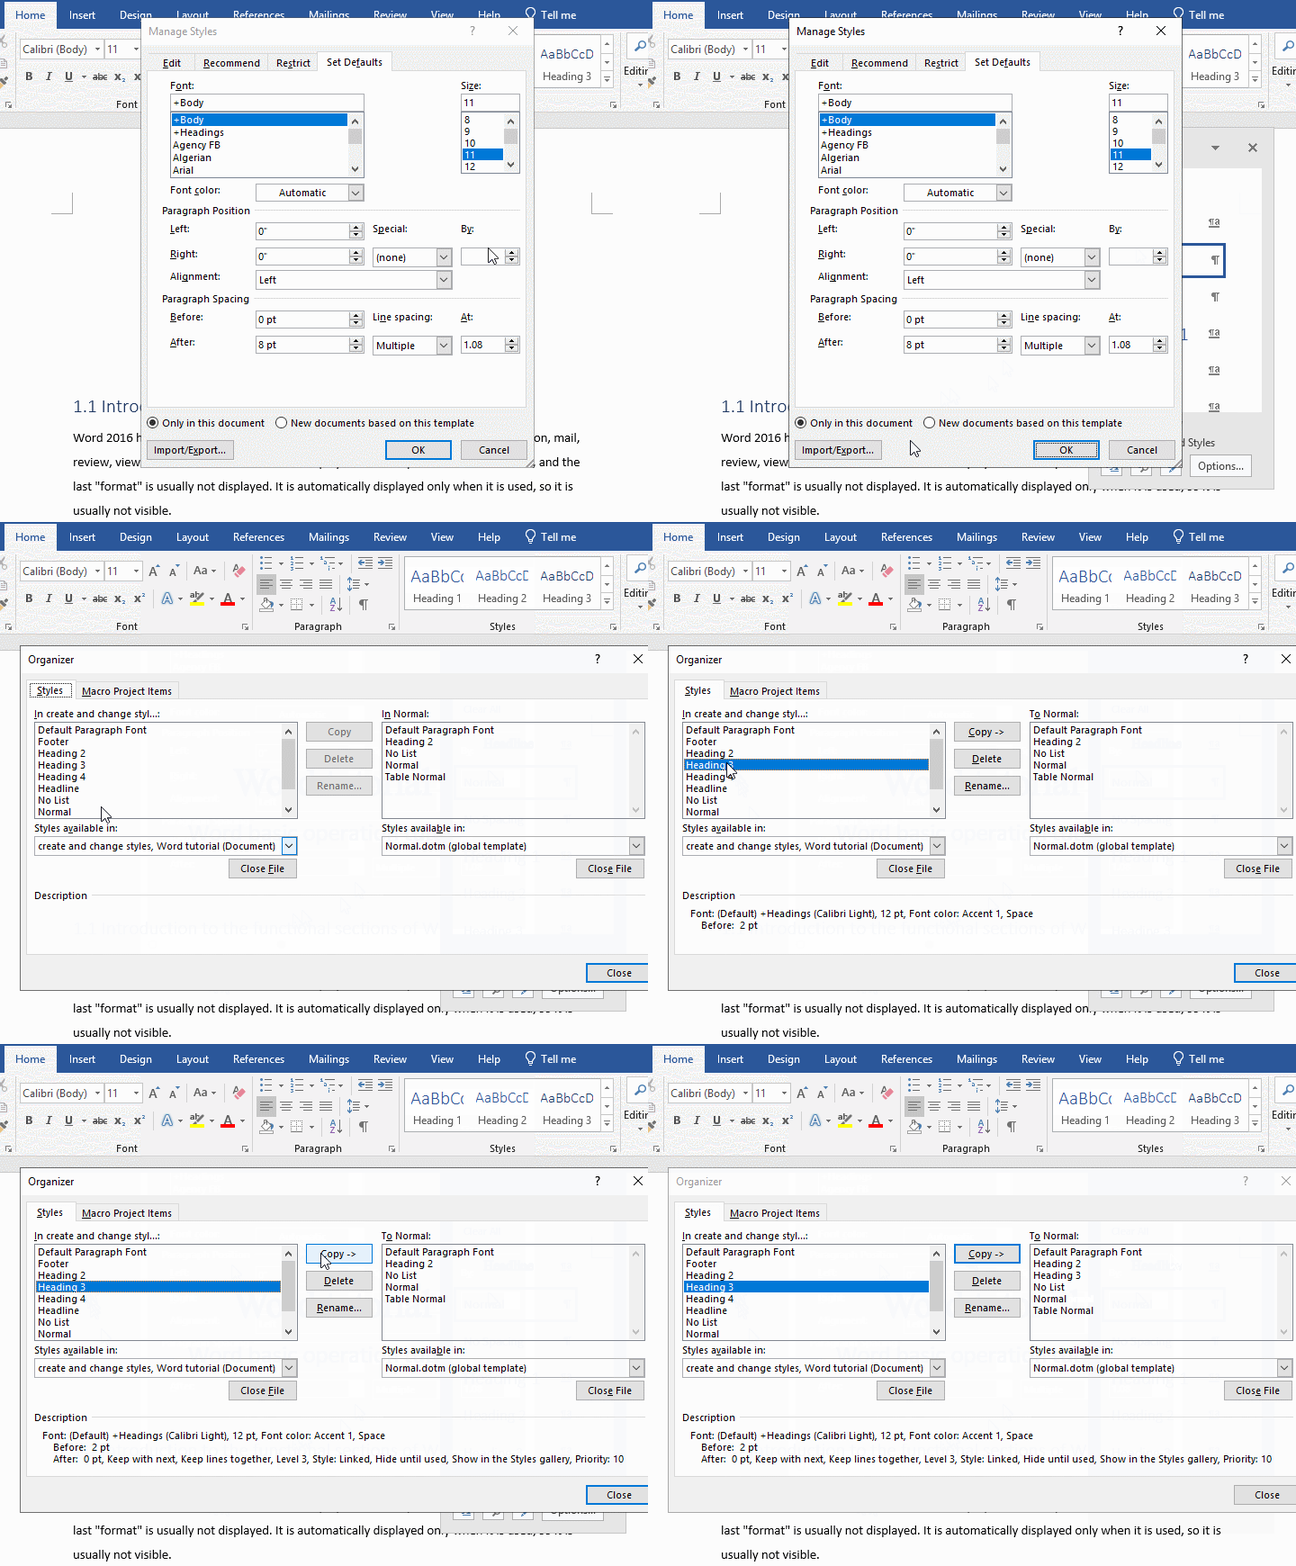
Figure 12
This is the same as the commands of Customizing the Ribbon introduced earlier.
2. Click the Delete button, and a small dialog box will pop up asking whether to delete the selected style. If you are sure you want to delete, select Yes, delete multiple selected items at once and select Yes to All; if you don't want to delete, select No or Cancel. But the built-in styles of Word cannot be deleted. The demonstration is shown in Figure 13:
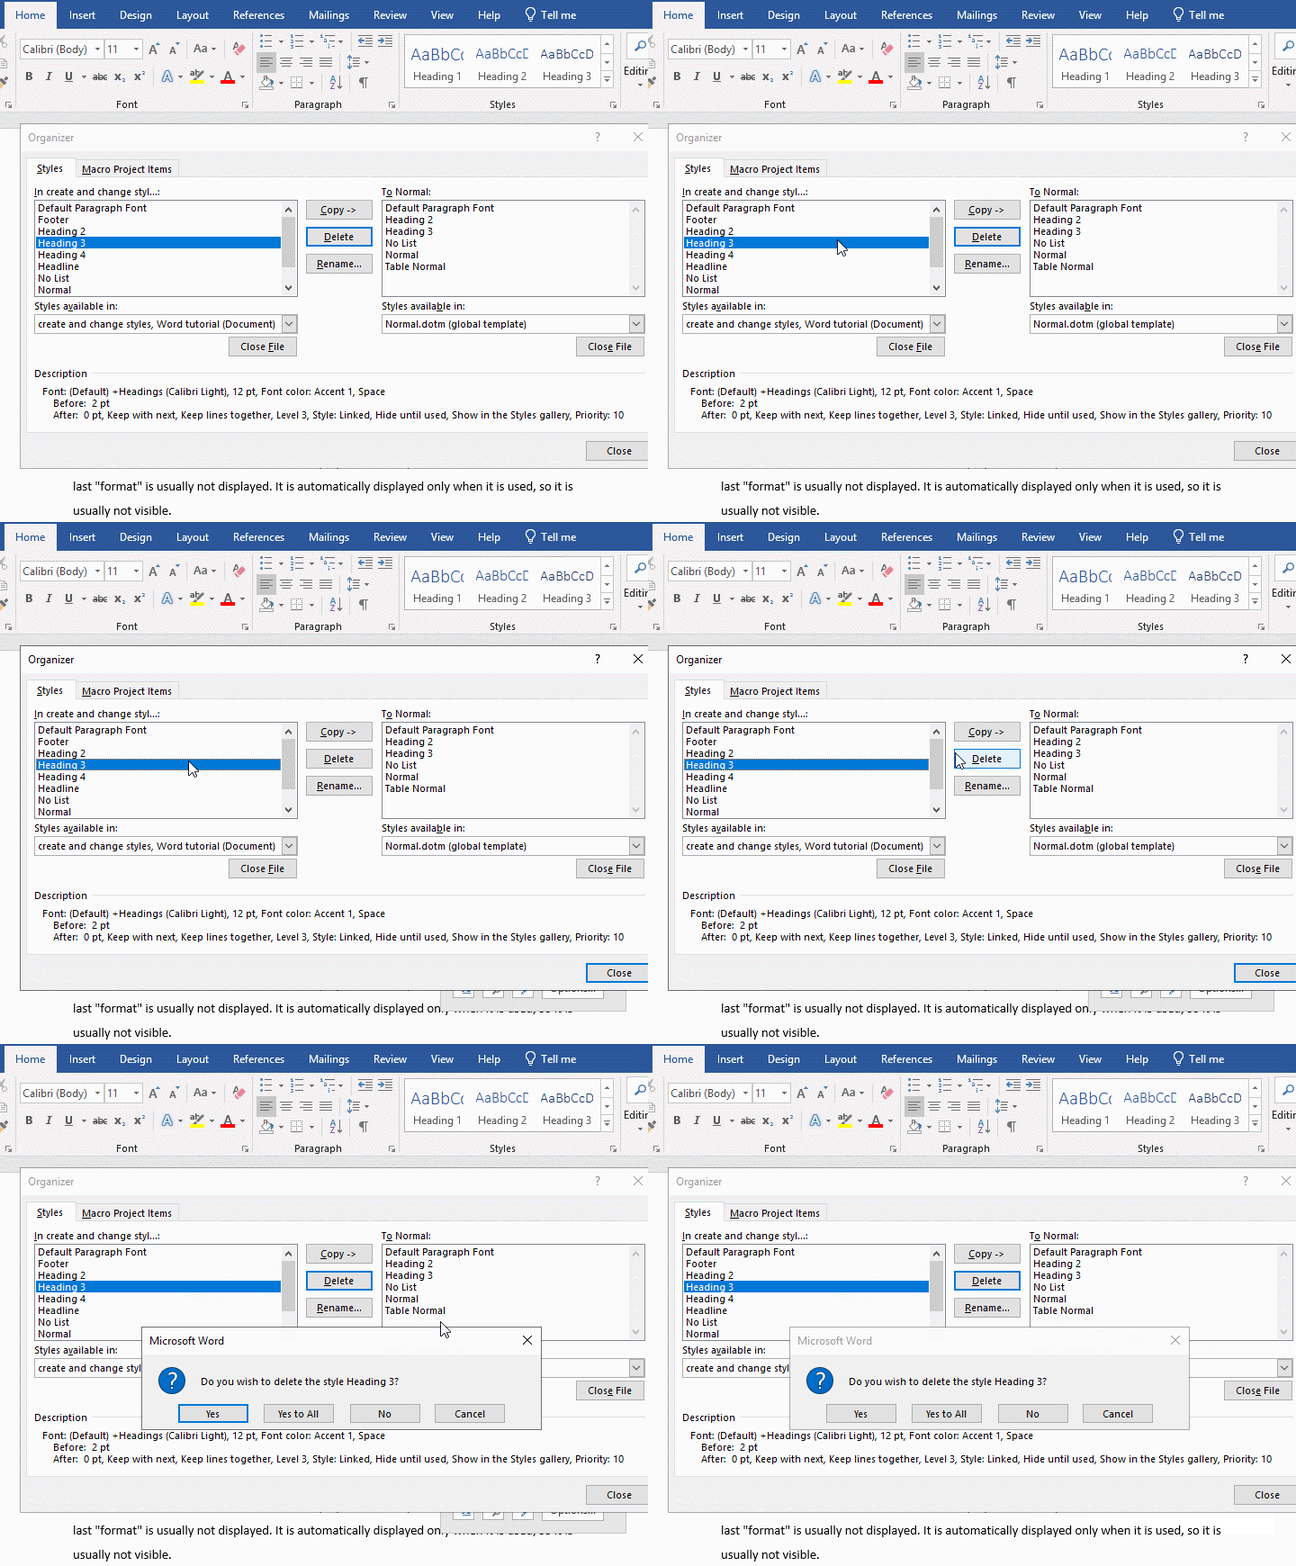
Figure 13
-
Related Reading
- How to delete table lines in Word (one line, remove
- How to sort paragraphs in Word, with sorting them al
- How to add cross symbol and tick mark in Word, with
- How to create and save as a new document in Ms Word,
- How to select multiple photos in Word and why is it
- Find ProPlusww.msi when opening Office(Word/Excel),
- How to set Header and footer in word(13 examples), i
- Word art transform text effect (Follow Path, Warp, A
- How to convert PowerPoint to word(4 examples), inclu
- How do I rotate a page 90 degrees in Word, with rota
- Can't print from microsoft Word (6 possible reasons)
- How to set default Printer in Microsoft Word when se
