How to customize ribbon in Word, with ribbon too big, not loading, resetting and defining shortcut
As mentioned earlier, Word has eleven ribbons, each of which displays different commands, and these commands are not fixed and can be customized, that is, you can add which command you want, and delete which command you want. From this point of view, Word is very user-friendly.
The Customize the Ribbon allows us to create a unique and personalized office environment, so that Word is more suitable for our work habits; the following is the specific method of Customizing ribbon in Word.
I. Customize ribbon in Word
(I) Add a new Group
1. After opening Word, right-click anywhere in the Ribbon, select Customize the Ribbon in the pop-up menu. Open the Word Options window, and select Customize Ribbon.
In addition, by selecting File → Options → Custom Ribbon on the left of window, you can also open the Custom Ribbon.
2. Right-click Paragraph, Select Add New Group in the pop-up menu, and a new group will be created under the selected subcommand (Paragraph).
In addition, after selecting the subcommand (Paragraph), click the New Group below, you can also create a new group in the subcommand (Paragraph).
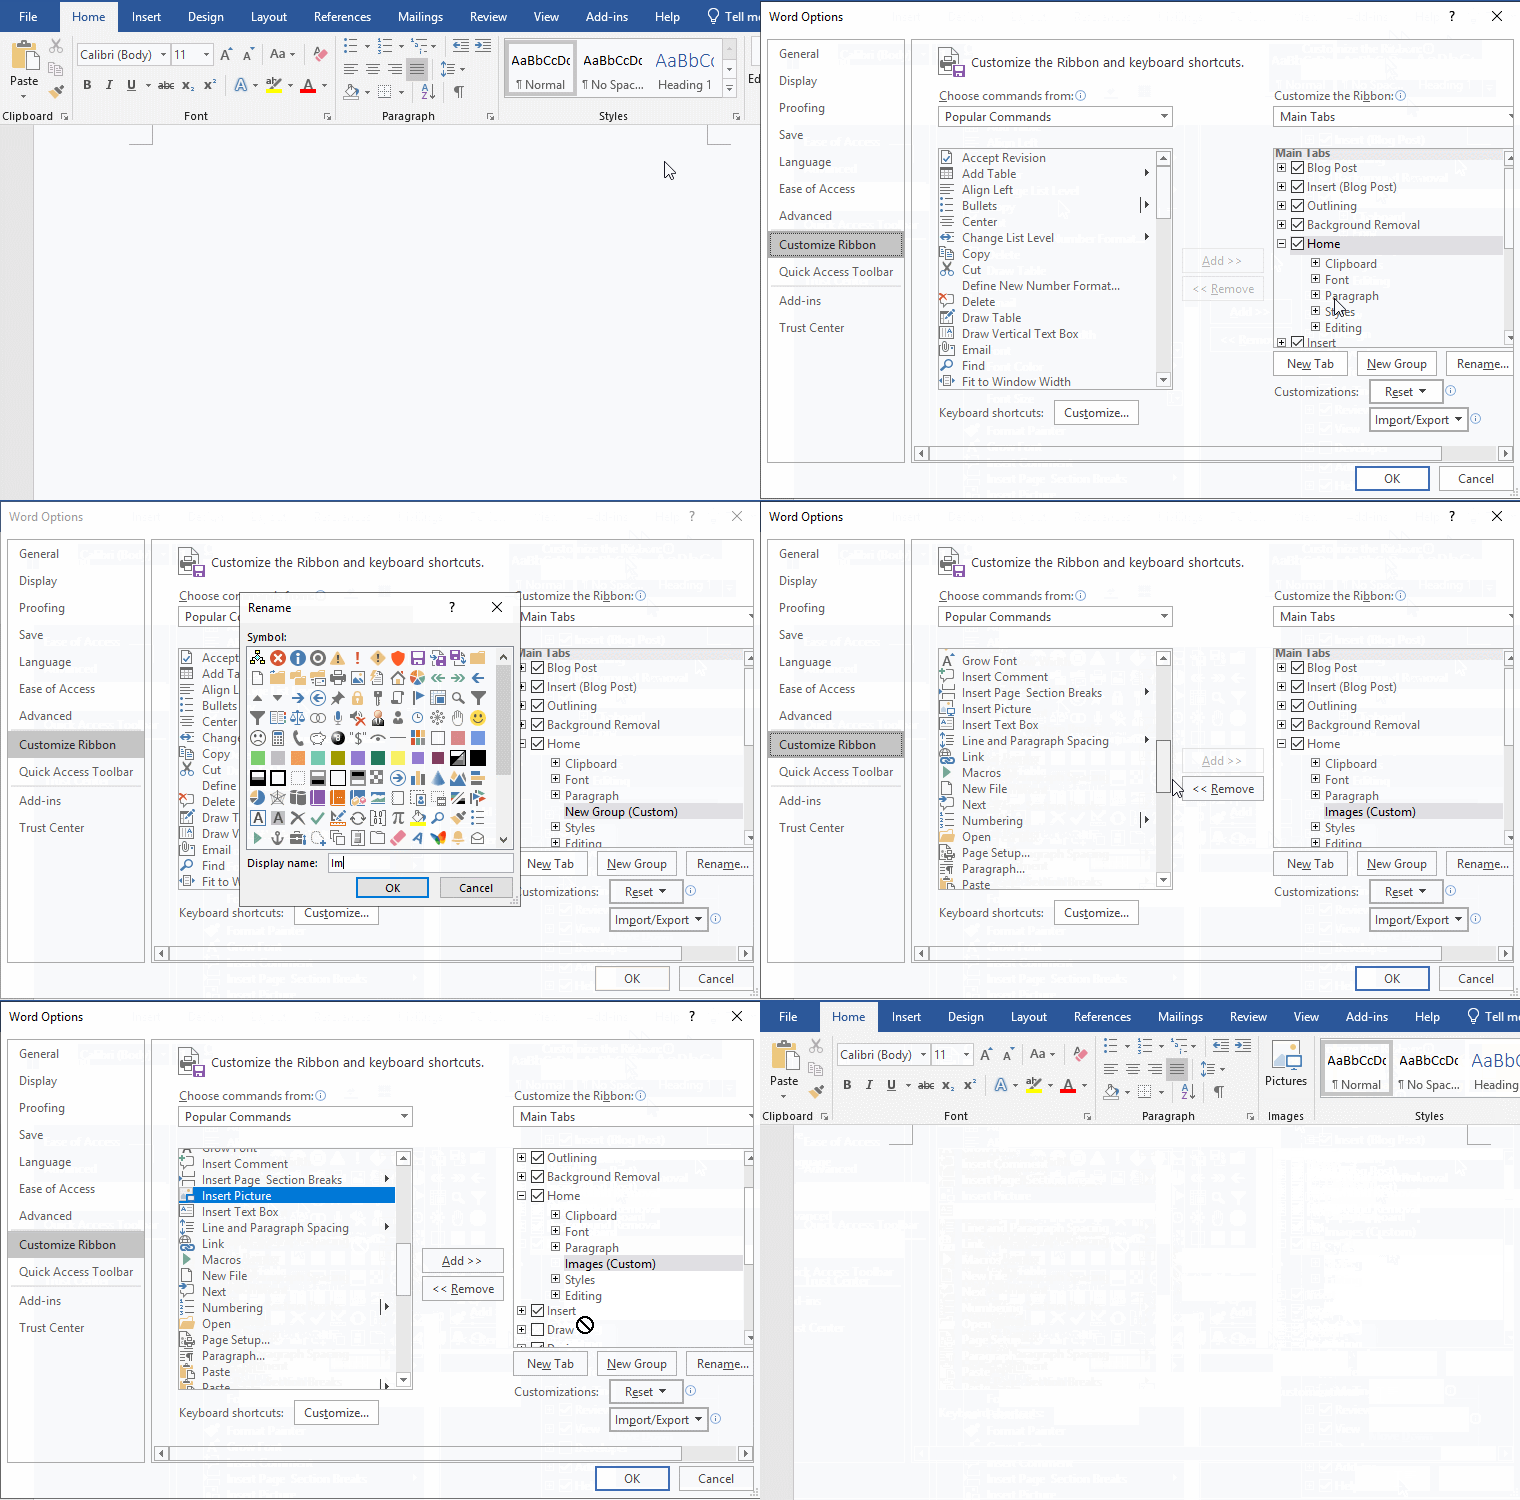
3. The newly created group has not been named yet, right-click it, and select Rename, open the Rename window, enter the name of the new group after the Display Name, for example: Images. After clicking OK, the new group is named Images. Now you can add commands to the new group, select Insert Picture on the left, click Add, then Insert Picture is added to Images group. After clicking OK, the Home tab of Ribbon already has Images group. The demonstration is shown in Figure 1:
Figure 1
4. As can be seen from the demonstration, Customized Ribbon and Customized Quick Access Toolbar are also similar, that is, the list box on the left is the command for selection, the list box on the right is the defined command. The list box on the left is the sub-commands of Popular Commands. If you want to choose other commands, you can click the drop-down list under Choose commands from, select command you want to add from the pop-up drop-down list. It has been introduced in detail in the previous article How to Customize quick access toolbar in Word, with it is not working. The list box on the right already lists the sixteen ribbons; here is a bit different from the custom quick access toolbar. You cannot select a command on the left and click Add to add the command to the right, but you need Create a group on the right before adding the selected command to the new group.
(II) Add a new Tab
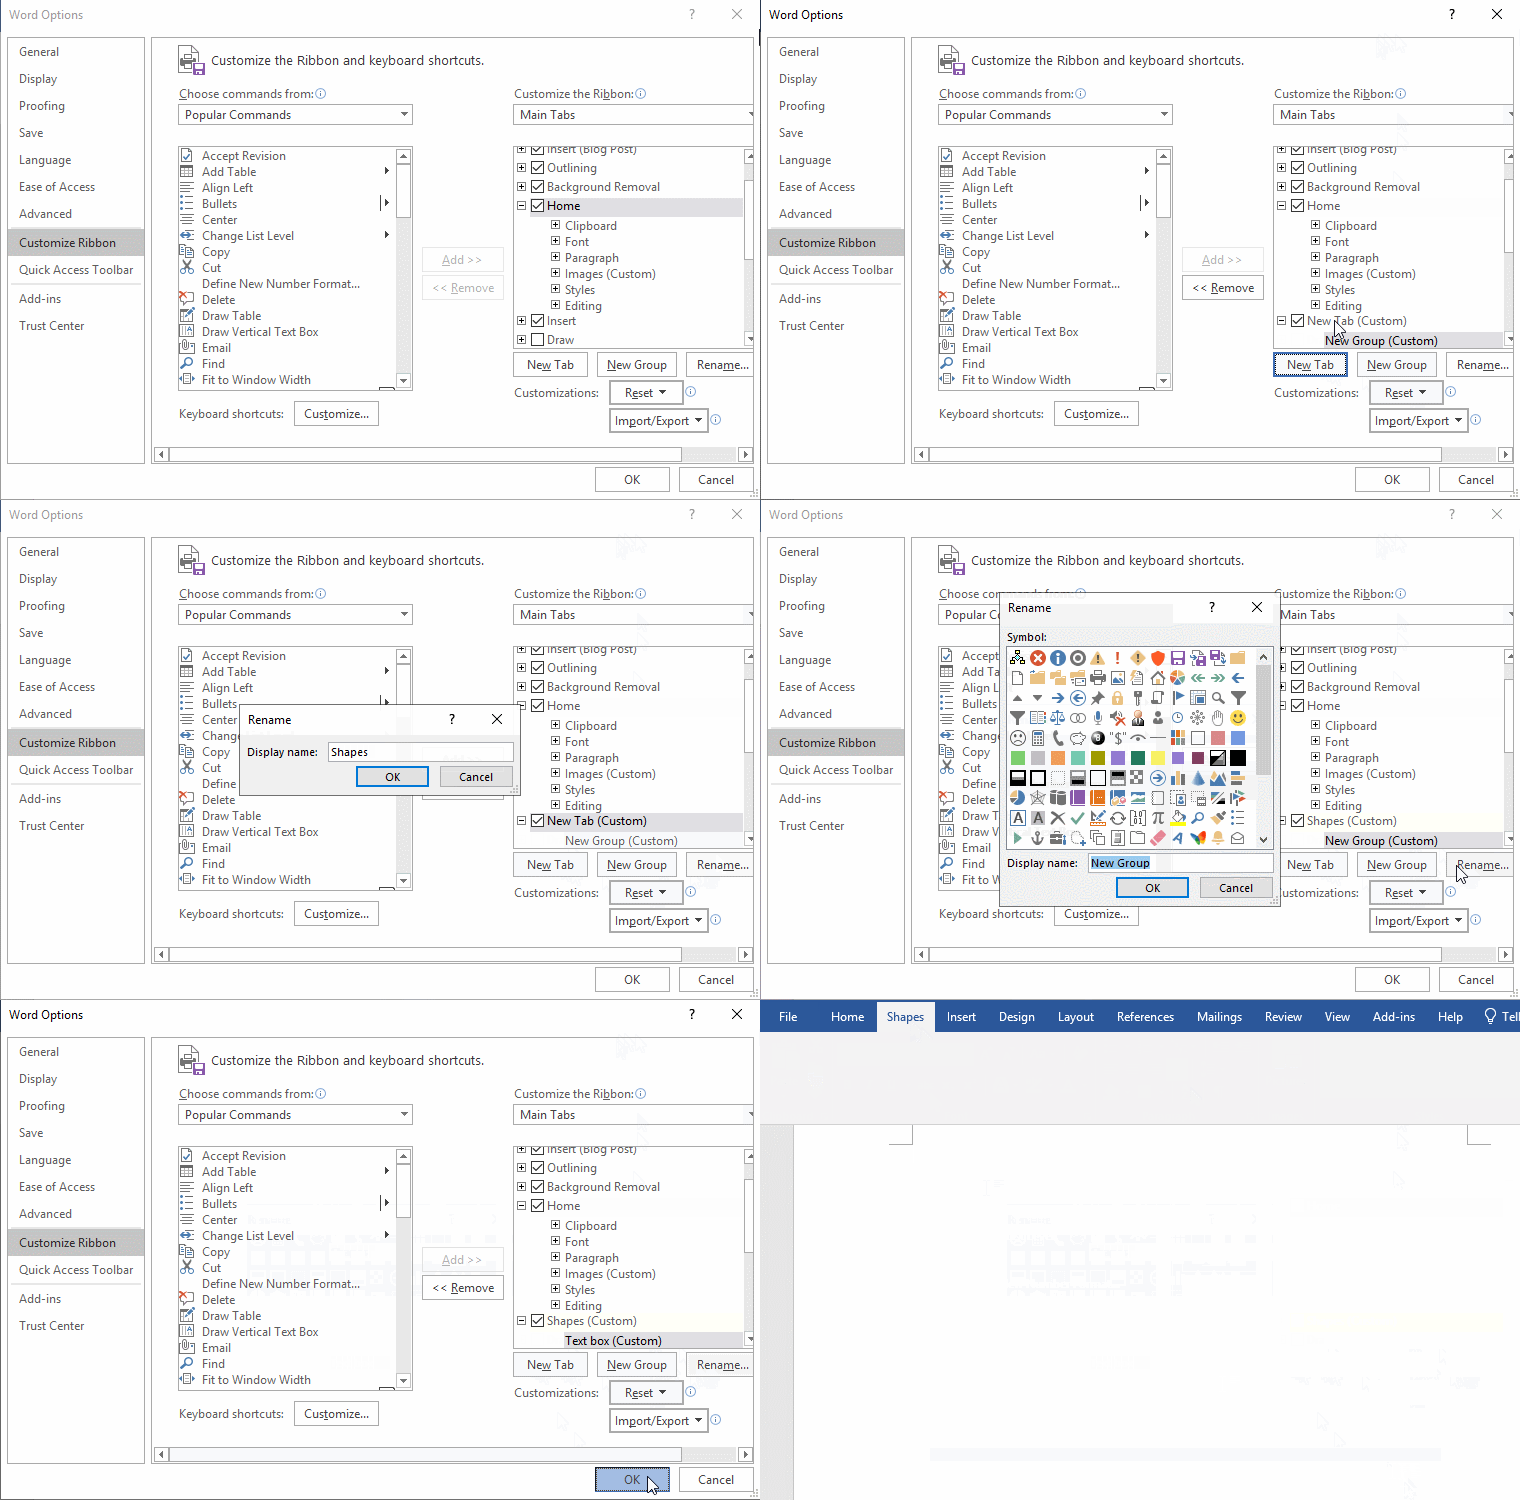
Home and Insert are all tabs, and tabs can also be created. Click New Tab to create a new tab under the selected tab (for example, the Home selected). Select the newly created tab, click Rename. Enter a name such as Shapes in the opened window. After pressing Enter or clicking OK, the name of newly created tab has become Shapes, and the name of New Group is the same as before, for example: named Text box. After clicking OK, there is an extra Shapes tab in the Ribbon. The demonstration is shown in Figure 2:
Figure 2
(III) Remove a Tab or Group
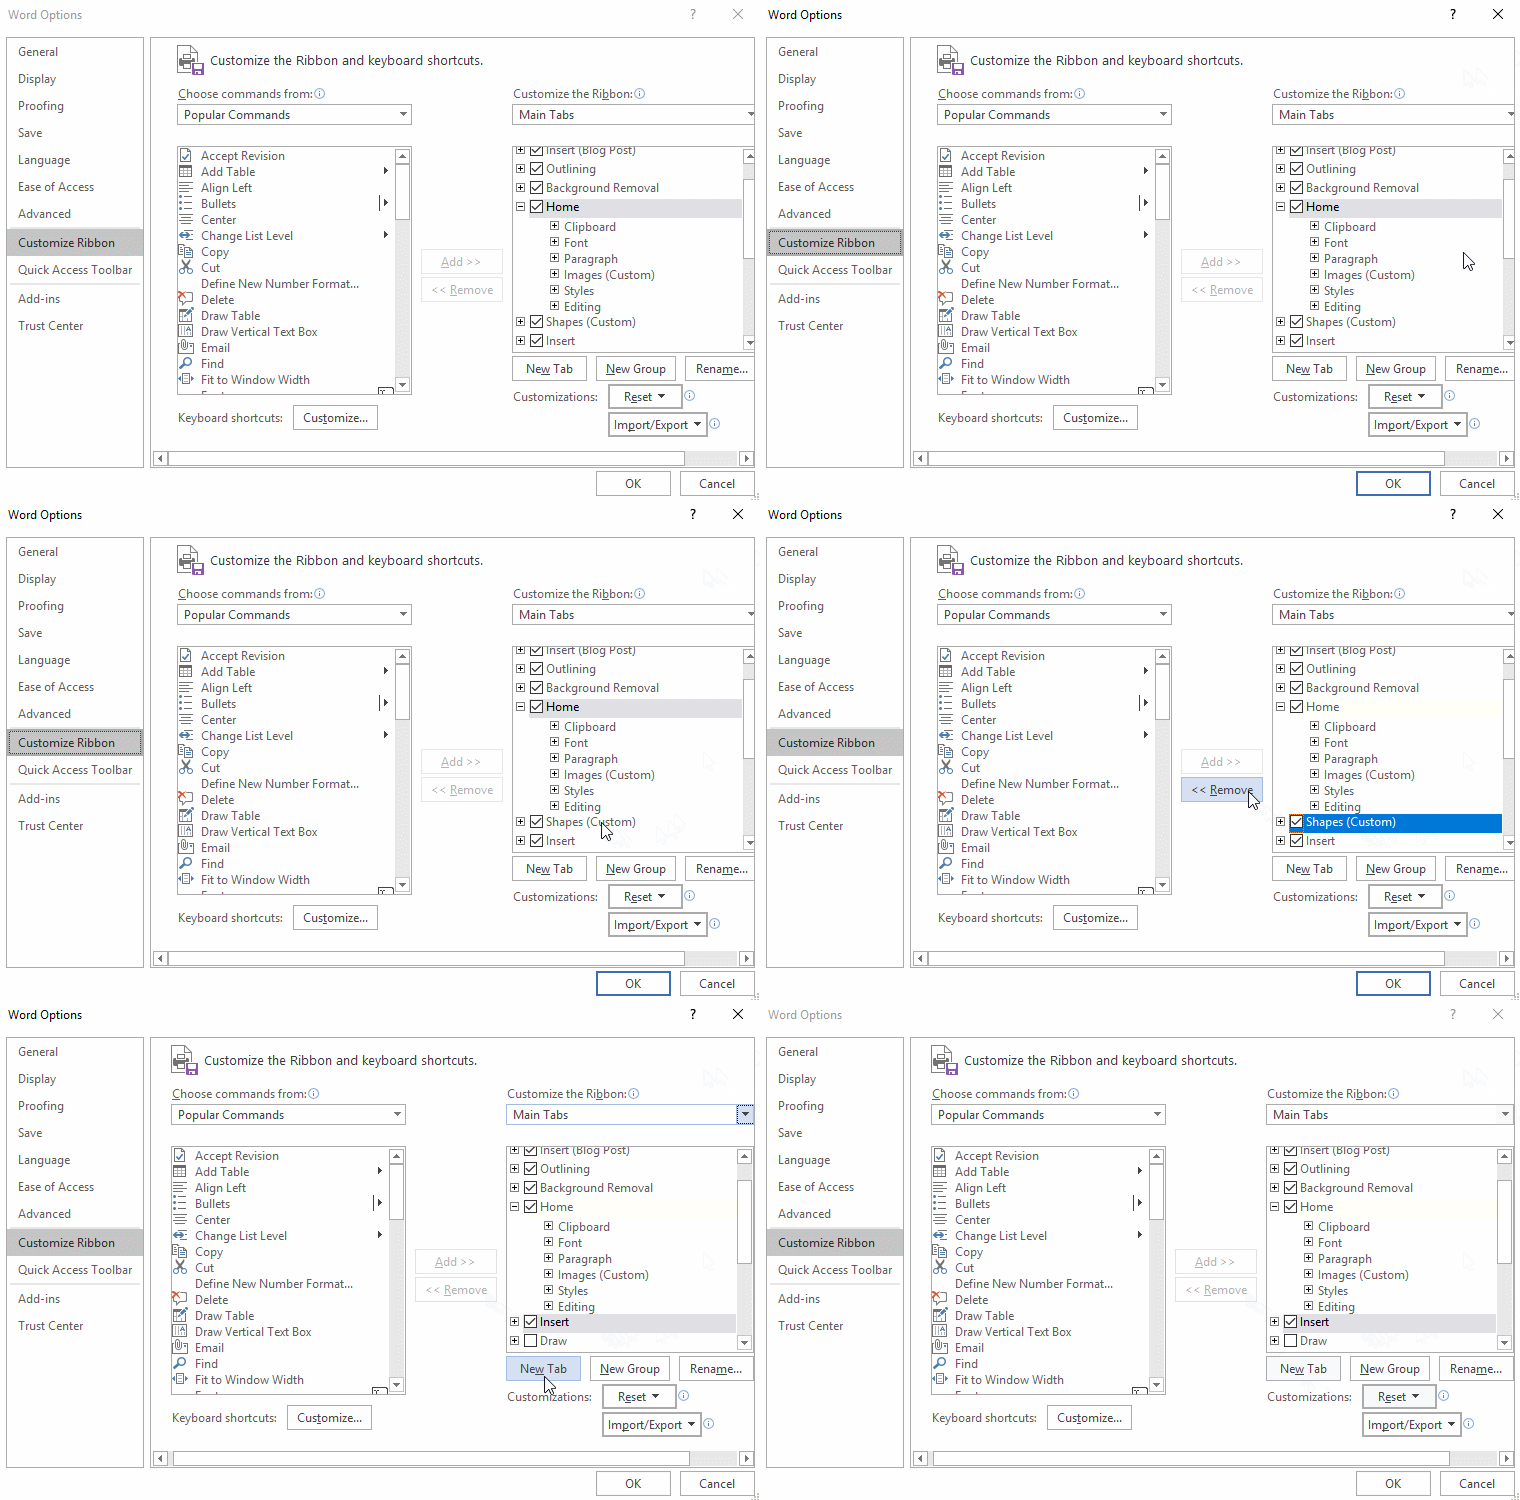
1. If you want to remove the tab or group, select it and click Remove. For example: select the newly created Shapes, click Remove, the Shapes tab will be removed, the demonstration is shown in Figure 3:
Figure 3
2. You can also right-click the tab or group you want to remove, select Remove in the pop-up menu to remove it.
(IV) Sort Tabs or Groups
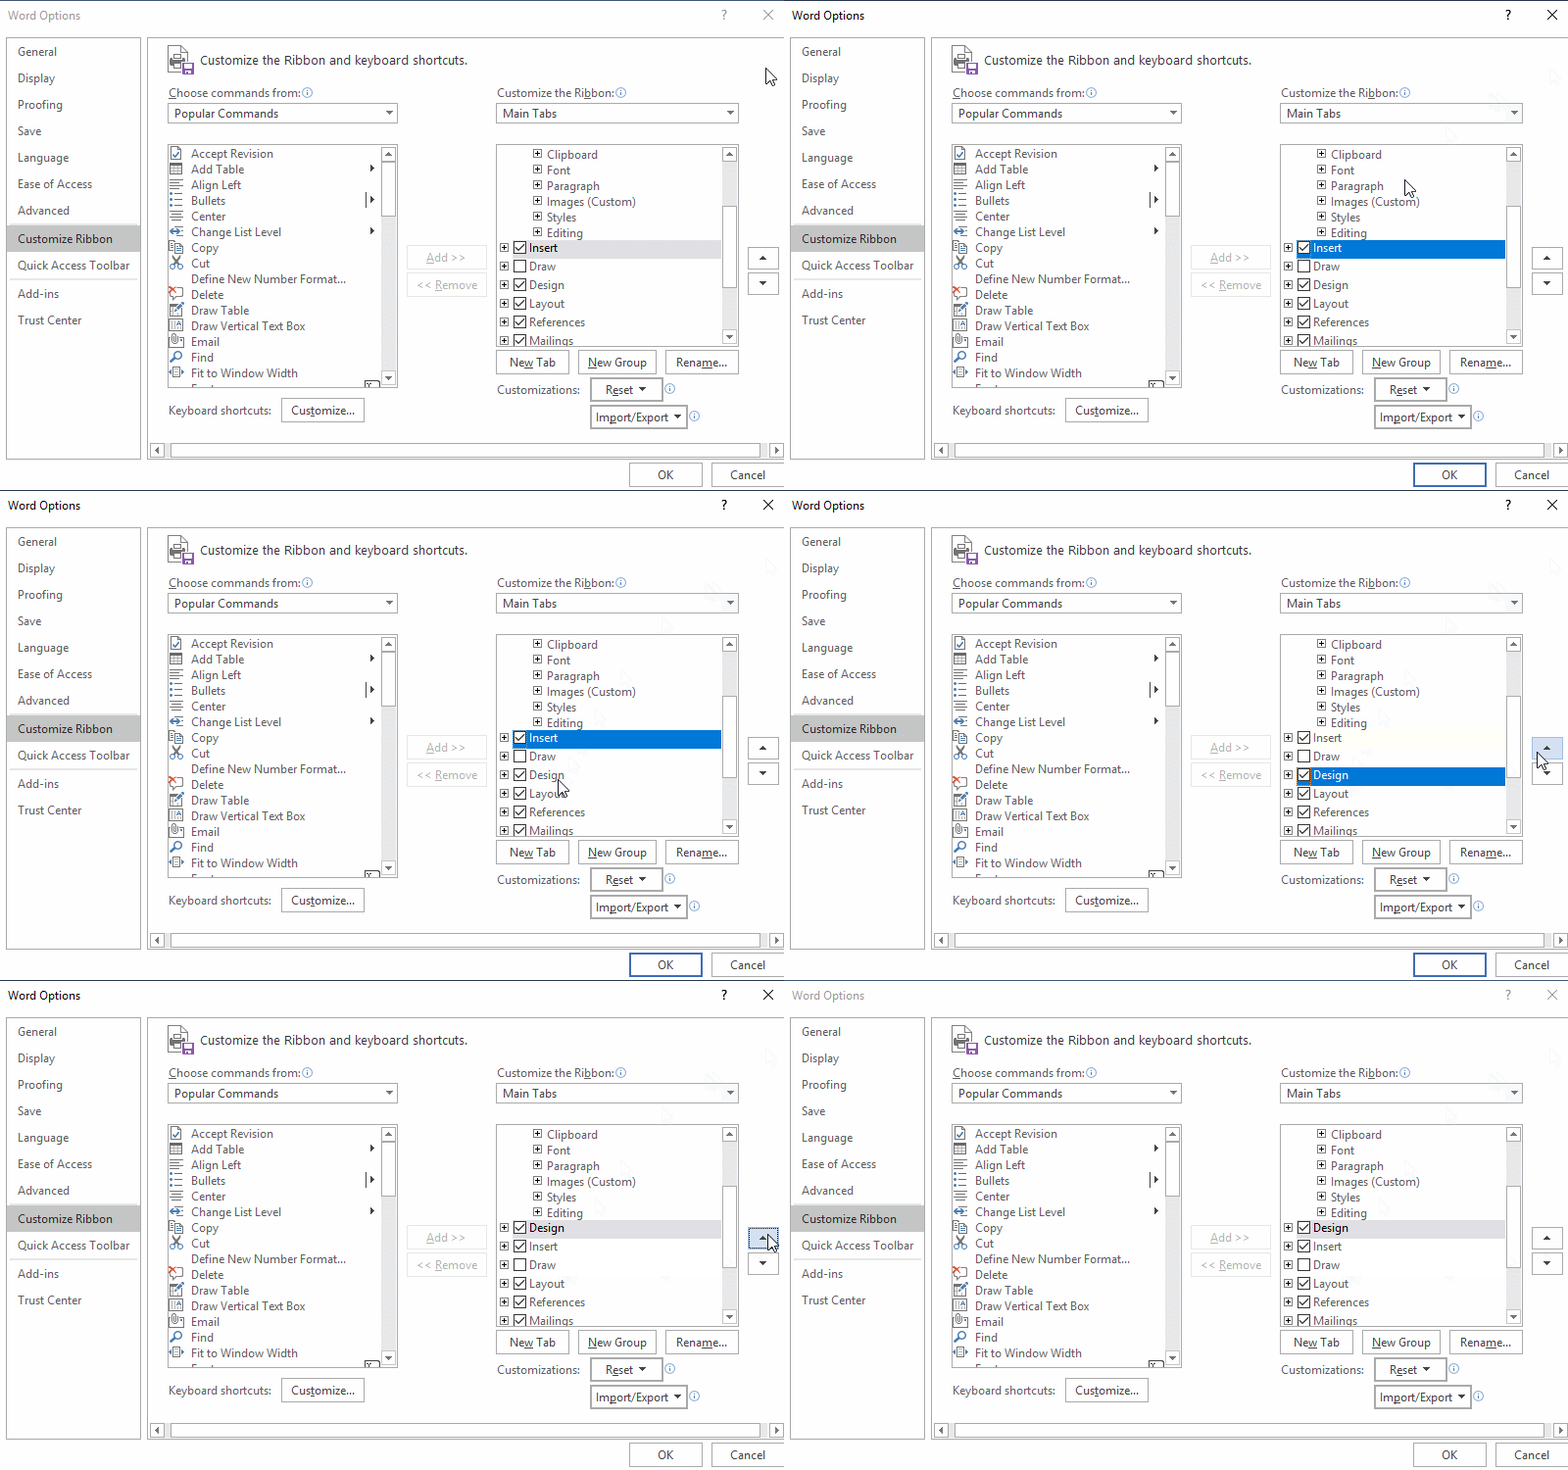
Select the tab that you want to adjust the order (such as: Design), if you want it to be arranged to the front, click Move up (up arrow), otherwise click Move Down (down arrow). If you let it move up two places, select Design, after clicking Move Up twice, Design has come to the front of Insert, the demonstration is shown in Figure 4:
Figure 4
(V) Reset the custom Ribbon
1. If you want to restore the Ribbon to the default state of Word, you can click Reset, and the customized Ribbons will be cleared, usually reset when the Ribbons are defined disorderly or there is a problem with Word.
2. Click Reset, a drop-down menu will pop up, there are two options, namely: Reset only selected Ribbon tab and Reset all customizations. If you choose the former, you need to select the Ribbon to be reset first, and then select it, the latter can be selected directly, generally select Reset all customizations. The demonstration is shown in Figure 5:
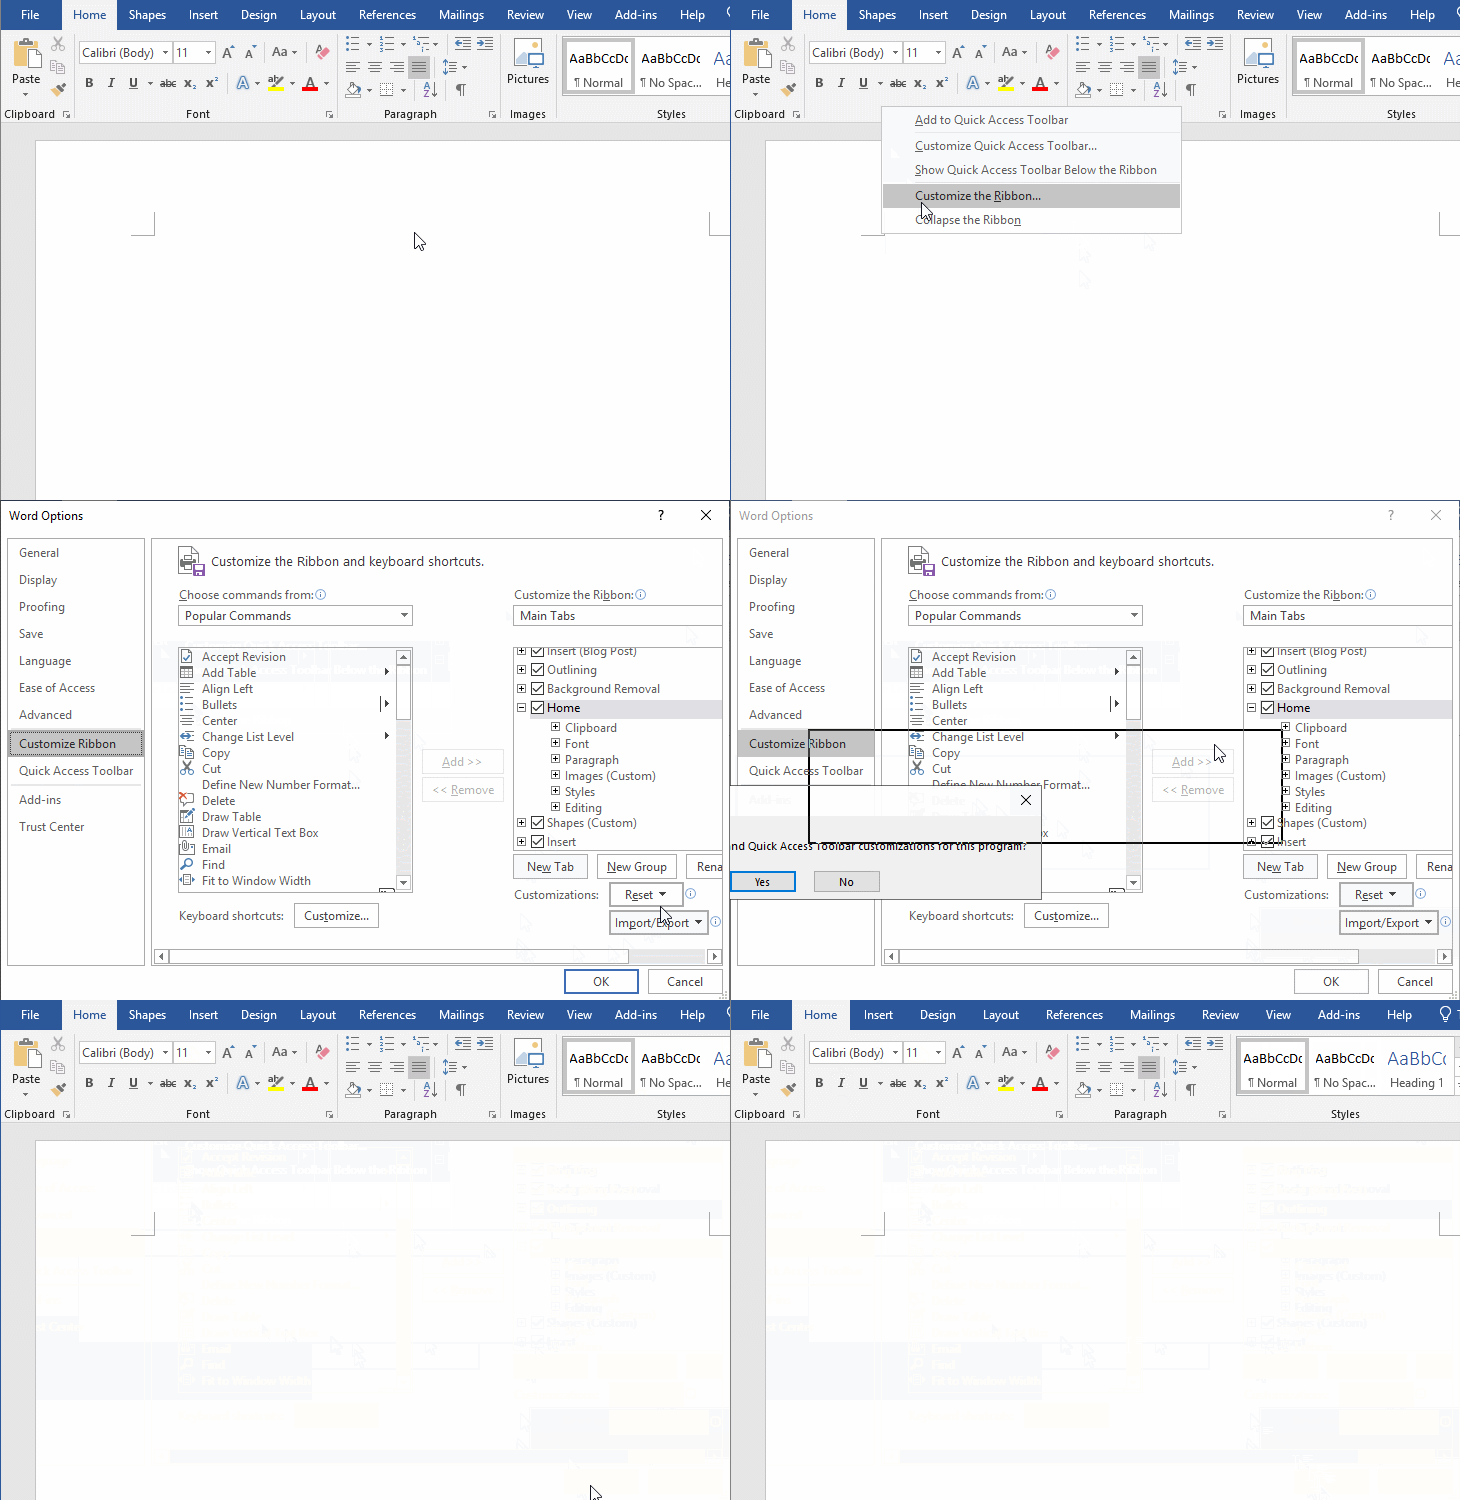
Figure 5
(VI) Customize shortcut keys for a command
Click Customize behind Keyboard Shortcuts, open the Custom Keyboard window. We define a shortcut key for the Insert tab, select the Insert tab in the Categories list box, select InsertPicture in the Commands list box, click the input box behind Press new shortcut key, and press Ctrl + Alt + Shift + I keys on your keyboard, the pressed keys appear in the input box. After clicking Assign, the Ctrl + Alt + Shift + I keys will appear in the list box under Current Keys. Click Cancel to close Word Options window. Press Ctrl + Alt + Shift + I on the keyboard at the same time, the Insert Picture window will open. The demonstration is shown in Figure 6:
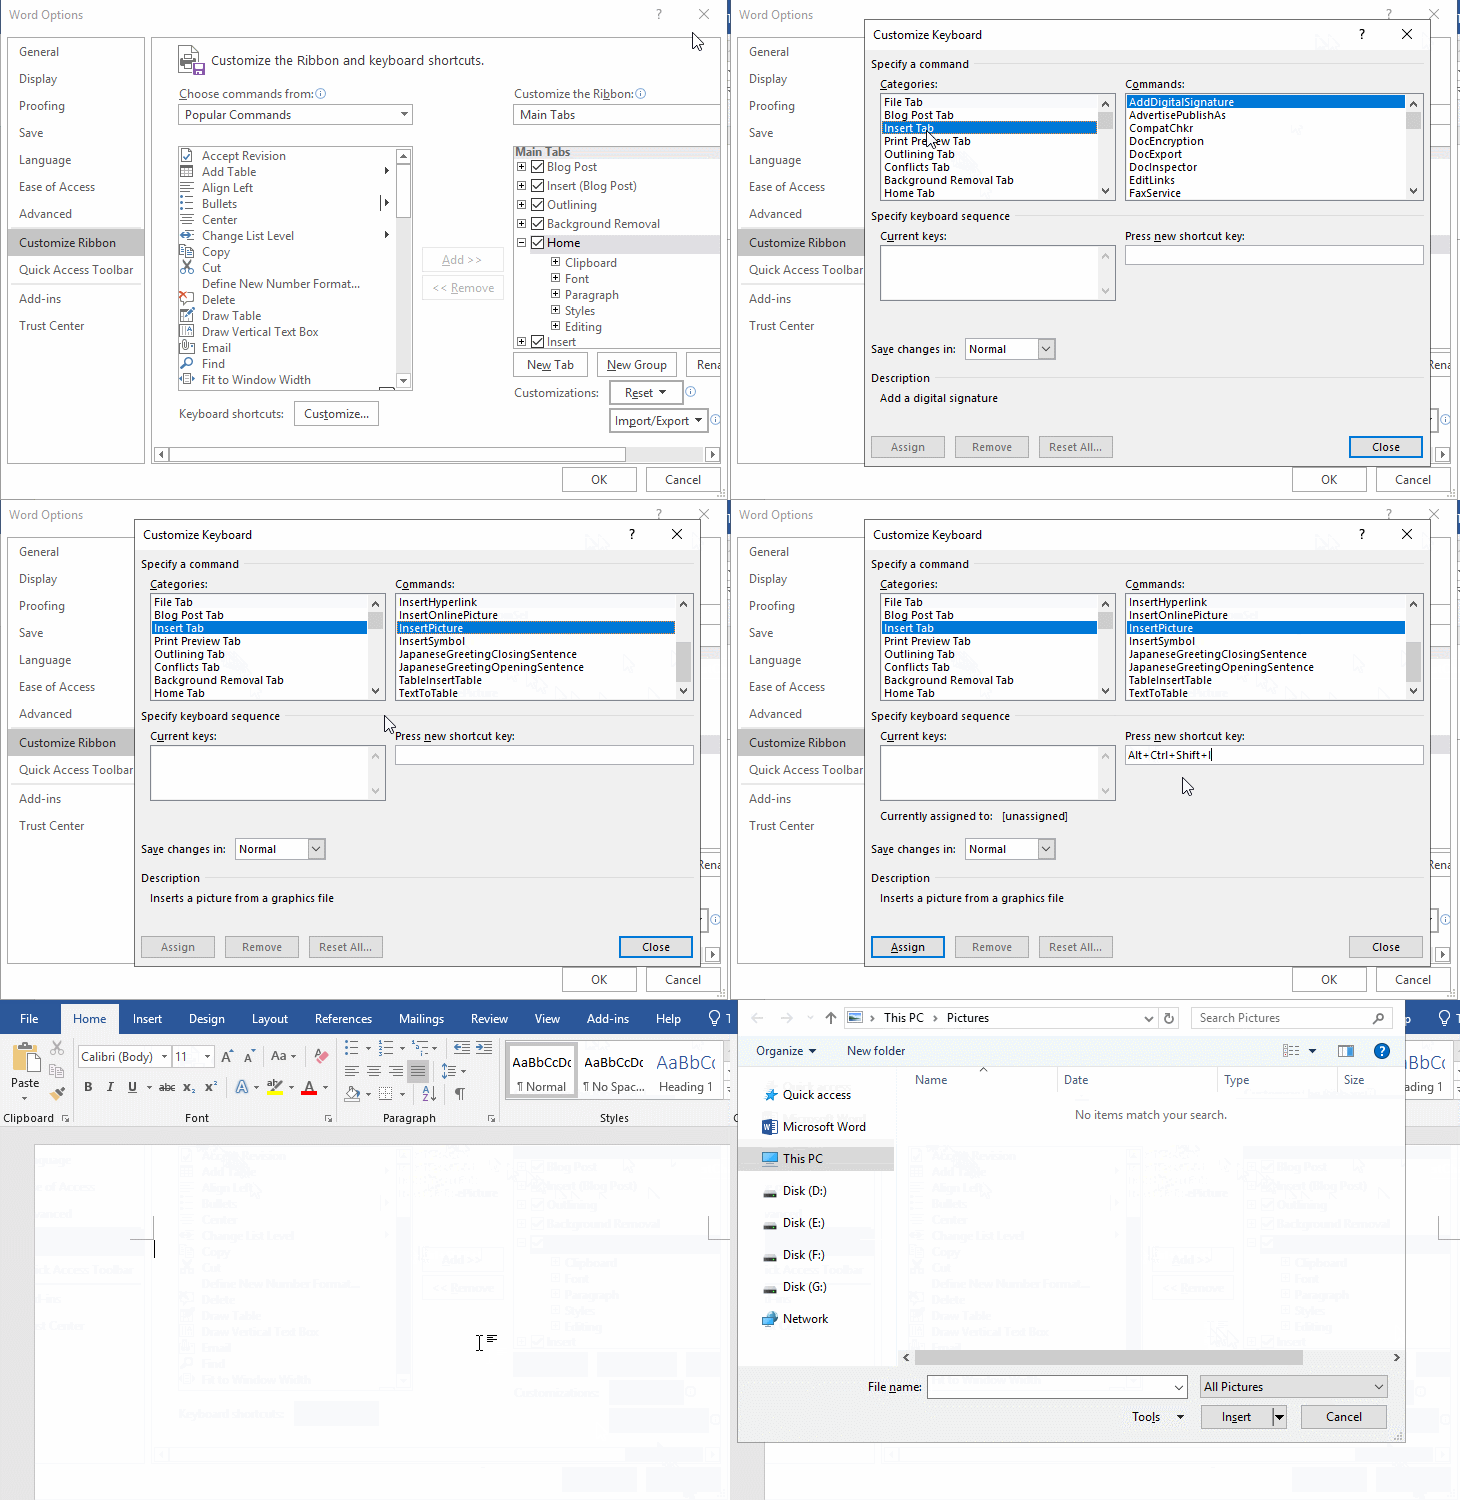
Figure 6
II. Word Ribbon common problems
1. Word Ribbon too big
Click the Customize Quick Access Toolbar icon in the upper left corner of the Word window, select Touch/Mouse Mode in the pop-up menu, and it will be added to the Customize Quick Access Toolbar, click it, and Select Mouse in the pop-up options, and the font, icon and interval in the Ribbon will be restored to their original size. The demonstration is shown in Figure 7:
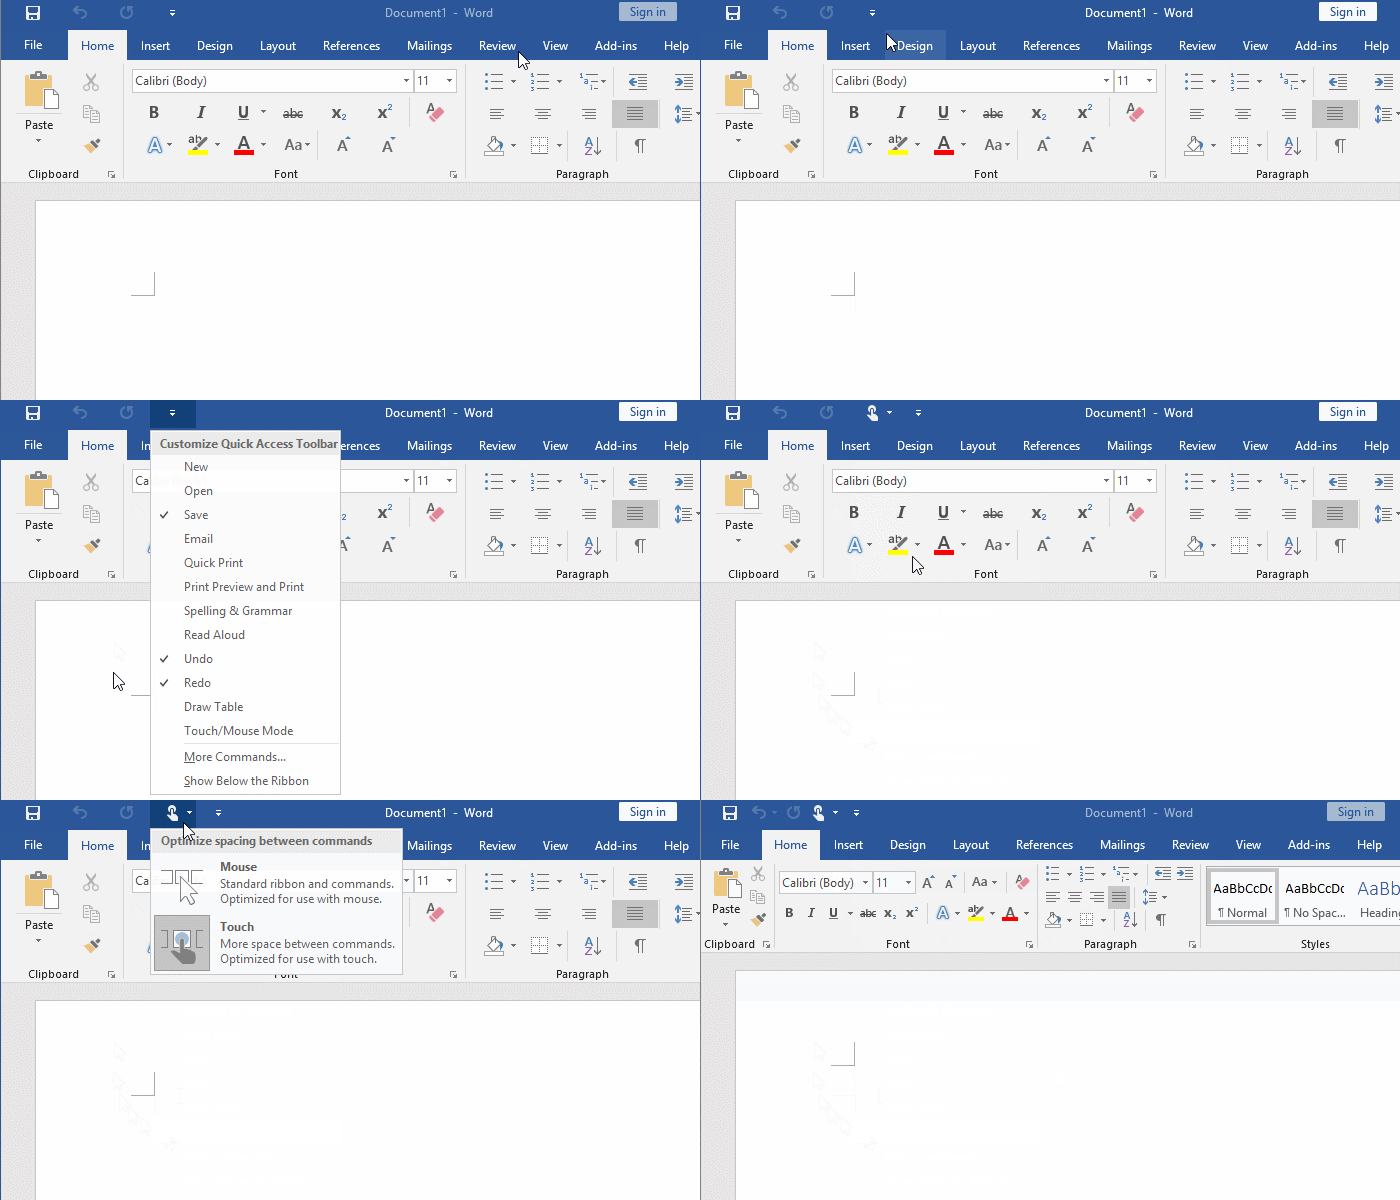
Figure 7
2. Word custom Ribbon not loading, can not customize Ribbon and cannot be saved after setting
After updating the system, the Word custom Ribbon is often blank and the commands in it are gone. Why is this happening? It may be caused by the conflict between the system update feature and Word. Therefore, to solve this problem, either uninstall the update or uninstall Office completely, and then reinstall it. It must be uninstalled cleanly, otherwise the problem will remain after the reinstallation.
You can download a tool to completely uninstall the software to completely uninstall Office. If you don't know how to download, you can search for software to uninstall software completely in the search engine, then find a to download, and uninstall Office after installing it. You can also use the above methods if you can't save the settings for custom Ribbon.
-
Related Reading
- How to delete table lines in Word (one line, remove
- How to add cross symbol and tick mark in Word, with
- How to create and save as a new document in Ms Word,
- Find ProPlusww.msi when opening Office(Word/Excel),
- How to set Header and footer in word(13 examples), i
- Word art transform text effect (Follow Path, Warp, A
- How to convert PowerPoint to word(4 examples), inclu
- How do I rotate a page 90 degrees in Word, with rota
- Can't print from microsoft Word (6 possible reasons)
- How to set default Printer in Microsoft Word when se
- How to fix Microsoft Word has stopped working (sever
- How to align, rotate and lock Text Box position in W

