How to create a Multilevel list in Word, with it is disordered or not displayed
The Microsoft Word multilevel list is like a table of contents of a book, such as 1.1..., 1.2...,...; 1.1.1..., 1.1.2...,..., used for multi-level text lists, It is more often used to make a table of contents or outlines of books. Compared with numbering, it is both numbering and grading.
When creating a multilevel list, the first level is used by default, so it looks like a numbering, and the grading will only be reflected after the second level or higher is selected. Please pay attention to this point to avoid misunderstanding. Let's first look at how to make a multilevel list in Word.
I. How to create a multilevel list in Word
1. Set the Heading style first and then create create a multilevel list
Select the Home tab, set the corresponding heading styles for Heading 1 to Heading 4, select them, click the Multilevel list icon, and select a style in the pop-up List Library, for example, the second one, then create a multilevel list. The demonstration is shown in Figure 1:
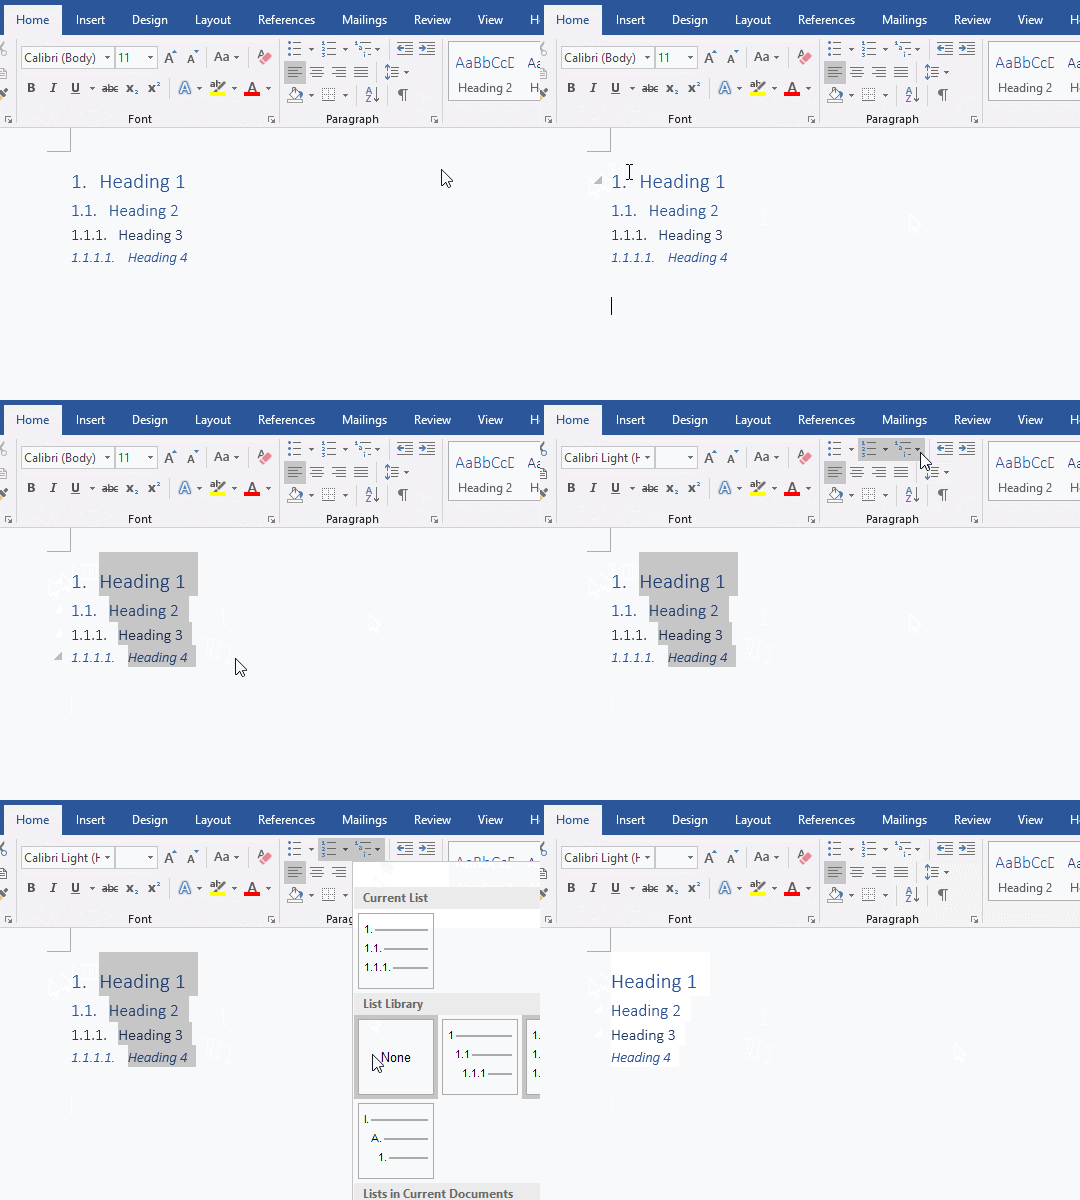
Figure 1
2. Directly create a multilevel list
Also create a multilevel list for Word version, select them, click the Multilevel list icon, pops up the list style; and Bullets and Numbering, click their icons will apply a default style. Select the second multilevel list, the effect is the same as the Numbering; click the Multilevel list icon again, select Change list level, and select the third level in the pop-up list level style to appear Multilevel list. The operation steps are shown in Figure 2:
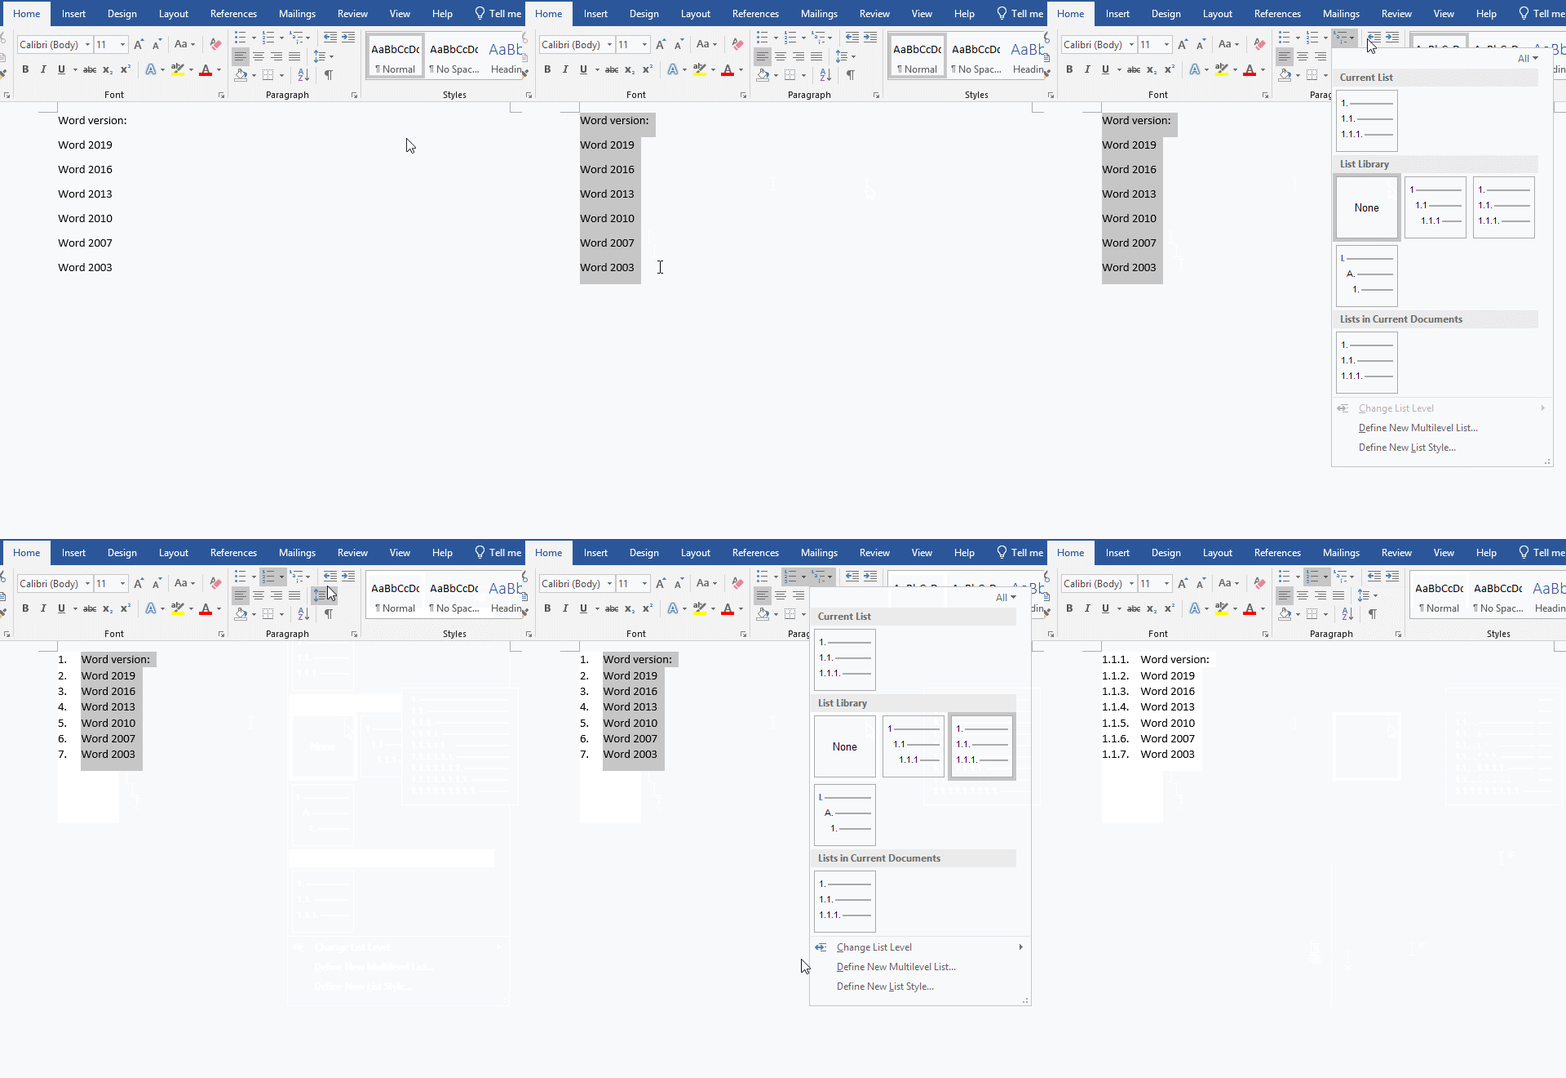
Figure 2
Note: The number of levels can be determined according to the actual situation.
II. How to remove multilevel list in Word
Select the multilevel list you want to remove, click the Multilevel list icon, and select None in the pop-up List Library. The operation steps are shown in Figure 3:
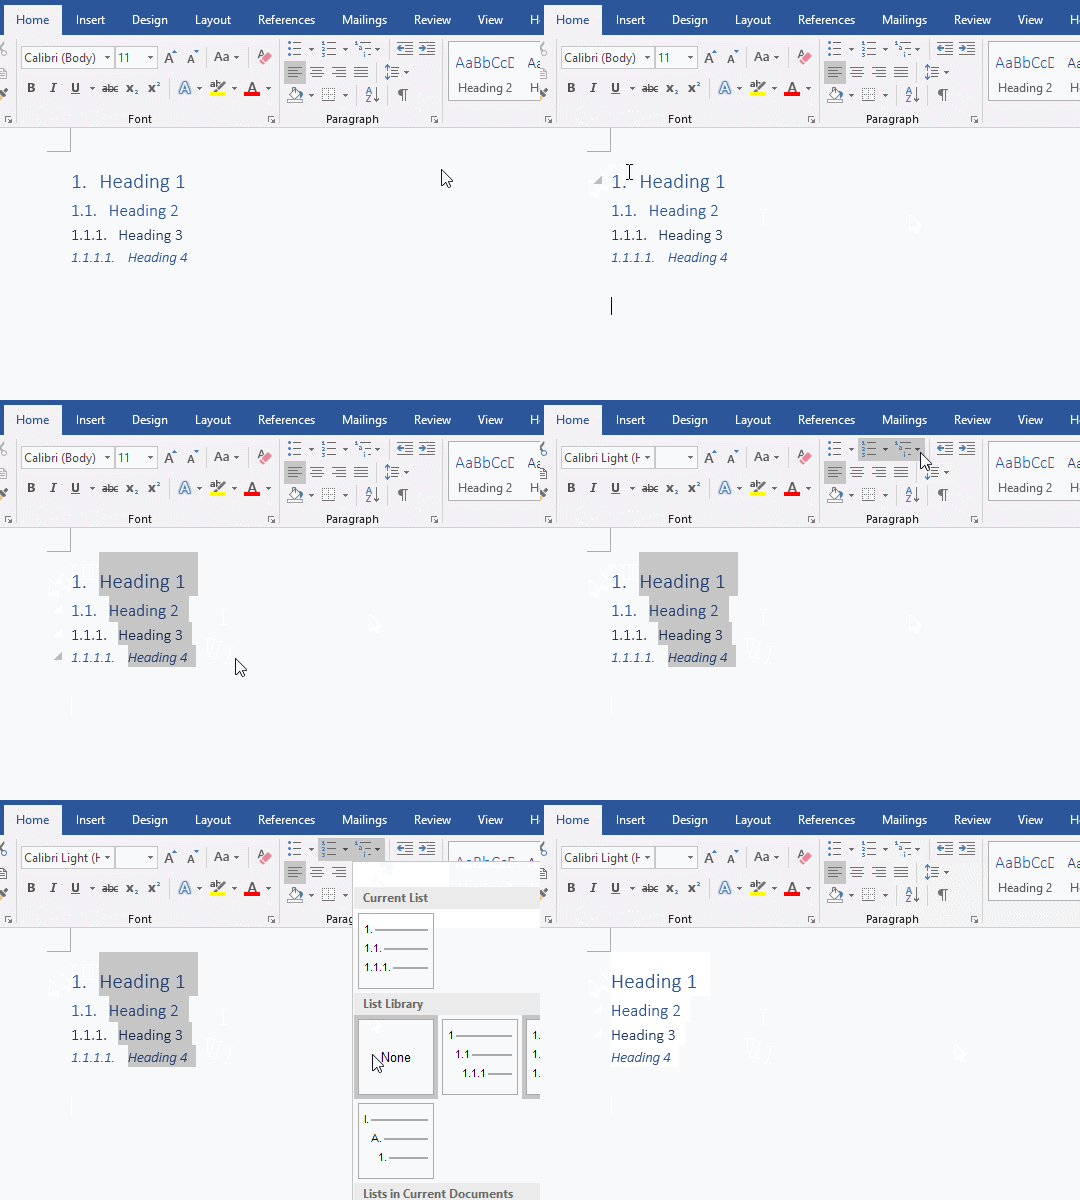
Figure 3
III. Multilevel list is disordered or not displayed in Word
1. The Multilevel list is disordered, how to solve it
Redefine the Multilevel list, first define the first list. For example, if there is a Multilevel list, the starting number does not start from 1. The solution is: position the cursor behind the number of the first line of the first list, right-click here, and select Set Numbering Value in the pop-up menu, open the Set Numbering Value window, change the Set value to to 1, and click OK. The numbers of all lists are reprogrammed in order. The operation steps are shown in Figure 4:
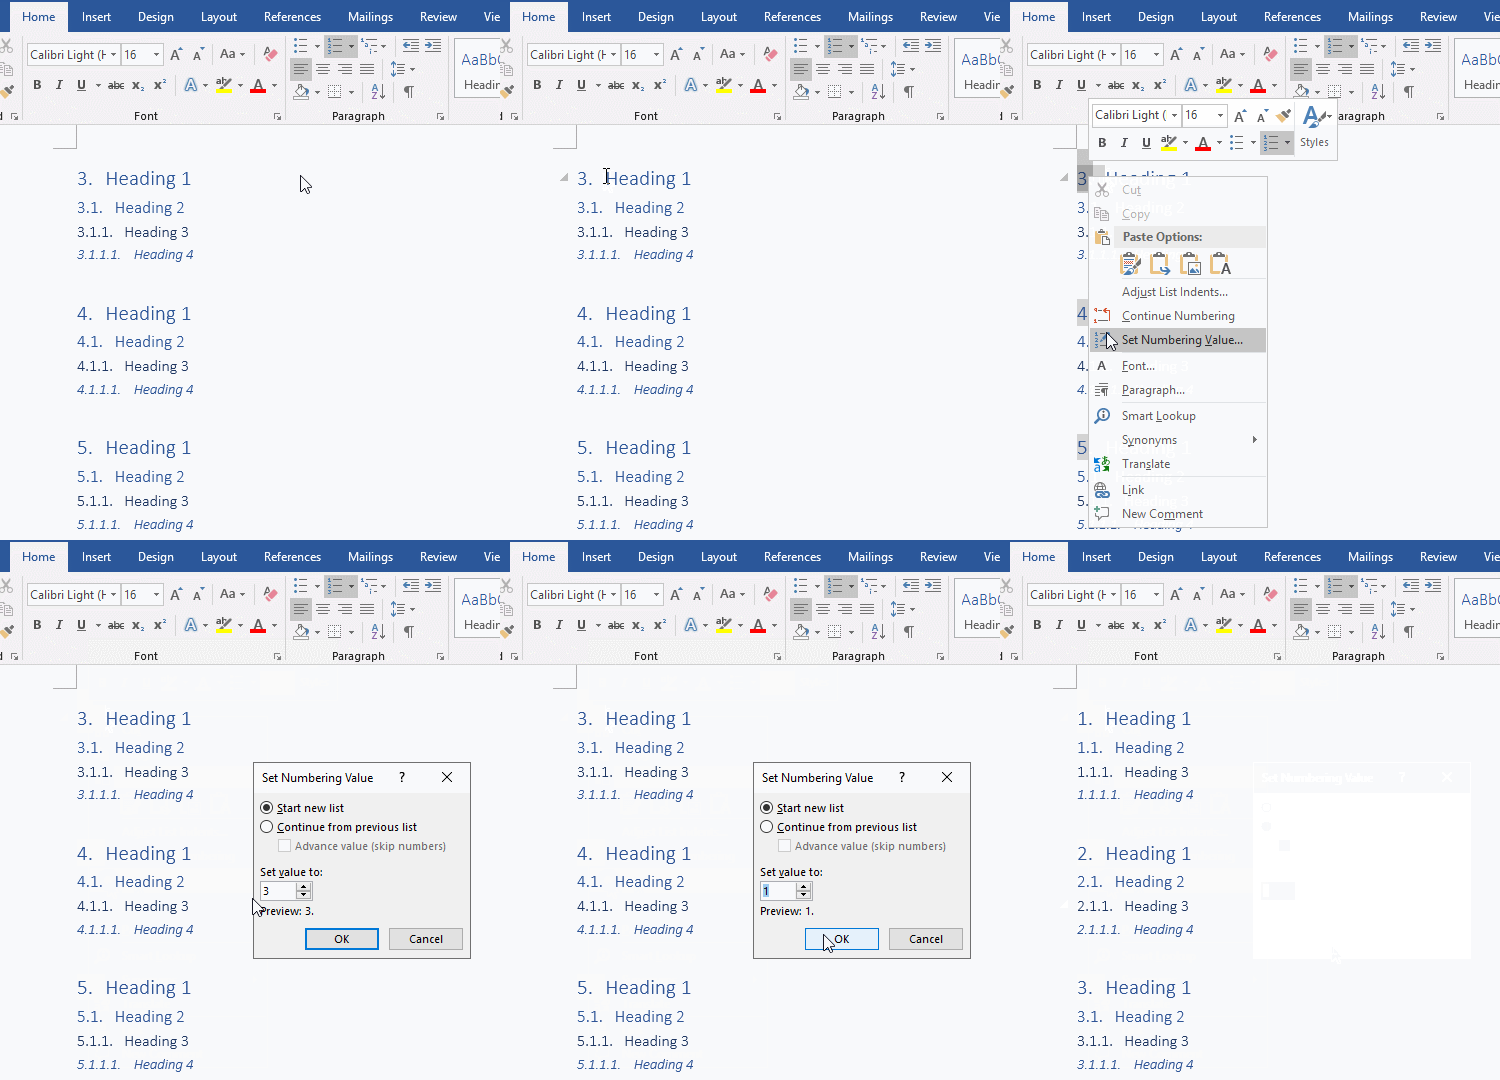
Figure 4
2. The number of Multilevel list is not displayed in Word
A. The number is hidden
Position the cursor in front of the hidden numbered text, click the Multilevel list icon, and select Define New Multilevel List in the pop-up menu, open the Define new Multilevel list window. Click Font to open the Font window, click Hidden to remove the tick in front of it, and click OK twice to display the hidden number. The operation steps are shown in Figure 5:
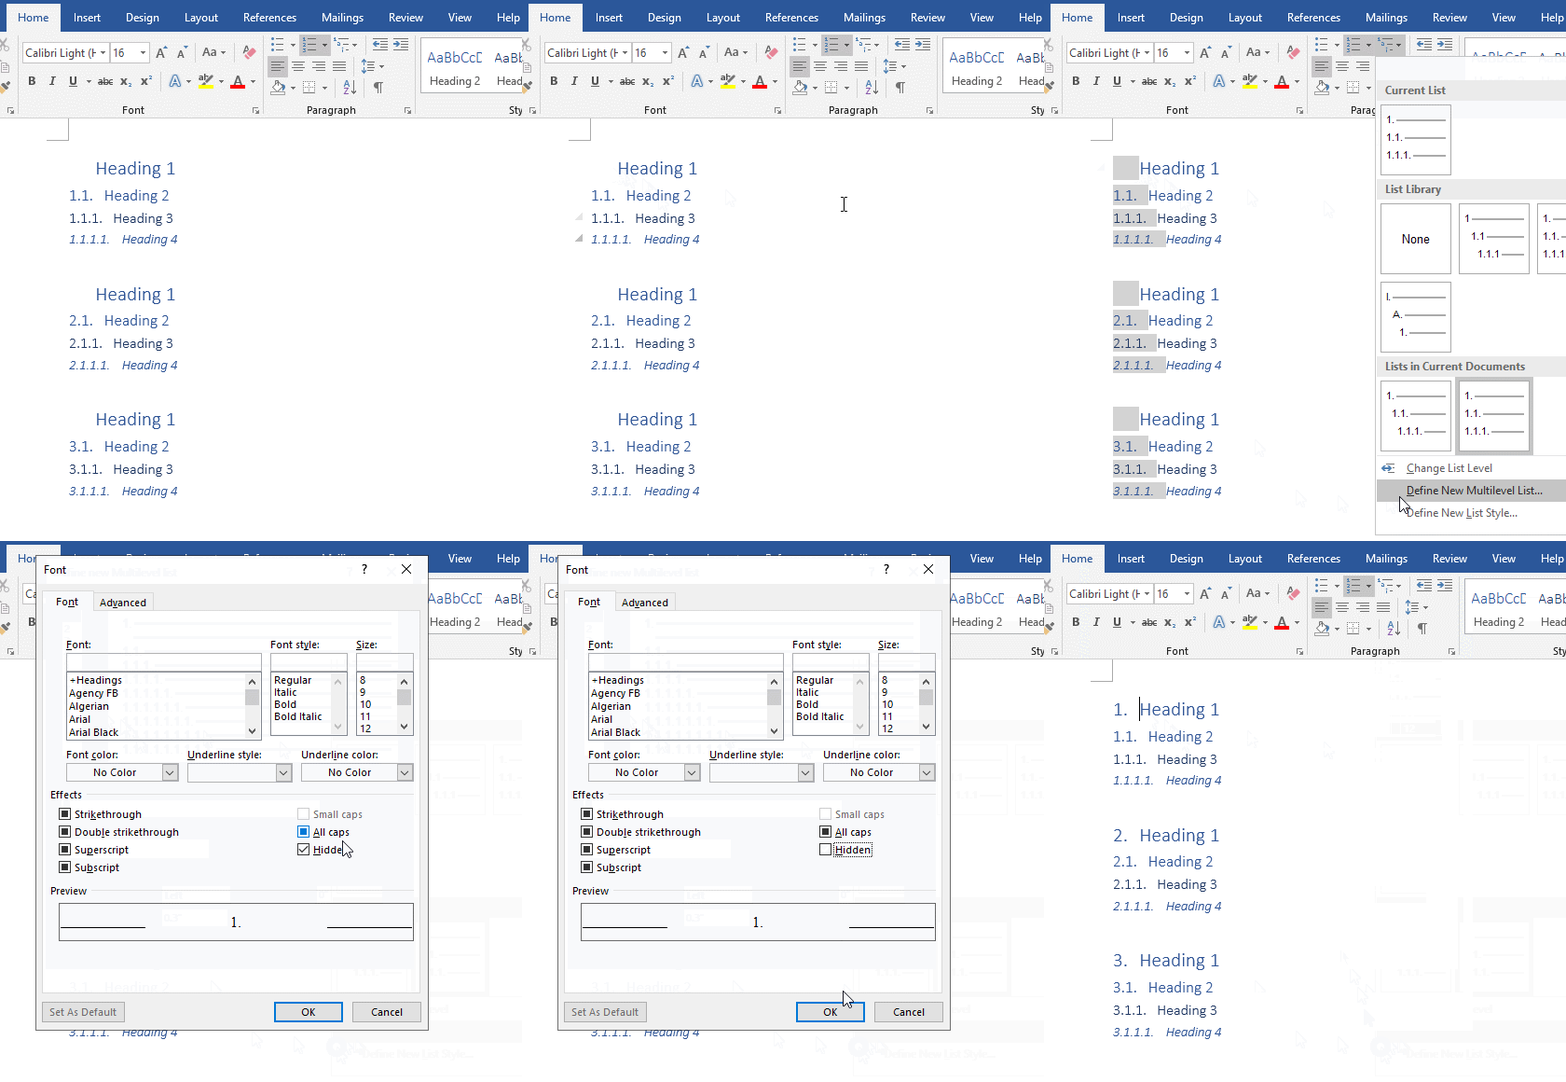
Figure 5
B. The template is destroyed
Close all Word windows, press the Windows logo + R key on your keyboard, open the Run window, copy %appdata%\microsoft\templates and paste it in the input box, press Enter (or click OK), and delete Normal.dotm (Normal.dot), reopen Word, and create a new blank document, Word will automatically regenerate the Normal.dotm (Normal.dot) template. Please refer to the article "How to turn off Microsoft Word compatibility mode that appears when opening or creating a new document".
IV. How to define multilevel list in Word
1. Click the Multilevel list icon and select Define New Multilevel List, open the Define new Multilevel list window. The upper part of the window is the level to be changed. The 1 2 3 4 5 6 7 8 9 on the left represents the level. We have selected level 3 before, so here level 3 is selected, and click on the number of levels to be changed. For example, click 5, as shown in Figure 6:
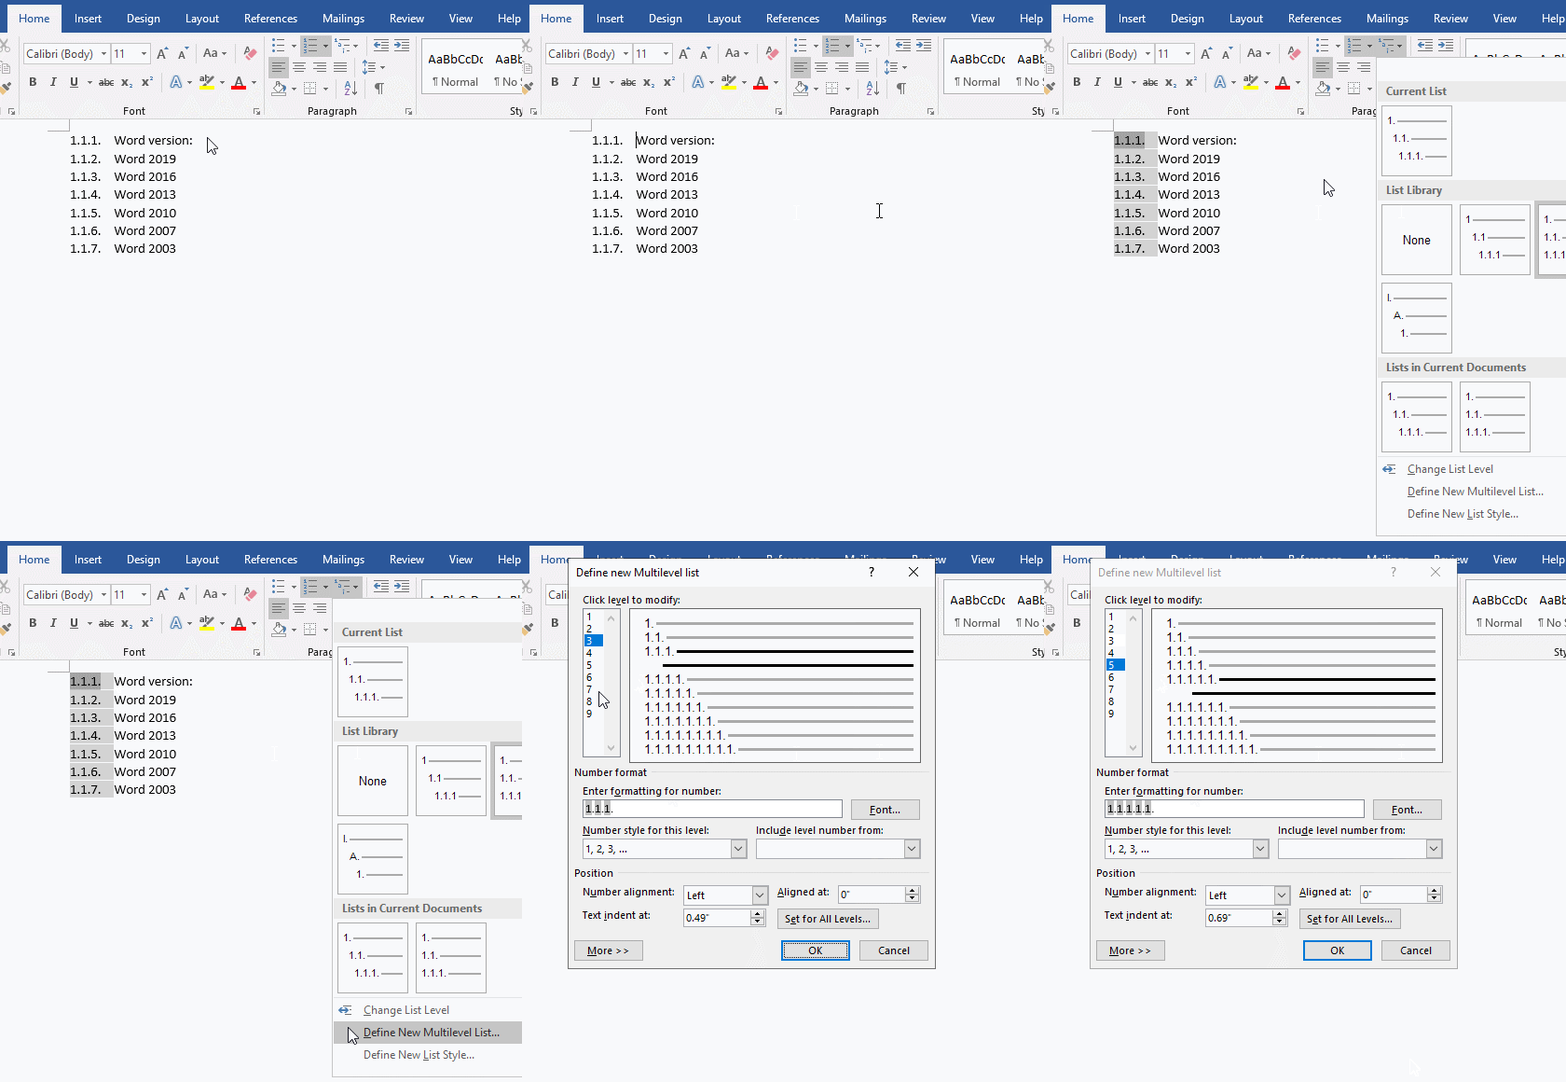
Figure 6
2. Number Format can also be customized, you can use letters instead of 1, and the period (.) can also be replaced by other symbols, for example, change to: 1-1-1-1-1., as shown in Figure 7:
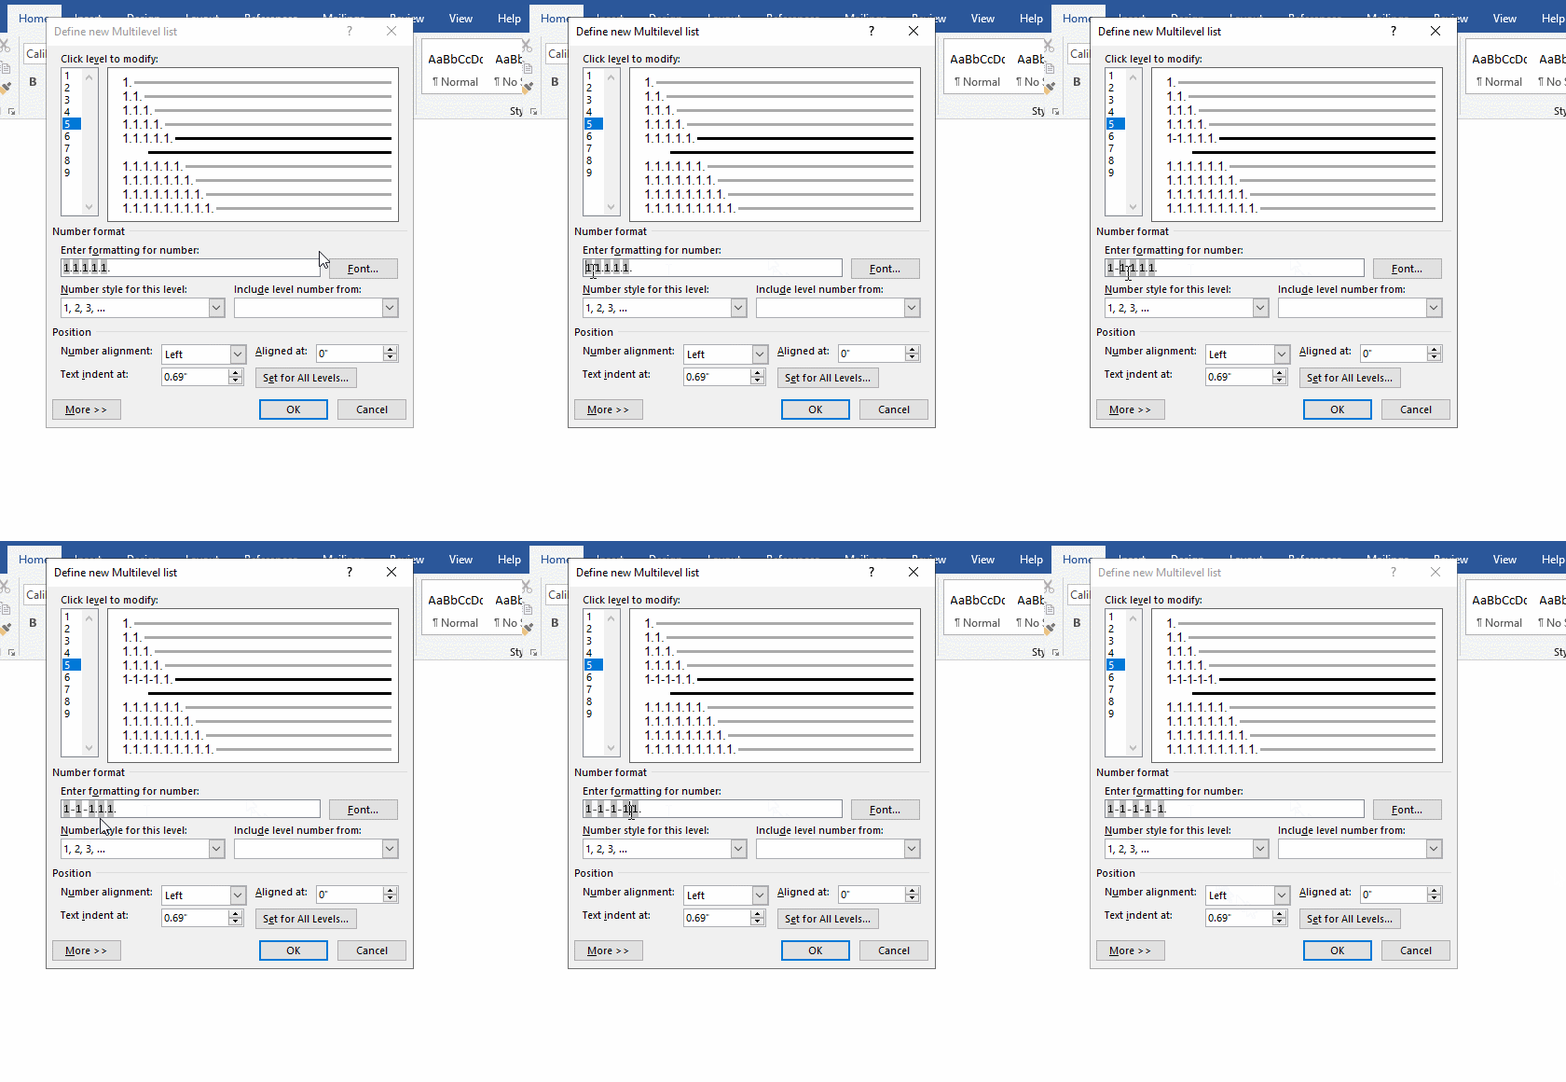
Figure 7
You can also set the font of the number by yourself, just follow the method described above.
3. Click the drop-down list box under Numbering style for this level, you can choose a style you like, we keep the default. The demonstration is shown in Figure 8:
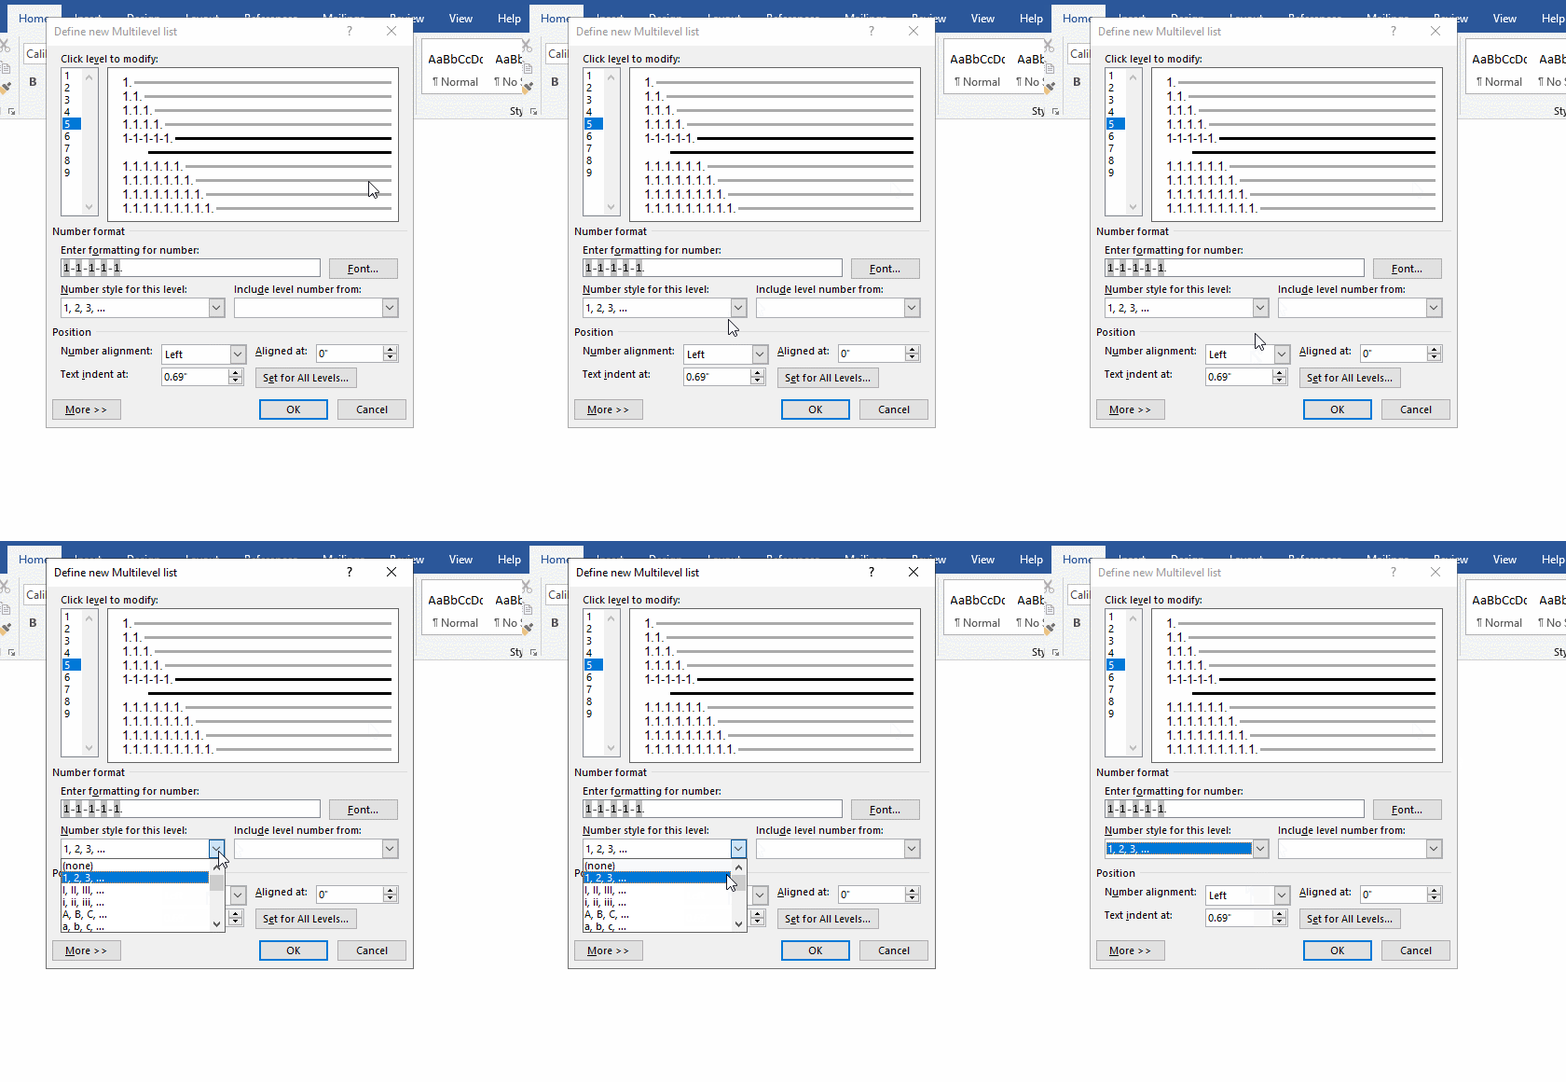
Figure 8
4. Click the drop-down list box under Include level number from, because the current selection is level 5, so you can select the previous four levels, the default is to select level 1, generally keep the default. The demonstration is shown in Figure 9:
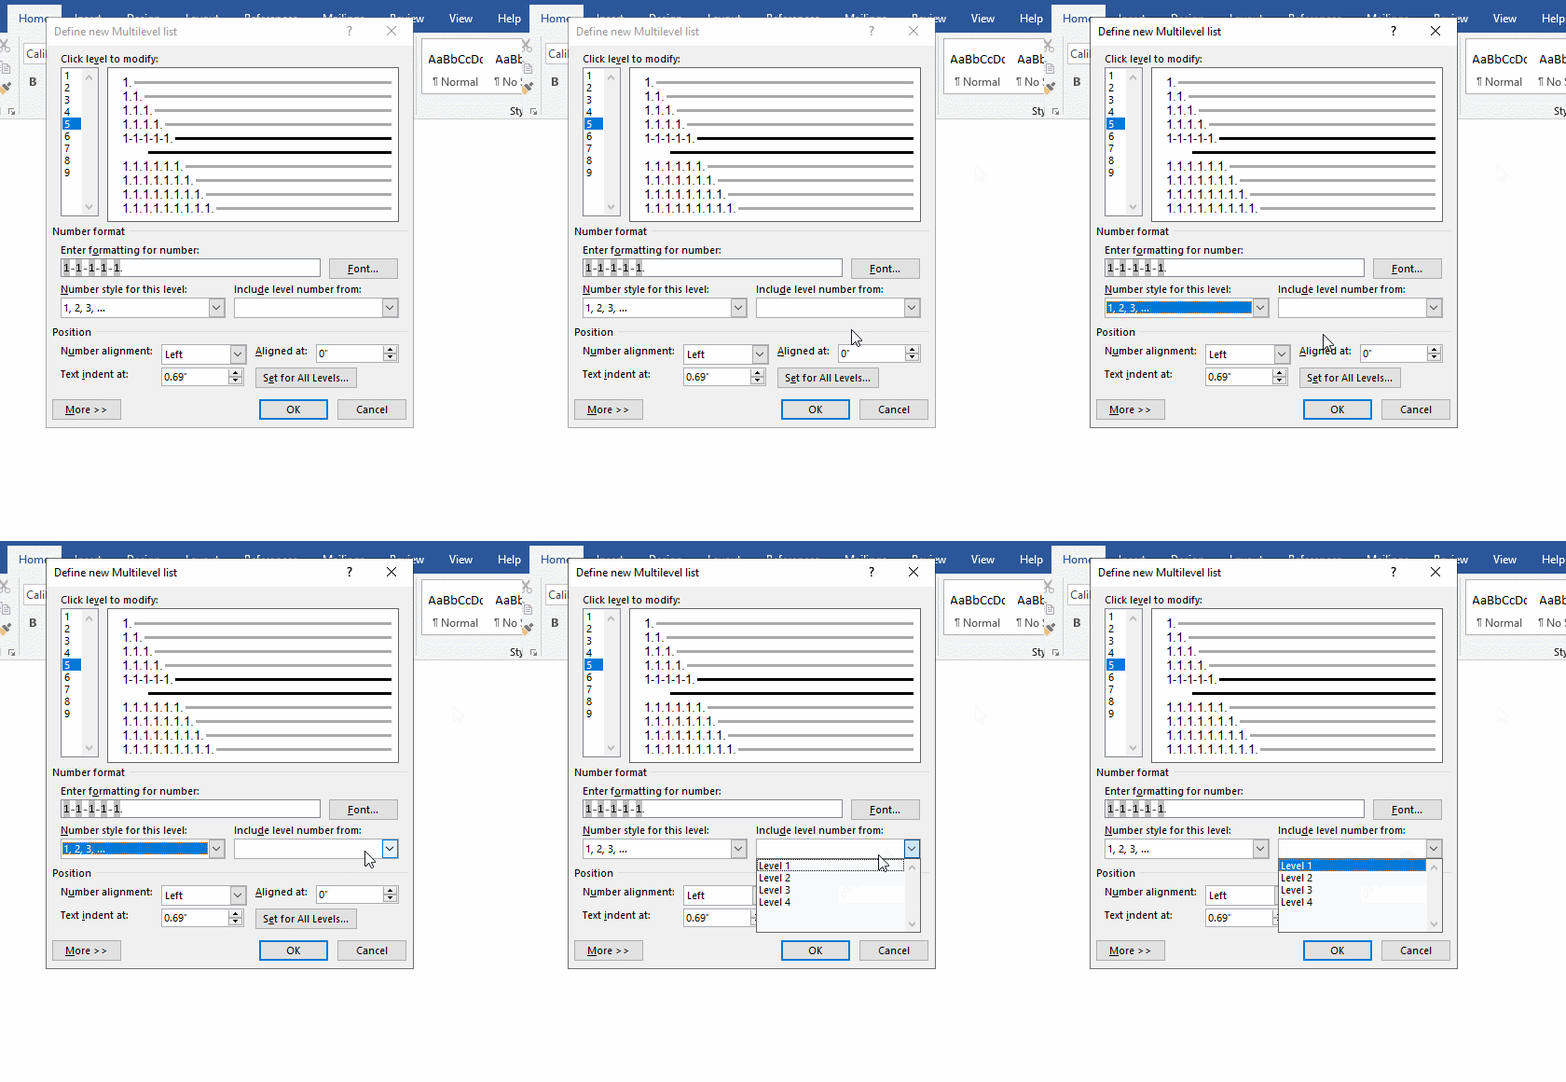
Figure 9
5. Number Alignment, Aligned at and Text indent at under Position, generally keep the default values, of course, you can also set according to actual needs. The setting method has been introduced in the previous chapter.
6. Click the More button to expand the window. There are three options for Apply changes to, namely: Whole list, this point forward and current paragraph, which need to be selected according to the actual situation. We select Whole list.
Link level to style has many options, mainly: Normal, No Spacing, Heading, table of contents, Index, Quote, List paragraph, Caption, Bibliography, citation, date, Endnote Text, etc. It is usually used more when making a table of contents. Specific applications will be covered in later chapters. We set Word version as follows: as Heading 1, and then select the link to Heading 1, the effect is shown in Figure 10:
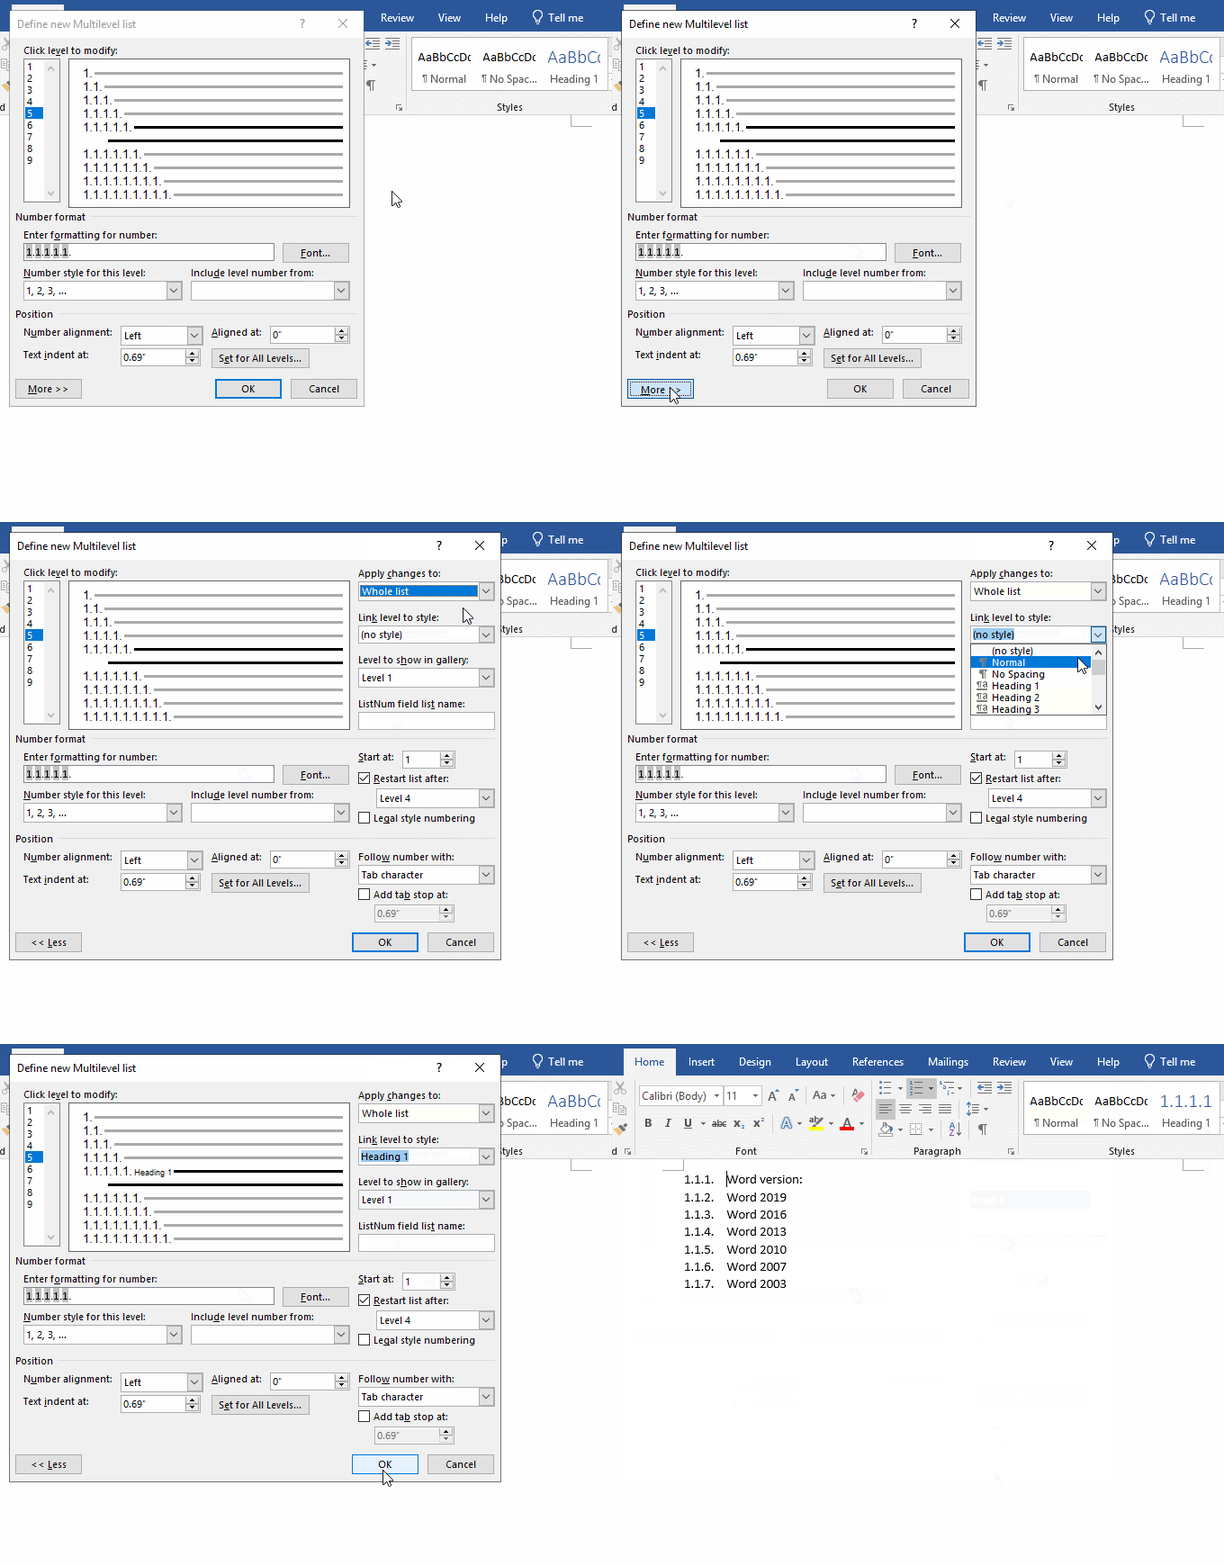
Figure 10
7. Select Level 5 for Level to show in gallery; ListNum field list name enter Custom list; Start at keep the default value 1, of course, you can set it yourself; Restart list after can be kept at the default Level 2; you can select Tab character, Space or Nothing for Follow number with, just select one, we select Tab character; click OK, that's it. The demonstration is shown in Figure 11:
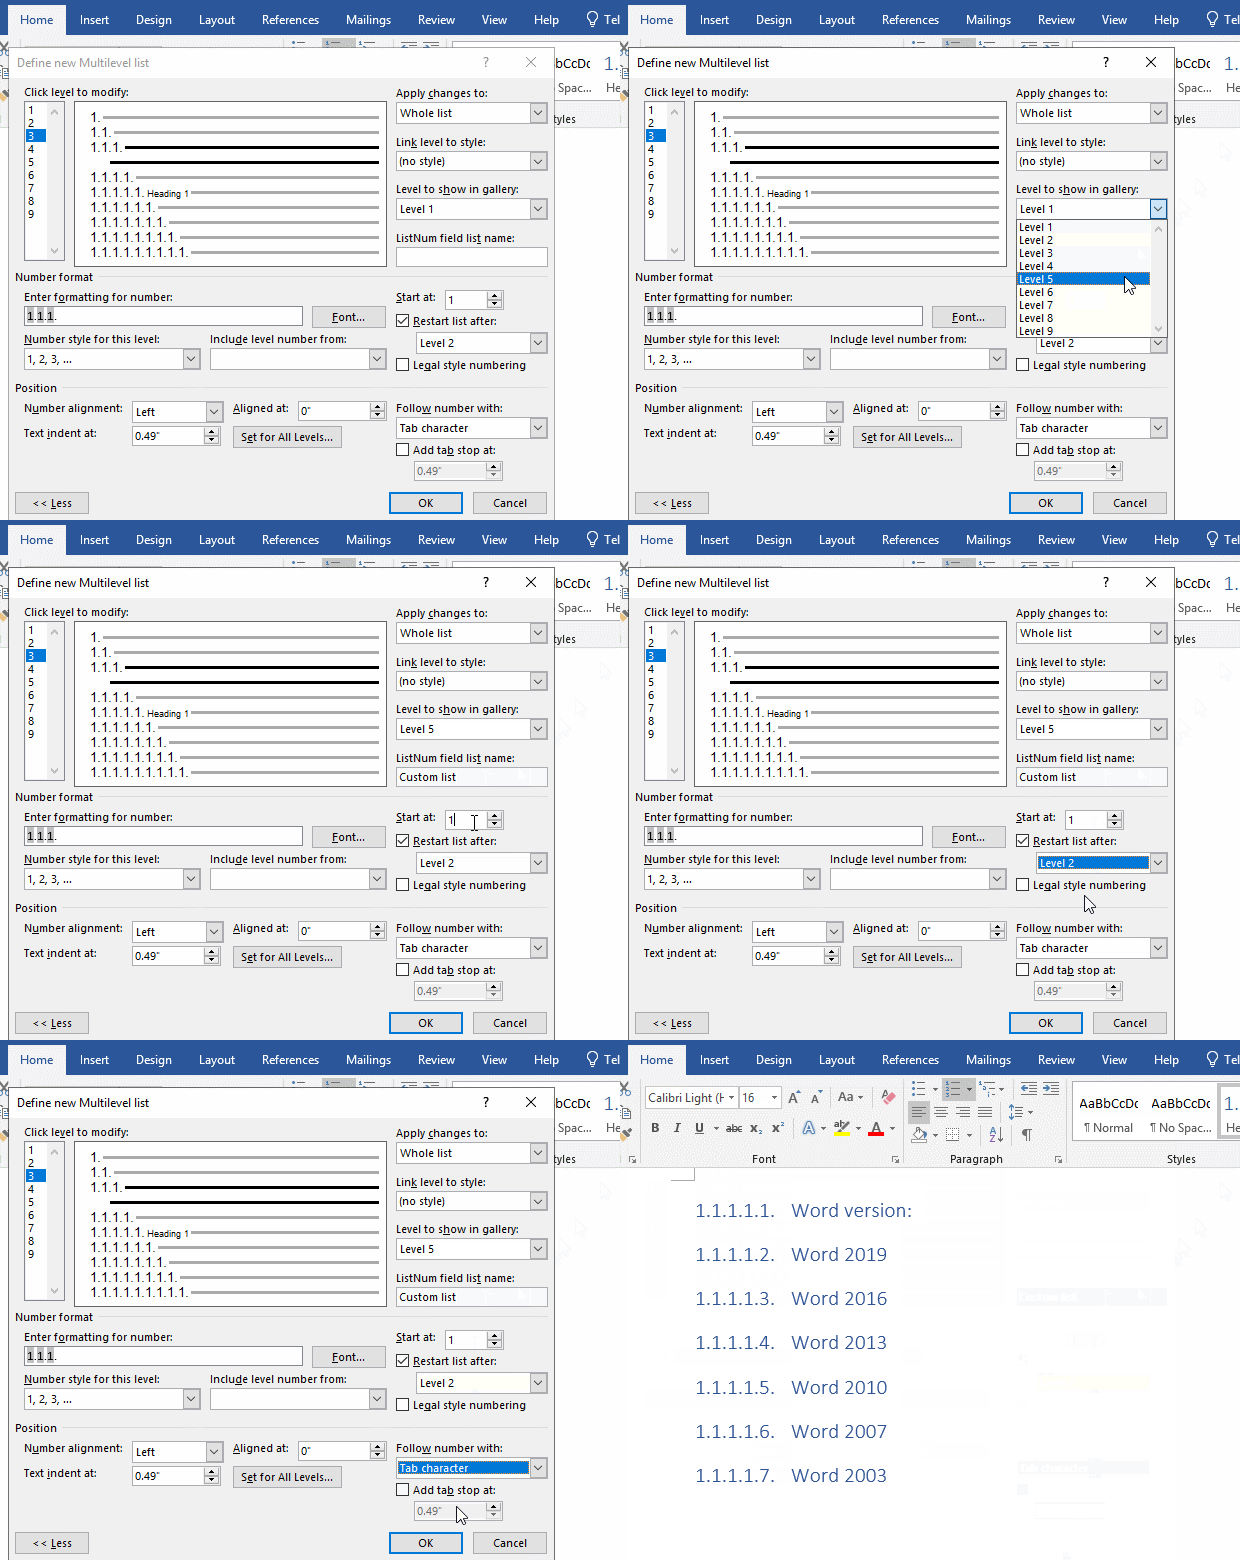
Figure 11
8. After clicking OK, there is already in the Lists in Current Documents, as shown in Figure 12:
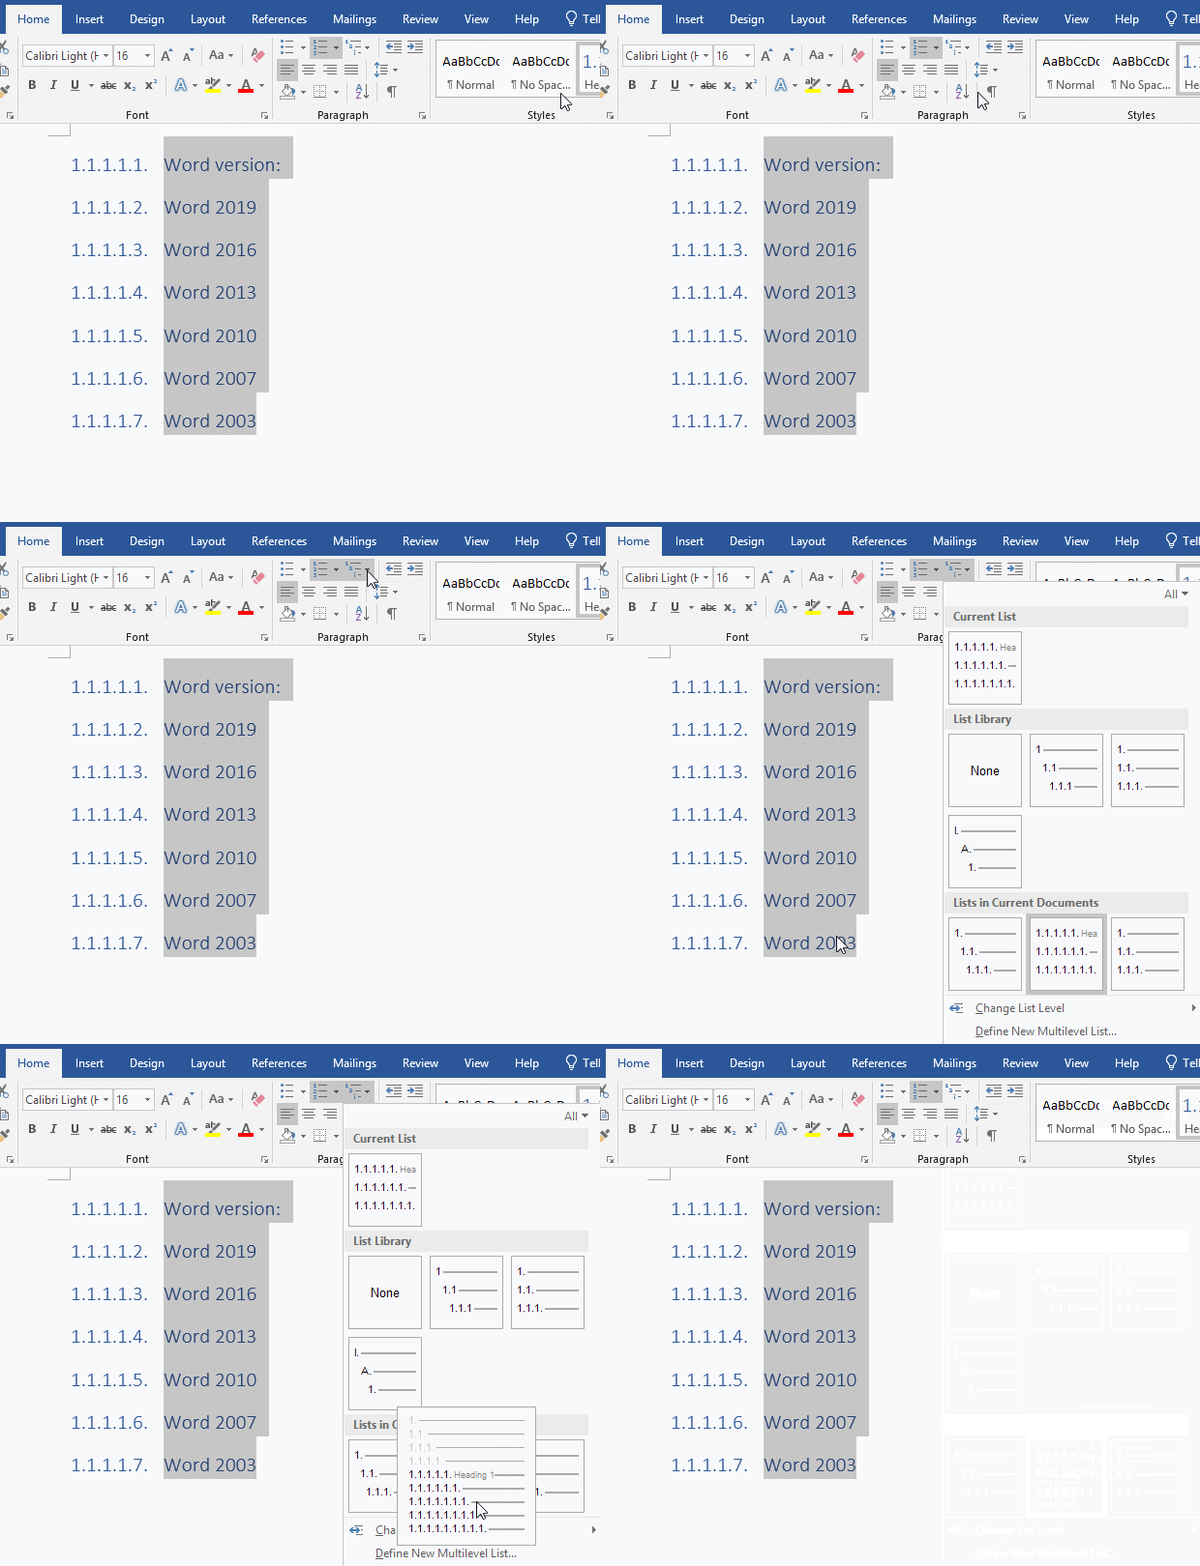
Figure 12
V. How to define new multilevel list in Word
Click the Multilevel list icon, select Define New List Style, open the Define New List Style window, enter a name, such as Catalogue style 1; enter 1 for the Start at; select 1st level for Apply formatting to; after clicking OK, not only the style is in the List Styles, but also the Word version list is applied. The demonstration is shown in Figure 13:
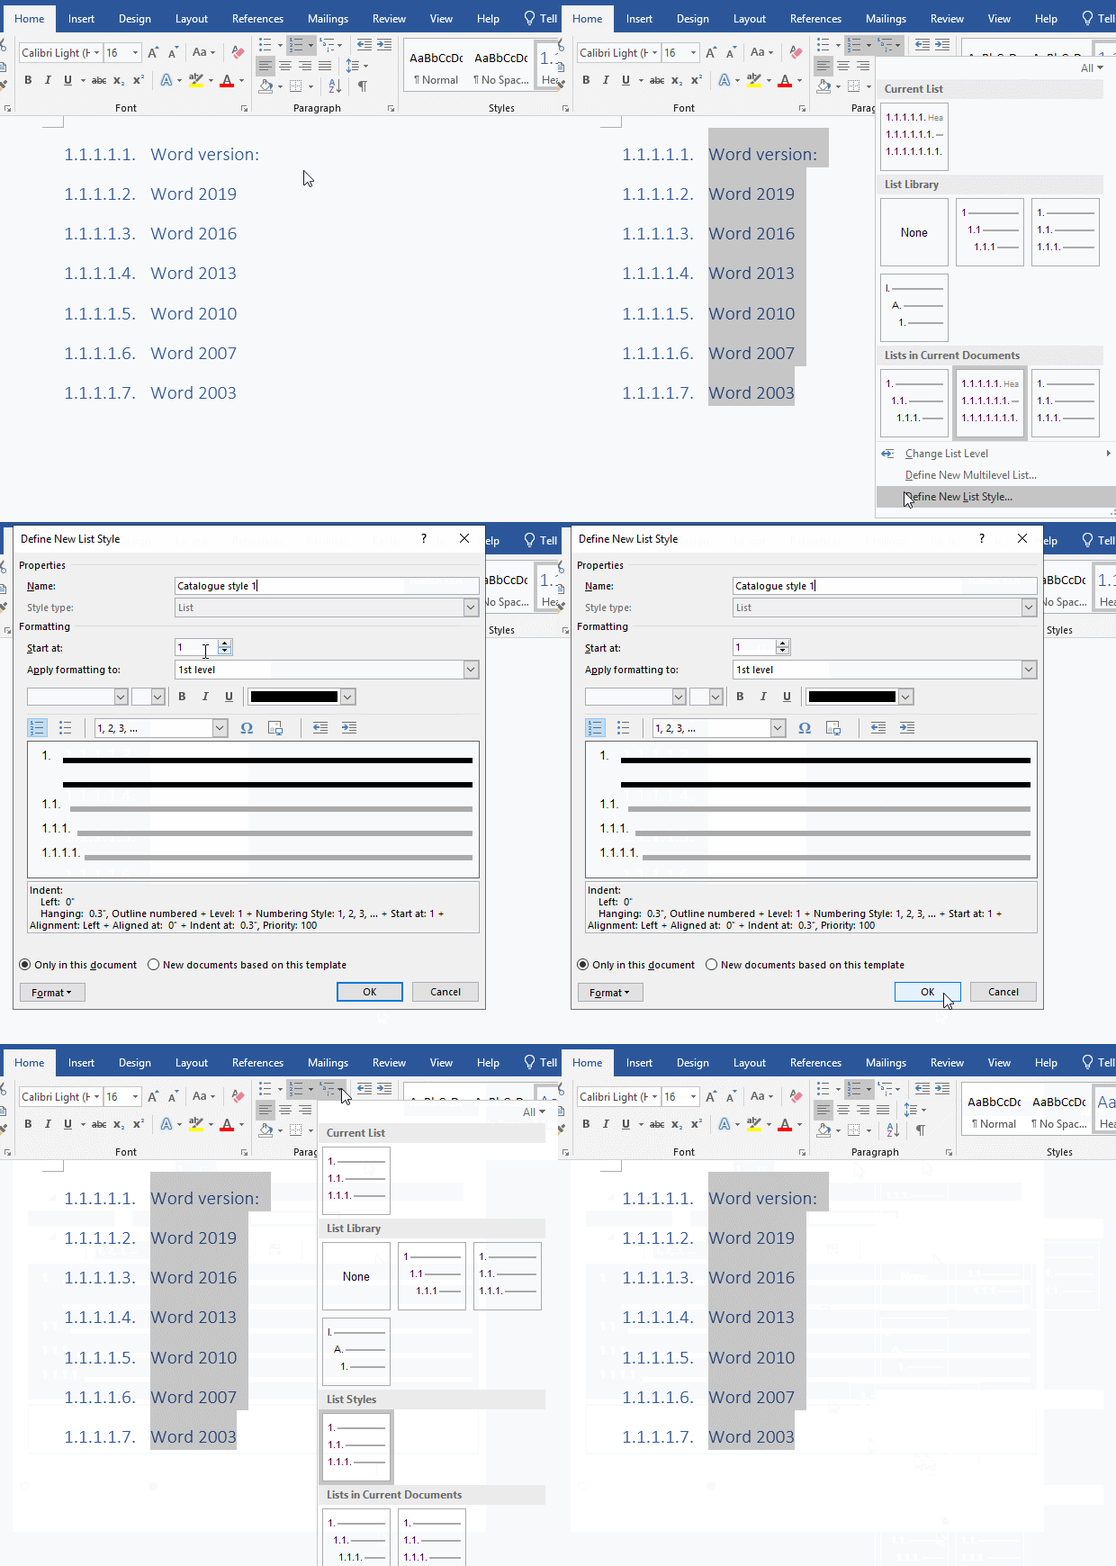
Figure 13
-
Related Reading
- How to delete table lines in Word (one line, remove
- How to add cross symbol and tick mark in Word, with
- How to create and save as a new document in Ms Word,
- How to select multiple photos in Word and why is it
- Find ProPlusww.msi when opening Office(Word/Excel),
- How to set Header and footer in word(13 examples), i
- Word art transform text effect (Follow Path, Warp, A
- How to convert PowerPoint to word(4 examples), inclu
- How do I rotate a page 90 degrees in Word, with rota
- Can't print from microsoft Word (6 possible reasons)
- How to set default Printer in Microsoft Word when se
- How to change MS Word autorecover file location and
